Uploading Files to Supabase with Ionic using Capacitor Last update: 2021-05-18
When you work with a cloud backend like Firebase or Supabase, you sometimes need to host files as well - and the actual database is usually not the best place.
In this tutorial we will build an Ionic app with Supabase backend and integrate the Storage functionality to host private and public files in different buckets while keeping track of the data in the SQL database!
To do so, we will have to set up our Supabase database and buckets including security policies upfront and then create the Ionic app with authentication afterwards - gonna be a lot of fun today!
Supabase Project Setup
To get started, simply create an account (or log in) to Supabase and then create a new organisation under which we can add a project.
Pick any name for your project and the database region close to your users, and set a password for the database.
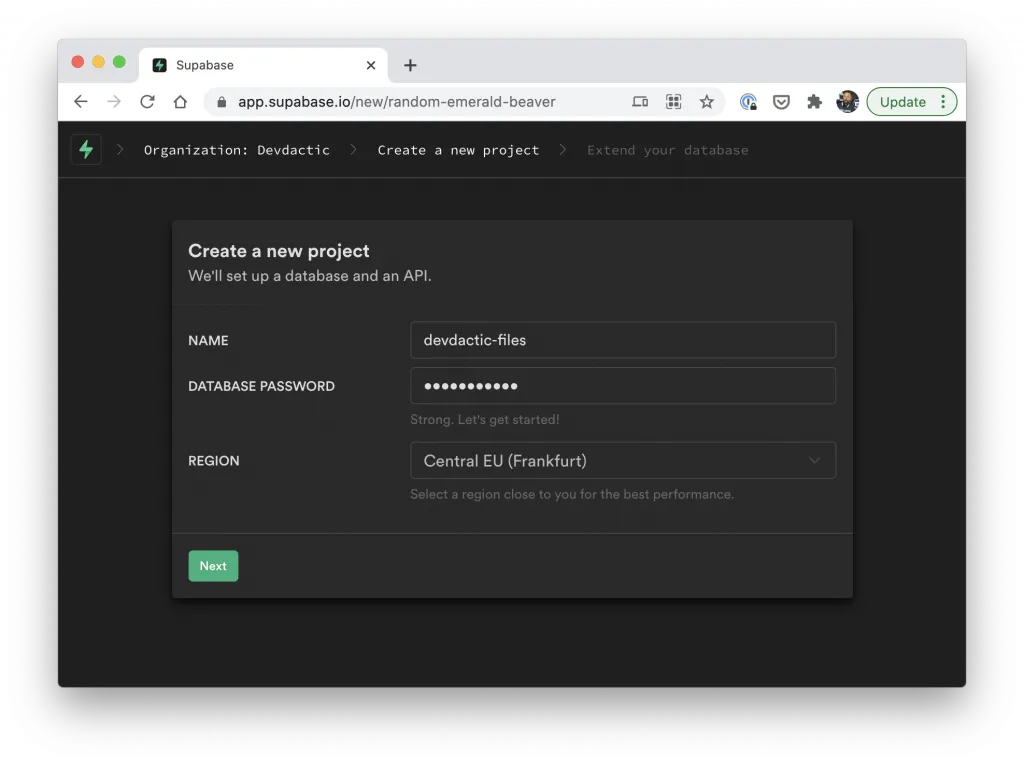
Wait until the creation is finished before we can continue. To define your backend, we need to dive a bit deeper into the SQL setup process now
SQL Security Policies
To setup the Supabase app correctly you need to define the SQL structure for the database, the buckets for Storage, and any security policies you want to add to your app.
What we do:
- Create a files table to keep track of all created files
- Policies so only authenticated users can create records or delete their own created files
- Create two buckets named public and private
- Enable public access to the public folder and only access for owners on the private files
- Enable the realtime capabilities for our files table so we get notified about all changes
To do all of that, execute the following statement inside the SQL editor tab and start a new query with this:
-- Create a table for Public Profiles
create table files (
  id bigint generated by default as identity primary key,
  user_id uuid references auth.users not null,

  title text,
  private boolean,
  file_name text,

  created_at timestamp with time zone default timezone('utc'::text, now()) not null
);

alter table files enable row level security;

create policy "Users can delete their own files."
  on files for delete
  using (auth.uid() = user_id);

create policy "Users can insert their own files."
  on files for insert
  with check ( auth.uid() = user_id );

create policy "Users can see public and their own files."
  on files for select
  using ( private = false OR auth.uid() = user_id);

-- Set up Storage!
insert into storage.buckets (id, name)
values ('public', 'public');

create policy "Public files are accessible."
  on storage.objects for select
  using ( bucket_id = 'public' );

insert into storage.buckets (id, name)
values ('private', 'private');

create policy "Private files are accessible for their creators."
  on storage.objects for select
  using ( bucket_id = 'private' AND auth.uid() = owner );

create policy "Users can create files."
  on storage.objects for insert
  with check ( auth.role() = 'authenticated' );

create policy "Delete files"
  on storage.objects for delete
  using ( auth.uid() = owner );

-- Enable Realtime
begin;
-- remove the realtime publication
drop publication if exists supabase_realtime;

-- re-create the publication but don't enable it for any tables
create publication supabase_realtime;
commit;

-- add a table to the publication
alter publication supabase_realtime add table files;

-- get full information even on remove
alter table files replica identity full;
You should now see your created table and also two new buckets inside the storage tab. You can also find all attached policies, which means we are ready to dive into our app!
Ionic App & Supabase Integration
For our Ionic app we start with a blank template, generate two additional pages, a service for the Supabase interaction and a guard to protect the inside area.
On top of that we install the supabase-js package and if you want to try the app on destop, install the Capacitor PWA Element and also include it in your main.ts as described in the docs.
Now run the following:
ionic start supabaseApp blank --type=angular --capacitor
cd ./supabaseApp

ionic g page login
ionic g page fileModal
ionic g service services/supabase
ionic g guard guards/auth --implements CanActivate

npm install @supabase/supabase-js

// For Desktop support if want
npm install @ionic/pwa-elements

ionic build
npx cap add ios
npx cap add android
Head back to your Supabase app and dive into the Settings -> API menu.
You can now copy the URL and the below listed anon key, which is used to create a connection to Supabase until a user signs in. We can put both of these values directly into our src/environments/environment.ts:
export const environment = {
  production: false,
  supabaseUrl: 'YOUR-URL',
  supabaseKey: 'YOUR-ANON-KEY'
};
Quickly also open our src/app/app-routing.module.ts so we can correct the entries to show our login first and the home page afterwards:
import { NgModule } from '@angular/core';
import { PreloadAllModules, RouterModule, Routes } from '@angular/router';
import { AuthGuard } from './guards/auth.guard';

const routes: Routes = [
  {
    path: 'login',
    loadChildren: () => import('./login/login.module').then( m => m.LoginPageModule)
  },
  {
    path: 'home',
    loadChildren: () => import('./home/home.module').then( m => m.HomePageModule),
    canActivate: [AuthGuard]
  },
  {
    path: '',
    redirectTo: 'login',
    pathMatch: 'full'
  }
];

@NgModule({
  imports: [
    RouterModule.forRoot(routes, { preloadingStrategy: PreloadAllModules })
  ],
  exports: [RouterModule]
})
export class AppRoutingModule { }
That’s all for the configuration today!
Supabase Authentication
We can now start with the authetnication part and we will do it mostly like in our previous Ionic Supabase integration tutorial.
To get establish a connection to Supabase, simply call the createClient() function right in the beginning with the information we added to our environment.
The automatic handling of stored user data didn’t work 100% for me, or in general could be improved. Loading the stored token from the Web storage (possibly using Ionic Storage for that in the future as a different Storage engine) is synchronous, but without awaiting the data inside loadUser() it didn’t quite work.
Besides that, you can listen to auth changes within onAuthStateChange to get notified when the user signs in or out. We will emit that information to our BehaviorSubject so we can later use it as an Observable for our guard.
The sign up and sign in are almost the same and only require a simple function of the Supabase JS package. What I found not optimal was that even an unsuccessful login fulfils the promise, while I would expect it to throw an error.
That’s the reason why I wrapped the calls in another Promise and called either resolve or reject depending of the result from Supabase, which makes it easier for our controller to handle the result in the next step without own logic!
Now get started with the src/app/services/supabase.service.ts and change it to:
import { Injectable } from '@angular/core';
import { Router } from '@angular/router';
import { createClient, SupabaseClient, User } from "@supabase/supabase-js";
import { BehaviorSubject, Observable } from 'rxjs';
import { environment } from '../../environments/environment';
import { CameraPhoto, FilesystemDirectory, Plugins } from '@capacitor/core';
import { isPlatform } from '@ionic/core';
import { DomSanitizer } from '@angular/platform-browser';
const { Filesystem } = Plugins;

export const FILE_DB = 'files';

export interface FileInfo {
  private: boolean;
  title: string;
  file_name?: string;
}

export interface FileItem {
  created_at: string;
  file_name: string;
  id: string;
  image_url?: Promise<any>;
  private: boolean;
  title: string;
  user_id: string;
  creator?: boolean;
}

@Injectable({
  providedIn: 'root'
})
export class SupabaseService {
  private privateFiles: BehaviorSubject<FileItem[]> = new BehaviorSubject([]);
  private publicFiles: BehaviorSubject<FileItem[]> = new BehaviorSubject([]);
  private currentUser: BehaviorSubject<boolean | User> = new BehaviorSubject(null);

  private supabase: SupabaseClient;

  constructor(private router: Router, private sanitizer: DomSanitizer) {
    this.supabase = createClient(environment.supabaseUrl, environment.supabaseKey, {
      autoRefreshToken: true,
      persistSession: true
    });

    // Load user from storage
    this.loadUser();

    // Also listen to all auth changes
    this.supabase.auth.onAuthStateChange((event, session) => {
      console.log('AUTH CHANGED: ', event);

      if (event == 'SIGNED_IN') {
        this.currentUser.next(session.user);
        this.loadFiles();
        this.handleDbChanged();
      } else {
        this.currentUser.next(false);
      }
    });
  }

  async loadUser() {
    const user = await this.supabase.auth.user();

    if (user) {
      this.currentUser.next(user);
      this.loadFiles();
      this.handleDbChanged();
    } else {
      this.currentUser.next(false);
    }
  }

  getCurrentUser() {
    return this.currentUser.asObservable();
  }

  async signUp(credentials: { email, password }) {
    return new Promise(async (resolve, reject) => {
      const { error, data } = await this.supabase.auth.signUp(credentials)
      if (error) {
        reject(error);
      } else {
        resolve(data);
      }
    });
  }

  signIn(credentials: { email, password }) {
    return new Promise(async (resolve, reject) => {
      const { error, data } = await this.supabase.auth.signIn(credentials)
      if (error) {
        reject(error);
      } else {
        resolve(data);
      }
    });
  }

  signOut() {
    this.supabase.auth.signOut().then(_ => {
      this.publicFiles.next([]);
      this.privateFiles.next([]);

      // Clear up and end all active subscriptions!
      this.supabase.getSubscriptions().map(sub => {
        this.supabase.removeSubscription(sub);
      });

      this.router.navigateByUrl('/');
    });
  }

  loadFiles() {
    // coming soon
  }

  handleDbChanged() {
    // coming soon
  }
}
To quickly build a simple sign up, get started by adding the ReactiveFormsModule to the src/app/pages/login/login.module.ts for our login next:
import { NgModule } from '@angular/core';
import { CommonModule } from '@angular/common';
import { FormsModule, ReactiveFormsModule } from '@angular/forms';

import { IonicModule } from '@ionic/angular';

import { LoginPageRoutingModule } from './login-routing.module';

import { LoginPage } from './login.page';

@NgModule({
  imports: [
    CommonModule,
    FormsModule,
    IonicModule,
    LoginPageRoutingModule,
    ReactiveFormsModule
  ],
  declarations: [LoginPage]
})
export class LoginPageModule {}
Just like we did in other full navigation examples with Ionic src/app/pages/login/login.page.ts, we craft a simple form to hold the user data.
On sign up or sign in, we use the according functions from our service, add some loading here and there and handle the errors now easily within the promise by using then/err to catch the different results.
Otherwise we would have to check the result in the then() block here, but I want to keep the controller here as dumb as possible and let the service handle the logic of that! Therefore we can now simply open the src/app/pages/login/login.page.ts and change it to:
import { SupabaseService } from './../services/supabase.service';
import { Component, OnInit } from '@angular/core';
import { FormBuilder, FormGroup, Validators } from '@angular/forms';
import { AlertController, LoadingController } from '@ionic/angular';
import { Router } from '@angular/router';

@Component({
  selector: 'app-login',
  templateUrl: './login.page.html',
  styleUrls: ['./login.page.scss'],
})
export class LoginPage implements OnInit {

  credentials: FormGroup;

  constructor(
    private fb: FormBuilder,
    private alertController: AlertController,
    private router: Router,
    private loadingController: LoadingController,
    private supabaseService: SupabaseService
  ) { }

  ngOnInit() {
    this.credentials = this.fb.group({
      email: ['', [Validators.required, Validators.email]],
      password: ['', Validators.required],
    });
  }

  async login() {
    const loading = await this.loadingController.create();
    await loading.present();

    this.supabaseService.signIn(this.credentials.value).then(async data => {
      await loading.dismiss();
      this.router.navigateByUrl('/home', { replaceUrl: true });
    }, async err => {
      await loading.dismiss();
      this.showAlert('Login failed', err.message);
    });
  }

  async signUp() {
    const loading = await this.loadingController.create();
    await loading.present();

    this.supabaseService.signUp(this.credentials.value).then(async data => {
      await loading.dismiss();
      this.showAlert('Signup success', 'Please confirm your email now!');
    }, async err => {
      await loading.dismiss();
      this.showAlert('Registration failed', err.message);
    });
  }

  async showAlert(title, msg) {
    const alert = await this.alertController.create({
      header: title,
      message: msg,
      buttons: ['OK'],
    });
    await alert.present();
  }
}
Besides the loading and error logic, there’s not much to do for our class!
The according template is also quite easy, just adding the input fields for our form so we can quickly create and sign in users.
Go ahead with the src/app/pages/login/login.page.html and change it to:
<ion-header>
  <ion-toolbar color="dark">
    <ion-title>Devdactic Supabase</ion-title>
  </ion-toolbar>
</ion-header>

<ion-content>
  <ion-card>
    <ion-card-content>
      <form (ngSubmit)="login()" [formGroup]="credentials">
        <ion-item>
          <ion-input placeholder="john@doe.com" formControlName="email"></ion-input>
        </ion-item>
        <ion-item>
          <ion-input type="password" placeholder="password" formControlName="password"></ion-input>
        </ion-item>

        <ion-button type="submit" expand="block" [disabled]="!credentials.valid" class="ion-margin-top">Log in
        </ion-button>
        <ion-button type="button" expand="block" (click)="signUp()" color="secondary">Sign up!
        </ion-button>
      </form>
    </ion-card-content>
  </ion-card>

</ion-content>
Now you should be able to create a new user. By default, that user has to confirm the email adress, that’s also why we don’t immediately log in new users.
If you don’t want this behaviour, you can also change it inside your Supabase app under Authentication -> Settings.
Adding the Authentication Guard
Right now every user could access the home page, so we need to protect it with a guard.
We’ve used basically the same logic in other places before, the idea is to use the currentUser Observable returned by our service to check if a user is authenticated.
Because the BehaviourSubject inside the service is initialised with null, we need to filter out this initial value, although this code be improved with a better instanceof check on boolean or User, but it also works like this for now.
Afterwards, the information of a user is retrieved from the Storage and we can use that value to check if we have a user or not, and then allow access or send the user back to the login.
Therefore implement the guard by changing the src/app/guards/auth.guard.ts to:
import { Injectable } from '@angular/core';
import { CanActivate, UrlTree, Router } from '@angular/router';
import { Observable } from 'rxjs';
import { SupabaseService } from '../services/supabase.service';
import { filter, map, take } from 'rxjs/operators'

@Injectable({
  providedIn: 'root'
})
export class AuthGuard implements CanActivate {

  constructor(private supabaseService: SupabaseService, private router: Router) { }

  canActivate(): Observable<boolean | UrlTree> {
    return this.supabaseService.getCurrentUser().pipe(
      filter(val => val !== null), // Filter out initial Behaviour subject value
      take(1), // Otherwise the Observable doesn't complete!
      map(isAuthenticated => {
        if (isAuthenticated) {
          return true;
        } else {
          return this.router.createUrlTree(['/']);
        }
      })
    );
  }
}
Now you can log in and refresh an internal page, and the page only loads when the user was authenticated before!
Uploading Files
We can now finally get into new functionality for uploading files, and we start by setting up our service functionality.
The Capacitor Camera will give us a File URI, but we need to create a real File object from that URI for the Supabase upload (as of now).
The process is different for web and native apps, so we add a little if/else to create the file correctly on each platform.
Once we got a file object (which you could also get from a file picker!) we can upload it to the correct bucket based on the other information we pass to our function. Generate a name or maybe even put it into a subfolder using the user ID if you want to and call the according functions of the Supabase package to upload the file!
Because we also want to keep track of all the files in our database we call the saveFileInfo() function after the upload to create a new record in our database with all the necessary information.
Go ahead by appending the new functions to our src/app/services/supabase.service.ts:
  async uploadFile(cameraFile: CameraPhoto, info: FileInfo): Promise<any> {
    let file = null;

    // Retrieve a file from the URI based on mobile/web
    if (isPlatform('hybrid')) {
      const { data } = await Filesystem.readFile({
        path: cameraFile.path,
        directory: FilesystemDirectory.Documents,
      });
      file = await this.dataUrlToFile(data);
    } else {
      const blob = await fetch(cameraFile.webPath).then(r => r.blob());
      file = new File([blob], 'myfile', {
        type: blob.type,
      });
    }

    const time = new Date().getTime();
    const bucketName = info.private ? 'private' : 'public';
    const fileName = `${this.supabase.auth.user().id}-${time}.webp`;

    // Upload the file to Supabase
    const { data, error } = await this.supabase
      .storage
      .from(bucketName)
      .upload(fileName, file);

    info.file_name = fileName;
    // Create a record in our DB
    return this.saveFileInfo(info);
  }

  // Create a record in our DB
  async saveFileInfo(info: FileInfo): Promise<any> {
    const newFile = {
      user_id: this.supabase.auth.user().id,
      title: info.title,
      private: info.private,
      file_name: info.file_name
    };

    return this.supabase.from(FILE_DB).insert(newFile);
  }

  // Helper
  private dataUrlToFile(dataUrl: string, fileName: string = 'myfile'): Promise<File> {
    return fetch(`data:image.webp;base64,${dataUrl}`)
      .then(res => res.blob())
      .then(blob => {
        return new File([blob], fileName, { type: 'image.webp' })
      })
  }
There are actually even more Storage functions to list files but I thought keeping the information in the database might be a more secure and logic way to handle this.
Now we can add the call to the Capacitor camera to our src/app/home/home.page.ts but we will first pass the resulting image to a modal where we can then add some more information to it:
import { Component } from '@angular/core';
import { ModalController } from '@ionic/angular';
import { SupabaseService } from '../services/supabase.service';
import { Plugins, CameraResultType, CameraSource } from '@capacitor/core';
import { FileModalPage } from '../file-modal/file-modal.page';
const { Camera } = Plugins;

@Component({
  selector: 'app-home',
  templateUrl: 'home.page.html',
  styleUrls: ['home.page.scss'],
})
export class HomePage {

  constructor(private supabaseService: SupabaseService, private modalCtrl: ModalController) { }

  async addFiles() {
    const image = await Camera.getPhoto({
      quality: 90,
      allowEditing: true,
      resultType: CameraResultType.Uri,
      source: CameraSource.Camera
    });

    const modal = await this.modalCtrl.create({
      component: FileModalPage,
      componentProps: { image }
    });

    await modal.present();
  }

  logout() {
    this.supabaseService.signOut();
  }

}
To call our functions, let’s quickly add a button to the src/app/home/home.page.html now:
<ion-header>
  <ion-toolbar color="dark">
    <ion-title>
      Supabase Files
    </ion-title>
    <ion-buttons slot="end">
      <ion-button (click)="logout()">
        <ion-icon slot="icon-only" name="log-out"></ion-icon>
      </ion-button>
    </ion-buttons>
  </ion-toolbar>
</ion-header>

<ion-content>
  <ion-fab vertical="bottom" horizontal="center" slot="fixed">
    <ion-fab-button (click)="addFiles()" color="dark">
      <ion-icon name="add"></ion-icon>
    </ion-fab-button>
  </ion-fab>
</ion-content>
Within our modal we want to show the captured image and allow the user to add a title and a private/public flag. To show the captured image we need to use the Angular Sanitizer as we would otherwise get an unsafe error.
The save functionality will in the end simply pass all information to our service and then dismiss the modal - we don’t have a good error handling in here but I didn’t want to add even more stuff to the tutorial.
For now, open the src/app/file-modal/file-modal.page.ts and change it to:
import { Component, Input, OnInit } from '@angular/core';
import { DomSanitizer } from '@angular/platform-browser';
import { ModalController, LoadingController } from '@ionic/angular';
import { SupabaseService } from '../services/supabase.service';

@Component({
  selector: 'app-file-modal',
  templateUrl: './file-modal.page.html',
  styleUrls: ['./file-modal.page.scss'],
})
export class FileModalPage implements OnInit {
  @Input() image: any;
  info = {
    private: false,
    title: 'That looks good'
  };

  imagePath = null;

  constructor(private modalCtrl: ModalController, private supabaseService: SupabaseService, private loadingCtrl: LoadingController,
    private sanitizer: DomSanitizer) { }

  ngOnInit() {
    this.imagePath = this.sanitizer.bypassSecurityTrustResourceUrl(this.image.webPath);
  }

  async save() {
    const loading = await this.loadingCtrl.create({
      message: 'Uploading File...'
    });
    await loading.present();

    await this.supabaseService.uploadFile(this.image, this.info);
    await loading.dismiss();
    this.modalCtrl.dismiss();
  }

  close() {
    this.modalCtrl.dismiss();
  }
}
To wrap it up, we can now display the image and our fields to add the metadata and upload our image inside the src/app/file-modal/file-modal.page.html:
<ion-header>
  <ion-toolbar color="dark">
    <ion-buttons slot="start">
      <ion-button (click)="close()">
        <ion-icon slot="icon-only" name="close"></ion-icon>
      </ion-button>
    </ion-buttons>
    <ion-title>Preview</ion-title>
  </ion-toolbar>
</ion-header>

<ion-content>
  <img [src]="imagePath" *ngIf="imagePath">

  <ion-item>
    <ion-label position="fixed">Title</ion-label>
    <ion-input [(ngModel)]="info.title"></ion-input>
  </ion-item>
  <ion-item>
    <ion-checkbox slot="start" [(ngModel)]="info.private"></ion-checkbox>
    <ion-label>Private File</ion-label>
  </ion-item>
  <ion-button expand="full" (click)="save()">
    <ion-icon slot="start" name="cloud-upload"></ion-icon>
    Save & Upload File
  </ion-button>
</ion-content>
You should now be able to capture/select an image, add the information and a new image should appear inside your Supabase bucket! At the same time, a new record in the database is created, so we can now continue and list all the user files in our app by loading the information from our SQL database.
Displaying Supabase Files
First of all, this looks mostly like building an SQL query. You can find all of the available functions and filters inside the Supabase documentation, but most of it is self explaining.
We use our constant database name and query all the data, which returns a Promise. To keep the data now locally inside the service without reloading it all the time, we simply emit it to our BehaviourSubject by calling next().
Before we do that we first add two fields to each item:
- image_url: We manually call a function that downloads the image from Supabase Storage. This returns a Promise - we will handle that correctly later
- creator: A quick flag to indicate if we created the file
The idea is that users should be able to see all public files and their own private files. Now you might ask: Doesn’t the select query return all data in the table?
The answer lies in our security policies that we created in the first step. Users are only allowed to see their own records and entries with private set to false!
Therefore we get the right data hear and only need to divide it now across our two lists.
At this point we can also create the logic to delete a file, which would remove both the file from the bucket and the actual database record.
Go ahead now and add the following to the src/app/services/supabase.service.ts:
  async loadFiles(): Promise<void> {
    const query = await this.supabase.from(FILE_DB).select('*').order('created_at', { ascending: false });

    // Set some custom data for each item
    const data: FileItem[] = query.data.map(item => {
      item.image_url = this.getImageForFile(item);
      item.creator = item.user_id == this.supabase.auth.user().id;
      return item;
    });

    // Divide by private and public
    const privateFiles = data.filter(item => item.private);
    const publicFiles = data.filter(item => !item.private);

    this.privateFiles.next(privateFiles);
    this.publicFiles.next(publicFiles);
  }

  getPublicFiles(): Observable<FileItem[]> {
    return this.publicFiles.asObservable();
  }

  getPrivateFiles(): Observable<FileItem[]> {
    return this.privateFiles.asObservable();
  }

  // Remove a file and the DB record
  async removeFileEntry(item: FileItem): Promise<void> {
    const bucketName = item.private ? 'private' : 'public';

    await this.supabase
      .from(FILE_DB)
      .delete()
      .match({ id: item.id });

    await this.supabase
      .storage
      .from(bucketName)
      .remove([item.file_name]);
  }

  // Get the Image URL for a file inside a bucket
  getImageForFile(item: FileItem) {
    const bucketName = item.private ? 'private' : 'public';

    return this.supabase.storage.from(bucketName).download(item.file_name).then(res => {
      const url = URL.createObjectURL(res.data);
      const imageUrl = this.sanitizer.bypassSecurityTrustUrl(url);
      return imageUrl;
    });
  }

  // Realtime change listener
  handleDbChanged() {
    return this.supabase
      .from(FILE_DB)
      .on('*', payload => {
        console.log('Files realtime changed: ', payload);
        if (payload.eventType == 'INSERT') {
          // Add the new item
          const newItem: FileItem = payload.new;
          newItem.creator = newItem.user_id == this.supabase.auth.user().id;

          if (newItem.private && newItem.user_id == this.supabase.auth.user().id) {
            newItem.image_url = this.getImageForFile(newItem);
            this.privateFiles.next([newItem, ...this.privateFiles.value]);
          } else if (!newItem.private) {
            newItem.image_url = this.getImageForFile(newItem);
            this.publicFiles.next([newItem, ...this.publicFiles.value]);
          }
        } else if (payload.eventType == 'DELETE') {
          // Filter out the removed item
          const oldItem: FileItem = payload.old;
          if (oldItem.private && oldItem.user_id == this.supabase.auth.user().id) {
            const newValue = this.privateFiles.value.filter(item => oldItem.id != item.id);
            this.privateFiles.next(newValue);
          } else if (!oldItem.private) {
            const newValue = this.publicFiles.value.filter(item => oldItem.id != item.id);
            this.publicFiles.next(newValue);
          }
        }
      }).subscribe();
  }
The handleDbChanged() is now our last piece in the realtime puzzle: At this point, we listen to all changes on our files table and react to the INSERT and DELETE events.
There is no realtime connection with the database like you might have used with Firebase, but by listening to the different change events you can easily manipulate your local data to add, remove or update an element from the array inside the BehaviourSubject.
Because those changes actually also broadcast events like “another user added a private file”, we need a bit more logic to only add the public or our own private files.
I’m sure that it’s possible to only get these events by establishing more rules for the realtime publication - give it a try and let me know if you made it work! But from what I know, there are still some open bugs with that part of Supabase at the time writing.
Since at this point our element also lack the custom image_url and creator properties we need to attach them to any new object as well.
But now everyone can use our Observables and get all the updates in realtime!
That’s what we want to use in our src/app/home/home.page.ts now:
import { Component } from '@angular/core';
import { ModalController } from '@ionic/angular';
import { SupabaseService } from '../services/supabase.service';
import { Plugins, CameraResultType, CameraSource } from '@capacitor/core';
import { FileModalPage } from '../file-modal/file-modal.page';
const { Camera } = Plugins;

@Component({
  selector: 'app-home',
  templateUrl: 'home.page.html',
  styleUrls: ['home.page.scss'],
})
export class HomePage {

  activeList = 'public';
  privateFiles = this.supabaseService.getPrivateFiles();
  publicFiles = this.supabaseService.getPublicFiles();

  constructor(private supabaseService: SupabaseService, private modalCtrl: ModalController) { }

  async addFiles() {
    const image = await Camera.getPhoto({
      quality: 90,
      allowEditing: true,
      resultType: CameraResultType.Uri,
      source: CameraSource.Camera
    });

    const modal = await this.modalCtrl.create({
      component: FileModalPage,
      componentProps: { image }
    });

    await modal.present();
  }

  logout() {
    this.supabaseService.signOut();
  }

  deleteFile(item) {
    this.supabaseService.removeFileEntry(item);
  }
}
We simply load the lists from our service and keep track of an activeList so we can create a simple segment view in our template.
When we now iterate the files of our Observables we need to be careful: We added the image_url as a Promise, so we also need to use the async pipe in that place when displaying the image again!
The rest is just using the information from the records, and showing a delete button in case we are the creator of a certain file.
Wrap up our app by changing the src/app/home/home.page.html to:
<ion-header>
  <ion-toolbar color="dark">
    <ion-title>
      Supabase Files
    </ion-title>
    <ion-buttons slot="end">
      <ion-button (click)="logout()">
        <ion-icon slot="icon-only" name="log-out"></ion-icon>
      </ion-button>
    </ion-buttons>
  </ion-toolbar>
</ion-header>

<ion-content>

  <ion-segment [(ngModel)]="activeList">
    <ion-segment-button value="public">
      <ion-label>Public</ion-label>
    </ion-segment-button>
    <ion-segment-button value="private">
      <ion-label>Private</ion-label>
    </ion-segment-button>
  </ion-segment>

  <ion-list *ngIf="activeList == 'public'">
    <ion-card *ngFor="let item of publicFiles | async">
      <ion-card-header>
        <ion-card-title>
          {{ item.title }}
        </ion-card-title>
        <ion-card-subtitle>
          Created at: {{ item.created_at | date:'short' }}
        </ion-card-subtitle>
      </ion-card-header>
      <ion-card-content>
        <img [src]="item.image_url | async">

        <ion-fab vertical="bottom" horizontal="end" *ngIf="item.creator">
          <ion-fab-button (click)="deleteFile(item)" color="danger">
            <ion-icon name="trash-outline"></ion-icon>
          </ion-fab-button>
        </ion-fab>

      </ion-card-content>
    </ion-card>
  </ion-list>

  <ion-list *ngIf="activeList == 'private'">
    <ion-card *ngFor="let item of privateFiles | async">
      <ion-card-header>
        <ion-card-title>
          {{ item.title }}
        </ion-card-title>
        <ion-card-subtitle>
          Created at: {{ item.created_at | date:'short' }}
        </ion-card-subtitle>
      </ion-card-header>
      <ion-card-content>
        <img [src]="item.image_url | async">

        <ion-fab vertical="bottom" horizontal="end" *ngIf="item.creator">
          <ion-fab-button (click)="deleteFile(item)" color="danger">
            <ion-icon name="trash-outline"></ion-icon>
          </ion-fab-button>
        </ion-fab>

      </ion-card-content>
    </ion-card>
  </ion-list>

  <ion-fab vertical="bottom" horizontal="center" slot="fixed">
    <ion-fab-button (click)="addFiles()" color="dark">
      <ion-icon name="add"></ion-icon>
    </ion-fab-button>
  </ion-fab>
</ion-content>
And with that we are finished and can upload files from both native apps and the web browser as well. If we are the owner, we can delete files and we can see all shared public files. To test this, create another account and create some more files and you’ll see how everything comes together in the end!
Conclusion
Just like inside the previous Supabase tutorial I really enjoyed working with this new feature. Defining the right rules and the table in the beginning is a crucial step to building decent Supabase apps, as it’s not as flexible as a NoSQL database like we used with Firebase.
To improve this code, you might want to add better error handling in most places, especially the file upload. And finally we would have to improve our realtime security logic, but somehow it should be possible with the according rules as well!
Want to see more about Supabase in the future? Let me know in the comments if you would like to see any other real world app or use case built with it!
You can also find a video version of this tutorial below.