How to Integrate Supabase in Your Ionic App Last update: 2021-03-23
If you have used Firebase in the past, you might have come across Supabase, an open source Firebase alternative that’s currently in Beta but getting a lot of great feedback.
In this tutorial we will build a simple Ionic Angular application that uses Supabase as our cloud backend. We will be able to immediately integrate authentication, all CRUD functions on the Supabase database and also a way to observe our database changes in real time.
Be aware that this tutorial used a beta version of Supabase, so likely a lot inside it will change in the future. But it’s a starting point to see if it fits your needs better than Firebase.
We will not cover all the technical details and features of Supabase today but in a video at a later point. For now, let’s see how fast we can build our app!
Supabase Project Setup
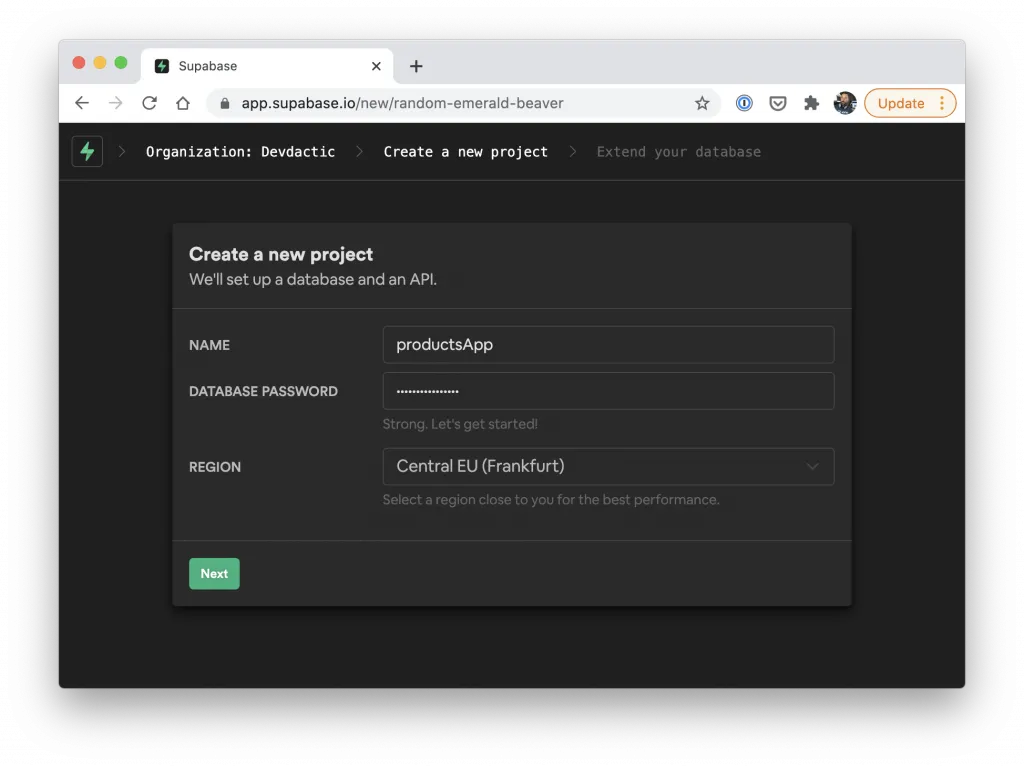
To get started, simply create an account (or log in) to Supabase and then create a new organisation under which we can add a project.
Pick any name for your project and the database region close to your users, and set a password for the database.
Now we need to wait a few minutes until the database is ready. This is a bit different from Firebase, because the database used by Supabase is a Postgres SQL database instead of NoSQL in Firebase.
Therefore, you also need to create the structure of your database upfront. I’m not a SQL expert, but luckily Supabase prepared some scripts for people like us to get started quickly and test everything.
Simply open the SQL tab inside the menu and you will see a bunch of scripts. We will pick the todo list, or you could also simply paste the following into the SQL editor there:
create table todos (
  id bigint generated by default as identity primary key,
  user_id uuid references auth.users not null,
  task text check (char_length(task) > 3),
  is_complete boolean default false,
  inserted_at timestamp with time zone default timezone('utc'::text, now()) not null
);

alter table todos enable row level security;

create policy "Individuals can create todos." on todos for
    insert with check (auth.uid() = user_id);

create policy "Individuals can view their own todos. " on todos for
    select using (auth.uid() = user_id);

create policy "Individuals can update their own todos." on todos for
    update using (auth.uid() = user_id);

create policy "Individuals can delete their own todos." on todos for
    delete using (auth.uid() = user_id);
This creates a new table with columns to create new todos, plus it adds row level security with a few policies so users can only see the data they created themself!
We might talk more about securing your Supabase app in the future, for now we will keep it just like this.
Ionic App Setup
Now we can get started with our Ionic app, and after setting up the project we install the Supabase JS client package and generate a few additional pages for our Ionic app:
ionic start devdacticSupa blank --type=angular --capacitor
cd ./devdacticSupa

npm install @supabase/supabase-js

ionic g page pages/login
ionic g page pages/list

ionic g service services/supabase

ionic g guard guards/auth --implements CanLoad
To connect our Ionic app to Supabase we need two values, which you can find inside the Settings tab in Supabase and further down in the API entry.
You can now copy the URL and the below listed anon key, which is used to create a connection to Supabase until a user signs in. We can put both of these values directly into our src/environments/environment.ts:
export const environment = {
  production: false,
  supabaseUrl: 'YOUR-URL',
  supabaseKey: 'YOUR-ANON-KEY'
};
Because we generated some pages and a guard, we can quickly fix our routing upfront inside the src/app/app-routing.module.ts with our new pages and the guard applied to our internal page:
import { NgModule } from '@angular/core';
import { PreloadAllModules, RouterModule, Routes } from '@angular/router';
import { AuthGuard } from './guards/auth.guard';

const routes: Routes = [
  {
    path: 'login',
    loadChildren: () => import('./pages/login/login.module').then( m => m.LoginPageModule)
  },
  {
    path: 'list',
    loadChildren: () => import('./pages/list/list.module').then( m => m.ListPageModule),
    canLoad: [AuthGuard]
  },
  {
    path: '',
    redirectTo: 'login',
    pathMatch: 'full'
  },

];

@NgModule({
  imports: [
    RouterModule.forRoot(routes, { preloadingStrategy: PreloadAllModules })
  ],
  exports: [RouterModule]
})
export class AppRoutingModule { }
Now let’s work with some Supabase data!
Building a Supabase CRUD Service
As usual, we will build all the necessary logic for our app inside a service. To get establish a connection to Supabase, simply call the createClient() function right in the beginning with the information we added to our environment.
The automatic handling of stored user data didn’t work 100% for me, or in general could be improved. Loading the stored token from the Web storage (possibly using Ionic Storage for that in the future as a different Storage engine) is synchronous, but without awaiting the data inside loadUser() it didn’t quite work.
Besides that, you can listen to auth changes within onAuthStateChange to get notified when the user signs in or out. We will emit that information to our BehaviorSubject so we can later use it as an Observable for our guard.
The sign up and sign in are almost the same and only require a simple function of the Supabase JS package. What I found not optimal was that even an unsuccessful login fulfils the promise, while I would expect it to throw an error.
That’s the reason why I wrapped the calls in another Promise and called either resolve or reject depending of the result from Supabase, which makes it easier for our controller to handle the result in the next step without own logic!
Now get started with the src/app/services/supabase.service.ts and change it to:
import { Injectable } from '@angular/core';
import { Router } from '@angular/router';
import { createClient, SupabaseClient, User } from "@supabase/supabase-js";
import { BehaviorSubject, Observable } from 'rxjs';
import { environment } from '../../environments/environment';

const TODO_DB = 'todos';

export interface Todo {
  id: number;
  inserted_at: string;
  is_complete: boolean;
  task: string;
  user_id: string;
}

@Injectable({
  providedIn: 'root'
})
export class SupabaseService {
  private _todos: BehaviorSubject<Todo[]> = new BehaviorSubject([]);
  private _currentUser: BehaviorSubject<any> = new BehaviorSubject(null);

  private supabase: SupabaseClient;

  constructor(private router: Router) {
    this.supabase = createClient(environment.supabaseUrl, environment.supabaseKey, {
      autoRefreshToken: true,
      persistSession: true
    });

    // Try to recover our user session
    this.loadUser();

    this.supabase.auth.onAuthStateChange((event, session) => {
      if (event == 'SIGNED_IN') {
        this._currentUser.next(session.user);
        this.loadTodos();
        this.handleTodosChanged();
      } else {
        this._currentUser.next(false);
      }
    });
  }

  async loadUser() {
    const user = await this.supabase.auth.user();

    if (user) {
      this._currentUser.next(user);
    } else {
      this._currentUser.next(false);
    }
  }

  get currentUser(): Observable<User> {
    return this._currentUser.asObservable();
  }

  async signUp(credentials: { email, password }) {
    return new Promise(async (resolve, reject) => {
      const { error, data } = await this.supabase.auth.signUp(credentials)
      if (error) {
        reject(error);
      } else {
        resolve(data);
      }
    });
  }

  signIn(credentials: { email, password }) {
    return new Promise(async (resolve, reject) => {
      const { error, data } = await this.supabase.auth.signIn(credentials)
      if (error) {
        reject(error);
      } else {
        resolve(data);
      }
    });
  }

  signOut() {
    this.supabase.auth.signOut().then(_ => {
      // Clear up and end all active subscriptions!
      this.supabase.getSubscriptions().map(sub => {
        this.supabase.removeSubscription(sub);
      });

      this.router.navigateByUrl('/');
    });
  }
}
There’s also a cool functionality that we can use after signup: Get all active subscriptions and remove them!
That means, you don’t have to come up with your own managed of Subscriptions in this case and can be sure everything is closed when a user logs out.
Now we got the authentication basics in place and can move on to the CRUD part and interaction with the Supabase database.
First of all, this looks mostly like building an SQL query. You can find all of the available functions and filters inside the Supabase documentation, but most of it is self explaining.
We use our constant database name and query the data, which returns a Promise. To keep the data now locally inside the service without reloading it all the time, we simply emit it to our BehaviourSubject by calling next().
When we add, remove or update a row in our database, we will also only call the according function and not directly handle the result, as we also integrate another handleTodosChanged() that listens to all database changes!
There is no realtime connection with the database like you might have used with Firebase, but by listening to the different change events you can easily manipulate your local data to add, remove or update an element from the array inside the BehaviourSubject.
If someone would now use the todos Observable, it would basically be like having a realtime connection to Firebase - but with Supabase!
Continue with the src/app/services/supabase.service.ts and add the following functions:
nget todos(): Observable < Todo[] > {
    return this._todos.asObservable();
}

async loadTodos() {
    const query = await this.supabase.from(TODO_DB).select('*');
    this._todos.next(query.data);
}

async addTodo(task: string) {
    const newTodo = {
        user_id: this.supabase.auth.user().id,
        task
    };
    // You could check for error, minlegth of task is 3 chars!
    const result = await this.supabase.from(TODO_DB).insert(newTodo);
}

async removeTodo(id) {
    await this.supabase
        .from(TODO_DB)
        .delete()
        .match({ id })
}

async updateTodo(id, is_complete: boolean) {
    await this.supabase
        .from(TODO_DB)
        .update({ is_complete })
        .match({ id })
}

handleTodosChanged() {
    return this.supabase
        .from(TODO_DB)
        .on('*', payload => {
            console.log('Todos changed: ', payload);

            if (payload.eventType == 'DELETE') {
                // Filter out the removed item
                const oldItem: Todo = payload.old;
                const newValue = this._todos.value.filter(item => oldItem.id != item.id);
                this._todos.next(newValue);
            } else if (payload.eventType == 'INSERT') {
                // Add the new item
                const newItem: Todo = payload.new;
                this._todos.next([...this._todos.value, newItem]);
            } else if (payload.eventType == 'UPDATE') {
                // Update one item
                const updatedItem: Todo = payload.new;
                const newValue = this._todos.value.map(item => {
                    if (updatedItem.id == item.id) {
                        item = updatedItem;
                    }
                    return item;
                });
                this._todos.next(newValue);
            }
        }).subscribe();
}
Since we added the row level security to our database schema in the beginning, we don’t need to worry about filtering only data from the current user. This already happens on the server side now!
We got our authentication and CRUD logic finished, now let’s build some templates to test things out.
Supabase Login and Registration
To quickly build a simple sign up, get started by adding the ReactiveFormsModule to the src/app/pages/login/login.module.ts for our login:
import { NgModule } from '@angular/core';
import { CommonModule } from '@angular/common';
import { FormsModule, ReactiveFormsModule } from '@angular/forms';

import { IonicModule } from '@ionic/angular';

import { LoginPageRoutingModule } from './login-routing.module';

import { LoginPage } from './login.page';

@NgModule({
  imports: [
    CommonModule,
    FormsModule,
    IonicModule,
    LoginPageRoutingModule,
    ReactiveFormsModule
  ],
  declarations: [LoginPage]
})
export class LoginPageModule {}
Just like we did in other full navigation examples with Ionic src/app/pages/login/login.page.ts, we craft a simple form to hold the user data.
On sign up or sign in, we use the according functions from our service, add some loading here and there and handle the errors now easily within the promise by using then/err to catch the different results.
Otherwise we would have to check the result in the then() block here, but I want to keep the controller here as dumb as possible and let the service handle the logic of that! Therefore we can now simply open the src/app/pages/login/login.page.ts and change it to:
import { SupabaseService } from './../../services/supabase.service';
import { Component, OnInit } from '@angular/core';
import { FormBuilder, FormGroup, Validators } from '@angular/forms';
import { AlertController, LoadingController } from '@ionic/angular';
import { Router } from '@angular/router';

@Component({
  selector: 'app-login',
  templateUrl: './login.page.html',
  styleUrls: ['./login.page.scss'],
})
export class LoginPage implements OnInit {

  credentials: FormGroup;

  constructor(
    private fb: FormBuilder,
    private alertController: AlertController,
    private router: Router,
    private loadingController: LoadingController,
    private supabaseService: SupabaseService
  ) {}

  ngOnInit() {
    this.credentials = this.fb.group({
      email: ['', [Validators.required, Validators.email]],
      password: ['', Validators.required],
    });
  }

  async login() {
    const loading = await this.loadingController.create();
    await loading.present();

    this.supabaseService.signIn(this.credentials.value).then(async data => {
      await loading.dismiss();
      this.router.navigateByUrl('/list', { replaceUrl: true });
    }, async err => {
      await loading.dismiss();
      this.showError('Login failed', err.message);
    });
  }

  async signUp() {
    const loading = await this.loadingController.create();
    await loading.present();

    this.supabaseService.signUp(this.credentials.value).then(async data => {
      await loading.dismiss();
      this.showError('Signup success', 'Please confirm your email now!');
      }, async err => {
      await loading.dismiss();
      const alert = await this.alertController.create({
        header: 'Registration failed',
        message: err.error.msg,
        buttons: ['OK'],
      });
      await alert.present();
    });
  }

  async showError(title, msg) {
    const alert = await this.alertController.create({
      header: title,
      message: msg,
      buttons: ['OK'],
    });
    await alert.present();
  }
}
Besides the loading and error logic, there’s not much to do for our class!
The according template is also quite easy, just adding the input fields for our form so we can quickly create and sign in users.
Go ahead with the src/app/pages/login/login.page.html and change it to:
<ion-header>
  <ion-toolbar color="primary">
    <ion-title>Devdactic Supabase</ion-title>
  </ion-toolbar>
</ion-header>

<ion-content>
  <form (ngSubmit)="login()" [formGroup]="credentials">
    <div class="input-group">
      <ion-item>
        <ion-input placeholder="john@doe.com" formControlName="email"></ion-input>
      </ion-item>
      <ion-item>
        <ion-input type="password" placeholder="password" formControlName="password"></ion-input>
      </ion-item>
    </div>

    <ion-button type="submit" expand="block" [disabled]="!credentials.valid">Log in</ion-button>
    <ion-button type="button" expand="block" (click)="signUp()" color="secondary">Sign up!
    </ion-button>
  </form>
</ion-content>
Now you should be able to create a new user. By default, that user has to confirm the email adress, that’s also why we don’t immediately log in new users.
If you don’t want this behaviour, you can also change it inside your Supabase app under Authentication -> Settings.
Working with Supabase Data
After the login, our user arrives on the list page. The idea is to get all the data from our service, which will emit any new values to the internal BehaviourSubject to which we can subscribe from the outside.
Therefore the items variable is now an Observable, and we can use the async pipe inside the view later to get all the new values every time something changes.
In terms of changes, we start by showing an alert with an input field to capture data for a new todo. The other functionalities to delete or toggle the completion of a todo are simply passed to our service with the right information about the object!
Get started with the list logic by changing the src/app/pages/list/list.page.ts to:
import { SupabaseService, Todo } from './../../services/supabase.service';
import { Component, OnInit } from '@angular/core';
import { AlertController } from '@ionic/angular';

@Component({
  selector: 'app-list',
  templateUrl: './list.page.html',
  styleUrls: ['./list.page.scss'],
})
export class ListPage implements OnInit {

  items = this.supabaseService.todos;

  constructor(private supabaseService: SupabaseService, private alertCtrl: AlertController) { }

  ngOnInit() { }

  async createTodo() {
    const alert = await this.alertCtrl.create({
      header: 'New todo',
      inputs: [
        {
          name: 'task',
          placeholder: 'Learn Ionic'
        }
      ],
      buttons: [
        {
          text: 'Cancel',
          role: 'cancel'
        },
        {
          text: 'Add',
          handler: (data: any) => {
            this.supabaseService.addTodo(data.task);
          }
        }
      ]
    });

    await alert.present();
  }

  delete(item: Todo) {
    this.supabaseService.removeTodo(item.id);
  }

  toggleDone(item: Todo) {
    this.supabaseService.updateTodo(item.id, !item.is_complete);
  }

  signOut() {
    this.supabaseService.signOut();
  }
}
Inside the template we can now iterate all available todos and print out some information about them. By using the ion-item-sliding we can also add some option buttons to the sides to toggle the completion or delete a todo.
Besides that we can add some logic to dynamically change colors or an icon based on the is_complete property of a todo.
Nothing really fancy, so go ahead and change the src/app/pages/list/list.page.html to:
<ion-header>
  <ion-toolbar color="primary">
    <ion-title>My Todos</ion-title>
    <ion-buttons slot="end">
      <ion-button (click)="signOut()">
        <ion-icon slot="icon-only" name="log-out"></ion-icon>
      </ion-button>
    </ion-buttons>
  </ion-toolbar>
</ion-header>

<ion-content>
  <ion-list>
    <ion-list>
      <ion-item-sliding *ngFor="let todo of items | async">
        <ion-item>
          <ion-label>{{ todo.task }}
            <p>{{ todo.inserted_at | date:'short' }}</p>
          </ion-label>
          <ion-icon name="checkbox-outline" slot="end" color="success" *ngIf="todo.is_complete"></ion-icon>
        </ion-item>

        <ion-item-options side="end">
          <ion-item-option (click)="delete(todo)" color="danger">
            <ion-icon name="trash" slot="icon-only"></ion-icon>
          </ion-item-option>
        </ion-item-options>

        <ion-item-options side="start">
          <ion-item-option (click)="toggleDone(todo)" [color]="todo.is_complete ? 'warning' : 'success'">
            <ion-icon [name]="todo.is_complete ? 'close' : 'checkmark'" slot="icon-only"></ion-icon>
          </ion-item-option>
        </ion-item-options>
      </ion-item-sliding>
    </ion-list>
  </ion-list>

  <ion-fab vertical="bottom" horizontal="end" slot="fixed">
    <ion-fab-button (click)="createTodo()">
      <ion-icon name="add"></ion-icon>
    </ion-fab-button>
  </ion-fab>
</ion-content>
That’s already everything to create basically the same kind of realtime logic that you are used from Firebase collections.
All changes to our data are sent to Supabase, and since we listen to changes of our table we can locally handle the rest without reloading the whole table of data all the time!
Authentication with Guard
Right now every user could access the list page, so we need to protect it with a guard.
We’ve used basically the same logic in other places before, the idea is to use the currentUser Observable returned by our service to check if a user is authenticated.
Because the BehaviourSubject inside the service is initialised with null, we need to filter out this initial value,
Afterwards, the information of a user is retrieved from the Storage and we can use that value to check if we have a user or not, and then allow access or send the user back to the login.
Therefore wrap up our example by changing the src/app/guards/auth.guard.ts to:
import { SupabaseService } from './../services/supabase.service';
import { Injectable } from '@angular/core';
import { CanLoad, Router } from '@angular/router';
import { Observable } from 'rxjs';
import { filter, map, take } from 'rxjs/operators'

@Injectable({
  providedIn: 'root'
})
export class AuthGuard implements CanLoad {

  constructor(private supabaseService: SupabaseService, private router: Router) { }

  canLoad(): Observable<boolean> {
    return this.supabaseService.currentUser.pipe(
      filter(val => val !== null), // Filter out initial Behaviour subject value
      take(1), // Otherwise the Observable doesn't complete!
      map(isAuthenticated => {
        if (isAuthenticated) {
          return true;
        } else {
          this.router.navigateByUrl('/')
          return false;
        }
      })
    );
  }
}
Now you can log in and refresh an internal page, and the page only loads when the user was authenticated before!
Conclusion
This simple example of Ionic with Supabase was my first try and I really enjoyed working with it so far. It’s still in beta so things might change, but the whole idea and approach feels already pretty close to what Firebase offers!
On top of that, your Supabase project directly offers an API that also comes with Swagger docs. Their docs also show a cool example of generating TS interfaces based on that Swagger information, like running:
npx @manifoldco/swagger-to-ts https://your-project.supabase.co/rest/v1/?apikey=your-anon-key --output types/supabase.tsJust add your URL and key and you got your interfaces ready!
One additional note: We injected our service in the first page shown in our app, therefore the createClient() is called right away. If you have a different kind of routing, make sure you still inject it in the first page or call some kind of init() of your service right inside the app.component.ts.
You can also find a video version of this tutorial below.