Building a Native Mobile App with Next.js and Capacitor Last update: 2022-09-29
If you are using Next.js to build a web app, you can easily benefit from Capacitor and make your web app a native mobile app without any big changes or learning something new!
I’ve previously talked about how to build a native mobile app using React with Capacitor and intentionally without React Native - and you can do the same for most Next.js applications.
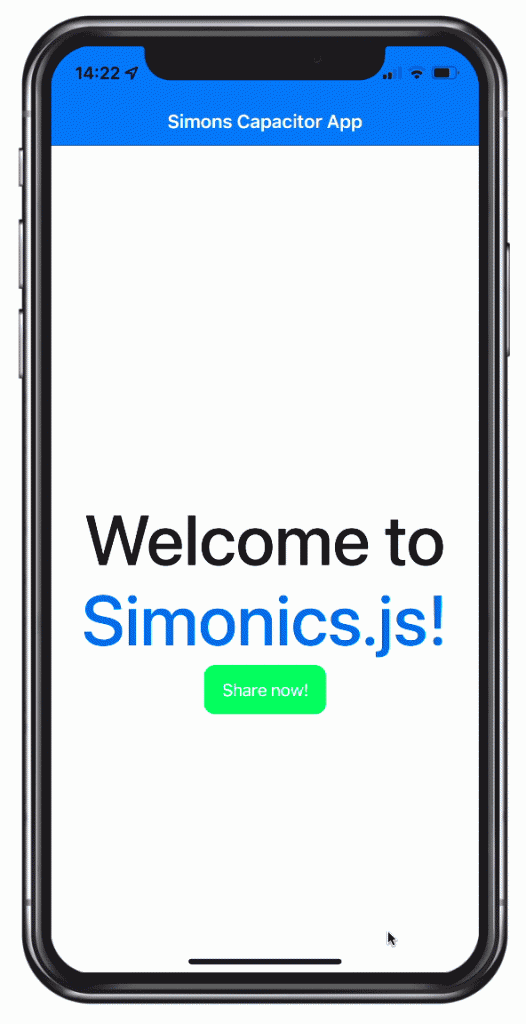
In this tutorial we will start with a new Next.js app and move into native land using Capacitor and eventually also add Ionic for an improved mobile UI, although the last step is completely optional.
About Capacitor
Unlike React Native, Capacitor can simply be dropped into any web project and helps to wrap your whole application into a native webview.
Capacitor then generates the native Xcode and Android Studio project for you, and afterwards only syncs your changes to that project.
Additionally you can use Capacitor plugins (which we will do) to access native device functionality like the camera through a JS bridge.
Because Capacitor has a super slim API and not a lot of functionality, it’s very easy to integrate it into any web project while still giving you an amazing native mobile app in the end.
Preparing Your Next.js App
There are different ways to start React applications, but for the sake of this tutorial let’s use the easiest one that will give us a blank new Next.js application:
npx create-next-app my-appTo build a native mobile app in the end we need an export of our project, so let’s add a simple script to our package.json which we can use to build and export the Next project:
  "scripts": {
    "dev": "next dev",
    "build": "next build",
    "start": "next start",
    "lint": "next lint",
    "static": "next build && next export"
  },
When executing the command I got errors, because image optimization won’t work in this setting.
Therefore open up the next.config.js and change it to:
/** @type {import('next').NextConfig} */
const nextConfig = {
	reactStrictMode: true,
	swcMinify: true,
	images: {
		unoptimized: true
	}
};

module.exports = nextConfig;
Now you can safely run npm run static and you should see a new out folder at the root of your project.
This folder will later be used by Capacitor, but first of all we need to set it up correctly.
Adding Capacitor to Your Next.js App
To wrap any web app into a native mobile container we need to take a few steps - but those have to be done just one initial time, later it’s as easy as running a sync command.
First of all we can install the Capacitor CLI as a development dependency and then initialise it in our project - you can press enter during the dialog to use the defualt values for name and bundle ID.
After that we need to install the core package and the respective packages for the iOS and Android platform.
Finally you can add the platforms, and Capacitor will create the folders for each platform at the root of your project:
# Install the Capacitor CLI locally
npm install -D @capacitor/cli

# Initialize Capacitor in your React project
npx cap init

# Install the required packages
npm install @capacitor/core @capacitor/ios @capacitor/android

# Add the native platforms
npx cap add ios
npx cap add android
At this point you should see a new ios and android folder in your React project.
Those are real native projects!
To open the Android project later you should install Android Studio, and for iOS you need to be on a Mac and install Xcode.
Additionally you should see a capacitor.config.ts in your project, which holds some basic settings for Capacitor that are used during sync. The only thing you need to worry about is the webDir which should point to the output of your build command - right now this is incorrect.
To fix this, open the capacitor.config.json and change the webDir:
{
	"appId": "com.example.app",
	"appName": "my-app",
	"webDir": "out",
	"bundledWebRuntime": false
}
Now you can give it a try by running the following commands:
npm run static
npx cap sync
The first command will simply build your Next.js project and export the static build, while the second command will sync all the web code into the right places of the native platforms so they can be displayed in an app.
Additionally the sync command might update the native platforms and install plugins, so when you install a new Capacitor plugins it’s time to run sync again.
Without noticing you are now actually done, so let’s see the app on a device!
Build and Deploy native apps
You now need Xcode for iOS and Android Studio for Android apps on your machine. Additionally you need to be enrolled in the Apple Developer Program if you want to build and distribute apps on the app store, and same for the Google Play Store.
If you never touched a native mobile project, you can easily open both native projects through the Capacitor CLI:
npx cap open ios
npx cap open android
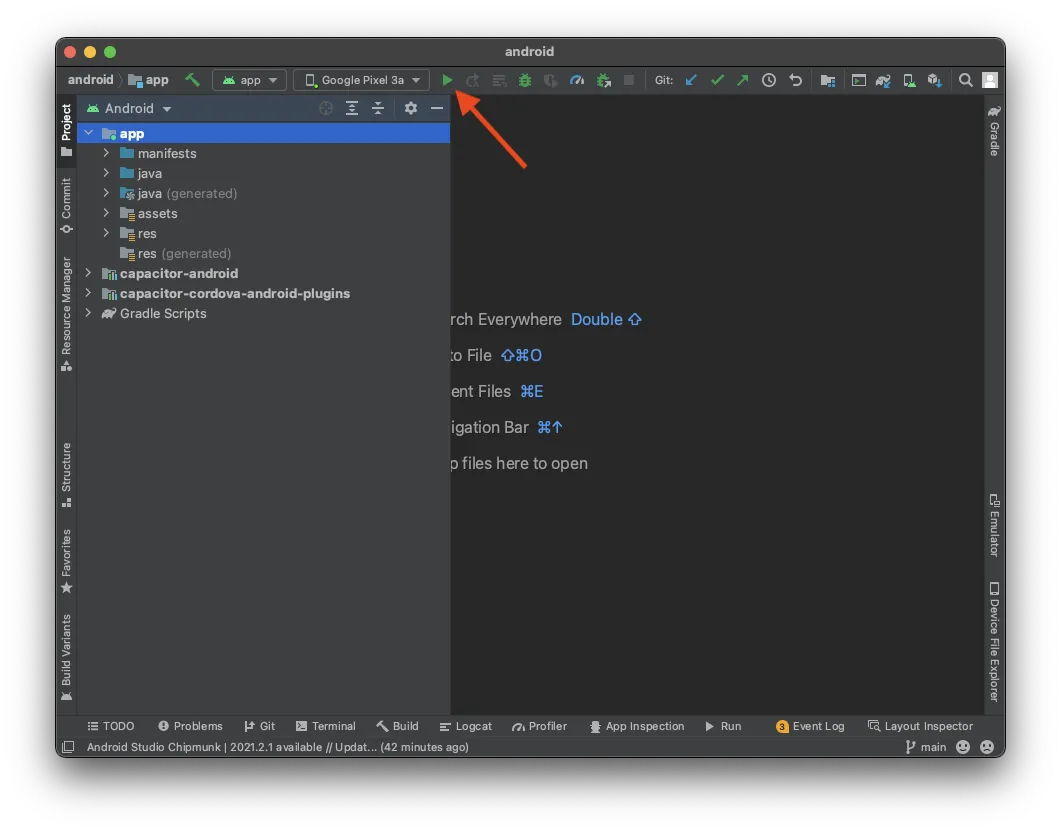
Inside Android Studio you now just need to wait until everything is ready, and you can deploy your app to a connected device without changing any of the settings!
Inside Xcode it’s almost the same, but you need to setup your signing account if you wan to deploy your app to a real device and not just the simulator. Xcode guides you through this if you’ve never done it (but again, you need to be enrolled in the Developer Program).
After that it’s as easy as hitting play and run the app on your connected device which you can select at the top! 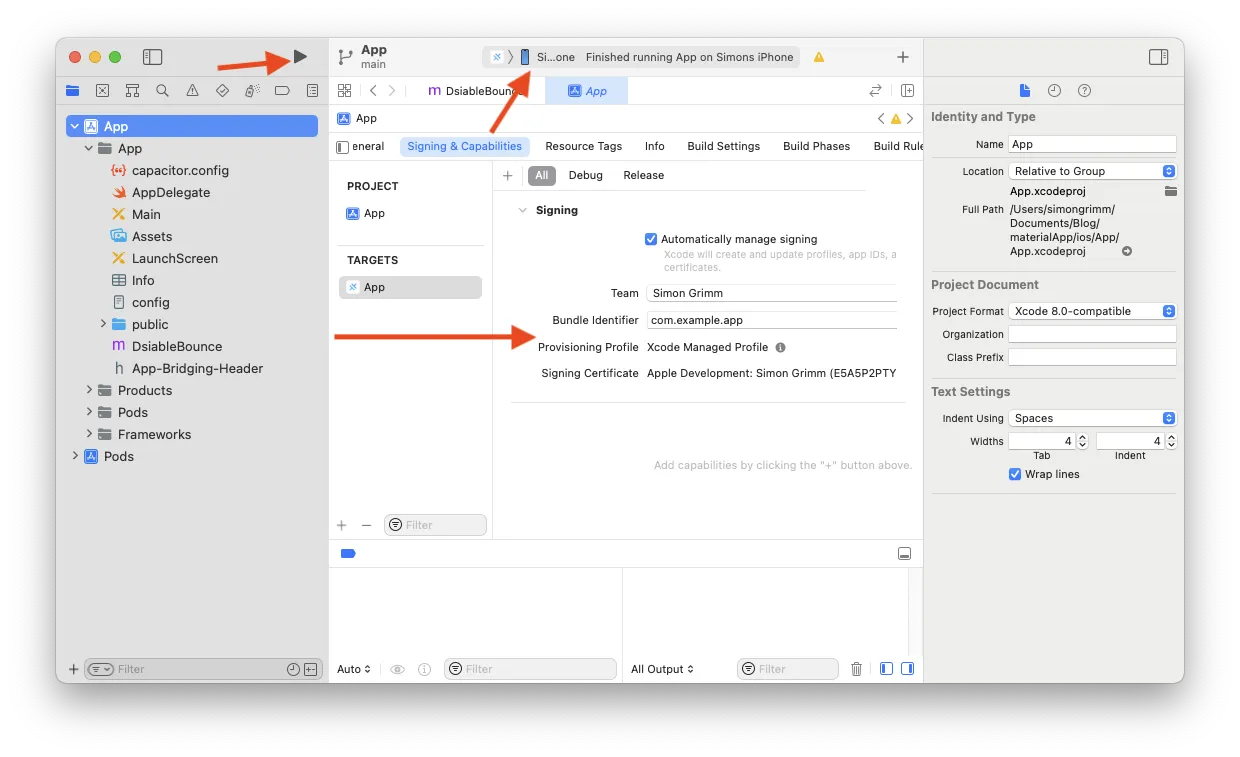
Congratulations, you have just deployed your Next.js web app to a mobile device!
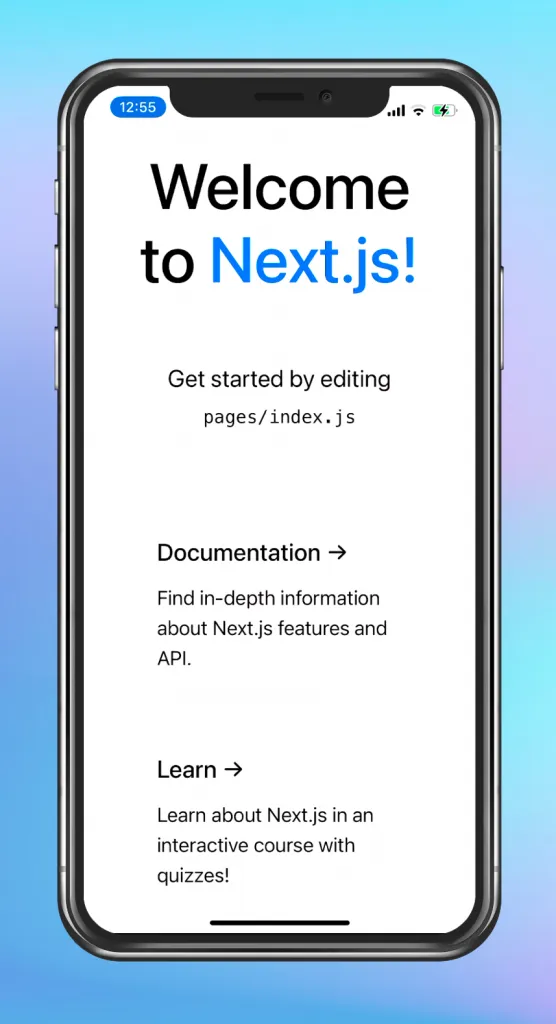 But hold on, there’s also a way to do this in a faster way during development…
Capacitor Live Reload
By now you are used to having hot reload with all modern frameworks, and we can have the same functionality even on a mobile device with minimum effort!
The idea is to make your locally served app with live reload available on your network, and the Capacitor app will simply load the content from that URL.
First step is figuring out your local IP, which you can get on a Mac by running:
ipconfig getifaddr en0On Windows, run ipconfig and look for the IPv4 address.
Now we only need to tell Capacitor to load the app directly from this server, which we can do right in our capacitor.config.ts with another entry:
import { CapacitorConfig } from '@capacitor/cli';

const config: CapacitorConfig = {
	appId: 'com.example.app',
	appName: 'my-app',
	webDir: 'out',
	bundledWebRuntime: false,
	server: {
		url: 'http://192.168.x.xx:3000',
		cleartext: true
	}
};

export default config;
Make sure you use the right IP and port, I’ve simply used the default Next.js port in here.
To apply those changes we can now copy over the changes to our native project:
npx cap copyCopy is mostly like sync, but will only copy over the changes of the web folder and config, not update the native project.
Now you can deploy your app one more time through Android Studio or Xcode and then change something in your React app - the app will automatically reload and show the changes!
Caution: If you install new plugins like the camera, this still requires a rebuild of your native project because native files are changed which can’t be done on the fly.
Using Capacitor Plugins
We have teased this a few times, now let’s see the usage of a Capacitor plugin in action. For this we can install a quite simple one by running:
npm i @capacitor/shareThere’s nothing fancy about the Share plugin, but it anyway brings up the native share dialog! For this we now only need to import the package and call the according share() function from our app, so let’s change the pages/index.js to this:
import Head from 'next/head';
import styles from '../styles/Home.module.css';
import { Share } from '@capacitor/share';

export default function Home() {
	const share = async () => {
		await Share.share({
			title: 'Simons YT Channel',
			text: 'Learn to build awesome mobile apps!',
			url: 'https://www.youtube.com/simongrimmdev_',
			dialogTitle: 'Share with friends'
		});
	};

	return (
		<div className={styles.container}>
			<Head>
				<title>Create Next App</title>
				<meta name="description" content="Generated by create next app" />
				<link rel="icon" href="/favicon.ico" />
			</Head>

			<main className={styles.main}>
				<h1 className={styles.title}>
					Welcome to <a href="https://nextjs.org">Simonics!</a>
				</h1>

				<p className={styles.description}>
					<h2>Cool channel</h2>
					<a onClick={() => share()}>Share now!</a>
				</p>
			</main>
		</div>
	);
}
As said before, after installing new plugins we need to run one sync and then redeploy the app to our device:
npx cap syncNow hit that button and witness the beautiful native share dialog!
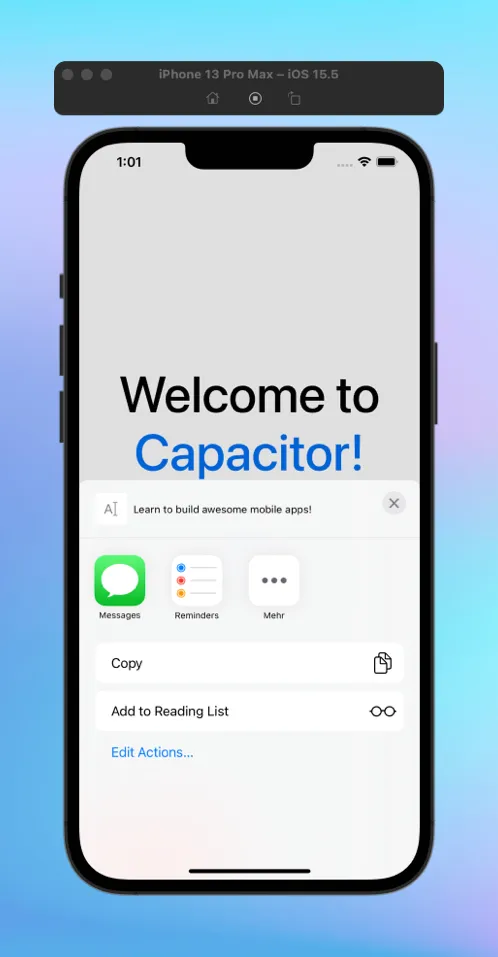
But the button doesn’t look mobile friendly without any styling, so let me introduce you to my favourite UI component library for web apps next (no pun intended).
Adding Ionic UI
I’ve worked years with Ionic to build awesome cross platform applications and it’s one of the best choices if you want a really great looking mobile UI that adapts to iOS and Android specific styling.
I even run a full blown online school where you can learn everything Ionic!
To use it, we only need to install the Ionic react package:
npm install @ionic/reactAdditionally Ionic usually ships with Ionicons, a great icon library that again adapts to the platform it’s running on. Let’s also add it by running:
npm install ioniconsBecause Next handles the build and export slightly different than usual we also need another plugin to fix a bug that we would get right now if we wanted to use any Ionic component. For this, install the following package:
npm install next-transpile-modulesNow we need to include the package and all libraries from Ionic in the next.config.js like this:
const withTM = require('next-transpile-modules')([
	'@ionic/react',
	'@ionic/core',
	'@stencil/core',
	'ionicons'
]);

/** @type {import('next').NextConfig} */
const nextConfig = {
	reactStrictMode: true,
	swcMinify: true,
	experimental: {
		images: {
			unoptimized: true
		}
	}
};

module.exports = withTM(nextConfig);
Doesn’t feel cool, but at the time writing this was required to use Ionic UI components with Next.js!
Because we haven’t had enough pain, there’s also a problem with the hydration of Ionic components when using server side rendering, so we effectively need to turn off SSR.
What I found works best is described in this article, so let’s create a new file components/NoSSRWrapper.jsx and insert the following:
import dynamic from 'next/dynamic';
import React from 'react';

const NonSSRWrapper = (props) => <React.Fragment>{props.children}</React.Fragment>;
export default dynamic(() => Promise.resolve(NonSSRWrapper), {
	ssr: false
});
We can now surround the rest of our components with this wrapper and fix one bug - but we also need to take care of actually loading Ionic and its styling!
For this we can bring in a bunch of CSS imports and most important call the setupIonicReact() because otherwise you will see a blank white page.
For all of this, open the pages/_app.js and change it to this:
import '../styles/globals.css';
import Head from 'next/head';
/* Core CSS required for Ionic components to work properly */
import '@ionic/react/css/core.css';

/* Basic CSS for apps built with Ionic */
import '@ionic/react/css/normalize.css';
import '@ionic/react/css/structure.css'; // Remove if nothing is visible
import '@ionic/react/css/typography.css';

/* Optional CSS utils that can be commented out */
import '@ionic/react/css/padding.css';
import '@ionic/react/css/float-elements.css';
import '@ionic/react/css/text-alignment.css';
import '@ionic/react/css/text-transformation.css';
import '@ionic/react/css/flex-utils.css';
import '@ionic/react/css/display.css';
import { setupIonicReact } from '@ionic/react';

setupIonicReact();

import NonSSRWrapper from '../components/NoSSrWrapper';

function MyApp({ Component, pageProps }) {
	return (
		<>
			<Head>
				<title>Create Next App</title>
				<meta name="description" content="Generated by create next app" />
				<meta name="viewport" content="width=device-width, initial-scale=1, viewport-fit=cover" />
				<link rel="icon" href="/favicon.ico" />
			</Head>
			<NonSSRWrapper>
				<Component {...pageProps} />
			</NonSSRWrapper>
		</>
	);
}

export default MyApp;
I’ve also added a little meta tag in here to set the viewport-fit because Ionic components will like this setting way more. Trust me.
Now we are free to use any of the Ionic UI components so I’m just adding a little header bar to our app and change our one click handler to use a real button UI.
To use those components we need to import them separately, and because you might not like a mobile friendly status bar on the web you could also surround this with a little platform check that’s part of Capacitors core package - very handy and convenient!
Finish up the tutorial by changing your pages/index.js to this now:
import Head from 'next/head';
import styles from '../styles/Home.module.css';
import { Share } from '@capacitor/share';
import { IonHeader, IonTitle, IonToolbar } from '@ionic/react';
import { Capacitor } from '@capacitor/core';

export default function Home() {
	const share = async () => {
		await Share.share({
			title: 'Simons YT Channel',
			text: 'Learn to build awesome mobile apps!',
			url: 'https://www.youtube.com/simongrimmdev_',
			dialogTitle: 'Share with freiends'
		});
	};

	return (
		<div>
			<Head>
				<title>Create Next App</title>
				<meta name="description" content="Generated by create next app" />
				<link rel="icon" href="/favicon.ico" />
			</Head>
			{Capacitor.isNativePlatform() && (
				<IonHeader>
					<IonToolbar color="primary">
						<IonTitle>Simons Capacitor App</IonTitle>
					</IonToolbar>
				</IonHeader>
			)}

			<main className={styles.main}>
				<h1 className={styles.title}>
					Welcome to <a href="https://nextjs.org">Simonics!</a>
				</h1>
				<ion-button color="success" onClick={() => share()}>
					Share now!
				</ion-button>
			</main>
		</div>
	);
}
If your live reload is out of sync after all the installation just restart everything and then you should see a somewhat native looking mobile app, built with Next.js and Capacitor!
Conclusion
Capacitor is the easiest solution when it comes to building a native application based on your existing web project.
The other common React solution would be React Native, however this usually only allows to share logic and not the actual UI code while we didn’t really have to touch the UI at all if we are using Capacitor.
If you enjoyed the tutorial or got any further questions, just drop a comment below!
