Ionic 5 Image Upload with NestJS & Capacitor: The API Last update: 2020-05-19
Image upload is one of the most common use cases in your Ionic app, and to show you everything you need, we’ll build both the API and app together!
This is the first part of our mini series on image upload with Ionic. Today, we are going to implement a NestJS API that works with a MongoDB so we can upload files from our app, get a list of all uploaded images and also delete images.
Part Two: The Capacitor App 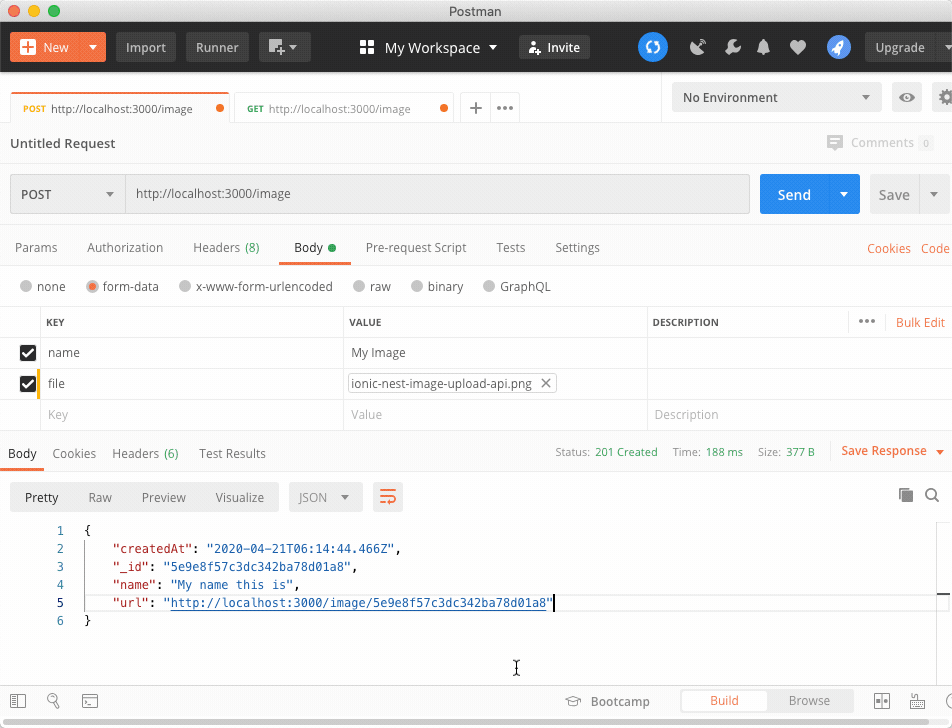
For today the only result we’ll have is the API which we can test with Postman, but adding some full stack skills to your toolbox is anyway a good idea!
Nest API Setup
If you haven’t worked with Nest before you need to install the CLI first. Then you can continue to generate a new project and install all dependencies that we need to integrate our MongoDB using Typegoose!
We can then continue by generating all necessary files for our Image upload using the Nest CLI again. Go ahead and run:
npm i -g @nestjs/cli
nest new imageApi
cd ./imageApi
npm i nestjs-typegoose @typegoose/typegoose mongoose @nestjs/platform-express
npm install --save-dev @types/mongoose

nest g module image
nest g controller image
nest g service image
nest g class image/image.model
In order to allow CORS requests to our Nest API we also need to add a line to the
src/main.ts now:
import { NestFactory } from '@nestjs/core';
import { AppModule } from './app.module';

async function bootstrap() {
  const app = await NestFactory.create(AppModule);
  app.enableCors();
  await app.listen(3000);
}
bootstrap();
To connect the Nest API to our database we also need to add the URL to the database right into the src/app.module.ts like this:
import { Module } from '@nestjs/common';
import { AppController } from './app.controller';
import { AppService } from './app.service';
import { ImageModule } from './image/image.module';
import { TypegooseModule } from "nestjs-typegoose";

@Module({
  imports: [
    ImageModule,
    TypegooseModule.forRoot('mongodb://localhost:27017/imageapi', {
      useNewUrlParser: true
    })],
  controllers: [AppController],
  providers: [AppService],
})
export class AppModule { }
If you already have a production DB running somewhere else you can of course use that URL as well!
Defining the Database Model
If we want to save our documents to the database we need to define the model, which also helps to have typings available. We just need to define these in one place using the annotations from Typegoose, which is the reason I added this package to the mix!
Our model will have a name and image file, so we will actually store the image as data right in the database. It’s probably not the best way, but in some cases definitely a legit alternative.
Go ahead and change the src/image/image.model.ts to:
import { prop } from '@typegoose/typegoose';
import { Schema } from 'mongoose';

export class ApiImage {
    // Created automatically, just needed for TS
    readonly _id: Schema.Types.ObjectId;

    @prop({ required: true })
    name: string;

    @prop({ default: {data: null, contentType: null} })
    image_file: {
        data: Buffer;
        contentType: string;
    };

    @prop({ default: Date.now() })
    createdAt: Date;

    // We'll manually populate this property
    url: string;
}
I left out the annotation for the url since this field shouldn’t be written to the database, but we still need it for Typescript since we want to write this manually later in this tutorial.
These objects can now be written right to the database, but before we can do this we need to tell our module about it.
Besides that we also need to add Multer, a package that is commonly used for handling file upload in Node applications. We got access to the underlying Express platform with Nest as well, it’s one of the packages we also installed in the beginning!
We will only accept image files with the filter for now, but feel free to change this to your needs.
We also pass another option to the initial call which connects typegoose with our database, since we don’t really want to have this ”__v” version key in all of the database query results from MongoDB!
Now open the src/image/image.module.ts and change it to:
import { Module, HttpException, HttpStatus } from '@nestjs/common';
import { ImageController } from './image.controller';
import { ImageService } from './image.service';
import { MulterModule } from '@nestjs/platform-express';
import { extname } from 'path';
import { ApiImage } from './image.model';
import { TypegooseModule } from 'nestjs-typegoose';

const imageFilter = function (req, file, cb) {
  // accept image only
  if (!file.originalname.match(/.(jpg|jpeg.webp)$/)) {
    cb(new HttpException(`Unsupported file type ${extname(file.originalname)}`, HttpStatus.BAD_REQUEST), false);
  }
  cb(null, true);
};

@Module({
  controllers: [ImageController],
  providers: [ImageService],
  imports: [
    TypegooseModule.forFeature([{
      typegooseClass: ApiImage,
      schemaOptions: {versionKey: false}
    }]),
    MulterModule.registerAsync({
      useFactory: () => ({
        fileFilter: imageFilter
      }),
    }),
  ]
})
export class ImageModule { }
Now our module is configured and can use the database model, so we just need to create a service that interacts with the database and a controller to define the actual endpoints of the API!
Creating our API Endpoints
Before we create the endpoints, we create a service that acts as the logic between the controller and the database.
This service will read and write our documents from the MongoDB, and most of it is pretty standard CRUD functionality definition. But we also need to make sure we store our file (which will be added by Multer), so whenever we create a new document in the database we also add the buffer and mimetype from the file of the upload to our database object before we save it.
Now open the src/image/image.service.ts and change it to:
import { Injectable } from '@nestjs/common';
import { InjectModel } from 'nestjs-typegoose';
import { ReturnModelType } from '@typegoose/typegoose';
import { ApiImage } from './image.model';

@Injectable()
export class ImageService {
    constructor(
        @InjectModel(ApiImage) private readonly imageModel: ReturnModelType<typeof apiimage="">
    ) { }

    async create(file, createCatDto: { name: string, image_file: Buffer }) {
        const newImage = await new this.imageModel(createCatDto);
        newImage.image_file.data = file.buffer;
        newImage.image_file.contentType = file.mimetype;
        return newImage.save();
    }

    async findAll(): Promise<apiimage[] |="" null=""> {
        return await this.imageModel.find({}, { image_file: 0 }).lean().exec();
    }

    async getById(id): Promise<apiimage> {
        return await this.imageModel.findById(id).exec();
    }

    async removeImage(id): Promise<apiimage> {
        return this.imageModel.findByIdAndDelete(id);
    }
}
</apiimage></apiimage></apiimage[]></typeof>
Everything is in place now, and we just need to define the endpoints and connect it with the right functions of the service we just created.
With Nest we can use a lot of annotations to mark our endpoints, and we can also use the FileInterceptor to tell Nest that we want to handle file uploads on a specific route - which is of course exactly what we want to do!
Most of the functions will simply call the according function of the service with a bit of error handling, but we also need to handle something else:
To show an actual image from our API, we need to get the data from the database and return the buffer data with the right content type back to the user. This allows to directly display an image using the according route!
The problem is that normally the database would also return the whole object for the list of images (or after upload), and this list would be a huge response including all the binary data.
To change this behaviour, we set the url property of our images now manually to the URL of our API and the right path to the image file. We also do this in the list call on all of the items that we return, and at the same time remove the image_file field since this contains the binary data that we don’t want to return to the front end!
Now it’s time to change the src/image/image.controller.ts to:
import { Controller, Post, UseInterceptors, UploadedFile, Res, Req, Body, HttpStatus, Get, Param, NotFoundException, Delete } from '@nestjs/common';
import { ImageService } from './image.service';
import { FileInterceptor } from '@nestjs/platform-express';

@Controller('image')
export class ImageController {

    constructor(private imageService: ImageService) { }

    @Post('')
    @UseInterceptors(FileInterceptor('file'))
    async uploadImage(@UploadedFile() file, @Res() res, @Req() req, @Body() body) {
        const image = await this.imageService.create(file, body);
        const newImage = image.toObject();

        const host = req.get('host');
        newImage.image_file = undefined;
        newImage.url = `http://${host}/image/${newImage._id}`;

        return res.send(newImage);
    }

    @Get('')
    async getImages(@Req() req) {
        const host = req.get('host');
        const images = await this.imageService.findAll();

        images.forEach(image => {
            image.url = `http://${host}/image/${image._id}`;
        });

        return images;
    }

    @Get(':id')
    async getImage(@Res() res, @Body() body, @Param('id') id) {
        const image = await this.imageService.getById(id);
        if (!image) throw new NotFoundException('Image does not exist!');
        res.setHeader('Content-Type', image.image_file.contentType);
        return res.send(image.image_file.data.buffer);
    }


    @Delete(':id')
    async deleteImage(@Res() res, @Body() body, @Param('id') id) {
        const image = await this.imageService.removeImage(id);

        if (!image) throw new NotFoundException('Image does not exist!');
        return res.status(HttpStatus.OK).json({msg: 'Image removed.'});
    }
}
With all of that in place you can run your Nest API by using one of the commands from the package.json like:
npm run start:devFor now we can test the API using a tool like Postman or Insomnia - go ahead and upload some files to your new API!
Conclusion
Setting up a Nest API is just as easy as creating any other Angular application - and we are now ready to upload images to our own API and list these files in a response back to the user.
We have created a decent API that can be used from any application, and in the next part we will create the Ionic app to upload images from all platforms to this API!
You can also find a video version of this tutorial below.