Ionic 5 Image Upload with NestJS & Capacitor: Capacitor App Last update: 2020-06-02
This is the second part of a mini series on image upload with Ionic. In this part we’ll create an Ionic app with Capacitor so we can upload image files from the browser and iOS & Android apps!
In order to go through this tutorial make sure you have the API from the first part up and running: Ionic 5 Image Upload with NestJS & Capacitor: The API
Today we will build the Ionic app and implement file upload with Capacitor, so we can upload images to our API from basically everywhere!
Starting our Ionic app with Capacitor
Get started by setting up a new Ionic app with Capacitor directly enabled and install the PWA elements so we can use the camera inside the browser as well.
Besides that we need just a service for our API communication and afterwards you can already build the project and add the platforms you want to target with Capacitor:
ionic start devdacticImages blank --type=angular --capacitor
cd ./devdacticImages
npm i @ionic/pwa-elements

ionic g service services/api

ionic build
npx cap add ios
npx cap add android
To make API calls we need to add the HttpClientModule as usually to our app/app.module.ts:
import { NgModule } from '@angular/core';
import { BrowserModule } from '@angular/platform-browser';
import { RouteReuseStrategy } from '@angular/router';

import { IonicModule, IonicRouteStrategy } from '@ionic/angular';
import { SplashScreen } from '@ionic-native/splash-screen/ngx';
import { StatusBar } from '@ionic-native/status-bar/ngx';

import { AppComponent } from './app.component';
import { AppRoutingModule } from './app-routing.module';
import { HttpClientModule } from '@angular/common/http';

@NgModule({
  declarations: [AppComponent],
  entryComponents: [],
  imports: [
    BrowserModule,
    IonicModule.forRoot(),
    AppRoutingModule,
    HttpClientModule,
  ],
  providers: [
    StatusBar,
    SplashScreen,
    { provide: RouteReuseStrategy, useClass: IonicRouteStrategy },
  ],
  bootstrap: [AppComponent],
})
export class AppModule {}
Now we also need to load the PWA elements package we installed in the beginning by adding 2 more lines at the bottom of our src/main.ts:
import { defineCustomElements } from '@ionic/pwa-elements/loader';
defineCustomElements(window);
That’s it for the configuration today!
Creating our Image Upload Service
Let’s start with the logic inside our service, which takes care of all the API calls to our Nest backend.
We can create the same kind of interface in our app like we did for the database model in the first part, and for the most part we just need to make the appropriate call to our API in the functions.
Besides that we need a bit of special handling for the image upload, for which we got actually 2 functions:
- uploadImage: This is the function used when dealing with blob data as a result of using the Camera or photo library
- uploadImageFile: This is used when we pick a file with a regular file input inside a browser
For the upload we can create new FormData and append everything else we want to have in the body of our call, for now we just use a name as example but you could supply all your other mandatory information in that place.
Now go ahead and change your services/api.service.ts to:
import { Injectable } from '@angular/core';
import { HttpClient } from '@angular/common/http';

export interface ApiImage {
  _id: string;
  name: string;
  createdAt: Date;
  url: string;
}

@Injectable({
  providedIn: 'root'
})
export class ApiService {
  url = 'http://localhost:3000';

  constructor(private http: HttpClient) { }

  getImages() {
    return this.http.get<ApiImage[]>(`${this.url}/image`);
  }

  uploadImage(blobData, name, ext) {
    const formData = new FormData();
    formData.append('file', blobData, `myimage.${ext}`);
    formData.append('name', name);

    return this.http.post(`${this.url}/image`, formData);
  }

  uploadImageFile(file: File) {
    const ext = file.name.split('.').pop();
    const formData = new FormData();
    formData.append('file', file, `myimage.${ext}`);
    formData.append('name', file.name);

    return this.http.post(`${this.url}/image`, formData);
  }

  deleteImage(id) {
    return this.http.delete(`${this.url}/image/${id}`);
  }
}
Not too much going on in here, let’s see how we can actually grab some images now.
Uploading Image Files
Capacitor makes it really easy to capture images across all devices, and the same code works on the web, iOS and Android! We only have one special case for image upload using a regular file input tag, which we also add as a ViewChild so we can manually trigger it and otherwise completely hide it in our DOM.
Getting our list of images and deleting an image isn’t very spectacular, but when we want to add a new image we first of all present an action sheet to select a source. We’ll create the array of available buttons upfront in order to dynamically add the file upload button if the code is running on the web on not inside a native app!
Once we capture an image (or chose from the photo library) we also need to convert this base64 string to a blob so we can send it to our API. This is just a decision we made on the API, you could also build it in a different way with only base64 data of course.
For the file input we actually don’t need any other conversion since we can directly upload this file element with a standard POSt to our API, so open your app/home/home.page.ts and change it to:
import { Component, ViewChild, ElementRef } from '@angular/core';
import { ApiService, ApiImage } from '../services/api.service';
import { Plugins, CameraResultType, CameraSource } from '@capacitor/core';
import { Platform, ActionSheetController } from '@ionic/angular';
const { Camera } = Plugins;
@Component({
selector: 'app-home',
templateUrl: 'home.page.html',
styleUrls: ['home.page.scss'],
})
export class HomePage {
images: ApiImage[] = [];
@ViewChild('fileInput', { static: false }) fileInput: ElementRef;
constructor(private api: ApiService, private plt: Platform, private actionSheetCtrl: ActionSheetController) {
this.loadImages();
}
loadImages() {
this.api.getImages().subscribe(images => {
this.images = images;
});
}
async selectImageSource() {
const buttons = [
{
text: 'Take Photo',
icon: 'camera',
handler: () => {
this.addImage(CameraSource.Camera);
}
},
{
text: 'Choose From Photos Photo',
icon: 'image',
handler: () => {
this.addImage(CameraSource.Photos);
}
}
];
// Only allow file selection inside a browser
if (!this.plt.is('hybrid')) {
buttons.push({
text: 'Choose a File',
icon: 'attach',
handler: () => {
this.fileInput.nativeElement.click();
}
});
}
const actionSheet = await this.actionSheetCtrl.create({
header: 'Select Image Source',
buttons
});
await actionSheet.present();
}
async addImage(source: CameraSource) {
const image = await Camera.getPhoto({
quality: 60,
allowEditing: true,
resultType: CameraResultType.Base64,
source
});
const blobData = this.b64toBlob(image.base64String, `image/${image.format}`);
const imageName = 'Give me a name';
this.api.uploadImage(blobData, imageName, image.format).subscribe((newImage: ApiImage) => {
this.images.push(newImage);
});
}
// Used for browser direct file upload
uploadFile(event: EventTarget) {
const eventObj: MSInputMethodContext = event as MSInputMethodContext;
const target: HTMLInputElement = eventObj.target as HTMLInputElement;
const file: File = target.files[0];
this.api.uploadImageFile(file).subscribe((newImage: ApiImage) => {
this.images.push(newImage);
});
}
deleteImage(image: ApiImage, index) {
this.api.deleteImage(image._id).subscribe(res => {
this.images.splice(index, 1);
});
}
// Helper function
// https://stackoverflow.com/questions/16245767/creating-a-blob-from-a-base64-string-in-javascript
b64toBlob(b64Data, contentType = '', sliceSize = 512) {
const byteCharacters = atob(b64Data);
const byteArrays = [];
for (let offset = 0; offset < byteCharacters.length; offset += sliceSize) {
const slice = byteCharacters.slice(offset, offset + sliceSize);
const byteNumbers = new Array(slice.length);
for (let i = 0; i < slice.length; i++) {
byteNumbers[i] = slice.charCodeAt(i);
}
const byteArray = new Uint8Array(byteNumbers);
byteArrays.push(byteArray);
}
const blob = new Blob(byteArrays, { type: contentType });
return blob;
}
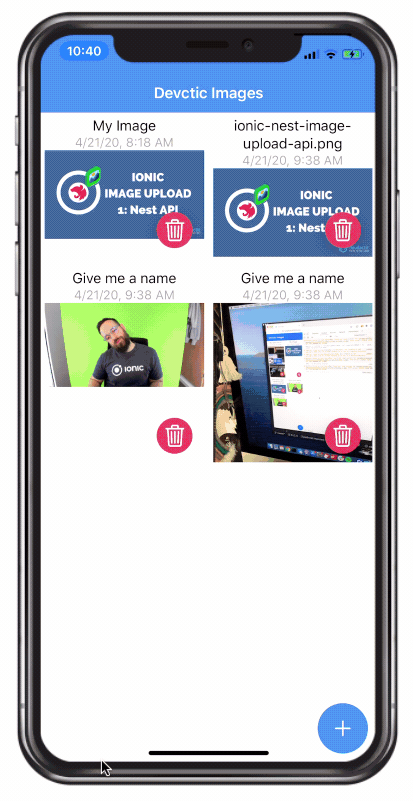
}Now we got a list of images from the backend, and we also got the functionality in place to upload images. We just need to create the appropriate view with a list of images, divided into columns and rows in our view.
Each column will hold the image and some information plus a button to delete that image. Remember from the first part: We created the API response exactly for this, so now the src for an image is just the URL to our API and we don’t need any additional logic to convert any data!
At the bottom we can add a nice looking fab button that floats above our content and triggers the action sheet we created, plus the previously mentioned file input that is simply hidden and only triggered through our ViewChild.
Although it’s hidden we can still capture the event when an image was selected, which will as a result upload that file using our service!
Now the last missing piece of our series goes to the app/home/home.page.html:
<ion-header>
  <ion-toolbar color="primary">
    <ion-title>
      Devctic Images
    </ion-title>
  </ion-toolbar>
</ion-header>

<ion-content>
  <ion-row>
    <ion-col
      size="6"
      *ngFor="let img of images; let i = index;"
      class="ion-text-center"
    >
      <ion-label>
        {{ img.name }}
        <p>{{ img.createdAt | date:'short' }}</p>
      </ion-label>

      <img [src]="img.url" />
      <ion-fab vertical="bottom" horizontal="end">
        <ion-fab-button
          color="danger"
          size="small"
          (click)="deleteImage(img, i)"
        >
          <ion-icon name="trash-outline"></ion-icon>
        </ion-fab-button>
      </ion-fab>
    </ion-col>
  </ion-row>

  <ion-fab vertical="bottom" horizontal="end" slot="fixed">
    <input
      type="file"
      #fileInput
      (change)="uploadFile($event)"
      hidden="true"
      accept="image/*"
    />
    <ion-fab-button (click)="selectImageSource()">
      <ion-icon name="add"></ion-icon>
    </ion-fab-button>
  </ion-fab>
</ion-content>
Start your app, run it on the browser or deploy it to a device - the image capturing will work seamlessly everywhere!
Just a quick note: If you deploy this app to a device you need to change the URL to your backend since your device won’t be able to access the localhost URL we currently got.
To fix this, either deploy the API to some hosting or for testing use the awesome ngrok tool!
I also recommend to test your app with live reload on a device, the command for that looks like this:
npx cap run ios --livereload --externalConclusion
We have built a powerful API with image upload in the first part and now created our Ionic app with Capacitor to interact with that API. Because of Capacitor we can also use the same interfaces across devices and the web, which makes handling files and images so much more enjoyable than in the past.
Enjoy our new project and expand it with some more functionality and let me know if you used this as the base for one of your next projects!
You can also find a video version of this tutorial below.