Display Images and Video Player using Ionic Last update: 2015-01-02

Lately I explained how to take photos and how to capture videos and store them within your apps directory. Due to a wish of you, this time I will show you how to present images and videos properly in your ionic app. Therefore, we will create a simple media popover using ionic modal overlay and the ionic slide box to slide through images. I will just load some local files as it’s a bit annoying to always take a photo/video first to see how it works, but you could just change the URLs I use for local files to your URLs to your captured media files.
For a even more detailed guide also check out my Complete Guide To Images With Ionic
I recently updated this post and expanded the functionality to also allow image zooming like in the Facebook app, so make sure to take a look at How To Create An Advanced Ionic Gallery with Image Zooming.
Setup the base
We start with a simple, blank ionic app:
ionic start devdactic-mediapopover blank
cd devdactic-mediapopover
ionic platform add ios
You could as well add other platforms, but I like to go with iOS as I am developing on a Mac. When your finished, go to your index.html and replace the body with this:
<body ng-app="starter">
	<ion-pane>
		<ion-header-bar class="bar-stable">
			<h1 class="title">Devdactic Media Popover</h1>
		</ion-header-bar>
		<ion-content class="has-header padding" ng-controller="MediaCtrl">
			<br /><br />
			<div class="item item-divider">
				<i class="ion-images"></i>
				My Images
			</div>
			<a class="item item-list-detail">
				<ion-scroll direction="x">
					<img
						ng-repeat="image in allImages"
						ng-src="{{image.src}}"
						ng-click="showImages($index)"
						class="image-list-thumb"
					/>
				</ion-scroll>
			</a>
			<br /><br />
			<div class="button-bar">
				<button class="button button-outline button-positive" ng-click="playVideo()">
					Play a video
				</button>
			</div>
		</ion-content>
	</ion-pane>
</body>
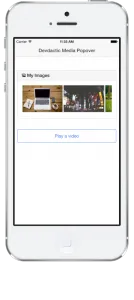
Nothing special in here. We got a small list of images, which will take images from a scope array and a click event which calls showImages with the index of the image in the array. You will see why we pass this parameter soon. Below the image scroll list we got a simple button which shall start our video. Obviously there could be your thumbnail images from your captured movies, but for the simplicity I will just open a local file.
Adding the image popover
The HTML is fine, let’s go to your app.js and add the controller we assigned to our ion-content tag. Inside our controller we need the image array with the source to each image, and the showImages function, so add:
.controller('MediaCtrl', function($scope, $ionicModal) {
	$scope.allImages = [{
		'src' : 'img/pic1.jpg'
	}, {
		'src' : 'img/pic2.jpg'
	}, {
		'src' : 'img/pic3.jpg'
	}];

	$scope.showImages = function(index) {
		$scope.activeSlide = index;
		$scope.showModal('templates/image-popover.html');
	}

	$scope.showModal = function(templateUrl) {
		$ionicModal.fromTemplateUrl(templateUrl, {
			scope: $scope,
			animation: 'slide-in-up'
		}).then(function(modal) {
			$scope.modal = modal;
			$scope.modal.show();
		});
	}

	// Close the modal
	$scope.closeModal = function() {
		$scope.modal.hide();
		$scope.modal.remove()
	};
}
If you want the same images and video file I used, you can grab it from the github repo for this tutorial. Our showImages sets the scope var activeSlide and calls the showModal function with a template for the modal which will be shown. The showModal function finally calls the ionicModal (which is why we included \$ionicModal as a dependency in our controller), sets the scope of the modal and the animation for the appearance, and shows the modal when it is created. The close modal will be used later. So for now, what’s missing? The template! So go ahead and create a file at templates/image-popover.html (you might need to create the folder if your use the blank ionic app), and fill it with:
<div class="modal image-modal transparent" ng-click="closeModal()">
	<ion-slide-box
		on-slide-changed="slideChanged(index)"
		show-pager="true"
		active-slide="activeSlide"
	>
		<ion-slide ng-repeat="image in allImages">
			<img ng-src="{{image.src}}" class="fullscreen-image" />
		</ion-slide>
	</ion-slide-box>
</div>
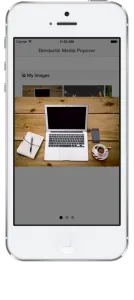
Here in our image-popover template file we got everything surrounded in a div, which will call closeModal() on click, and a ion-slide-box to display all images as pages with a tiny pager at the bottom. Furthermore we set the active-slide through our scope variable. This is why we passed the index of the image to our showImages() function; we can now open the slide box with exactly the clicked image. Otherwise, the box would always start at the first picture even if we had clicked the third! Be friendly to your users.
For more information on the slide-box check the ionic documentation for ion-slide-box.
The ng-repeat is the same as in our index, only the class has changed. You might have already missed some css if you have run your app before, so let’s change that and open up the style.css file from the project and insert:
.image-list-thumb {
	padding: 2px 2px 2px 2px;
	height: 100px;
}

.image-modal {
	width: 100% !important;
	height: 100%;
	top: 0 !important;
	left: 0 !important;
}

.transparent {
	background: transparent !important;
}

.fullscreen-image {
	max-width: 100%;
	max-height: 100%;
	bottom: 0;
	left: 0;
	margin: auto;
	overflow: auto;
	position: fixed;
	right: 0;
	top: 0;
}

.slider {
	width: 100%;
	height: 100%;
}
Here we have the styling for our tiny image thumbnails in the list, and the styling for the modal box. It’s nothing special, most of the time we just have to call our elements to use the complete width and height of the view. You can play around a bit with the styling elements to see what brakes your app when you remove it. If you have any tweaks or better styling ideas, please leave me a comment below!
That’s all we need for our images! Now run your app and it should look like this:
 |
 |
Adding the Videoplayer
The image popover is working, now we need a way to present our videos. First of all we need the source for our clipfile, then we need the action for our image button, so add this to our MediaCtrl:
$scope.clipSrc = 'img/coffee.MOV';

$scope.playVideo = function() {
	$scope.showModal('templates/video-popover.html');
}
Quite short, hm? Good thing we created our showModal() function, which now just get’s the link to our video popover. Nothing more to do here! You might know what’s coming now…yes, create the templates/video-popover.html file and insert this:
<div class="modal transparent fullscreen-player" ng-click="closeModal()">
	<video ng-src="{{clipSrc}}" class="centerme" controls="controls" autoplay></video>
</div>
Our div has again the closeModal() action, and now we have just a simple HTML5 video tag in here. THAT’S ALL? Yes, that is all we need to display our clips! There are some new CSS attributes, so for the last time open the style.css and add the missing stuff:
.centerme {
	margin: 0 auto;
	width: 100%;
	height: 100%;
}

.fullscreen-player {
	max-width: 100%;
	max-height: 100%;
	bottom: 0;
	left: 0;
	margin: auto;
	overflow: none;
	position: fixed;
	right: 0;
	top: 0;
}
The centerme is to display the preview of the image in the center of the screen, otherwise it would be at (0,0). The player gets some standard styling to use all the space, again no magic inside. If you use your own movie file, or wonder why you have no preview image: The video tag loads a clippreview, but sometimes it’s just not fast enough and the result is just a black box. In that case, you can assign a custom image like this:
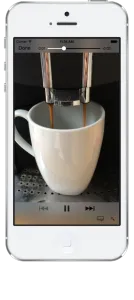
<video poster="{{myPreviewImageSrc}}" ....></video>If you run your app and start the video, it should look somehow like this (depending on your movie):
 The video starts automatically when you press the button as we set autoplay on the video element, and we got some standard controls for the media player in here.
Conclusion
In this tutorial I showed you how it’s very easy to display images and videos in fullscreen inside your ionic app. The complete tutorial can be done without a device, as we use no cordova here. If anyone of you has some better ideas for styling or displaying media, please leave me a comment!
If this tutorial was helpful, follow me on twitter @schlimmson (or your preferred platform) and leave a comment/ tweet it! Don’t forget to subscribe to my newsletter to receive new posts and infos via mail!
Happy Coding, Simon
