The Complete Guide To Images With Ionic Last update: 2015-05-13
It can be a bit challenging and frustrating to handle local file URLs when working with images or media files in your app. In one of my articles I described how to capture and store images with Ionic, but there have been a lot of questions regarding saving and accessing those files later. Additional,
adding local files as email attachments have been tricky for some of you as well.
This article aims to solve all those problems by providing a solid solution to all those problems:
- we will implement the capturing of images (or taking them from your photo library)
- we will present all the taken image in a scrollview
- we will store those images inside localStorage to access them on future app launches
- we will open the mail composer and add the images as attachments
At the end we will have a very simple controller for our app, and some really great reusable services for everything we need!
Getting started with a blank project
As always, I will start this tutorial at zero so you can choose where you want to join my journey. Let’s create a blank new project and add all the plugins we need for this tutorial:
ionic start devdactic-images blank
bower install --save ngCordova
cordova plugin add cordova-plugin-camera
cordova plugin add cordova-plugin-file
cordova plugin add https://github.com/katzer/cordova-plugin-email-composer.git
ionic platform add ios
We have some cordova plugins for the camera and email, and also the ngCordova wrapper. To use ngCordova, we need to load it from our index.html so make sure to add the line before the cordova.js import line. Additional we can already load our controllers.js and services.js as we will add them soon:
<!-- Before cordova.js -->
<script src="lib/ngCordova/dist/ng-cordova.js"></script>

<!-- After app.js -->
<script src="js/controllers.js"></script>
<script src="js/services.js"></script>
To finally use ngCordova add it to our dependency array inside our app.js:
angular.module('starter', ['ionic', 'ngCordova'])We have already load our 2 additional files, now make sure to create the controllers.js and services.js files next to the app.js in your ionic project. Everything is ready now to implement some cool image functions!
Creating the view
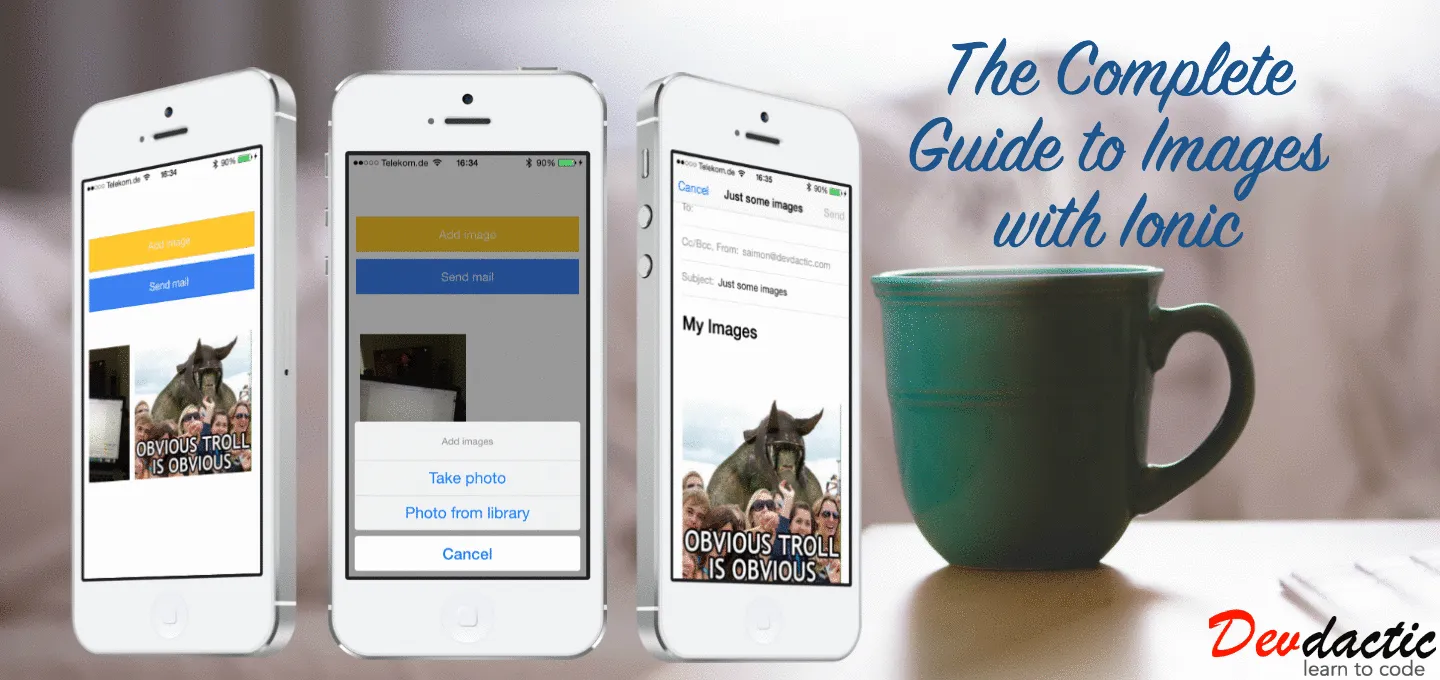
Before we implement the actual logic, open the index.html replace the current body with these lines:
<body ng-app="starter">
  <ion-content class="has-header padding" ng-controller="ImageController">
    <button class="button button-full button-energized" ng-click="addMedia()">
      Add image
    </button>
    <button class="button button-full button-positive" ng-click="sendEmail()">
      Send mail
    </button>
    <br><br>
    <ion-scroll direction="x" style="height:200px; min-height: 200px; overflow: scroll; white-space: nowrap;">
      <img ng-repeat="image in images" ng-src={{urlForImage(image)}} style="height:200px; padding: 5px 5px 5px 5px;"/>
    </ion-scroll>
  </ion-conten>
</body>
Nothing special, we just got 2 buttons for adding an image and sending out an email. Additional, we got a interesting ion-scroll directive, in which our images will be displayed. By adding some custom styling here we can achieve a cool horizontal scrollview for images! If you want to add actions for opening those images in a something like a lightbox, take a look at my tutorial about How to show images fullscreen in a cool way.
Adding our image and file service
The (even more) interesting part of this tutorial starts now. To persist our captured media objects, we will have to store a reference to the file. Therefore we will use the localStorage to store a JSON array of file references. To safe and retrieve the information, we use some JSON parsing, but nothing you have to worry about. Open the blank services.js and insert this:
angular.module('starter')

.factory('FileService', function() {
  var images;
  var IMAGE_STORAGE_KEY = 'images';

  function getImages() {
    var img = window.localStorage.getItem(IMAGE_STORAGE_KEY);
    if (img) {
      images = JSON.parse(img);
    } else {
      images = [];
    }
    return images;
  };

  function addImage(img) {
    images.push(img);
    window.localStorage.setItem(IMAGE_STORAGE_KEY, JSON.stringify(images));
  };

  return {
    storeImage: addImage,
    images: getImages
  }
})
So our FileService can store an image reference and also retrieve all stored images from the storage. If you inspect the stored array, you can see something like this:  That’s enough for persisting our images across app starts. Next we add a service for our complete image functionality. You might know some of the code from my previous image tutorial, but for this one I optimised the code, reduced it by many lines and moved everything to a clean service so you can use it in your next project!
So append this to your services.js file:
.factory('ImageService', function($cordovaCamera, FileService, $q, $cordovaFile) {

  function makeid() {
    var text = '';
    var possible = 'ABCDEFGHIJKLMNOPQRSTUVWXYZabcdefghijklmnopqrstuvwxyz0123456789';

    for (var i = 0; i < 5; i++) {
      text += possible.charAt(Math.floor(Math.random() * possible.length));
    }
    return text;
  };

  function optionsForType(type) {
    var source;
    switch (type) {
      case 0:
        source = Camera.PictureSourceType.CAMERA;
        break;
      case 1:
        source = Camera.PictureSourceType.PHOTOLIBRARY;
        break;
    }
    return {
      destinationType: Camera.DestinationType.FILE_URI,
      sourceType: source,
      allowEdit: false,
      encodingType: Camera.EncodingType.JPEG,
      popoverOptions: CameraPopoverOptions,
      saveToPhotoAlbum: false
    };
  }

  function saveMedia(type) {
    return $q(function(resolve, reject) {
      var options = optionsForType(type);

      $cordovaCamera.getPicture(options).then(function(imageUrl) {
        var name = imageUrl.substr(imageUrl.lastIndexOf('/') + 1);
        var namePath = imageUrl.substr(0, imageUrl.lastIndexOf('/') + 1);
        var newName = makeid() + name;
        $cordovaFile.copyFile(namePath, name, cordova.file.dataDirectory, newName)
          .then(function(info) {
            FileService.storeImage(newName);
            resolve();
          }, function(e) {
            reject();
          });
      });
    })
  }
  return {
    handleMediaDialog: saveMedia
  }
});
Our ImageService offers exactly 1 function we can call from our controller, so this makes this service really easy to use! When we call the handleMediaDialog function, we will receive a promise. Our service will then open the photo library or the camera, based on the type we pass to the function. The other parameters we receive from optionsForType(type) are standard, but you can experiment with them of course if you need different settings.
When we receive the media link from the cordovaCamera, we gather some substring and use the cordovaFile wrapper to move our image into our app folder. This is the part where I removed some lines which I had previously, but this wrapper makes it just too easy! Additional I add a random string to the filename by calling makeid just to make sure our file has a unique name inside our folder.
If the copy function finishes successful, we finally call FileService.storeImage(newName); which uses our FileService to add the new filename to our existing array of media names. At this point the image lies inside our app folder, we have a stored reference and can happily resolve our promise!
Connect everything with our ImageController
We got a simple view, a very clean service structure and the last thing missing is the controller to wire up everything we just coded to a useful app!
The first important function is addMedia, which will call the Ionic Action Sheet. This is a very cool and also quite native way to offer the option to choose between taking an image or selecting a file from the photo library. If the user selects an option, the addImage function will be called with the selected type.
At this point we have almost nothing to do but hide the sheet and call our service with ImageService.handleMediaDialog(type), and if the promise gets fulfilled we refresh our scope to show the new image. All of our images will get their correct path from the urlForImage function, as the relative path to our app may change on the next app start! That’s why we just need to store the filename of the image.
To get all of our images on app start, we use the ionicPlatform.ready function, in which we call our FileService for all images we have (and have stored!) and apply those changes to show them almost immediately after startup.
Add all of the following code to your app.js:
angular.module('starter')

.controller('ImageController', function($scope, $cordovaDevice, $cordovaFile, $ionicPlatform, $cordovaEmailComposer, $ionicActionSheet, ImageService, FileService) {

  $ionicPlatform.ready(function() {
    $scope.images = FileService.images();
    $scope.$apply();
  });

  $scope.urlForImage = function(imageName) {
    var trueOrigin = cordova.file.dataDirectory + imageName;
    return trueOrigin;
  }

  $scope.addMedia = function() {
    $scope.hideSheet = $ionicActionSheet.show({
      buttons: [
        { text: 'Take photo' },
        { text: 'Photo from library' }
      ],
      titleText: 'Add images',
      cancelText: 'Cancel',
      buttonClicked: function(index) {
        $scope.addImage(index);
      }
    });
  }

  $scope.addImage = function(type) {
    $scope.hideSheet();
    ImageService.handleMediaDialog(type).then(function() {
      $scope.$apply();
    });
  }

  $scope.sendEmail = function() {
    if ($scope.images != null && $scope.images.length > 0) {
      var mailImages = [];
      var savedImages = $scope.images;
      if ($cordovaDevice.getPlatform() == 'Android') {
        // Currently only working for one image..
        var imageUrl = $scope.urlForImage(savedImages[0]);
        var name = imageUrl.substr(imageUrl.lastIndexOf('/') + 1);
        var namePath = imageUrl.substr(0, imageUrl.lastIndexOf('/') + 1);
        $cordovaFile.copyFile(namePath, name, cordova.file.externalRootDirectory, name)
        .then(function(info) {
          mailImages.push('' + cordova.file.externalRootDirectory + name);
          $scope.openMailComposer(mailImages);
        }, function(e) {
          reject();
        });
      } else {
        for (var i = 0; i < savedImages.length; i++) {
          mailImages.push('' + $scope.urlForImage(savedImages[i]));
        }
        $scope.openMailComposer(mailImages);
      }
    }
  }

  $scope.openMailComposer = function(attachments) {
    var bodyText = '<html><h2>My Images</h2></html>';
    var email = {
        to: 'some@email.com',
        attachments: attachments,
        subject: 'Devdactic Images',
        body: bodyText,
        isHtml: true
      };

    $cordovaEmailComposer.open(email).then(null, function() {
      for (var i = 0; i < attachments.length; i++) {
        var name = attachments[i].substr(attachments[i].lastIndexOf('/') + 1);
        $cordovaFile.removeFile(cordova.file.externalRootDirectory, name);
      }
    });
  }
});
You might have noticed the last part of this tutorial: The Email functionality. Our view calls the sendEmail function which could be very easy, but Android makes our life hard. As we want to put the stored files into the email, we need to pass the path to all of the files to the cordova plugin, but apparently Android won’t take the images from the apps folder.
That’s where I introduce a tiny hack: If we are on an Android device, we copy the file (temporary) to another folder of the device which can be accessed by the email plugin. As the copy process is async and the article is already long enough, I just implemented a solution for taking the first image and call the openMailComposer once this operation is finished. If you need to send out all images, implement a function to copy all the files and resolve a promise when it’s finished so we can call the composer. If you do this, please share your knowledge in the comments below!
The final Email chooser is just like in my adding local files as email attachments tutorial, the only addition is that we try to delete the files from the image array after sending the mail out. As this takes a different folder, our image files inside the app are safe on iOS and on Android as well! It’s maybe not the best solution, but it is a solution. If you think this is a bug, open a ticket on the Email Composer Cordova Plugin!
Conclusion
It’s not very hard to handle local image URLs with Ionic, but it can get challenging at some point. This tutorial offers a solution to take, store and send out images with iOS and Android.
See a video version of this article below.
If this tutorial was helpful, follow me on twitter @schlimmson and leave a comment/ tweet it! Make sure to subscribe to my mailing list to receive new posts and updates by mail!
So long, Simon