How to Capture and Store Images with Ionic Last update: 2014-12-09

From time to time you may want to capture images with your app, either from camera or from the users library. But just keeping a reference to it won’t help if the user deletes the images from hist photo library. Therefore, you need to store them local in your apps directory. I will make use of the ngCordova module, which is a simpler library from the ionic guys of the cordova stuff (great job btw @ionic).
For a even more detailed guide also check out my new Complete Guide To Images With Ionic
Set up your base app
We will integrate the image chooser and storing of the file in a simple app, so we start a new blank app. Then we install the ngCordova via bower(—save to persist the changes to our bower file) and finally add the stuff from the cordova library we need to capture images and store files. I also add the ios platform because I run it on my iPhone, as using the camera is hardly possible in the simulator or web ;)
ionic start devdactic-images blank
bower install --save ngCordova
cordova plugin add cordova-plugin-camera
cordova plugin add cordova-plugin-file
ionic platform add ios
If the installation of ngcordova asks for a suitable angular version, just take the newest one (angular#1.2.27 at this point). To make use of ngCordova, we need to include this in our index.html BEFORE the cordova.js!
<script src="lib/ngCordova/dist/ng-cordova.js"></script>Finally, our app.js should also load ngCodrova so add it after the standard ionic module:
angular.module('starter', ['ionic', 'ngCordova'])As the blank app has no controller, we simply replace everything inside body with:
<ion-view class="has-header padding" ng-controller="imageController">
	<button class="button button-energized" ng-click="addImage()">Add image</button><br /><br />
	<ion-scroll>
		<img ng-repeat="image in images" ng-src="{{urlForImage(image)}}" height="200px" />
	</ion-scroll>
</ion-view>
and for the controller in the app.js add:
.controller('imageController', function($scope, $cordovaCamera, $cordovaFile) {
    $scope.images = [];

    $scope.addImage = function() {
        console.log('add image');
    }

    $scope.urlForImage = function(imageName) {
        console.log('get correct path for image');
    }
});
Adding the camera function
Currently, the app can’t do anything special but display a button. We will add the image functionality, so insert in addImage these lines:
// 1
$scope.images = [];

$scope.addImage = function() {
	// 2
	var options = {
		destinationType : Camera.DestinationType.FILE_URI,
		sourceType : Camera.PictureSourceType.CAMERA, // Camera.PictureSourceType.PHOTOLIBRARY
		allowEdit : false,
		encodingType: Camera.EncodingType.JPEG,
		popoverOptions: CameraPopoverOptions,
	};

	// 3
	$cordovaCamera.getPicture(options).then(function(imageData) {

		// 4
		onImageSuccess(imageData);

		function onImageSuccess(fileURI) {
			createFileEntry(fileURI);
		}

		function createFileEntry(fileURI) {
			window.resolveLocalFileSystemURL(fileURI, copyFile, fail);
		}

		// 5
		function copyFile(fileEntry) {
			var name = fileEntry.fullPath.substr(fileEntry.fullPath.lastIndexOf('/') + 1);
			var newName = makeid() + name;

			window.resolveLocalFileSystemURL(cordova.file.dataDirectory, function(fileSystem2) {
				fileEntry.copyTo(
					fileSystem2,
					newName,
					onCopySuccess,
					fail
				);
			},
			fail);
		}

		// 6
		function onCopySuccess(entry) {
			$scope.$apply(function () {
				$scope.images.push(entry.nativeURL);
			});
		}

		function fail(error) {
			console.log("fail: " + error.code);
		}

		function makeid() {
			var text = "";
			var possible = "ABCDEFGHIJKLMNOPQRSTUVWXYZabcdefghijklmnopqrstuvwxyz0123456789";

			for (var i=0; i < 5; i++) {
				text += possible.charAt(Math.floor(Math.random() * possible.length));
			}
			return text;
		}

	}, function(err) {
		console.log(err);
	});
}
Ok, that is quite a lot code. Lets step through it.
- 1. The scope array is used for our ng-repeat to store the links to the images.
- 2. The options array is passed to the cordovaCamera with specific options. For more options see the official docs for cordova camera.
- 3. Call the ngCodrova module cordovaCamera we injected to our controller.
- 4. When the image capture returns data, we pass the information to our success function, which will call some other functions to copy the original image to our app folder.
- 5. This function copies the original file to our app directory. As we might have to deal with duplicate images, we give a new name to the file consisting of a random string and the original name of the image.
- 6. If the copy task finishes successful, we push the image url to our scope array of images. Make sure to use the
apply()function to update the scope and view!
The last part is to get the correct image url. In this case we have no problem, as we only store the images in scope, but if you store the URLs in like localStorage, the URL will be wrong when you close the app and start again. This happens due to the sandbox folder in which the app exists. Therefore you should use this method to always get the correct image path:
$scope.urlForImage = function(imageName) {
  var name = imageName.substr(imageName.lastIndexOf('/') + 1);
  var trueOrigin = cordova.file.dataDirectory + name;
  return trueOrigin;
}
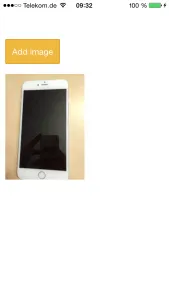
Here we make again use of cordova.file.dataDirectory which will give us the path to the data directory of our application. Now you can run the app on your device, capture a image and see a tiny image. Your result should look like this: 
If you want to have a cooler presentation of your images, also check out my tutorial on How To Display Images and Videos with Ionic Really Cool!
You can find the complete source for this tutorial on github!
If you like this tutorial, follow me on twitter @schlimmson and leave a comment/ tweet it! Don’t forget to subscribe to my newsletter to receive new posts and infos via mail!
So long, Saimon
