Flutter Authentication with Appwrite Last update: 2023-04-25
Flutter Authentication with Appwrite
In this tutorial, we will build a simple Flutter app with authentication using Appwrite and Provider for state management. We will use the Appwrite Flutter SDK to communicate with Appwrite and the Provider package to manage our app’s state.
This tutorial is also sponsored by Appwrite!
Instead of setting up our own Appwrite backend server, we will use Appwrite cloud this time which makes the process of connecting your Flutter app to a backend with user authenticaiton even faster.
After going through this tutorial you will be able to:
- Setup Appwrite Cloud
- Create a Flutter project with Apwwrite SDK
- Manage App State and Authentication
- Build a UI for login, registration and protected inside area
- Work with Appwrite roles and permissions
- Load data from Appwrite database
- Update user preferences on Appwrite
You can als find the full source code for this tutorial on GitHub.
Setting up Appwrite Cloud
What is Appwrite?
Appwrite is an open-source backend server for web, mobile, and Flutter developers that is packaged as a set of Docker containers for easy deployment.
It comes with a secure set of easy-to-use APIs to perform common tasks related to user accounts, databases, storage, files, images, functions, and much more.
But the latest addition of Appwrite Cloud allows us to skip the setup and just create a project in the browser!
Creating a new Appwrite Cloud project
Get started by creating an Appwrite cloud account and then create a new project in your organization.
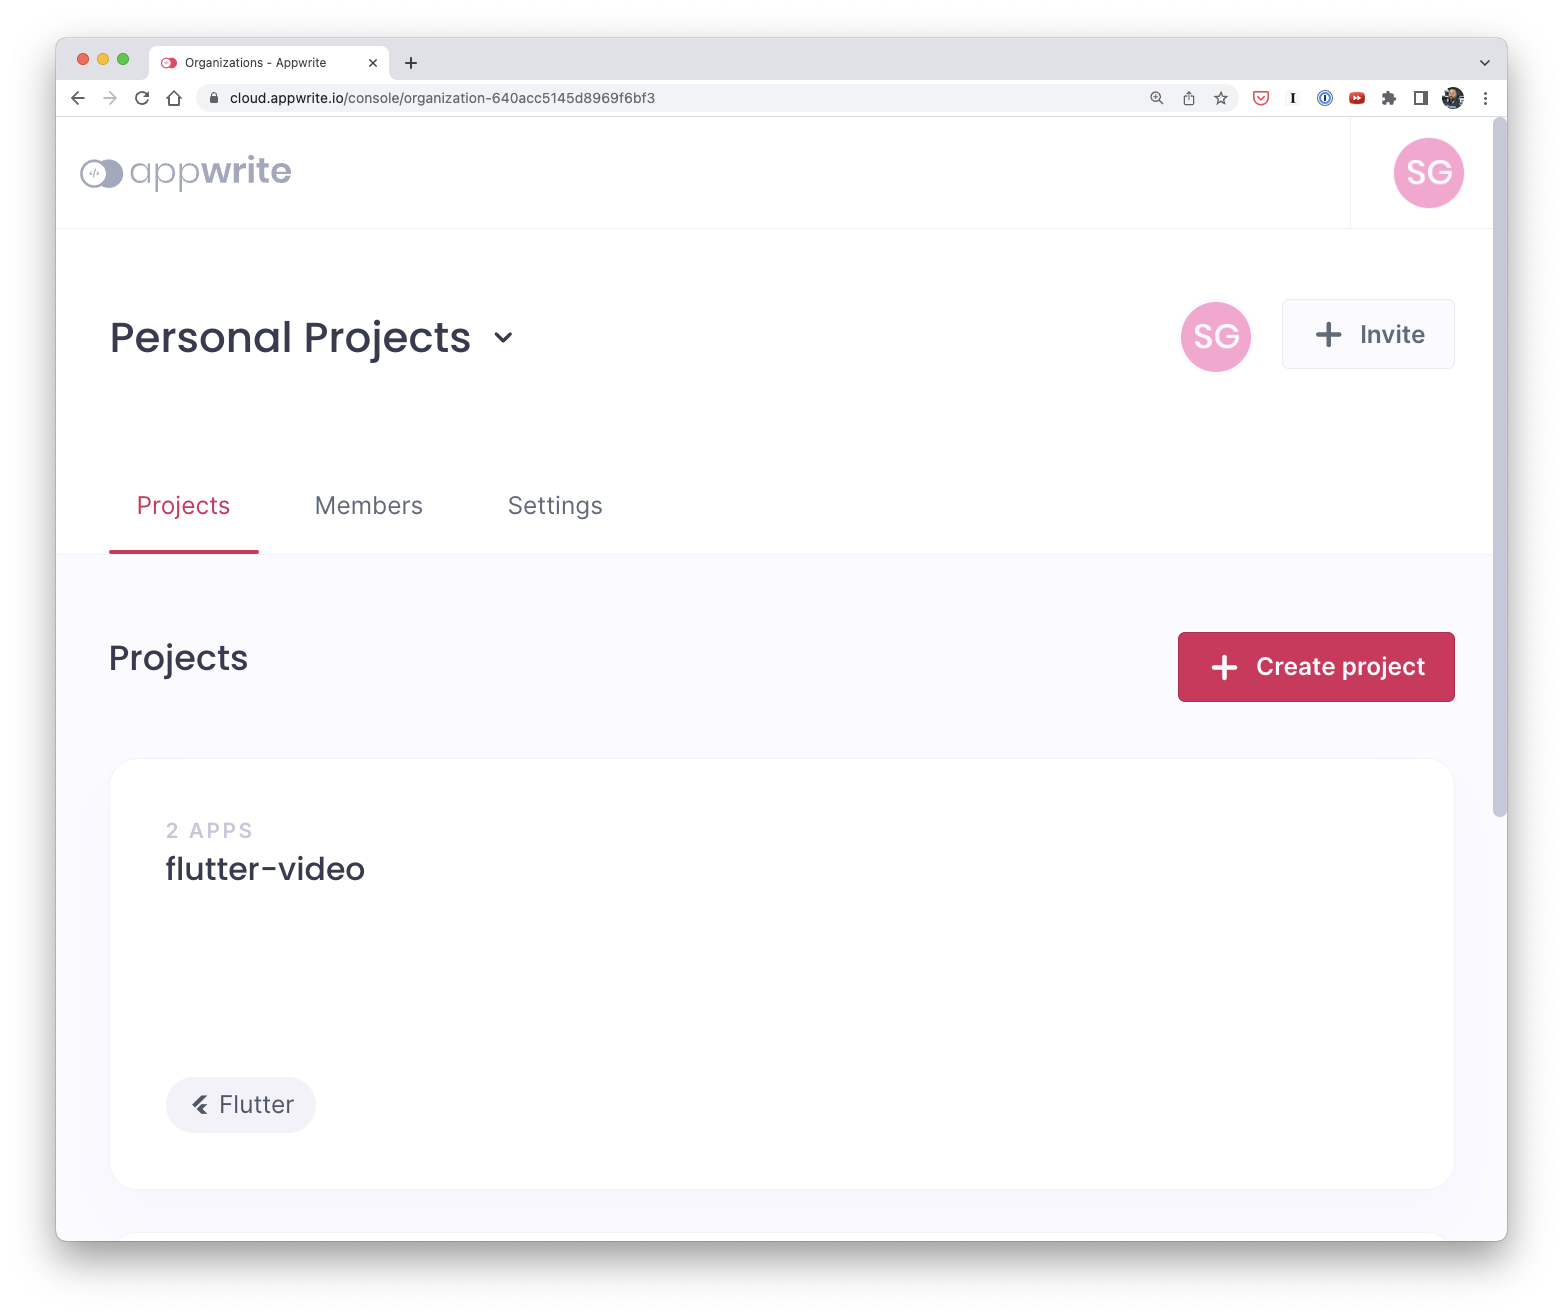
This also means you can have different projects (with different databases) inside one Appwrite server!
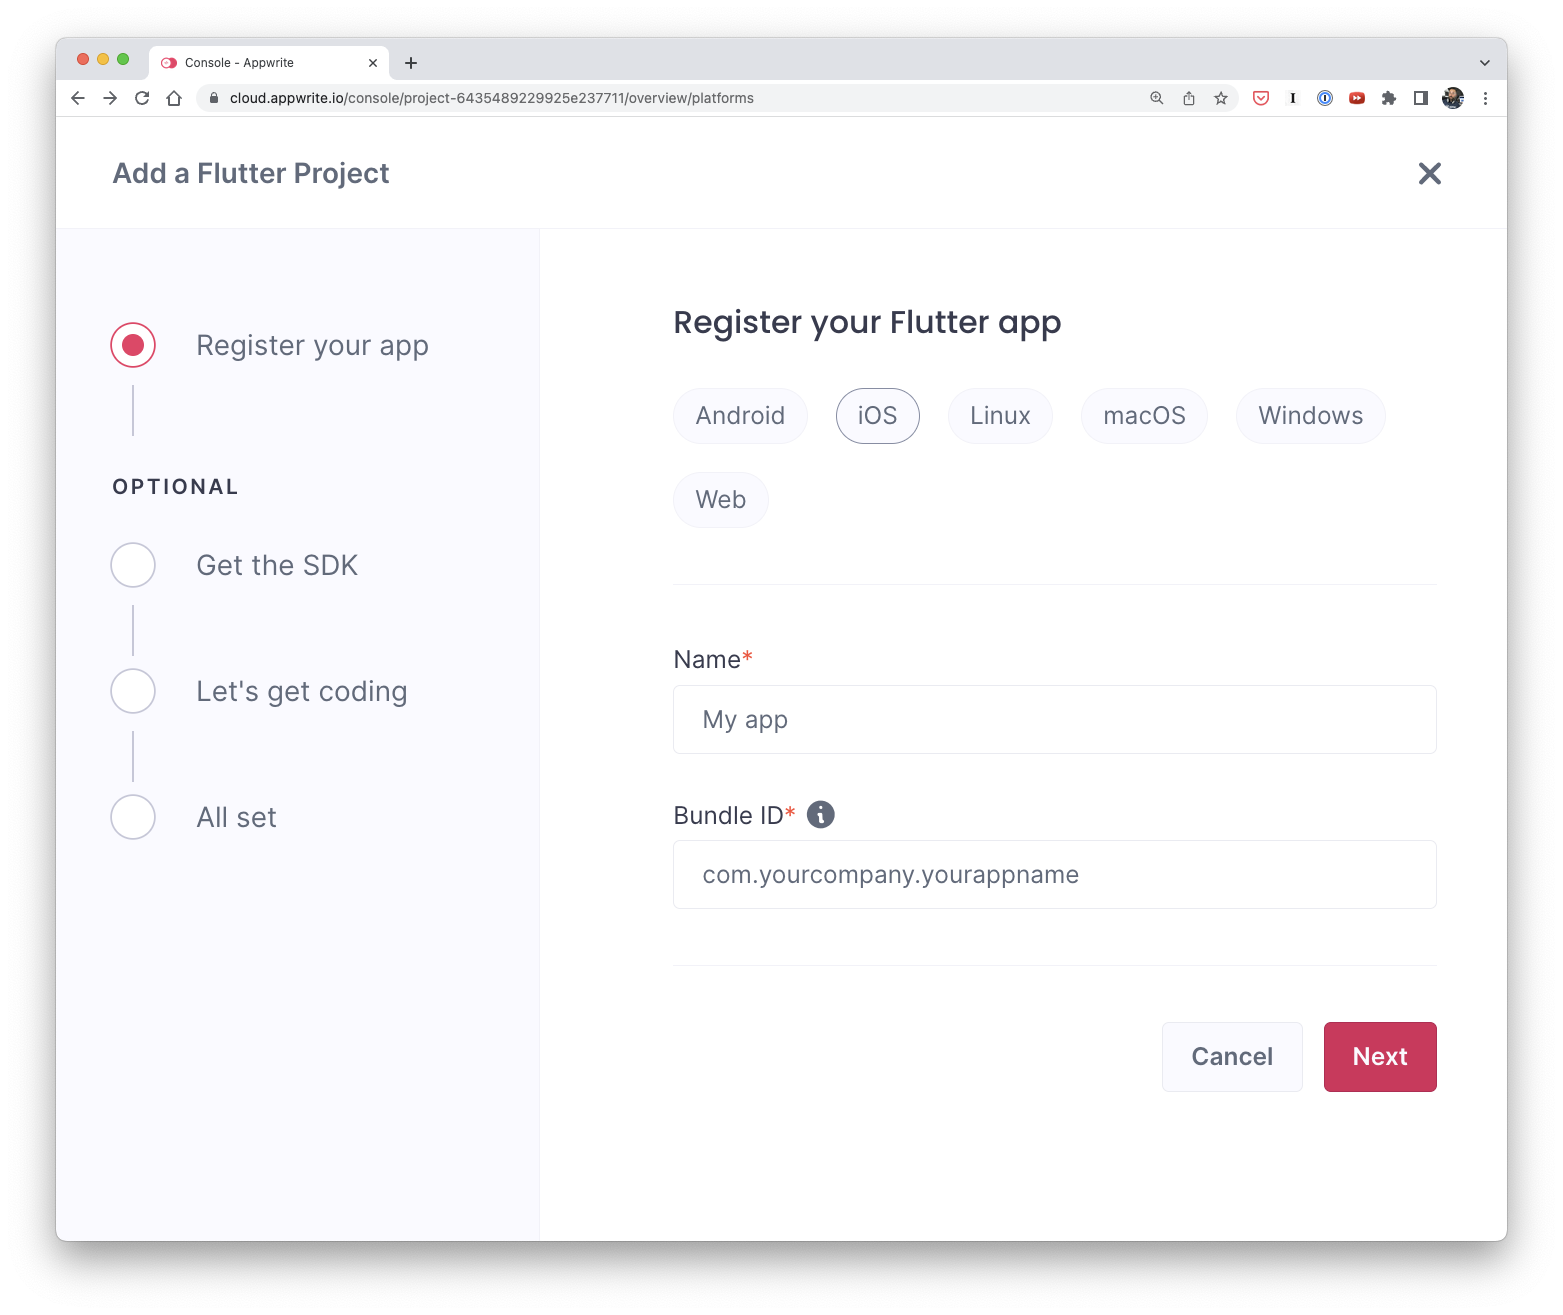
To later connect our Flutter app to Appwrite we now also need to click on Add Platform inside the home screen of our new project, and then add your apps bundle ID for a Flutter iOS and Andropid app.
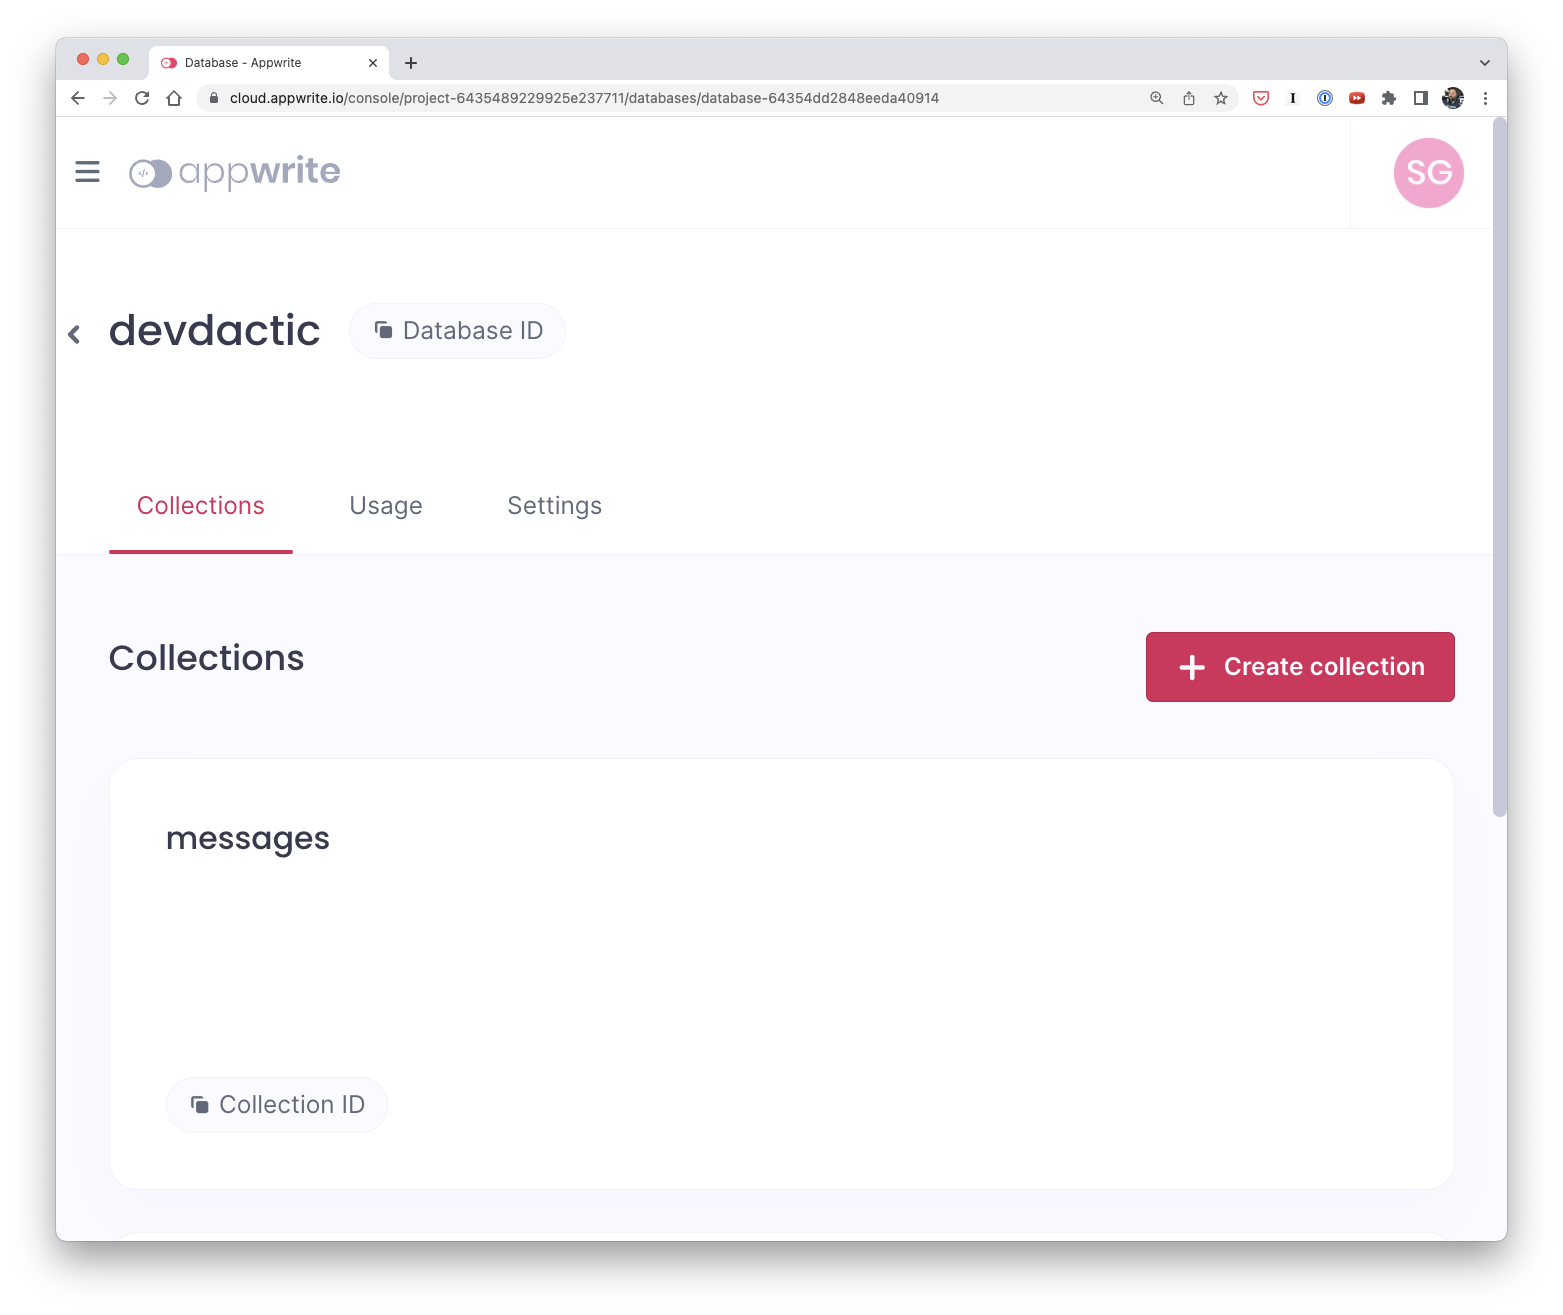
User authentication is already enabled by default, but we can now also add database and within that database a new collection that we call “messages”.
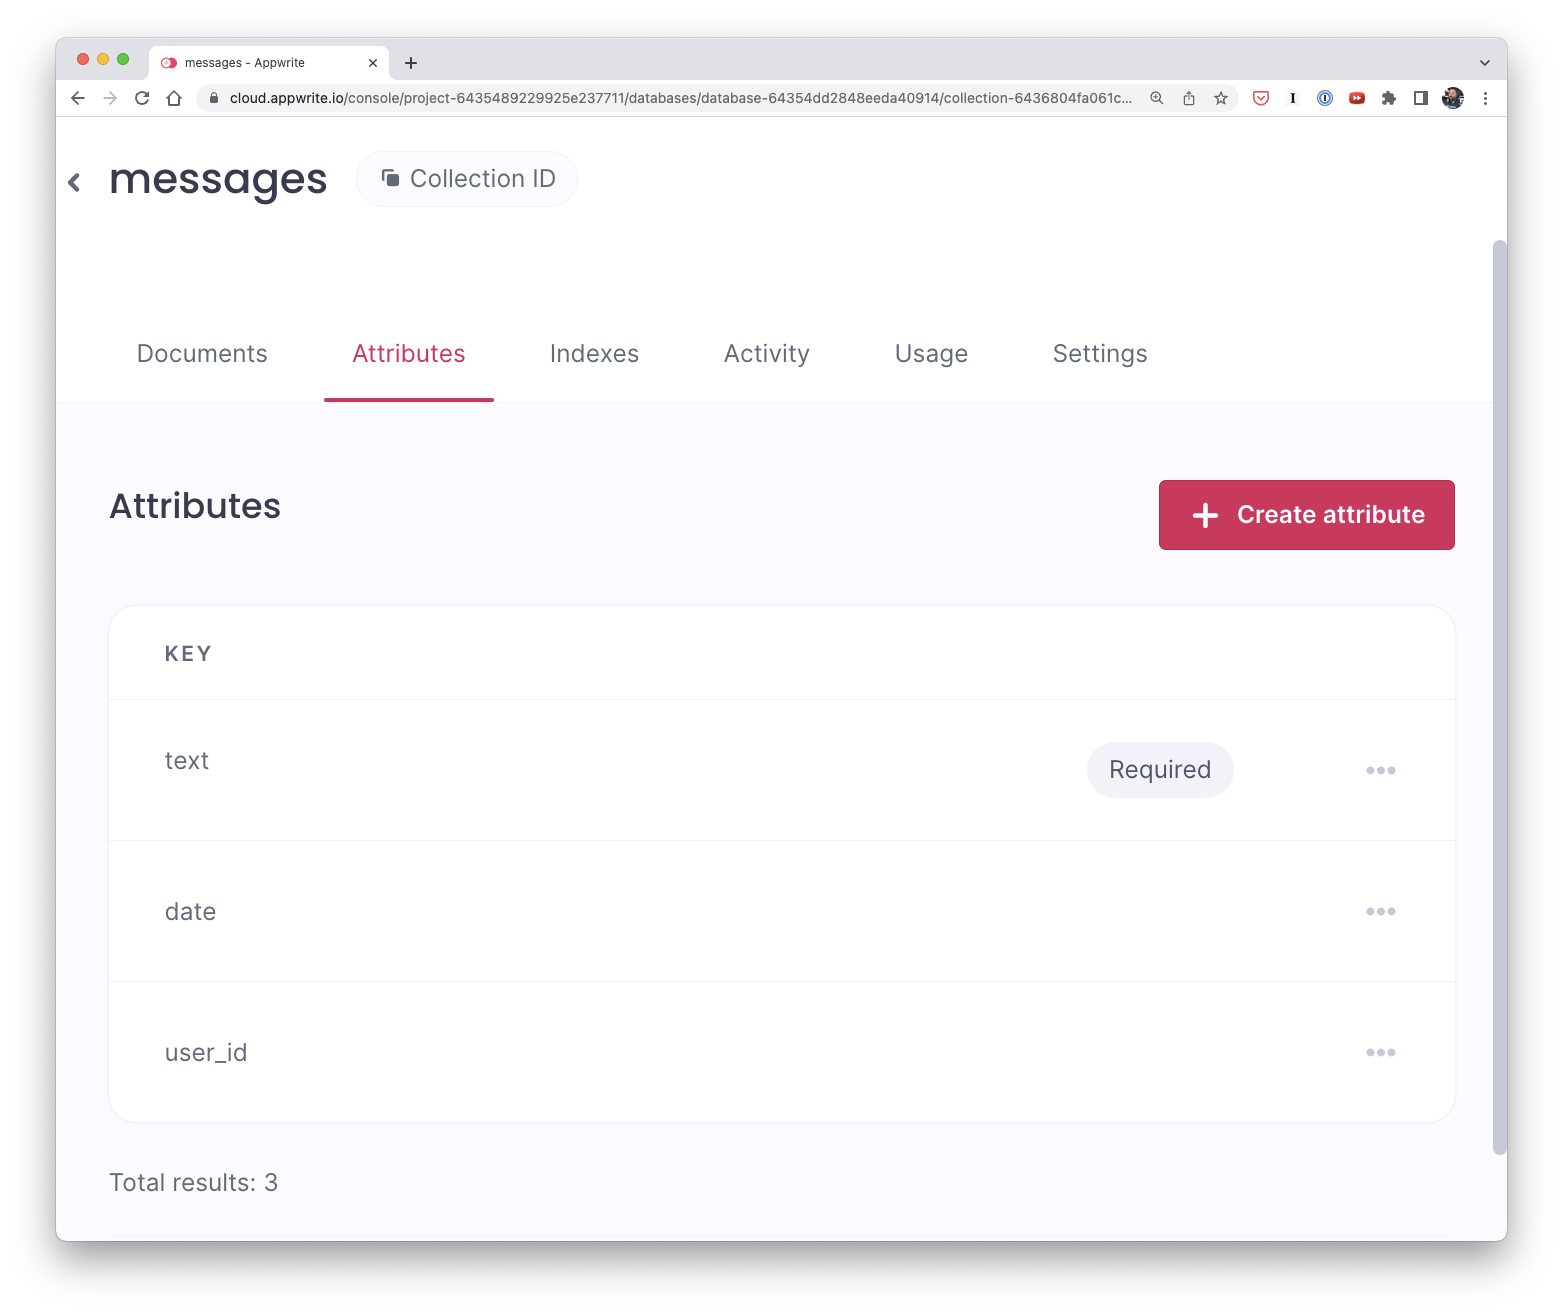
In our new collection we can now define attributes for the future documents, so let’s add a text, user_id and date attribute:
Finally we will add permissions to our collection so that only authenticated users can read and write to our collection, and any other user can only read the messages.
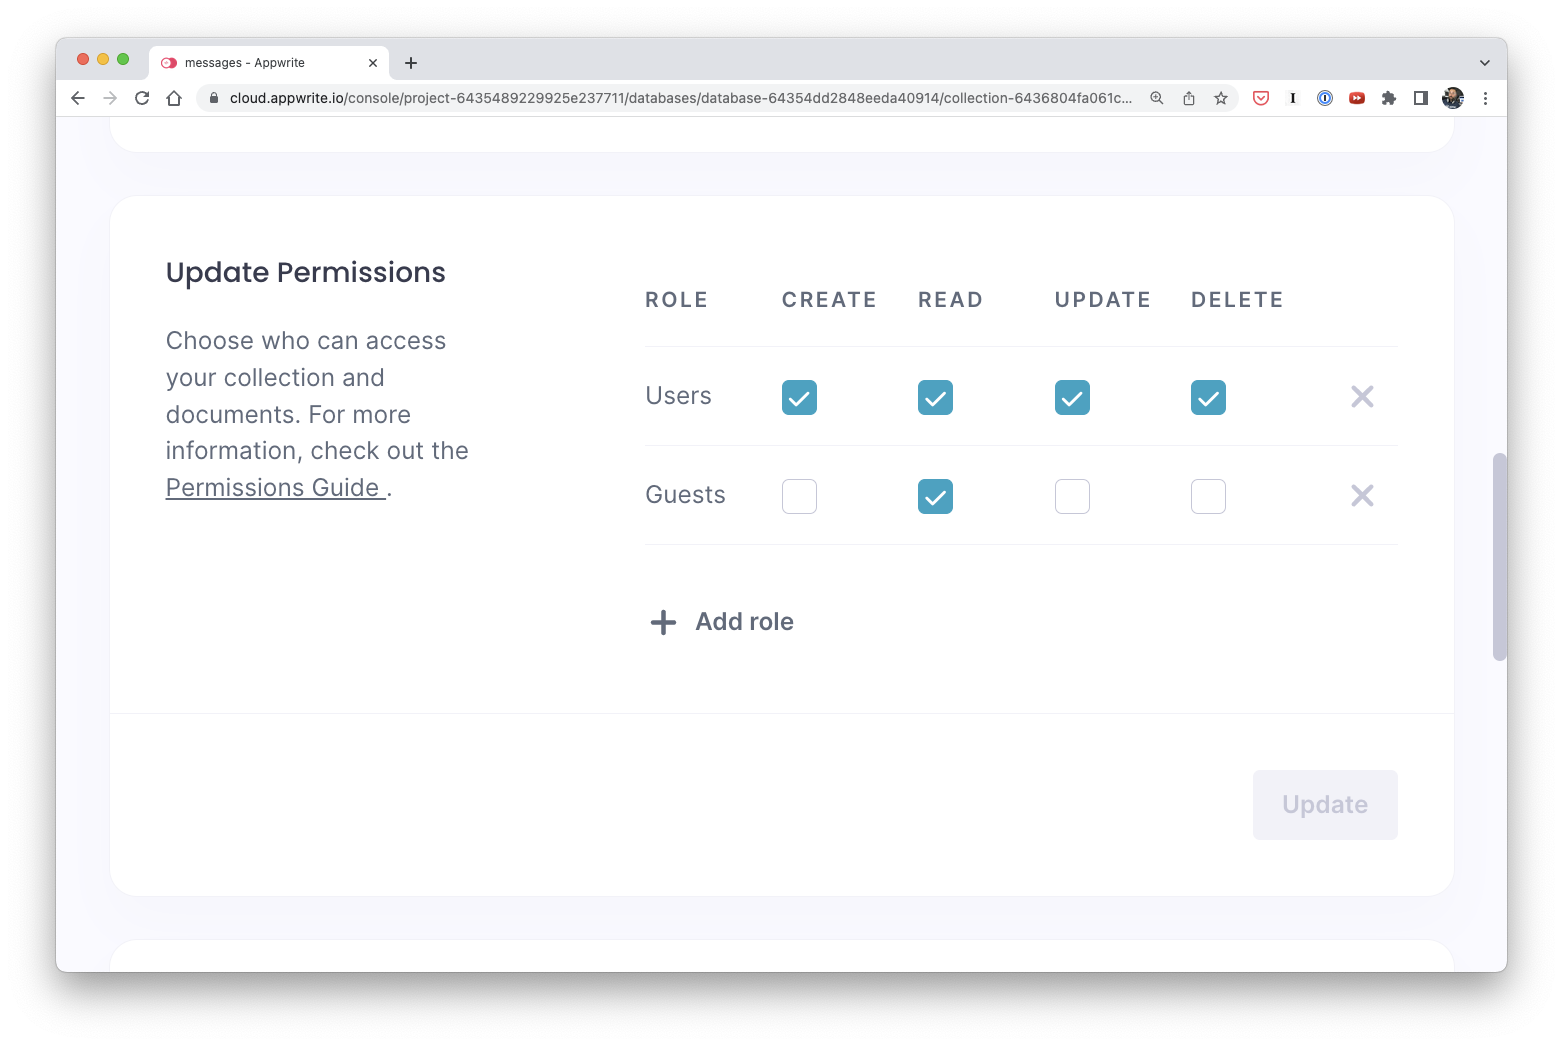
There are actually 3 roles that we can use for permissions:
- Any - Anyone using our app
- Guest - Users with an anonymous session
- User - Actually signed up users
We will later see how to handle these roles in our Flutter app. For now we can just click on Save and then move into our Flutter authentication app.
Setting up Flutter Authentication App
Create a new Flutter project
We will use the Flutter CLI to create a new Flutter project and then add the Appwrite SDK and other dependencies.
In our case we also need to add the flutter_svg package to load SVG assets, and the provider package to manage our app state.
By passing in the org parameter we can also set the bundle ID for our Flutter app - this makes it easier to connect it to Appwrite (if you haven’t done already):
flutter create --org com.devdactic appwrite_app
cd ./appwrite_app

flutter pub add appwrite
flutter pub add flutter_svg
flutter pub add provider
Next we need to add the assets we want to use to the pubspec.yaml file:
assets:
  - assets/google_icon.svg
  - assets/apple_icon.svg
  - assets/github_icon.svg
  - assets/twitter_icon.svg
You can grab them from the GitHub repo or just use your own.
Add Appwrite Flutter SDK
The Appwrite Flutter SDK is available on pub.dev, and we need some IDs from our Appwrite project to connect our Flutter app to Appwrite.
We can find the Project ID and Database ID in the Settings tab of our Appwrite project, or we can usually find a quick copy button at the top.
All of these IDs go to our lib/constants/constants.dart now:
const String APPWRITE_PROJECT_ID = "";
const String APPWRITE_DATABASE_ID = "";
const String APPWRITE_URL = "https://cloud.appwrite.io/v1";
const String COLLECTION_MESSAGES = "";
If you self host Appwrite, of course use that URL!
Manage App State and Authentication
We will use the provider package to manage our app state and authentication - this is a very common pattern in Flutter apps.
Now create a new lib/appwrite/auth_api.dart file that will handle all of our authentication logic and keep the state of our user from Appwrite.
The important part of the AuthAPI class is that it extends ChangeNotifier:
The ChangeNotifier class is part of the provider package and allows us to listen to changes in our app state and update our UI accordingly.
We can simply trigger a notifyListeners() method to notify all listeners that the state has changed - and we just need to provide the class to our app later.
Additionally we will use the appwrite package to connect to Appwrite and manage our user.
Now go ahead with the lib/appwrite/auth_api.dart and insert:
import 'package:appwrite/appwrite.dart';
import 'package:appwrite/models.dart';
import 'package:appwrite_app/constants/constants.dart';
import 'package:flutter/widgets.dart';

enum AuthStatus {
  uninitialized,
  authenticated,
  unauthenticated,
}

class AuthAPI extends ChangeNotifier {
  Client client = Client();
  late final Account account;

  late User _currentUser;

  AuthStatus _status = AuthStatus.uninitialized;

  // Getter methods
  User get currentUser => _currentUser;
  AuthStatus get status => _status;
  String? get username => _currentUser?.name;
  String? get email => _currentUser?.email;
  String? get userid => _currentUser?.$id;

  // Constructor
  AuthAPI() {
    init();
    loadUser();
  }

  // Initialize the Appwrite client
  init() {
    client
        .setEndpoint(APPWRITE_URL)
        .setProject(APPWRITE_PROJECT_ID)
        .setSelfSigned();
    account = Account(client);
  }

  loadUser() async {
    try {
      final user = await account.get();
      _status = AuthStatus.authenticated;
      _currentUser = user;
    } catch (e) {
      _status = AuthStatus.unauthenticated;
    } finally {
      notifyListeners();
    }
  }

  Future<User> createUser(
      {required String email, required String password}) async {
    notifyListeners();

    try {
      final user = await account.create(
          userId: ID.unique(),
          email: email,
          password: password,
          name: 'Simon G');
      return user;
    } finally {
      notifyListeners();
    }
  }

  Future<Session> createEmailSession(
      {required String email, required String password}) async {
    notifyListeners();

    try {
      final session =
          await account.createEmailSession(email: email, password: password);
      _currentUser = await account.get();
      _status = AuthStatus.authenticated;
      return session;
    } finally {
      notifyListeners();
    }
  }

  signInWithProvider({required String provider}) async {
    try {
      final session = await account.createOAuth2Session(provider: provider);
      _currentUser = await account.get();
      _status = AuthStatus.authenticated;
      return session;
    } finally {
      notifyListeners();
    }
  }

  signOut() async {
    try {
      await account.deleteSession(sessionId: 'current');
      _status = AuthStatus.unauthenticated;
    } finally {
      notifyListeners();
    }
  }

  Future<Preferences> getUserPreferences() async {
    return await account.getPrefs();
  }

  updatePreferences({required String bio}) async {
    return account.updatePrefs(prefs: {'bio': bio});
  }
}
At the end we also add some wrapper to update the Appwrite preferences of a user - we will see how once we are signed in.
Now we have a class that can handle all of our authentication logic and keep track of our user.
We can now use this class in our app by wrapping our app with a ChangeNotifierProvider.
Building the UI
Setting up the ChangeNotifier
The key to Flutter authentication is to use a ChangeNotifier to keep track of the state of our user.
We can then use the ChangeNotifierProvider to wrap our app and provide the AuthAPI class to all of our widgets.
By doing this, we can use the context.watch method to listen to changes in our app state and update our UI accordingly whenever the state changes.
To make this page work you can also create all of our missing pages and create a statefull widget as a placeholder:
- lib/pages/login_page.dart
- lib/pages/register_page.dart
- lib/pages/tabs_page.dart
- lib/pages/account_page.dart
- lib/pages/messages_page.dart
Now we can go ahead and update our lib/main.dart file and insert:
import 'package:appwrite_app/appwrite/auth_api.dart';
import 'package:appwrite_app/pages/login_page.dart';
import 'package:appwrite_app/pages/tabs_page.dart';
import 'package:flutter/material.dart';
import 'package:provider/provider.dart';
void main() {
runApp(
ChangeNotifierProvider(
create: (context) => AuthAPI(),
child: const MyApp(),
),
);
}
class MyApp extends StatelessWidget {
const MyApp({super.key});
Widget build(BuildContext context) {
final value = context.watch<AuthAPI>().status;
print('TOP CHANGE Value changed to: $value!');
return MaterialApp(
title: 'Appwrite Auth Demo',
debugShowCheckedModeBanner: false,
home: value == AuthStatus.uninitialized
? const Scaffold(
body: Center(child: CircularProgressIndicator()),
)
: value == AuthStatus.authenticated
? const TabsPage()
: const LoginPage(),
theme: ThemeData(
colorScheme: ColorScheme.fromSwatch().copyWith(
primary: const Color(0xFFE91052),
),
));
}
}It’s important to use the AuthAPI from the context.watch method to make sure that our UI is updated whenever the state changes, and not create a new instance of it.
We will use this pattern across our app to make sure the state is consistent.
When the state changes now, we show the inside area (Tabs page) and otherwise the outside area, or a loading indicator if the app is still initializing.
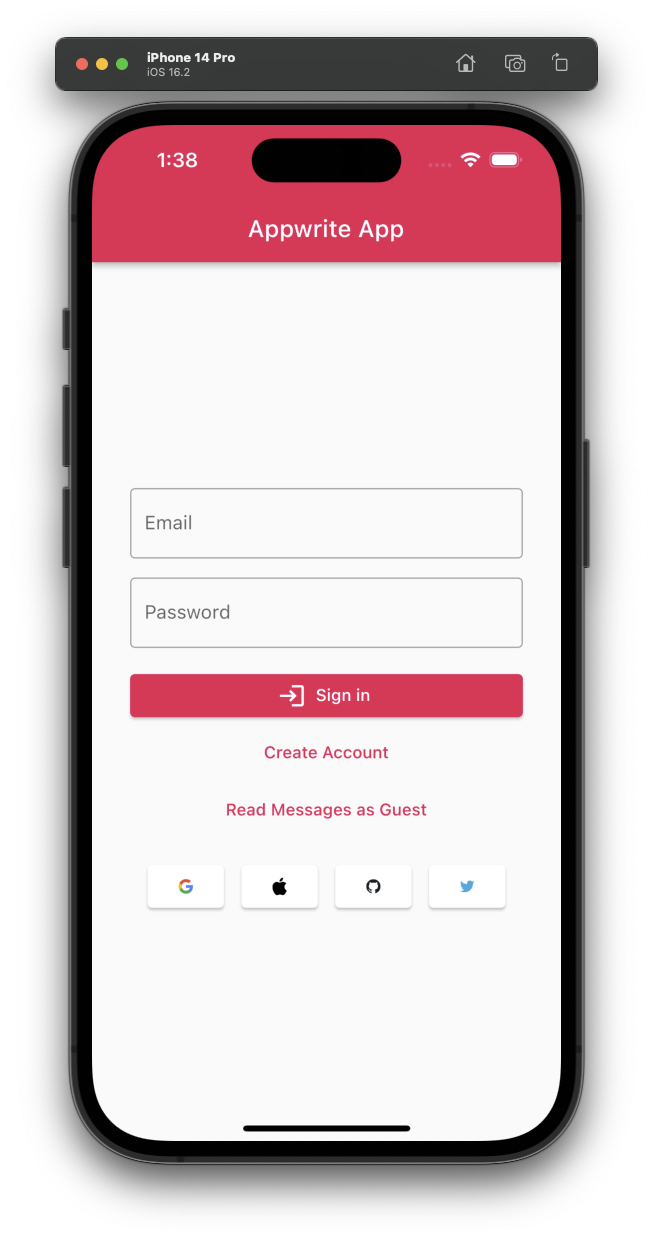
Creating the Login Screen
So far our login does not do anything, so let’s add some logic to it.
This page will mostly make use of the AuthAPI class we created earlier, and use the Navigator to navigate to the register or messages page.
We also add some buttons for social authentication - check out the video version of this article to see how quickly we can add e.g. GitHub authentication to our app with Appwrite!
For now bring upn the lib/pages/login_page.dart and change it to:
import 'package:appwrite/appwrite.dart';
import 'package:appwrite_app/appwrite/auth_api.dart';
import 'package:appwrite_app/pages/messages_page.dart';
import 'package:appwrite_app/pages/register_page.dart';
import 'package:flutter/material.dart';
import 'package:flutter_svg/flutter_svg.dart';
import 'package:provider/provider.dart';
class LoginPage extends StatefulWidget {
const LoginPage({Key? key}) : super(key: key);
_LoginPageState createState() => _LoginPageState();
}
class _LoginPageState extends State<LoginPage> {
final emailTextController = TextEditingController();
final passwordTextController = TextEditingController();
bool loading = false;
signIn() async {
showDialog(
context: context,
barrierDismissible: false,
builder: (BuildContext context) {
return Dialog(
backgroundColor: Colors.transparent,
child: Row(
mainAxisAlignment: MainAxisAlignment.spaceEvenly,
children: const [
CircularProgressIndicator(),
]),
);
});
try {
final AuthAPI appwrite = context.read<AuthAPI>();
await appwrite.createEmailSession(
email: emailTextController.text,
password: passwordTextController.text,
);
Navigator.pop(context);
} on AppwriteException catch (e) {
Navigator.pop(context);
showAlert(title: 'Login failed', text: e.message.toString());
}
}
showAlert({required String title, required String text}) {
showDialog(
context: context,
builder: (context) {
return AlertDialog(
title: Text(title),
content: Text(text),
actions: [
ElevatedButton(
onPressed: () {
Navigator.pop(context);
},
child: const Text('Ok'))
],
);
});
}
signInWithProvider(String provider) {
try {
context.read<AuthAPI>().signInWithProvider(provider: provider);
} on AppwriteException catch (e) {
showAlert(title: 'Login failed', text: e.message.toString());
}
}
Widget build(BuildContext context) {
return Scaffold(
appBar: AppBar(
title: const Text('Appwrite App'),
),
body: Center(
child: Padding(
padding: const EdgeInsets.all(32.0),
child: Column(
mainAxisAlignment: MainAxisAlignment.center,
crossAxisAlignment: CrossAxisAlignment.stretch,
children: [
TextField(
controller: emailTextController,
decoration: const InputDecoration(
labelText: 'Email',
border: OutlineInputBorder(),
),
),
const SizedBox(height: 16),
TextField(
controller: passwordTextController,
decoration: const InputDecoration(
labelText: 'Password',
border: OutlineInputBorder(),
),
obscureText: true,
),
const SizedBox(height: 16),
ElevatedButton.icon(
onPressed: () {
signIn();
},
icon: const Icon(Icons.login),
label: const Text("Sign in"),
),
TextButton(
onPressed: () {
Navigator.push(
context,
MaterialPageRoute(
builder: (context) => const RegisterPage()));
},
child: const Text('Create Account'),
),
TextButton(
onPressed: () {
Navigator.push(
context,
MaterialPageRoute(
builder: (context) => const MessagesPage()));
},
child: const Text('Read Messages as Guest'),
),
const SizedBox(height: 16),
Row(
mainAxisAlignment: MainAxisAlignment.spaceEvenly,
children: [
ElevatedButton(
onPressed: () => signInWithProvider('google'),
style: ElevatedButton.styleFrom(
foregroundColor: Colors.black,
backgroundColor: Colors.white),
child:
SvgPicture.asset('assets/google_icon.svg', width: 12),
),
ElevatedButton(
onPressed: () => signInWithProvider('apple'),
style: ElevatedButton.styleFrom(
foregroundColor: Colors.black,
backgroundColor: Colors.white),
child: SvgPicture.asset('assets/apple_icon.svg', width: 12),
),
ElevatedButton(
onPressed: () => signInWithProvider('github'),
style: ElevatedButton.styleFrom(
foregroundColor: Colors.black,
backgroundColor: Colors.white),
child:
SvgPicture.asset('assets/github_icon.svg', width: 12),
),
ElevatedButton(
onPressed: () => signInWithProvider('twitter'),
style: ElevatedButton.styleFrom(
foregroundColor: Colors.black,
backgroundColor: Colors.white),
child:
SvgPicture.asset('assets/twitter_icon.svg', width: 12),
)
],
),
],
),
),
),
);
}
}At this point you should already be able to run the app and try the login - but since we have no user yet it should fail.
Let’s build the registration screen now.
Creating the Register Screen
The register screen is very similar to the login screen, so we can reuse most of the code. The only difference is that we need to call the createUser method instead of createEmailSession.
Once the user ius created we show a success message and redirect the user to the login screen.
There’s nothing too fancy or state relevan in here, so continue with the lib/pages/register_page.dart:
import 'package:appwrite/appwrite.dart';
import 'package:appwrite_app/appwrite/auth_api.dart';
import 'package:flutter/material.dart';
import 'package:provider/provider.dart';
class RegisterPage extends StatefulWidget {
const RegisterPage({Key? key}) : super(key: key);
_RegisterPageState createState() => _RegisterPageState();
}
class _RegisterPageState extends State<RegisterPage> {
final emailTextController = TextEditingController();
final passwordTextController = TextEditingController();
createAccount() async {
showDialog(
context: context,
barrierDismissible: false,
builder: (BuildContext context) {
return Dialog(
backgroundColor: Colors.transparent,
child: Row(
mainAxisAlignment: MainAxisAlignment.spaceEvenly,
children: const [
CircularProgressIndicator(),
]),
);
});
try {
final AuthAPI appwrite = context.read<AuthAPI>();
await appwrite.createUser(
email: emailTextController.text,
password: passwordTextController.text,
);
Navigator.pop(context);
const snackbar = SnackBar(content: Text('Account created!'));
ScaffoldMessenger.of(context).showSnackBar(snackbar);
} on AppwriteException catch (e) {
Navigator.pop(context);
showAlert(title: 'Account creation failed', text: e.message.toString());
}
}
showAlert({required String title, required String text}) {
showDialog(
context: context,
builder: (context) {
return AlertDialog(
title: Text(title),
content: Text(text),
actions: [
ElevatedButton(
onPressed: () {
Navigator.pop(context);
},
child: const Text('Ok'))
],
);
});
}
Widget build(BuildContext context) {
return Scaffold(
appBar: AppBar(
title: const Text('Create your account'),
),
body: Center(
child: Padding(
padding: const EdgeInsets.all(32.0),
child: Column(
mainAxisAlignment: MainAxisAlignment.center,
crossAxisAlignment: CrossAxisAlignment.stretch,
children: [
TextField(
controller: emailTextController,
decoration: const InputDecoration(
labelText: 'Email',
border: OutlineInputBorder(),
),
),
const SizedBox(height: 16),
TextField(
controller: passwordTextController,
decoration: const InputDecoration(
labelText: 'Password',
border: OutlineInputBorder(),
),
obscureText: true,
),
const SizedBox(height: 16),
ElevatedButton.icon(
onPressed: () {
createAccount();
},
icon: const Icon(Icons.app_registration),
label: const Text('Sign up'),
),
],
),
),
),
);
}
}After creating a user you can now also check your Appwrite dashboard and see the new user:
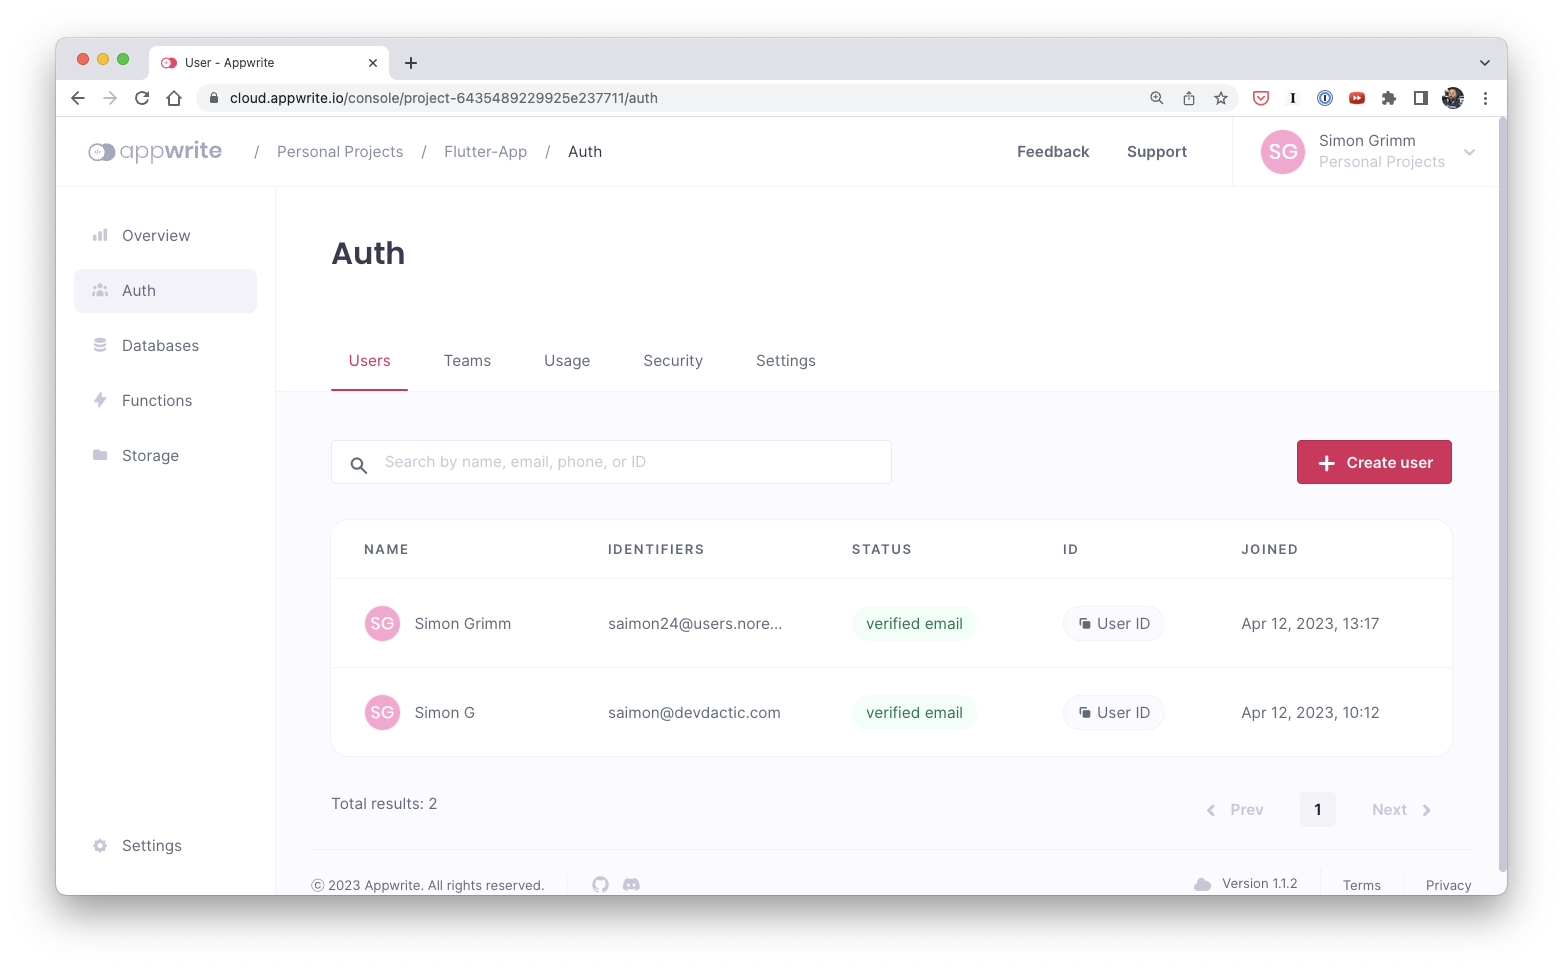
This also means your login will work with the new user - give it a try!
You should now have a fully working login and registration screen, and because we are watching the user state the widget tree is automatically updated and shows the inside area of our tabs instead after a successful login.
Building the Inside Area
Now that we are able to get to the tabs, let’s set up a simple BottomNavigationBar and add two tabs: one for the messages and one for the account.
Bring up the lib/pages/tabs_page.dart and change it to:
import 'package:appwrite_app/pages/account_page.dart';
import 'package:appwrite_app/pages/messages_page.dart';
import 'package:flutter/material.dart';
class TabsPage extends StatefulWidget {
const TabsPage({Key? key}) : super(key: key);
_TabsPageState createState() => _TabsPageState();
}
class _TabsPageState extends State<TabsPage> {
int _selectedIndex = 0;
static const _widgets = [MessagesPage(), AccountPage()];
void _onItemTapped(int index) {
setState(() {
_selectedIndex = index;
});
}
Widget build(BuildContext context) {
return Scaffold(
body: _widgets.elementAt(_selectedIndex),
bottomNavigationBar: BottomNavigationBar(
items: const [
BottomNavigationBarItem(
icon: Icon(Icons.message_outlined), label: "Messages"),
BottomNavigationBarItem(
icon: Icon(Icons.account_circle_outlined), label: "Account")
],
currentIndex: _selectedIndex,
onTap: _onItemTapped,
),
);
}
}Pretty much the standard way of doing tabs!
Update User Preferences
Before we get into the roles and database writes, let’s also use Appwrites Preferences API.
With this API we can store some user preferences like a bio or a profile picture. Let’s add a simple text field to the account page where the user can enter a bio and save it to the preferences now.
On top of that we will also add a logout button to the account page, and retrieve the current user information from our AuthAPI class.
Loading and saving preferences is pretty easy and works diorectly through our AuthAPI class. Let’s add the following code to the lib/pages/account_page.dart:
import 'package:flutter/material.dart';
import 'package:appwrite_app/appwrite/auth_api.dart';
import 'package:provider/provider.dart';
class AccountPage extends StatefulWidget {
const AccountPage({Key? key}) : super(key: key);
_AccountPageState createState() => _AccountPageState();
}
class _AccountPageState extends State<AccountPage> {
late String? email, username;
TextEditingController bioTextController = TextEditingController();
void initState() {
super.initState();
final AuthAPI appwrite = context.read<AuthAPI>();
email = appwrite.email;
username = appwrite.username;
appwrite.getUserPreferences().then((value) {
if (value.data.isNotEmpty) {
setState(() {
bioTextController.text = value.data['bio'];
});
}
});
}
signOut() {
final AuthAPI appwrite = context.read<AuthAPI>();
appwrite.signOut();
}
savePreferences() {
final AuthAPI appwrite = context.read<AuthAPI>();
appwrite.updatePreferences(bio: bioTextController.text);
const snackbar = SnackBar(content: Text('Preferences updated!'));
ScaffoldMessenger.of(context).showSnackBar(snackbar);
}
Widget build(BuildContext context) {
return Scaffold(
appBar: AppBar(
title: const Text('My Account'),
actions: [
IconButton(
icon: const Icon(Icons.logout),
onPressed: () {
signOut();
},
),
],
),
body: Center(
child: Padding(
padding: const EdgeInsets.all(32.0),
child: Column(
mainAxisAlignment: MainAxisAlignment.start,
crossAxisAlignment: CrossAxisAlignment.center,
children: [
Text('Welcome back $username!',
style: Theme.of(context).textTheme.headlineSmall),
Text('$email'),
const SizedBox(height: 40),
Card(
child: Padding(
padding: const EdgeInsets.all(16),
child: Column(children: [
TextField(
controller: bioTextController,
decoration: const InputDecoration(
labelText: 'Your Bio',
border: OutlineInputBorder(),
),
),
const SizedBox(height: 16),
TextButton(
onPressed: () => savePreferences(),
child: const Text('Save Preferences'),
),
]),
),
)
],
)),
));
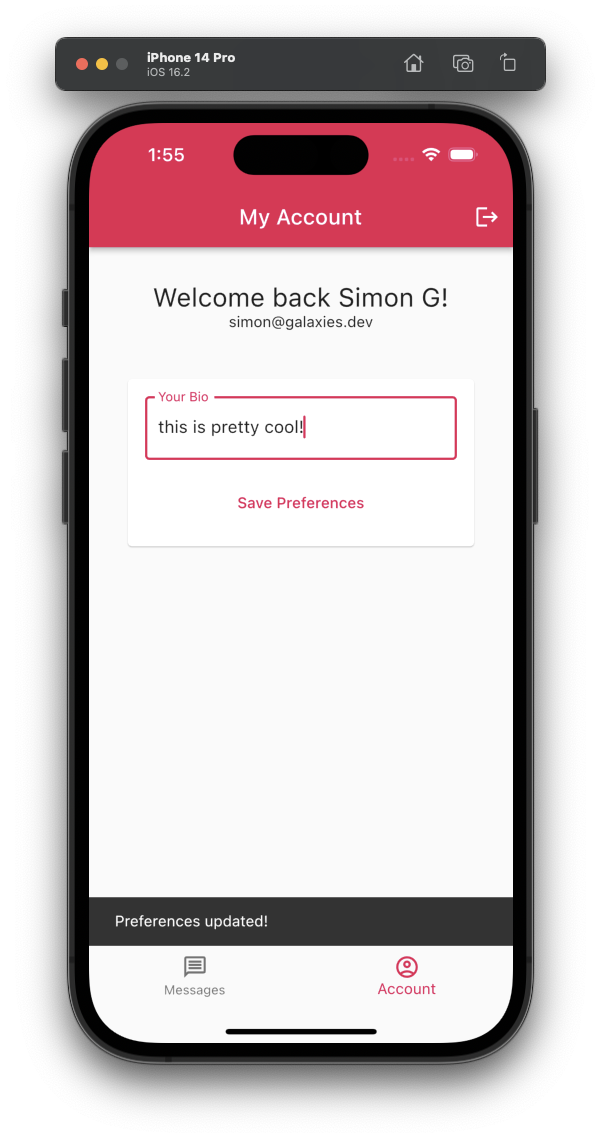
}
}When we enter the account page now, we will see the current user information and a text field where we can enter a bio. After saving the preferences we will see a snackbar at the bottom of the screen.
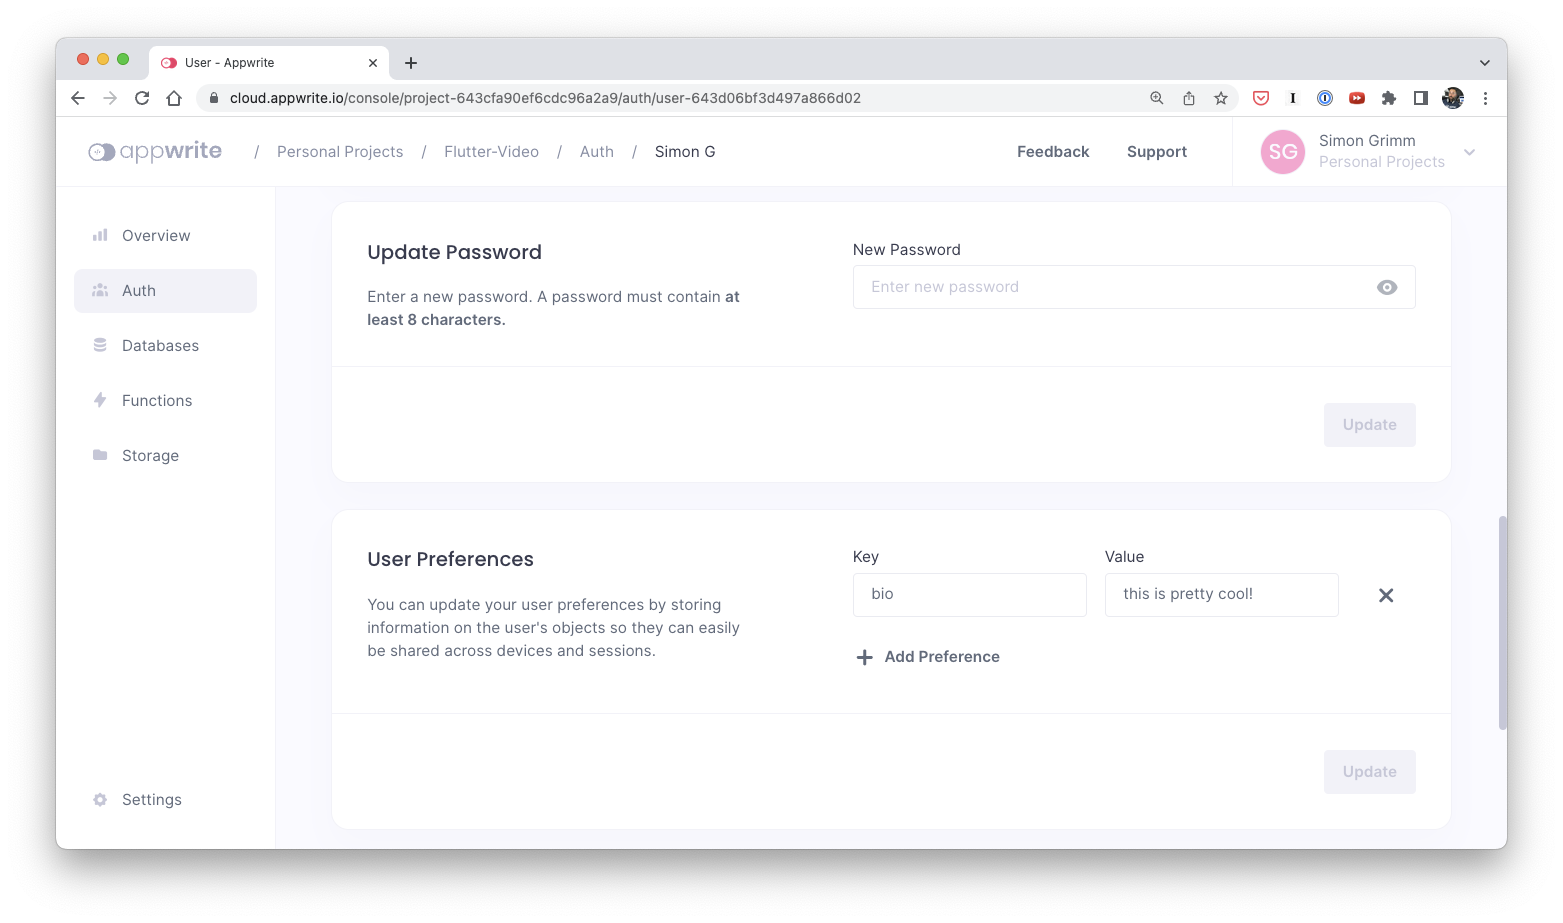
You can also reload your app, and the bio will still be there, because we are saving the preferences to the Appwrite user, where you can also find those settings:
Now let’s finally tackle our messages screen and show some data from our Appwrite database!
Working with the Appwrite Roles and the Database
Before we use our database we can create a class that will handle all the database related stuff.
We need to initialize the database client again, and then create the usual CRUD operations for the messages collection.
Let’s create a new file in the lib/appwrite folder called database_api.dart and add the following code:
import 'package:appwrite/appwrite.dart';
import 'package:appwrite/models.dart'
import 'package:appwrite_app/appwrite/auth_api.dart';
import 'package:appwrite_app/constants/constants.dart';

class DatabaseAPI {
  Client client = Client();
  late final Account account;
  late final Databases databases;
  final AuthAPI auth = AuthAPI();

  DatabaseAPI() {
    init();
  }

  init() {
    client
        .setEndpoint(APPWRITE_URL)
        .setProject(APPWRITE_PROJECT_ID)
        .setSelfSigned();
    account = Account(client);
    databases = Databases(client);
  }

  Future<DocumentList> getMessages() {
    return databases.listDocuments(
      databaseId: APPWRITE_DATABASE_ID,
      collectionId: COLLECTION_MESSAGES,
    );
  }

  Future<Document> addMessage({required String message}) {
    return databases.createDocument(
        databaseId: APPWRITE_DATABASE_ID,
        collectionId: COLLECTION_MESSAGES,
        documentId: ID.unique(),
        data: {
          'text': message,
          'date': DateTime.now().toString(),
          'user_id': auth.userid
        });
  }

  Future<dynamic> deleteMessage({required String id}) {
    return databases.deleteDocument(
        databaseId: APPWRITE_DATABASE_ID,
        collectionId: COLLECTION_MESSAGES,
        documentId: id);
  }
}
This should be enough, and we can now load, add and delete messages from our database.
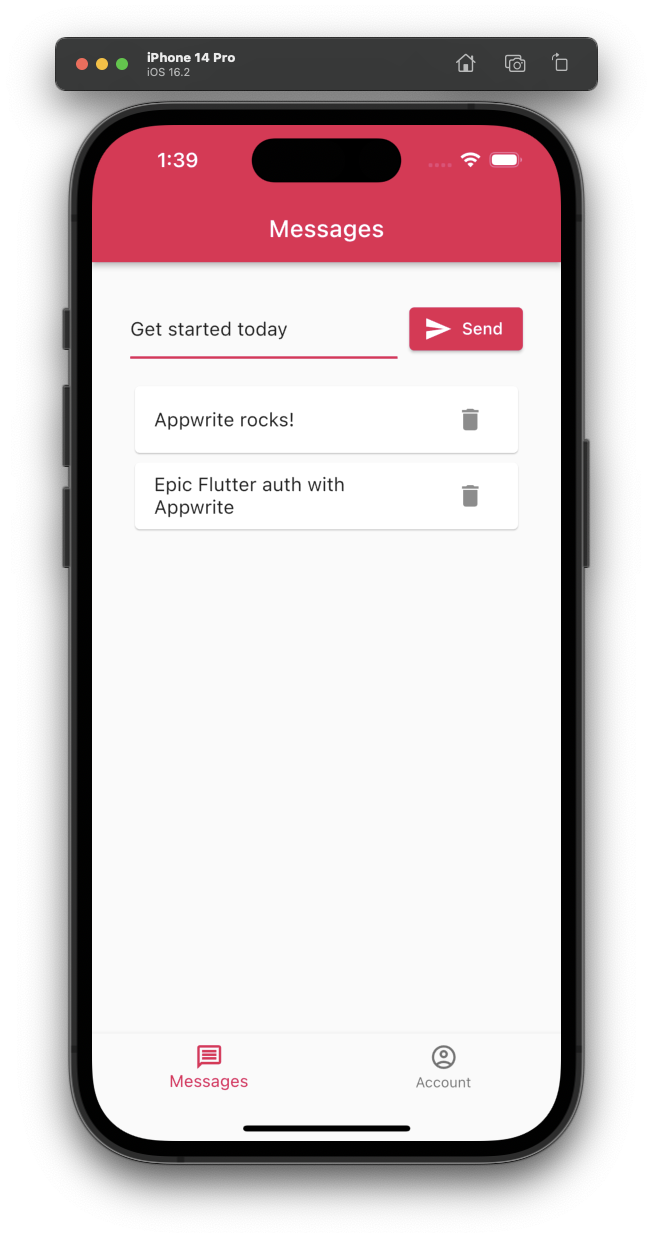
To achieve this we add a text field and a button to our messages_page.dart file, and we will use the addMessage method from our DatabaseAPI class to add the message to the database.
The other CRUD operations work mostly the same way, and in our widget we iterate over the messages and show them in a list.
Now bring up the lib/pages/messages_page.dart and change it to:
import 'package:appwrite/appwrite.dart';
import 'package:appwrite_app/appwrite/auth_api.dart';
import 'package:appwrite_app/appwrite/database_api.dart';
import 'package:flutter/material.dart';
import 'package:appwrite/models.dart';
import 'package:provider/provider.dart';
class MessagesPage extends StatefulWidget {
const MessagesPage({Key? key}) : super(key: key);
_MessagesPageState createState() => _MessagesPageState();
}
class _MessagesPageState extends State<MessagesPage> {
final database = DatabaseAPI();
late List<Document>? messages = [];
TextEditingController messageTextController = TextEditingController();
AuthStatus authStatus = AuthStatus.uninitialized;
void initState() {
super.initState();
final AuthAPI appwrite = context.read<AuthAPI>();
authStatus = appwrite.status;
loadMessages();
}
loadMessages() async {
try {
final value = await database.getMessages();
setState(() {
messages = value.documents;
});
} catch (e) {
print(e);
}
}
addMessage() async {
try {
await database.addMessage(message: messageTextController.text);
const snackbar = SnackBar(content: Text('Message added!'));
ScaffoldMessenger.of(context).showSnackBar(snackbar);
messageTextController.clear();
loadMessages();
} on AppwriteException catch (e) {
showAlert(title: 'Error', text: e.message.toString());
}
}
deleteMessage(String id) async {
try {
await database.deleteMessage(id: id);
loadMessages();
} on AppwriteException catch (e) {
showAlert(title: 'Error', text: e.message.toString());
}
}
showAlert({required String title, required String text}) {
showDialog(
context: context,
builder: (context) {
return AlertDialog(
title: Text(title),
content: Text(text),
actions: [
ElevatedButton(
onPressed: () {
Navigator.pop(context);
},
child: const Text('Ok'))
],
);
});
}
Widget build(BuildContext context) {
return Scaffold(
appBar: AppBar(
title: const Text('Messages'),
),
body: Center(
child: Padding(
padding: const EdgeInsets.all(32.0),
child: Column(
mainAxisAlignment: MainAxisAlignment.start,
crossAxisAlignment: CrossAxisAlignment.center,
children: [
authStatus == AuthStatus.authenticated
? Row(
children: [
Expanded(
child: TextField(
controller: messageTextController,
decoration: const InputDecoration(
hintText: 'Type a message'),
),
),
const SizedBox(width: 10),
ElevatedButton.icon(
onPressed: () {
addMessage();
},
icon: const Icon(Icons.send),
label: const Text("Send")),
],
)
: const Center(),
const SizedBox(height: 20),
Expanded(
child: ListView.builder(
itemCount: messages?.length ?? 0,
itemBuilder: (context, index) {
final message = messages![index];
return Card(
child: ListTile(
title: Text(message.data['text']),
trailing: IconButton(
onPressed: () {
deleteMessage(message.$id);
},
icon: const Icon(Icons.delete)),
));
}),
)
]),
),
),
);
}
}In here we are also using the user authentication status to show the text field and the button only if the user is authenticated!
We can do this by using read method from the Provider package, and we can access the AuthAPI class from the context like before.
This means we are not watching the state but only use its value once.
Now what’s interesting is what happens when we navigate to this page directly from the login screen without logging in.
The user is now not authenticated and the text field and the button are not shown, and if we still try to remove a message (because we maybe forgot to hide an element) this happens:
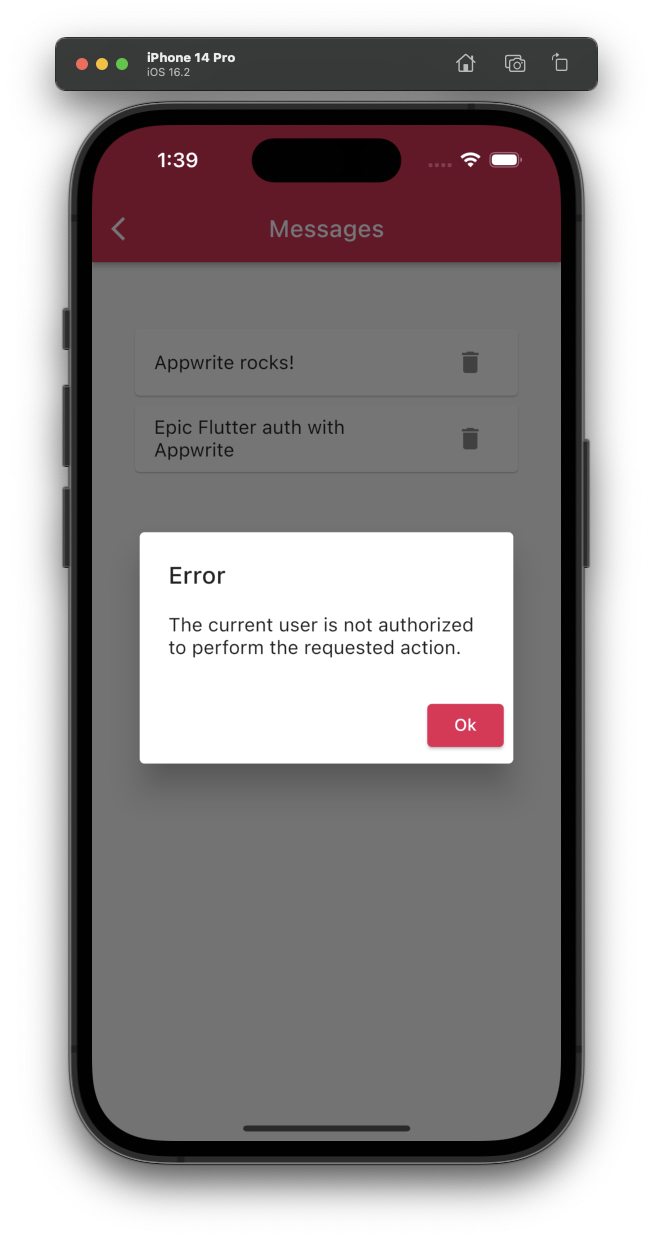
This goes way back to when we added the permissions for our collection in the beginning - and you can actually play around with those permissions now to see the effect almost in realtime!
Conclusion
In this tutorial we have learned how to use Appwrite to authenticate users in Flutter, and how to use the Appwrite Flutter SDK to create, read, update and delete data from our database.
I have used the self hosted version of Appwrite with Ionic before, but Appwrite Cloud made this process even easier!
Besides all of this Appwrite offers more functionality like creating cloud functions, storage, realtime data and much more!
Got questions? Leave a comment or join the Appwrite Discord server!
You can also find a video version of this tutorial below.