Getting Started with Appwrite using Ionic React Last update: 2022-11-22
If you want to build a modern application for web and mobile using Ionic React, chances are high you need a decent backend. And what could be better than simply spinning up an Appwrite backend with all basic functionalities included in minutes?
In this tutorial we will go through all the basics of setting up your own Appwrite server, adding collections and security and then building an Ionic React app with authentication around our self hosted Appwrite backend!
Curious to see the result? Check out a hosted preview!
This tutorial is also sponsored by Appwrite!
After going through the tutorial you will be able to:
- Run your own Appwrite backend
- Work with Appwrite security features and rules
- Perform CRUD operations on your Appwrite collections
- Upload files to Appwrite Storage
- Implement realtime data fetching
On top of that you will build a basic Ionic React application with protected routes and modals, which you can use as a starting point for your next project together with Appwrite.
You can also find the full code of the Appwrite Ionic React app on Github.
What is Appwrite?
While Firebase was one of the first providers to offer a simple cloud backend, different other solutions came up over the years to improve areas where Firebase fails.
Appwrite stands out as it is a secure open-source backend server that you can easily self host! And with easy, I mean really easy.
To setup Appwrite you can either use Docker or deploy it to a Gitpod or DigitalOcean using their one-click-installer.
This is one of the biggest differences compared to other solutions which either don’t have a self-hosting option at all, or putting everything together is really complicated.
Note: In the future there will also be Appwrite Cloud available as another option in case you still prefer that someone else hosts your Appwrite server!
Once your Appwrite server is running, you get tons of boilerplate features you need to develop modern apps right out of the box, like:
- Database and permission configuration
- Authentication and user management
- File storage
- Cloud functions
All of Appwrite is open source, and you can connect your backend to any web or mobile app no matter what technology or framework you are using with the help of the Appwrite SDKs.
Setting up your Appwrite Backend
For our app we will use a local instance of Appwrite which we can easily spin up with Docker.
If you have never used Docker don’t fear this, simply make sure to install the Docker client before you continue.
I personally never used Docker before, but I was amazed by the simplicity of using it in combination with Appwrite!
Now pick the right docker command snippet for your system, in my case I used Unix for my Mac and ran:
docker run -it --rm
    --volume /var/run/docker.sock:/var/run/docker.sock
    --volume "$(pwd)"/appwrite:/usr/src/code/appwrite:rw
    --entrypoint="install"
    appwrite/appwrite:1.0.3
You can simply use the default value for all questions for now by hitting enter, and hopefully your Appwrite instance is created successfully.
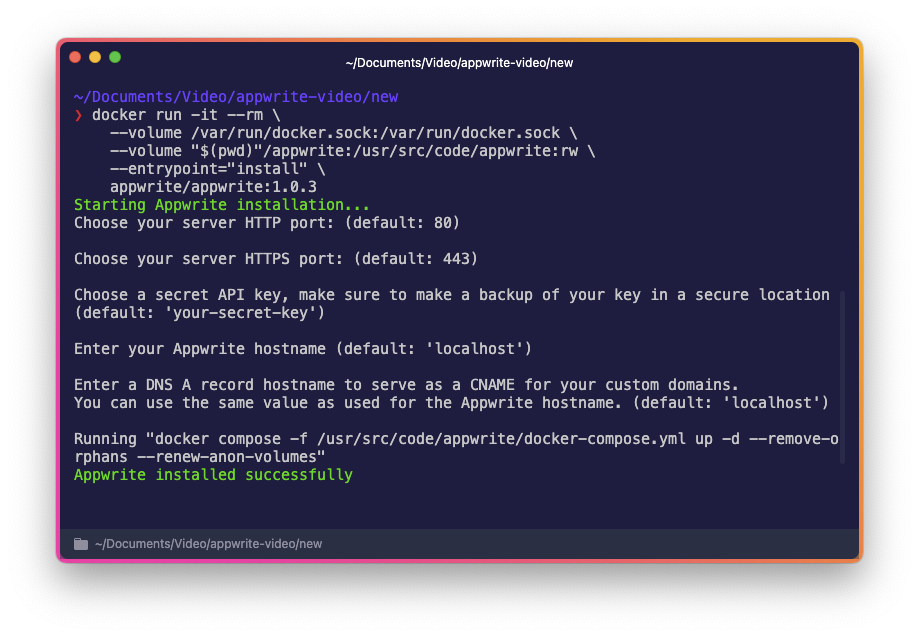
You can now already access your Appwrite server at localhost (if you left it at the default port), and you are greeted by the initial sign up to create your admin account.
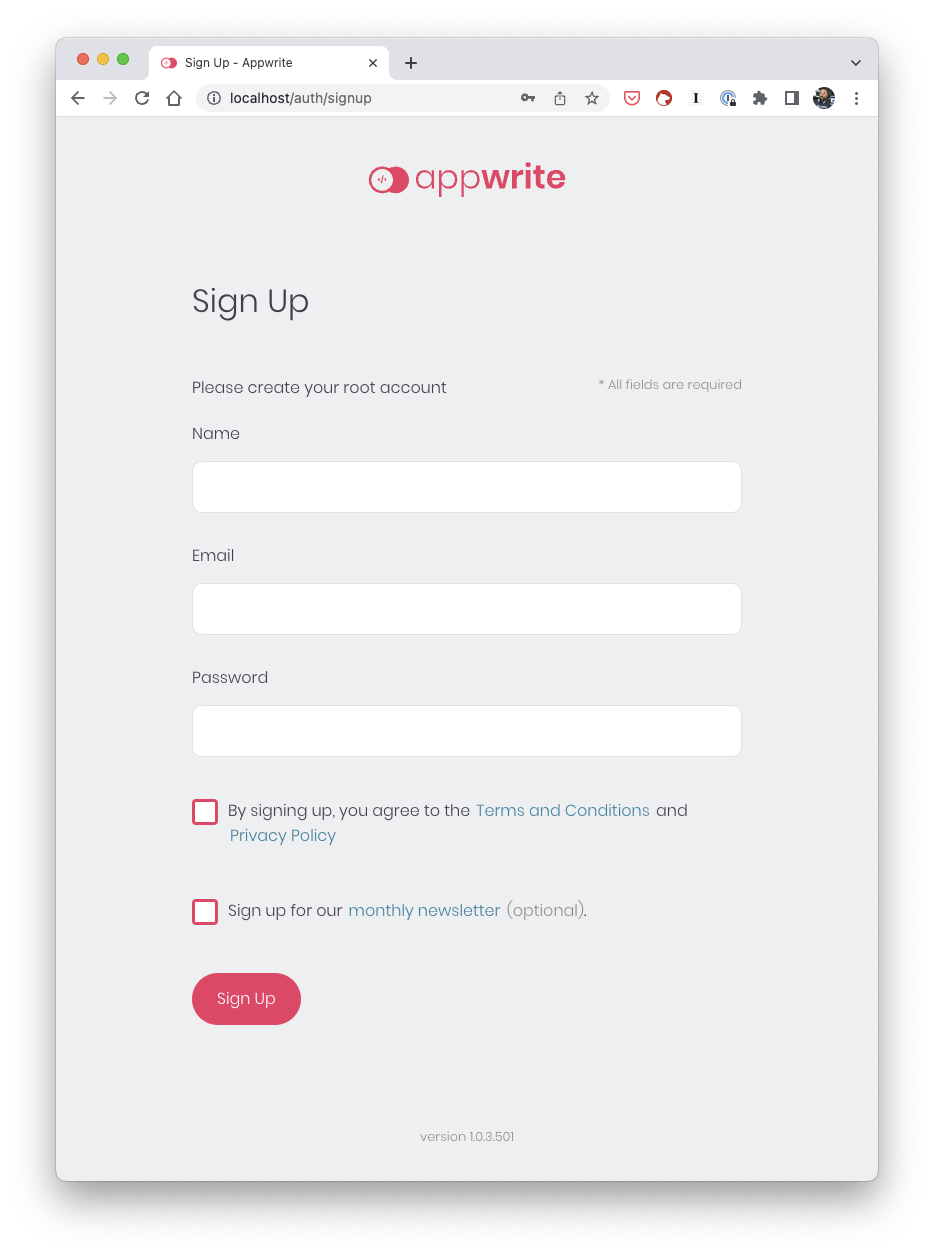
Go ahead and create your account and make sure to save that information.
Congratulations, you now have your own Appwrite backend ready for action!
Defining your Appwrite Project & Database
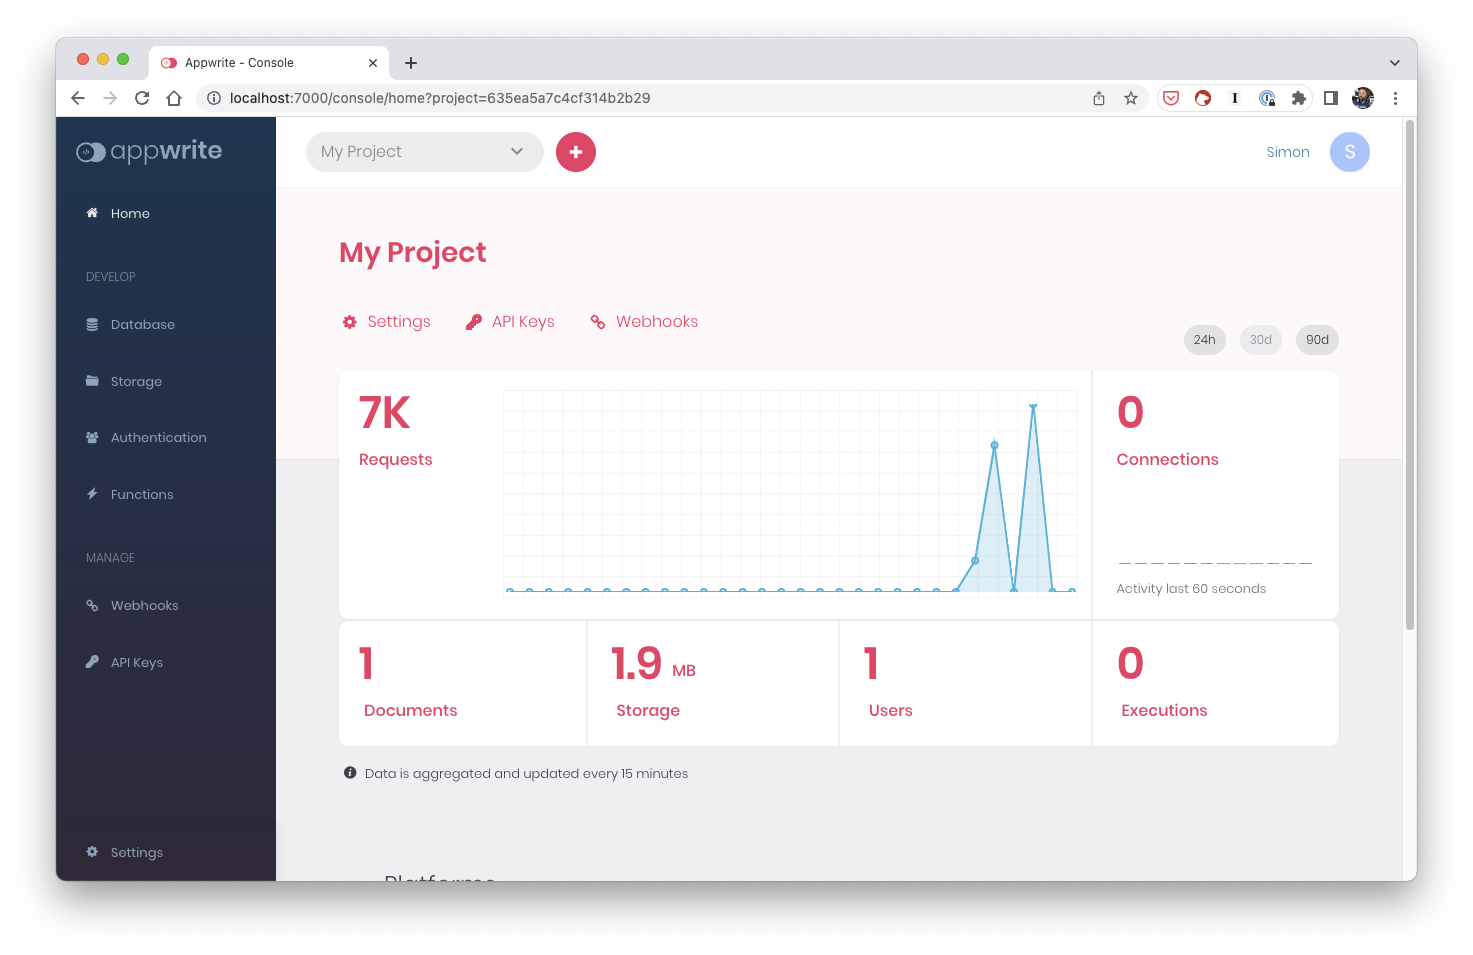
Right now our server is empty and there are no projects, so from the dashboard of your Appwrite server click Create Project and give your project a name.
This also means you can have different projects (with different databases) inside one Appwrite server!
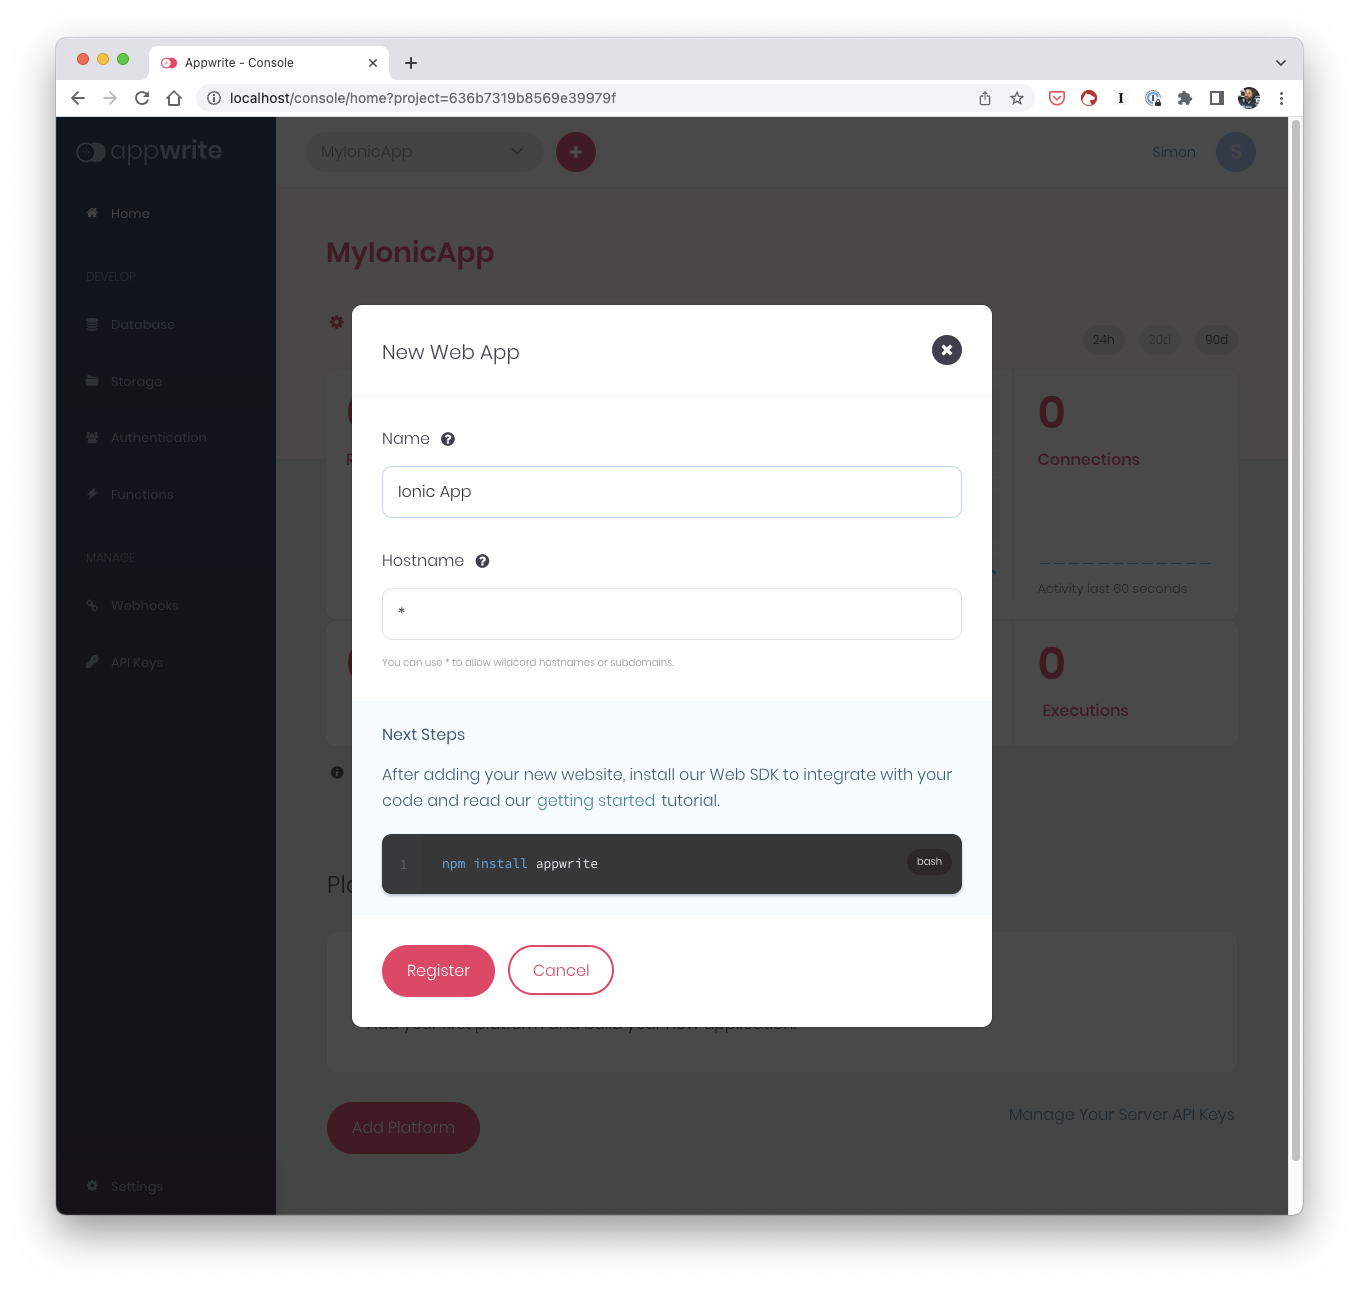
To later connect our Ionic app to Appwrite we now also need to click on Add Platform inside the home screen of our new project.
Simply select New Web App, give the app a name and set the hostname to whatever you want - in my case I picked the star as a wildcard.
We do get a lot out of the box, so feel free to inspect your server a while.
One critical piece for our actual app is still missing, so select Database from the menu and hit Add Database and call it MyDb.
Again, this means you can also have multiple databases in one Appwrite project!
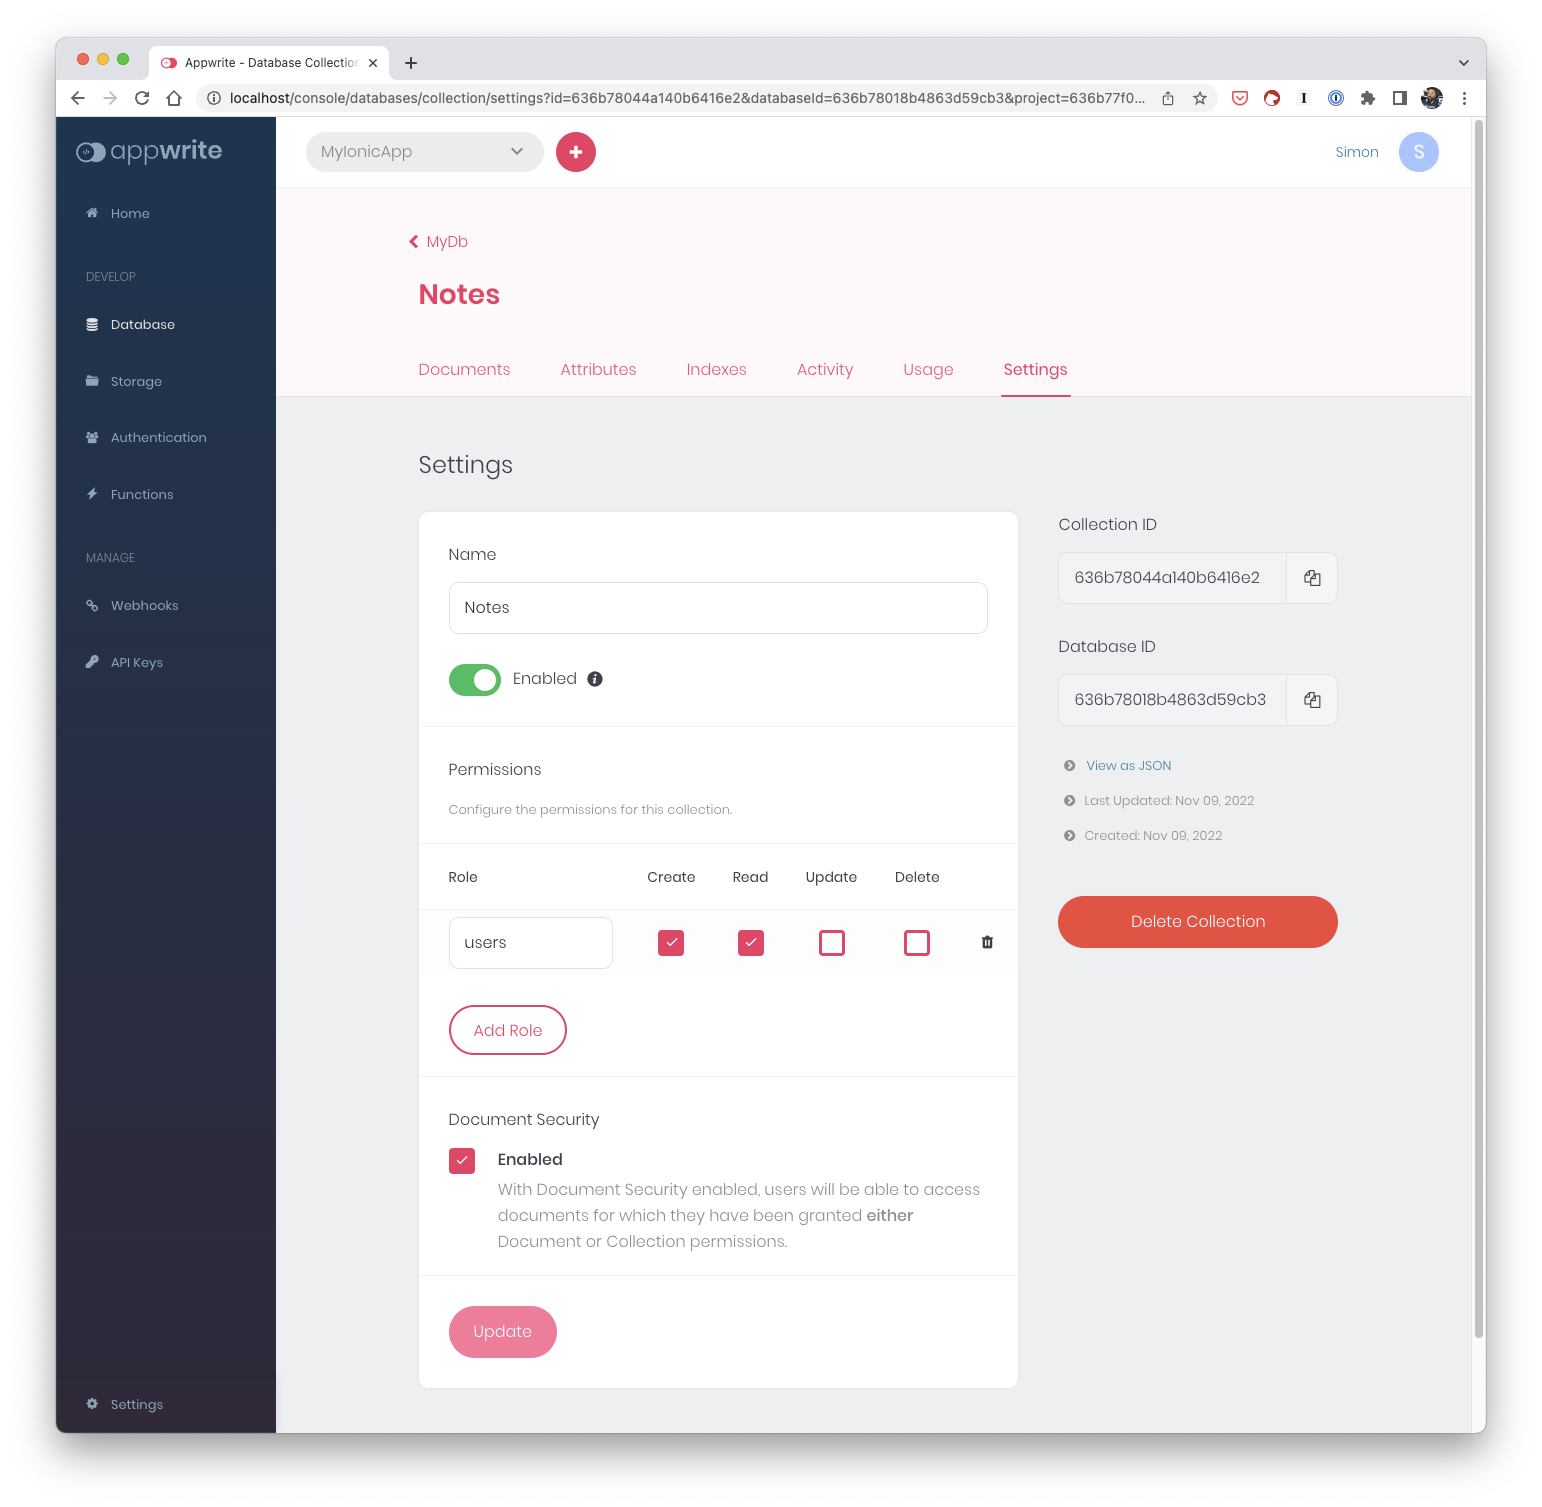
Inside the database we now need to create a collection, so click Add Collection and call it Notes.
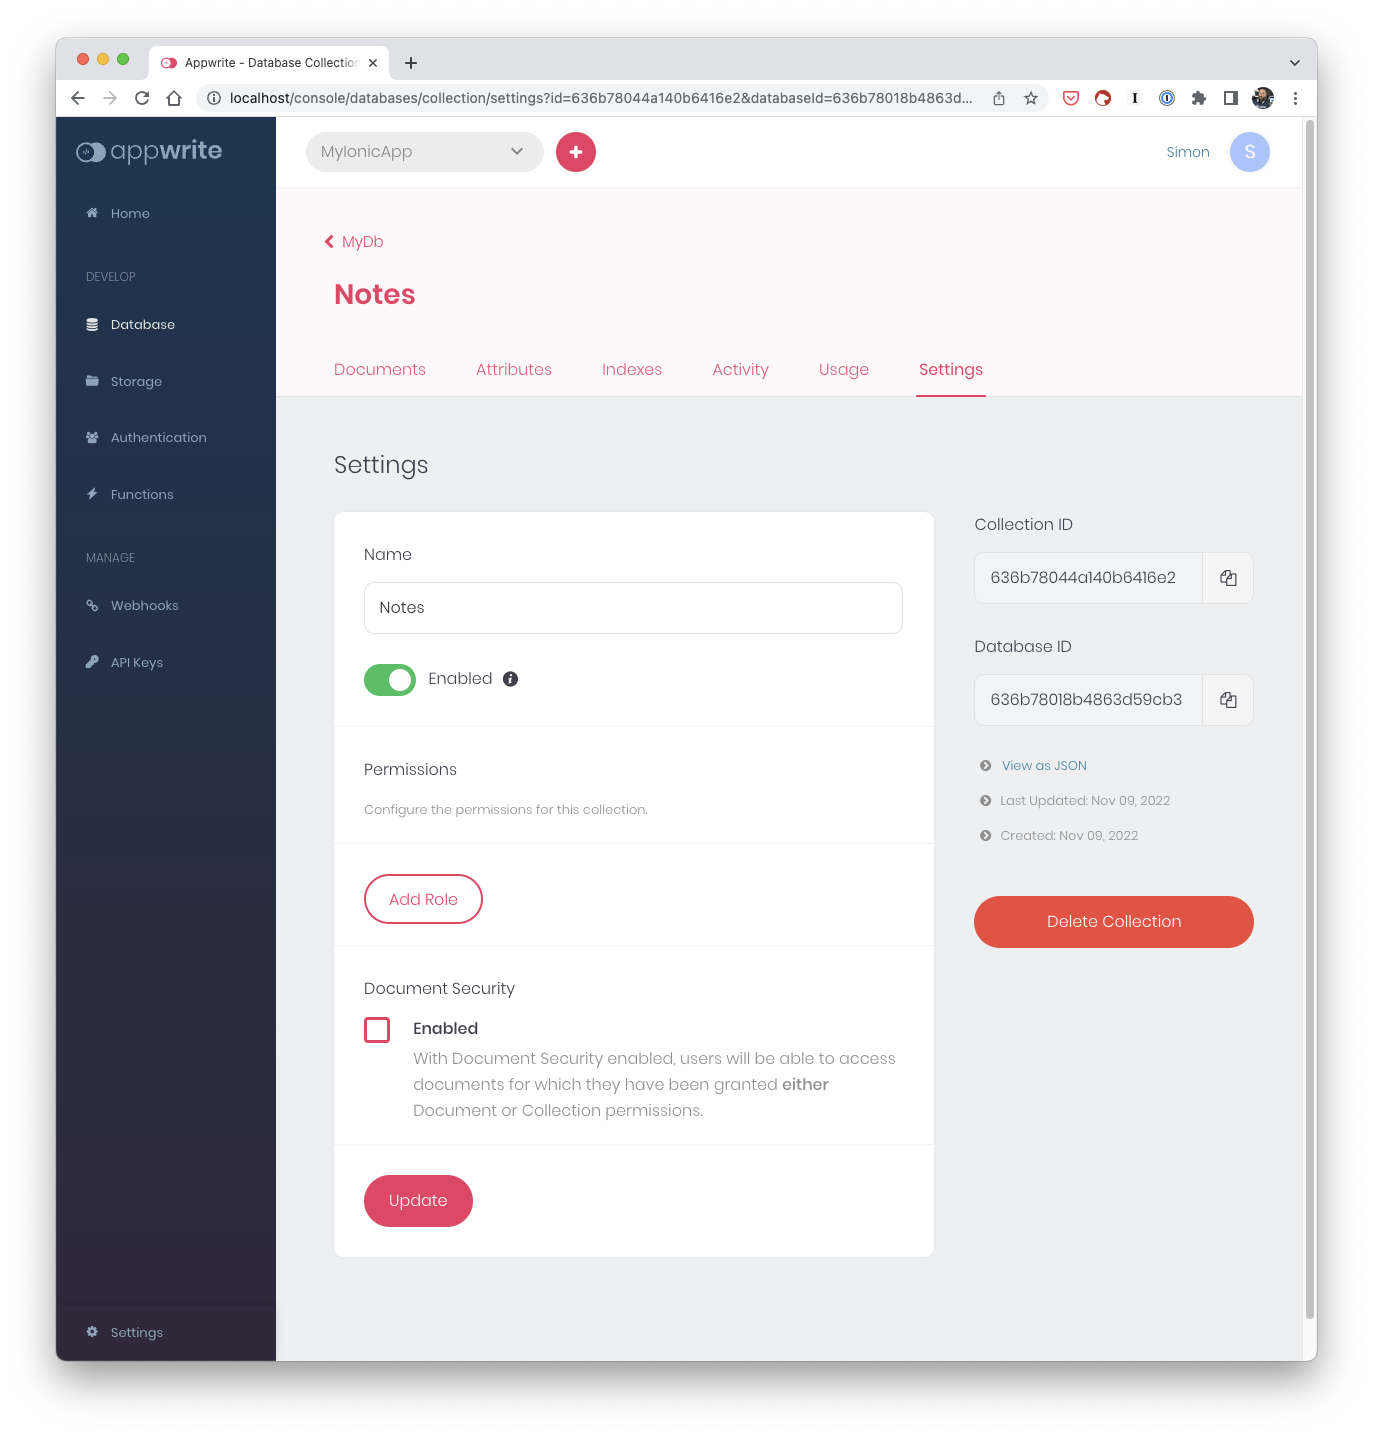
The new collection has no fields, but we can simply define those under Attributes so add two String Attributes called title and text.

Finally we might want to protect our data, so right inside the settings of our collection we can add different roles for different CRUD operations.
In our case, we will allows all users (meaning they need to be logged in) to create and read data, ad we also check the Document Security checkbox because we will later manually add more specific permissions when we create documents.
If you want to automate all of this, you could also use the Appwrite CLI to initialize collections based on my appwrite.json file!
Now our Appwrite server is ready for some action, but I also applied another change..
Updating Appwrite Settings
The installation will also create a new appwrite folder at the path where you ran the command, and inside you will find a .env and docker-compose.yml file with information about your Appwrite server.
From your local folder here you can also manually control your Docker instance, so if we want to update some settings we can run the following to stop the server:
docker compose stopIn my case I wanted to add SMTP credentials so Appwrite can send automatic emails to users after they sign up.
To achieve this, we can simply replace the following values inside the .env with our own SMTP credentials that you can retrieve from your email provider:
_APP_SMTP_HOST=smtp.mailgun.org
_APP_SMTP_PORT=587
_APP_SMTP_SECURE=tls
_APP_SMTP_USERNAME=postmaster@....
_APP_SMTP_PASSWORD=your-password
You can use a service like Mailgun for this, or directly add the information of any of your email accounts.
After saving your file, you can start the server again by running:
docker-compose up -dNow it’s finally time to create our Ionic app!
Creating an Ionic React App
Bring up your terminal and run the following commands to create a blank new Ionic React app and install all required packages for our tutorial:
ionic start appwriteApp blank --type=react
cd ./appwriteApp

# Install packages
npm i appwrite
npm i react-hook-form react-usestateref
npm i @capacitor/camera
npm i @ionic/pwa-elements

# Add native platforms
ionic capacitor add ios
ionic capacitor add android
Now we need to establish a connection to the Appwrite server, so let’s create a file at src/config/appwrite.ts and insert:
import { Account, Avatars, Client, Databases, Storage } from 'appwrite';

const client = new Client().setEndpoint('http://localhost/v1').setProject('YOURPROJECTID');

const account = new Account(client);
const databases = new Databases(client);
const storage = new Storage(client);
const avatars = new Avatars(client);

export { client, account, databases, storage, avatars };
Make sure to use your endpoint and port if you changed the default settings, and you can find your project id on teh Settings page of your Appwrite project (this screen also shows the API Endpoint).
This will act as our singleton and we can simply import the different elements from this file instead of creating the connection in every other file.
To test out the settings, let’s start with some real functionality.
Creating the Login and Registration
We did expose the different object from the Appwrite SDK int he step before, so now we can dive further into them and start by laying out the different account functions that we need for our app.
The cool thing about backends like Appwrite is that we can simply use all the basic functions like creating a new user account or even sending them a magic link - we did not write a single line of code for that!
So we now prepare a custom hook that uses the according SDK functions.
The most interesting is probably the sendMagicLink where we also pass a redirect URL, which in our case will be the /verify/magic route.
Note how we also use a tiny different route /verify/account when we start the email verification process right after creating an account.
By doing this, we will be able to either confirm the magic link session or simply the email, for which we have 2 more functions that receive the user ID and a secret. We don’t need to worry about it too much yet as we’ll come back to it later.
For now go ahead and create a new src/hooks/auth.ts and fill it with:
import { ID } from 'appwrite';
import { account } from '../config/appwrite';
export const useAuth = () => {
const createAccount = async (email: string, password: string) => {
try {
// Create user account
await account.create(ID.unique(), email, password);
// Create user session
await account.createEmailSession(email, password);
// Start email verification
return account.createVerification(`${window.location.origin}/verify/account`);
} catch (e) {
return e;
}
};
const logIn = (email: string, password: string) => {
try {
return account.createEmailSession(email, password);
} catch (e) {
return e;
}
};
const sendMagicLink = (email: string) => {
try {
return account.createMagicURLSession(
ID.unique(),
email,
`${window.location.origin}/verify/magic`
);
} catch (e) {
return e;
}
};
const updateMagicVerification = async (userId: string, secret: string) => {
try {
return account.updateMagicURLSession(userId, secret);
} catch (e) {
return e;
}
};
const updateUserVerification = async (userId: string, secret: string) => {
try {
return account.updateVerification(userId, secret);
} catch (e) {
return e;
}
};
const getCurrentUser = () => {
return account.get();
};
const signOutUser = async () => {
try {
await account.deleteSession('current');
} catch (e) {
return e;
}
};
return {
createAccount,
logIn,
sendMagicLink,
updateMagicVerification,
updateUserVerification,
getCurrentUser,
signOutUser
};
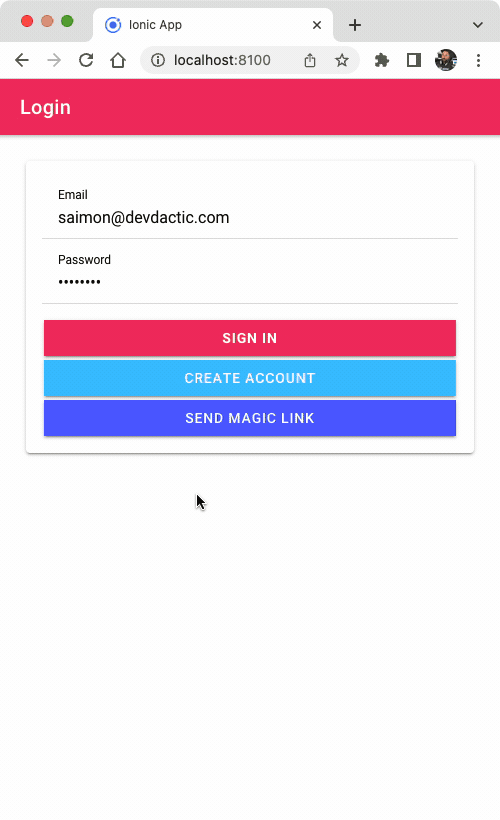
};Now we can build a simple login based on the custom hook and functions we got, so create get started by creating a file at src/pages/Login.tsx.
Inside we mostly need to proxy data to our custom hook and additionally add the useIonLoading() hook to present a loading overlay while our async operations are executed.
To easily get our form data, we installed the react-hook-form package in the beginning. Therefore we don’T need to handle any additional state, and can begin the src/pages/Login.tsx like this:
import {
  IonButton,
  IonCard,
  IonCardContent,
  IonContent,
  IonHeader,
  IonInput,
  IonItem,
  IonLabel,
  IonPage,
  IonTitle,
  IonToolbar,
  useIonAlert,
  useIonLoading,
  useIonRouter,
} from '@ionic/react'
import { useForm } from 'react-hook-form'
import { useAuth } from '../hooks/auth'

const Login: React.FC = () => {
  const { register, handleSubmit, getValues } = useForm()

  const [present, dismiss] = useIonLoading()
  const [showAlert] = useIonAlert()

  const { sendMagicLink, createAccount, logIn } = useAuth()

  const triggerMagicLink = async () => {
    present()
    const data = getValues()
    await sendMagicLink(data.email)
    dismiss()
    showAlert('Check your emails for the magic link!')
  }

  const signUp = async () => {
    await present()
    const data = getValues()
    try {
      await createAccount!(data.email, data.password)
      dismiss()
      showAlert('Please check your inbox to confirm your account!')
    } catch (e) {
      dismiss()
      showAlert('Login failed, invalid credentials')
    }
  }

  const signIn = async (data: any) => {
    await present()
    try {
      console.log('try login...')

      await logIn!(data.email, data.password)
      dismiss()
    } catch (e) {
      dismiss()
      showAlert('Login failed, invalid credentials')
    }
  }

  return (

  )
}

export default Login
Oh yeah the view is missing - that was intentional so we don’t have ultra long snippets.
But creating a view based on Ionic components is fairly easy now as we simply need two items inside our form, which uses the handleSubmit from our React forms package to pass the data of the IonInput fields to our login function.
Below the items we need more buttons in case we just want to send a magic link or register a user. Again for simplicity, this reuses our form fields data but you could easily implement a separate register screen!
Make sure that you import all components separately with Ionic React, as we did in the previous snippet already.
Now go ahead and implement the return() function for our view:
return (
	<IonPage>
		<IonHeader>
			<IonToolbar color={'primary'}>
				<IonTitle>Login</IonTitle>
			</IonToolbar>
		</IonHeader>
		<IonContent className="ion-padding">
			<IonCard>
				<IonCardContent>
					<form onSubmit={handleSubmit(signIn)}>
						<IonItem>
							<IonLabel position="stacked">Email</IonLabel>
							<IonInput
								type="email"
								placeholder="john@doe.com"
								{...register('email', {
									required: true
								})}
							></IonInput>
						</IonItem>

						<IonItem>
							<IonLabel position="stacked">Password</IonLabel>
							<IonInput
								type="password"
								placeholder="password"
								{...register('password', {
									required: true
								})}
							></IonInput>
						</IonItem>
						<IonButton expand="full" type="submit" strong={true} className="ion-margin-top">
							Sign in
						</IonButton>

						<IonButton expand="full" type="button" color="secondary" onClick={signUp}>
							Create account
						</IonButton>
					</form>
					<IonButton expand="full" type="submit" color="tertiary" onClick={triggerMagicLink}>
						Send Magic Link
					</IonButton>
				</IonCardContent>
			</IonCard>
		</IonContent>
	</IonPage>
);
At this point Ionic is still showing the initial page, so let’s change our routing information inside the src/App.tsx to show our login instead:
import Login from './pages/Login';

setupIonicReact();

const App: React.FC = () => (
	<IonApp>
		<IonReactRouter>
			<IonRouterOutlet>
				<Route exact path="/" component={Login} />
			</IonRouterOutlet>
		</IonReactRouter>
	</IonApp>
);

export default App;
What a nice login screen!
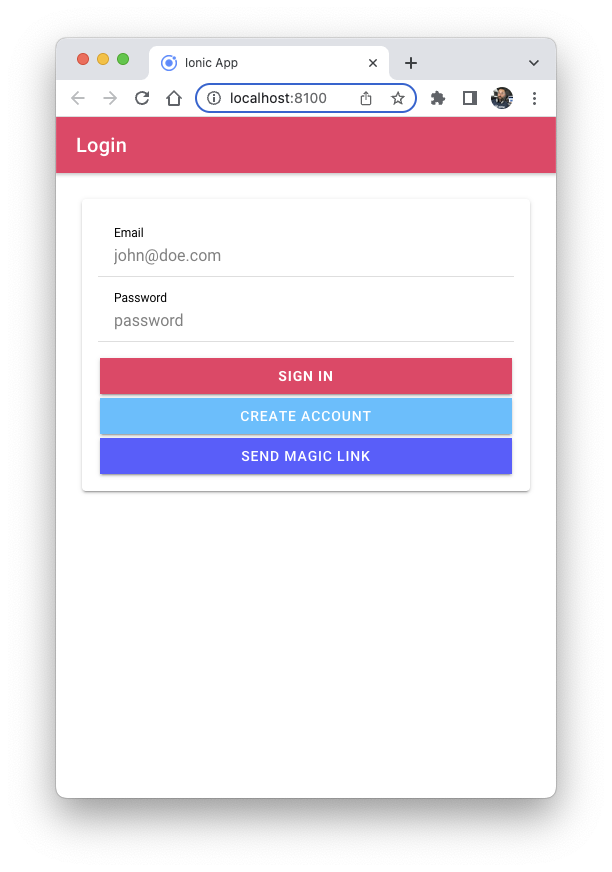
And it’s not only looking good, it actually works. Go try and log in and you will fail as you don’t have a user account yet.
Go try the other options and a new user account will be created inside Appwrite.
You can check this out in the Authentication tab of your project which should show an unverified new user.
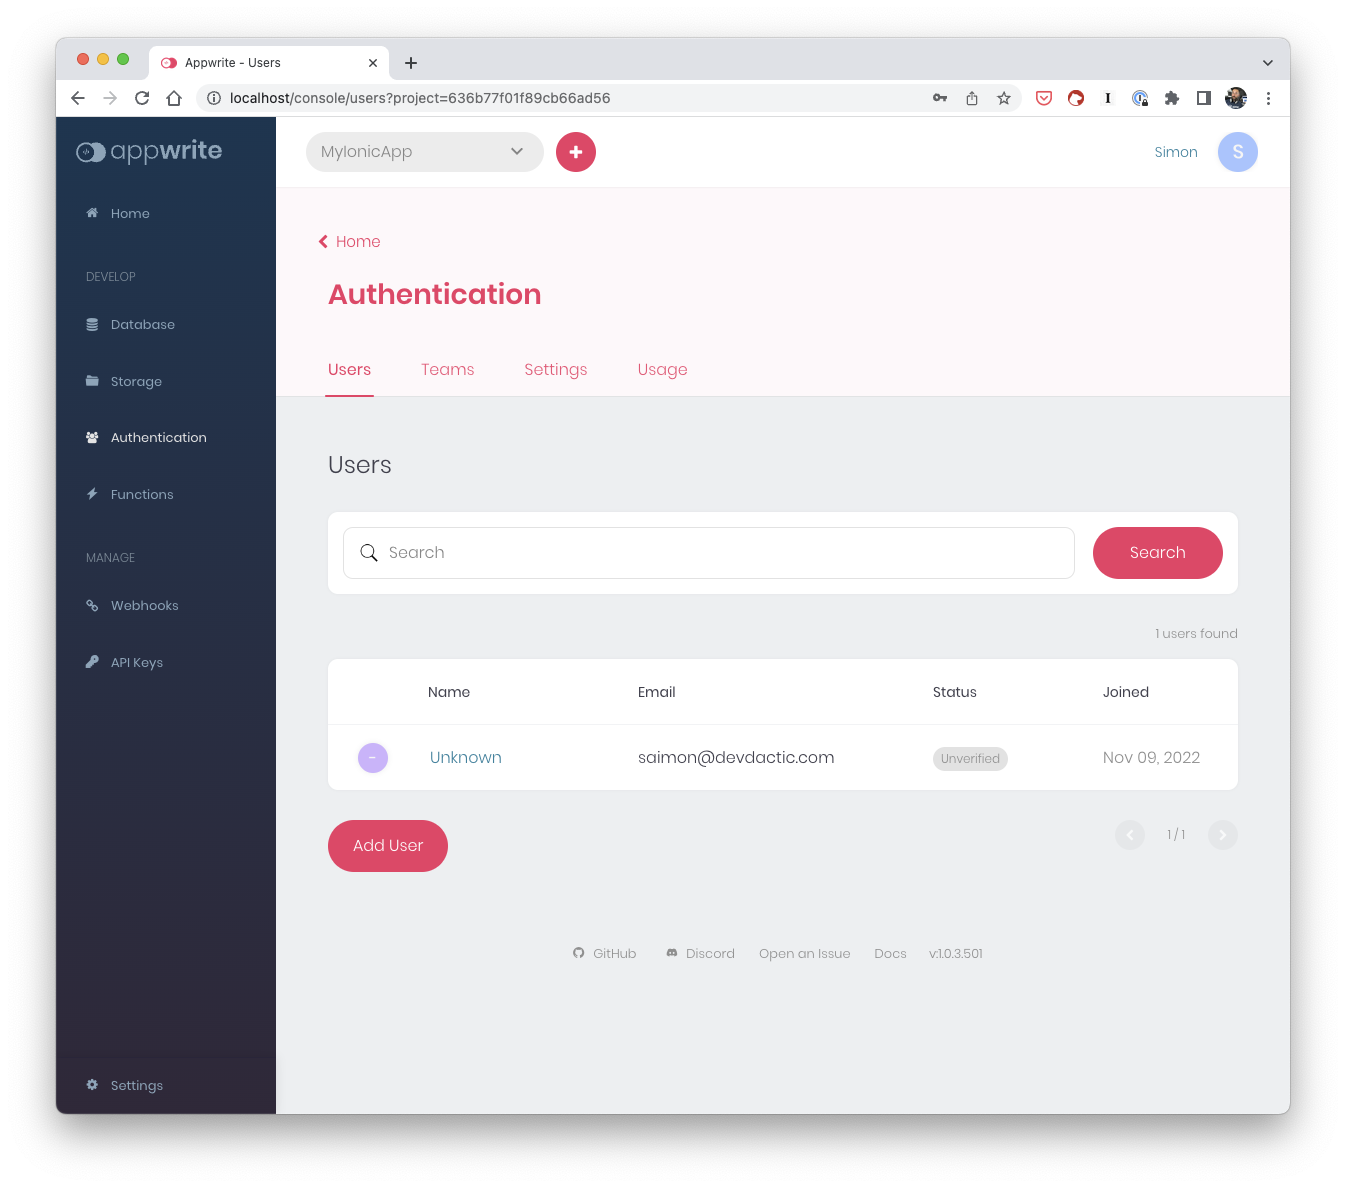
If you did set up your SMTP credentials before you should receive an email now. However, at this point we haven’t built the functionality to actually verify an account, so let’s take a step back for a second and take care of adding real authentication with React.
Adding an Auth Provider context
To protect pages of our app we need to keep track of the user session, and we also want to protect specific routes like the internal pages that only a logged in user should see.
To achieve this we can use Reacts createContext() and build our own authentication context which we wrap around our app.
This provider has the state of our current user and loads the user from our previous custom useAuth() hook, and also makes sure to load the user right when our app starts by using useEffect().
We also expose a loadUser() function as part of the AuthProps so we can easily trigger a reload opf the user in our context later.
Now create a new file src/providers/AuthProvider.tsx and fill our provider with:
import { createContext, useContext, useEffect, useState } from 'react';
import { Redirect, Route, RouteProps } from 'react-router-dom';
import { useAuth } from '../hooks/auth';

interface AuthProps {
	authUser?: any;
	isLoading?: boolean;
	loadUser?: () => Promise<void>;
}

export const AuthContext = createContext<AuthProps>({});

export const AuthProvider = ({ children }: any) => {
	const [authUser, setAuthUser] = useState(null as any);
	const [isLoading, setLoading] = useState(true);

	const { getCurrentUser } = useAuth();

	useEffect(() => {
		loadUser();
	}, []);

	const loadUser = async () => {
		const user = await getCurrentUser().catch(() => setLoading(false));
		setAuthUser(user);
		setLoading(false);
	};

	const value = {
		authUser,
		isLoading,
		loadUser
	};

	return <AuthContext.Provider value={value}>{children}</AuthContext.Provider>;
};

interface PrivateRouteProps extends RouteProps {
	component: any;
}

export const PrivateRoute: React.FC<PrivateRouteProps> = ({ component: Component, ...rest }) => {
	const { authUser, isLoading } = useContext(AuthContext);

	return (
		<Route
			{...rest}
			render={(props) => {
				if (isLoading) {
					return <></>;
				}
				if (!authUser) {
					return <Redirect to={{ pathname: '/' }} />;
				}

				return <Component {...props} />;
			}}
		/>
	);
};
After the implementation of our custom AuthContext we also define a PrivateRoute component which simply checks if we have a user object or are still initially loading the user.
If there’s no user we use a Redirect to bring the user back to the login, otherwise the component is created with all required props.
Now we need to wrap our context around our routes inside the src/App.tsx like this:
import { AuthProvider, PrivateRoute } from './providers/AuthProvider';

const App: React.FC = () => (
	<AuthProvider>
		<IonApp>
			<IonReactRouter>
				<IonRouterOutlet>
					<Route exact path="/" component={Login} />
				</IonRouterOutlet>
			</IonReactRouter>
		</IonApp>
	</AuthProvider>
);
At this point we can also implement an automatic login since our context holds the current user information.
In case we arrive on the login but already have a valid user in our context, we simply navigate the user to the inside area using the useIonRouter() hook from Ionic!
Bring back up the src/pages/Login.tsx and change the relevant parts to:
import { AuthContext } from '../providers/AuthProvider';

const Login: React.FC = () => {
	const { authUser, loadUser } = useContext(AuthContext);
	const navigation = useIonRouter();

	useEffect(() => {
		if (authUser) {
			navigation.push('/notes', 'root');
		}
	}, [authUser]);

	const signIn = async (data: any) => {
		await present();
		try {
			console.log('try login...');

			await logIn!(data.email, data.password);
			dismiss();

			// ADD THIS
			await loadUser!();
		} catch (e) {
			dismiss();
			showAlert('Login failed, invalid credentials');
		}
	};
};
After a login we also trigger a reload of the user inside the context so it’s correctly set for all further actions.
With all of this “Behind the scenes” logic in place, we can finally implement our email verification and all further pages!
Verifying a User Session
After your first sign up your should get an email with a link to verify the email, which looks somewhat like this:
http://localhost:8100/verify/account?userId=636b8dc446df7d824974&secret=f1df343..To confirm either a magic link session or just the email after signup, we now need to extract the userId and secret from that URL and call the according functions of our auth hook, which completes the process.
You can already create a file at src/pages/Verify.tsx, and then change our routing inside the src/pages/Login.tsx to include the correct URL with a wildcard parameter type:
import Verify from './pages/Verify';

const App: React.FC = () => (
	<AuthProvider>
		<IonApp>
			<IonReactRouter>
				<IonRouterOutlet>
					<Route exact path="/" component={Login} />
					<Route exact path="/verify/:type" component={Verify} />
				</IonRouterOutlet>
			</IonReactRouter>
		</IonApp>
	</AuthProvider>
);
We can simply get that value on a page by accessing the URLSearchParams of the current location - the query params of the URL.
If we get both values, we just need to check the type value that we passed through with the URL by accessing the match.params inside our page.
Once everything is clear we just need to call the correct function of our hook and verify the email and update our context user.
At that point everything is fine and we can route a user forward to our (not yet existing) inside area!
Go ahead and change the src/pages/Verify.tsx to this now:
import {
	IonPage,
	IonHeader,
	IonToolbar,
	IonTitle,
	IonContent,
	useIonViewWillEnter,
	useIonRouter,
	useIonAlert,
	useIonLoading
} from '@ionic/react';
import { useContext } from 'react';
import { useAuth } from '../hooks/auth';
import { AuthContext } from '../providers/AuthProvider';

const Verify: React.FC<any> = ({ match }) => {
	const { updateUserVerification, updateMagicVerification } = useAuth();
	const navigate = useIonRouter();
	const [present, dismiss] = useIonLoading();
	const [showAlert] = useIonAlert();
	const { loadUser } = useContext(AuthContext);

	useIonViewWillEnter(async () => {
		await present();
		const queryParams = new URLSearchParams(window.location.search);
		const userId = queryParams.get('userId');
		const secret = queryParams.get('secret');
		await dismiss();

		if (userId && secret) {
			try {
				const type = match.params.type;

				if (type === 'magic') {
					await updateMagicVerification(userId, secret);
				} else if (type === 'account') {
					await updateUserVerification(userId, secret);
				}

				// Update our auth context
				await loadUser!();

				navigate.push('/notes', 'root');
			} catch (e) {
				console.log('CATCH: ', e);
				showError();
			}
		} else {
			showError();
		}
	});

	const showError = () => {
		showAlert('We could not verify your session, please get a new magic link!', [
			{
				text: 'Open Login',
				handler: () => {
					navigate.push('/', 'root');
				}
			}
		]);
	};

	return (
		<IonPage>
			<IonHeader>
				<IonToolbar color={'primary'}>
					<IonTitle>Verify</IonTitle>
				</IonToolbar>
			</IonHeader>
			<IonContent className="ion-padding"></IonContent>
		</IonPage>
	);
};
export default Verify;
The page won’t be visible for long, and so there are no real UI elements. In fact you could remove everything if you wanted!
However, now the user inside your Appwrite server should be verified, and we can start working with the database.
Creating the Notes Page
For our simple tutorial app we just want to create notes with a title and text inside our database, but it will cover all the CRUD basics you need to learn about Appwrite.
As we did with the authentication, we now also need to create another hook that calls the according SDK functions.
On top of that we now need our Database ID and the Collection ID, which you can both find on the settings screen of the Notes collection.
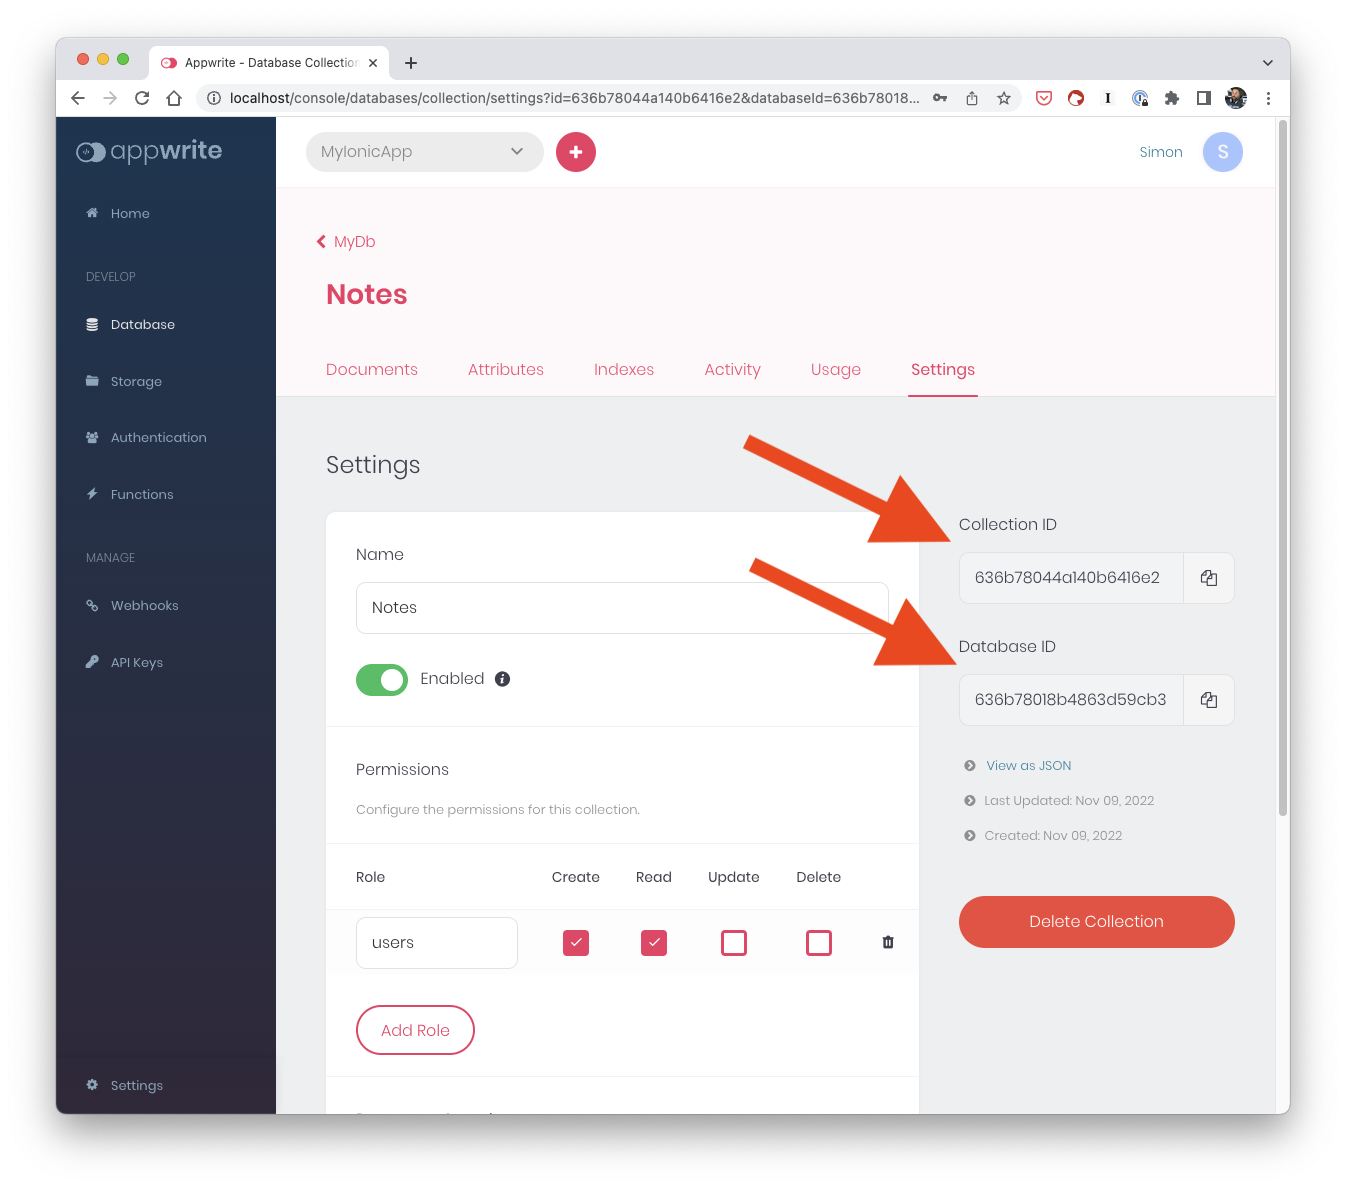
The calls to our Appwrite database are using teh databases object we created in our helper class in the beginning, and by defining our IDs at the top we can easily use them across the different functions.
Getting all or a specific note is quite easy, but when we add a note we now also embrace the document level security by defining specific Permissions for different CRUD operations.
As a result, a user created note can only be changed by that user as we tie the permission directly to the user id!
Finally we can already add a simply function to get realtime updates of our database - and this is easier than I have seen with any other provider.
We can simply listen to different events, and in our case we want to get notified when something in our collection happens.
If it’s an insert or delete, we call our custom callback function (using RxJS would be really hand here..) so we can later react to those events right on our Notes page to update the data!
Go ahead now and create the src/hooks/data.ts and fill it with:
import { useIonAlert } from '@ionic/react';
import { Permission, Role } from 'appwrite';
import { useContext } from 'react';
import { databases } from '../config/appwrite';
import { AuthContext } from '../providers/AuthProvider';

const DB_ID = 'YOURDBID';
const NOTES_COLLECTION_ID = 'YOURCOLLECTIONID';

export interface Note {
	title?: string;
	text?: string;
}

export enum Action {
	add = 'add',
	remove = 'remove'
}
export interface RealtimeUpdate {
	type: Action;
	data: any;
}

export const useData = () => {
	const { authUser } = useContext(AuthContext);
	const [showAlert] = useIonAlert();

	const getNotes = async (): Promise<any[]> => {
		try {
			return (await databases.listDocuments(DB_ID, NOTES_COLLECTION_ID)).documents;
		} catch (e) {
			showAlert(`There was an error with your request: ${e}`);
			return [];
		}
	};

	const getNoteById = async (id: string) => {
		try {
			return databases.getDocument(DB_ID, NOTES_COLLECTION_ID, id);
		} catch (e) {
			showAlert(`There was an error with your request: ${e}`);
			return null;
		}
	};

	const addNote = (title: string) => {
		const userId = authUser.$id;

		try {
			return databases.createDocument(
				DB_ID,
				NOTES_COLLECTION_ID,
				'unique()',
				{
					title
				},
				[
					Permission.read(Role.users()),
					Permission.update(Role.user(userId)),
					Permission.delete(Role.user(userId))
				]
			);
		} catch (e) {
			showAlert(`There was an error with your request: ${e}`);
			return null;
		}
	};

	const updateNoteById = async (id: string, data: Note) => {
		try {
			return databases.updateDocument(DB_ID, NOTES_COLLECTION_ID, id, data);
		} catch (e) {
			showAlert(`There was an error with your request: ${e}`);
			return null;
		}
	};

	const deleteNoteById = async (id: string) => {
		try {
			return databases.deleteDocument(DB_ID, NOTES_COLLECTION_ID, id);
		} catch (e) {
			showAlert(`There was an error with your request: ${e}`);
			return null;
		}
	};

	const getNotesRealtime = (func: (data: any) => void) => {
		client.subscribe(`databases.${DB_ID}.collections.${NOTES_COLLECTION_ID}.documents`, (data) => {
			if (data.events.includes('databases.*.collections.*.documents.*.delete')) {
				func({ type: Action.remove, data: data.payload });
			} else if (data.events.includes('databases.*.collections.*.documents.*.create')) {
				func({ type: Action.add, data: data.payload });
			}
		});
	};

	return {
		getNotes,
		addNote,
		getNoteById,
		updateNoteById,
		deleteNoteById,
		getNotesRealtime
	};
};
All of this gives us the power we need to create our notes page, where we now list out all existing notes by loading them through our custom useData() hook right in the beginning.
Afterwards we just react to changes of getNotesRealtime() and either insert or remove an element from our notes state.
To create a new note we will just call the according function that adds a new object to the database, and we directly open the (yet to be implemented) details screen where we will be able to edit the note.
Even the view with our Ionic elements is fairly easy as we only need to iterate the notes and create IonItem objects with an according routerLink that uses the $id of any database object.
Start a new src/pages/Notes.tsx now and insert:
import {
	IonPage,
	IonHeader,
	IonToolbar,
	IonTitle,
	IonContent,
	useIonViewWillEnter,
	IonButtons,
	IonButton,
	IonIcon,
	useIonRouter,
	IonFab,
	IonFabButton,
	IonList,
	IonItem,
	IonLabel
} from '@ionic/react';
import { useAuth } from '../hooks/auth';
import { logOutOutline, addOutline } from 'ionicons/icons';
import { RealtimeUpdate, useData, Action } from '../hooks/data';
import useState from 'react-usestateref';

const Notes: React.FC = () => {
	const { signOutUser } = useAuth();
	const navigation = useIonRouter();
	const { getNotes, addNote, getNotesRealtime } = useData();
	const [notes, setNotes, notesRef] = useState<any[]>([]);

	useIonViewWillEnter(async () => {
		const notes = await getNotes();

		setNotes(notes);
		getNotesRealtime((result: RealtimeUpdate) => {
			if (result.type === Action.add) {
				setNotes([...notesRef.current, result.data]);
			} else {
				const filtered = notesRef.current.filter((note) => note.$id !== result.data.$id);
				setNotes(filtered);
			}
		});
	});

	const signOut = async () => {
		await signOutUser();
		navigation.push('/', 'back');
	};

	const createNote = async () => {
		const newNote = await addNote('My new note');

		if (newNote) {
			navigation.push(`/notes/${newNote.$id}`, 'forward');
		}
	};

	return (
		<IonPage>
			<IonHeader>
				<IonToolbar color={'primary'}>
					<IonTitle>My Notes</IonTitle>
					<IonButtons slot="end">
						<IonButton onClick={signOut}>
							<IonIcon icon={logOutOutline} slot="icon-only"></IonIcon>
						</IonButton>
					</IonButtons>
				</IonToolbar>
			</IonHeader>
			<IonContent>
				<IonList>
					{notes.map((note) => (
						<IonItem
							button
							key={note.$id}
							routerLink={`/notes/${note.$id}`}
							routerDirection="forward"
						>
							<IonLabel>{note.title}</IonLabel>
						</IonItem>
					))}
				</IonList>
				<IonFab vertical="bottom" horizontal="end" slot="fixed">
					<IonFabButton onClick={createNote}>
						<IonIcon icon={addOutline}></IonIcon>
					</IonFabButton>
				</IonFab>
			</IonContent>
		</IonPage>
	);
};
export default Notes;
Finally we need to connect all of this to our routing, and since this page should only be available to logged in users, open the src/App.tsx and use our previously created PrivateRoute component for the new routes:
import Login from './pages/Login';
import Verify from './pages/Verify';
import Notes from './pages/Notes';
import Details from './pages/Details';
import { AuthProvider, PrivateRoute } from './providers/AuthProvider';

const App: React.FC = () => (
	<AuthProvider>
		<IonApp>
			<IonReactRouter>
				<IonRouterOutlet>
					<Route exact path="/" component={Login} />
					<Route exact path="/verify/:type" component={Verify} />
					<PrivateRoute exact path="/notes" component={Notes}></PrivateRoute>
					<PrivateRoute path="/notes/:id" component={Details}></PrivateRoute>
				</IonRouterOutlet>
			</IonReactRouter>
		</IonApp>
	</AuthProvider>
);
At this point you should be able to create new notes - but the routing will fail.
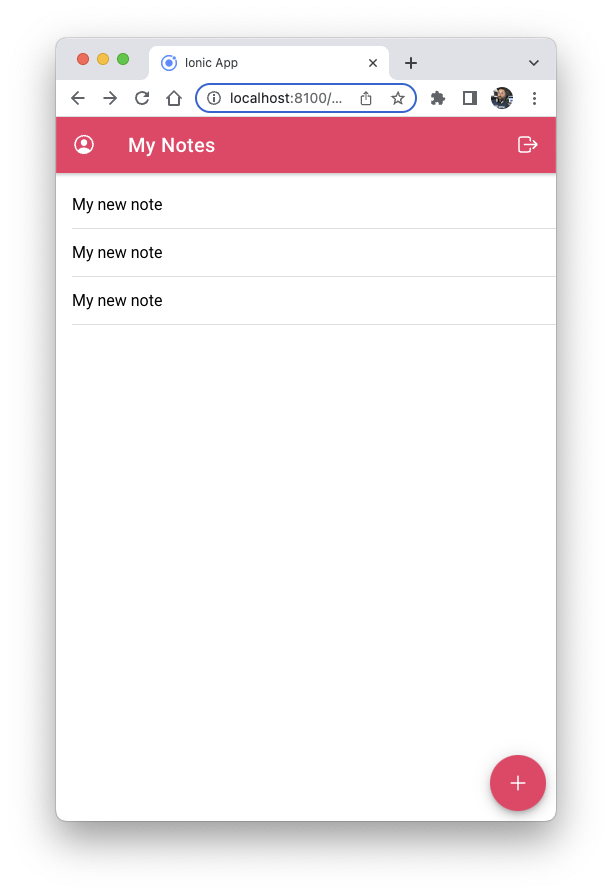
You can also check the collection inside your Appwrite server and should see new documents being added to it. Great success!
But wait.. we already added the details page that does not yet exist - better hurry up and create it now!
Creating the Details Page
We are passing the ID of an object to our details page with the URL, just like inside most applications these days.
Because we created our data hook and all necessary functions before we can easily call getNoteById() which will give us the data for the current from our Appwrite server.
Also, updating and deleting a note is no problem with the information we already have at this point.
However, we need to be careful as those operations can fail due to missing permissions!
In that case, we simply show a little toast at the bottom using the Ionic useIonToast() hook.
The view of our page is connected to the state of our note, and when the input field changes we simply directly update our state in the onIonChange function.
Now go ahead and add the src/pages/Details.tsx like this:
import {
IonPage,
IonHeader,
IonToolbar,
IonTitle,
IonContent,
useIonViewWillEnter,
IonButtons,
IonButton,
IonIcon,
useIonRouter,
IonItem,
IonLabel,
IonBackButton,
IonInput,
IonTextarea,
useIonToast
} from '@ionic/react';
import { useData } from '../hooks/data';
import { useState } from 'react';
import { saveOutline } from 'ionicons/icons';
const Details: React.FC<any> = ({ match }) => {
const navigation = useIonRouter();
const { getNoteById, updateNoteById, deleteNoteById } = useData();
const [note, setNote] = useState<any>(null);
const [showToast] = useIonToast();
useIonViewWillEnter(async () => {
const id = match.params.id;
const note = await getNoteById(id);
setNote(note);
});
const updateNote = async () => {
try {
await updateNoteById(note.$id, {
text: note.text,
title: note.title
});
showToast('Saved', 3000);
} catch (e) {
showToast('You are note allowed to update this note', 3000);
}
};
const deleteNote = async () => {
try {
await deleteNoteById(note.$id);
navigation.push('/notes', 'back');
showToast('Deleted', 3000);
} catch (e) {
showToast('You are note allowed to delete this note', 3000);
}
};
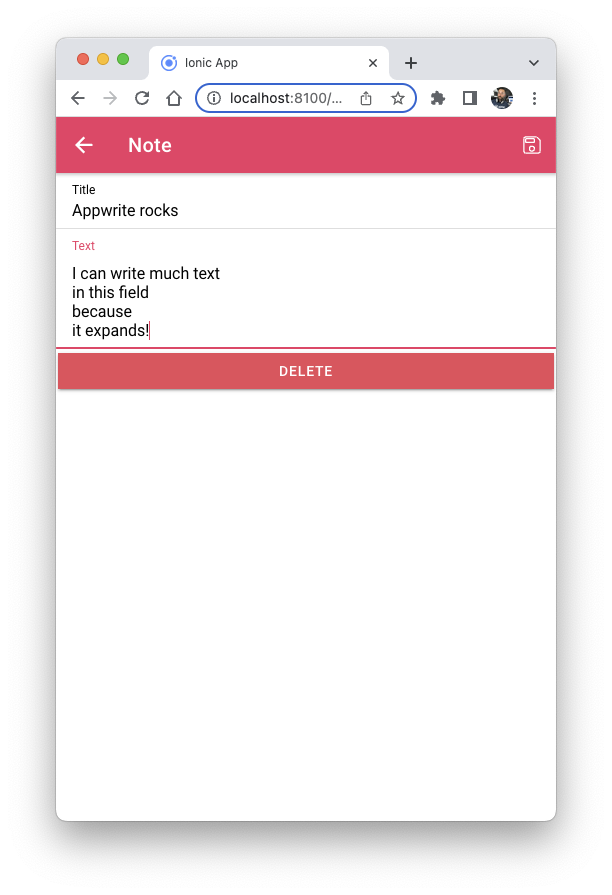
return (
<IonPage>
<IonHeader>
<IonToolbar color={'primary'}>
<IonButtons slot="start">
<IonBackButton defaultHref="/notes"></IonBackButton>
</IonButtons>
<IonTitle>Note</IonTitle>
<IonButtons slot="end">
<IonButton onClick={updateNote}>
<IonIcon icon={saveOutline} />
</IonButton>
</IonButtons>
</IonToolbar>
</IonHeader>
<IonContent>
<IonItem>
<IonLabel position="stacked">Title</IonLabel>
<IonInput
value={note?.title}
onIonChange={(e: CustomEvent) => setNote({ ...note, title: e.detail.value })}
></IonInput>
</IonItem>
<IonItem>
<IonLabel position="stacked">Text</IonLabel>
<IonTextarea
autoGrow
value={note?.text}
onIonChange={(e: CustomEvent) => setNote({ ...note, text: e.detail.value })}
></IonTextarea>
</IonItem>
<IonButton onClick={deleteNote} expand="full" color="danger">
Delete
</IonButton>
</IonContent>
</IonPage>
);
};
export default Details;Nothing fancy, but we are finally able to perform all CRUD operations on our Appwrite database!
We are basically finished with all important functionality, but there’s one more thing we should talk about.
Adding a Modal with File Upload
File storage is such an important topic in most of todays app, and we basically get file storage for free with Appwrite.
Only requirement is defining a bucket inside our Appwrite server, so navigate to Storage and click Add Bucket.
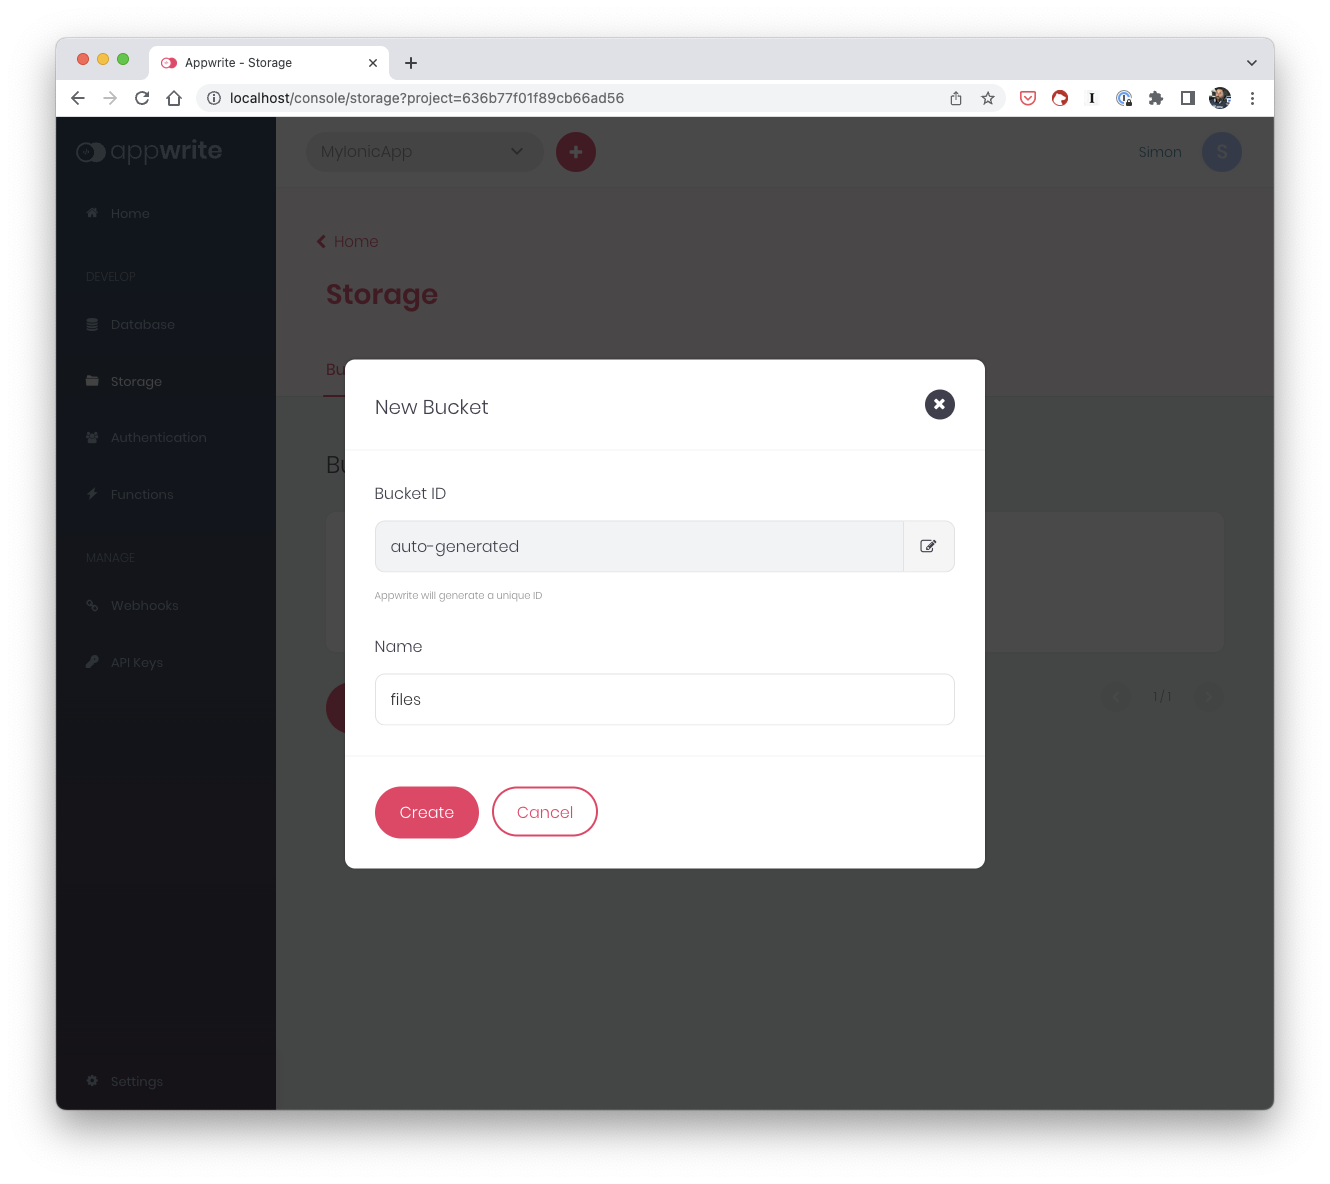
I have also enabled File Security on the settings page of that bucket so we will set the permissions later when we upload a file.
Just like before we need to grab the Bucket ID from the settings page of that new bucket now as we will add it to the top of our src/hooks/data.ts where we implement the upload functionality.
The functions for handling file upload are exposed through the storage object of the Appwrite SDK, and we can directly pass a Blob to the createFile() function including all permissions that we want to set.
Later we can check if the file exists and then grab it using getFilePreview() where we could also add more parameters like the quality and size of an image!
Now open up the src/hooks/data.ts again and add the relevant pieces:
const BUCKET_ID = 'YOURID';

const uploadImage = async (file: any) => {
	const userId = authUser.$id;

	try {
		return storage.createFile(BUCKET_ID, userId, file, [
			Permission.read(Role.user(userId)),
			Permission.update(Role.user(userId)),
			Permission.delete(Role.user(userId))
		]);
	} catch (e) {
		showAlert(`There was an error with your request: ${e}`);
		return null;
	}
};

const hasUserAvatar = async () => {
	const userId = authUser.$id;

	try {
		return storage.getFile(BUCKET_ID, userId);
	} catch (e) {
		return null;
	}
};

const getUserAvatar = async () => {
	const userId = authUser.$id;

	try {
		return storage.getFilePreview(BUCKET_ID, userId);
	} catch (e) {
		showAlert(`There was an error with your request: ${e}`);
		return null;
	}
};

const getInitials = () => {
	return avatars.getInitials(authUser.email, 200, 200);
};

return {
	getNotes,
	addNote,
	getNoteById,
	updateNoteById,
	deleteNoteById,
	uploadImage,
	hasUserAvatar,
	getUserAvatar,
	getNotesRealtime,
	getInitials
};
For fun I also added a call to the avatars API, which is a convenient way to perform basic functions with Appwrite like getting a credit card icon or a browser flag.
Certainly not always required, but helpful when your app needs it!
We could now integrate all of this on the Notes page, but I felt like creating a modal component worked better to put all image related logic into its own file.
Therefore, create a src/pages/Profile.tsx and add a placeholder component so we can include the profile page as a modal inside our src/pages/Notes.tsx like this:
import Profile from './Profile';

const Notes: React.FC = () => {
	return (
		<IonPage>
			<IonHeader>
				<IonToolbar color={'primary'}>
					<IonButtons slot="start">
						<IonButton id="open-modal">
							<IonIcon icon={personCircleOutline} slot="icon-only"></IonIcon>
						</IonButton>
					</IonButtons>
					<IonTitle>My Notes</IonTitle>
					<IonButtons slot="end">
						<IonButton onClick={signOut}>
							<IonIcon icon={logOutOutline} slot="icon-only"></IonIcon>
						</IonButton>
					</IonButtons>
				</IonToolbar>
			</IonHeader>
			<IonContent>
				{/* Everything from before */}
				<Profile trigger="open-modal" />
			</IonContent>
		</IonPage>
	);
};
export default Notes;
Alright, only one last page to implement!
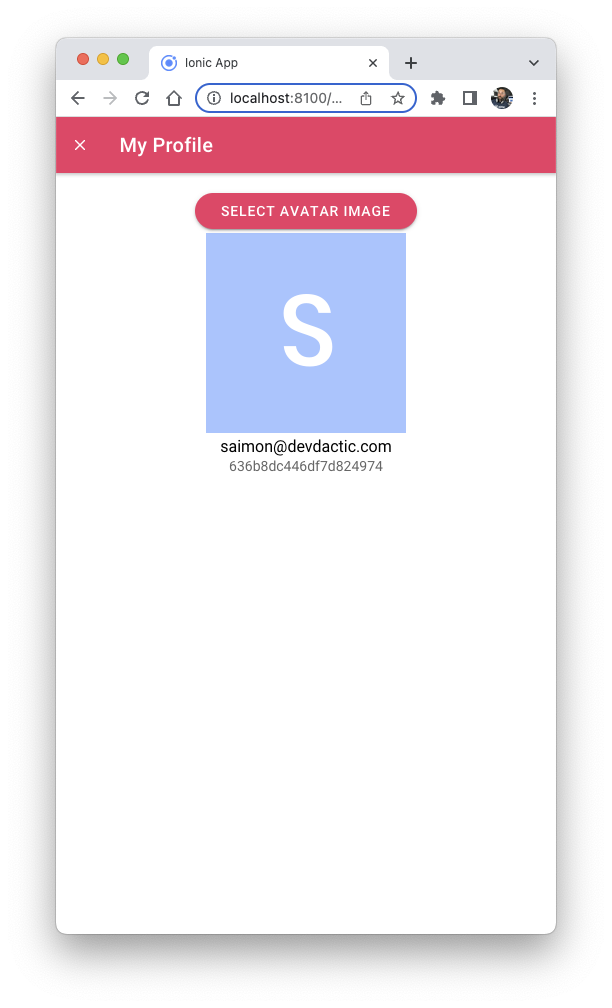
On our profile component we will first check if the user already has an avatar image inside our bucket and then get the image preview so we can display it.
Note two things:
- You will see an error in your debug logs because we try to access a file that doesn’t exist yet when the user has no avatar image
- I added a little hack with date as query param to the image string, so when we update the file we always get a new file without caching issues
On top of that we are now using the Capacitor camera plugin to easily capture an image. Make sure you also add the native permissions before building your iOS and Android app like described on the plugin page.
Because we need to send a real File object to our Appwrite server we convert the base64 result from the camera to a Blob and then File with a simple helper function, and then pass it to our custom hook that uploads the file.
Life can be that easy.
For the view we just need to piece together a few components in order to show either the avatar image or a fallback placeholder, for which we make use of the previouslyadded avatars API and get the user initials. Don’t confuse this with our user avatar, this is a completely different Appwrite client package!
Now open up the src/pages/Profile.tsx and change it to:
import {
	IonModal,
	IonHeader,
	IonToolbar,
	IonButtons,
	IonButton,
	IonIcon,
	IonTitle,
	IonContent,
	useIonViewWillEnter,
	IonLabel
} from '@ionic/react';
import { closeOutline } from 'ionicons/icons';
import React, { useContext, useRef, useState } from 'react';
import { Camera, CameraResultType, CameraSource } from '@capacitor/camera';
import { useData } from '../hooks/data';
import { AuthContext } from '../providers/AuthProvider';

interface ProfilePageProps {
	trigger: string;
}

const Profile: React.FC<ProfilePageProps> = ({ trigger }) => {
	const modal = useRef<HTMLIonModalElement>(null);
	const [avatar, setAvatar] = useState<any>(null);
	const [initials, setInitials] = useState<any>(null);

	const { uploadImage, hasUserAvatar, getUserAvatar, getInitials } = useData();
	const { authUser } = useContext(AuthContext);

	useIonViewWillEnter(async () => {
		try {
			const file = await hasUserAvatar();

			if (file) {
				const img = await getUserAvatar();

				if (img) {
					setAvatar(`${img.href}&date=${Date.now()}`);
				}
			}
		} catch (e) {
			// User has no image yet!
		}

		const initials = await getInitials();
		setInitials(initials.href);
	}, [authUser]);

	const takePicture = async () => {
		const image = await Camera.getPhoto({
			quality: 90,
			allowEditing: true,
			resultType: CameraResultType.Base64,
			source: CameraSource.Photos
		});
		const file = await dataUrlToFile(
			`data:image/jpeg;base64,${image.base64String!}`,
			`${authUser.$id}.jpg`
		);
		await uploadImage(file);

		setAvatar(`data:image/jpeg;base64,${image.base64String!}`);
	};

	async function dataUrlToFile(dataUrl: string, fileName: string): Promise<File> {
		const res: Response = await fetch(dataUrl);
		const blob: Blob = await res.blob();
		return new File([blob], fileName, { type: 'image/png' });
	}

	return (
		<IonModal ref={modal} trigger={trigger}>
			<IonHeader>
				<IonToolbar>
					<IonButtons slot="start">
						<IonButton onClick={() => modal.current?.dismiss()}>
							<IonIcon icon={closeOutline} />
						</IonButton>
					</IonButtons>
					<IonTitle>My Profile</IonTitle>
				</IonToolbar>
			</IonHeader>
			<IonContent className="ion-padding ion-text-center">
				<div style={{ display: 'block' }}>
					{avatar ? (
						<img
							src={avatar}
							onClick={() => takePicture()}
							alt="Task"
							style={{ width: 'auto', height: 'auto' }}
						/>
					) : (
						<IonButton shape="round" color="primary" onClick={() => takePicture()}>
							Select Avatar image
						</IonButton>
					)}
				</div>
				<div style={{ display: 'block' }}>
					<img src={initials} alt="initials"></img>
				</div>

				<IonLabel>
					{authUser?.email}
					<p>{authUser?.$id}</p>
				</IonLabel>
			</IonContent>
		</IonModal>
	);
};

export default Profile;
By default a user has now image, so we only see the fallback with credentials and the ID of a user (for testing purpose).
Now try and upload some random image or capture it first, and you should soon see the new image being displayed on your profile!

Again you can check your Appwrite server and manage all files from over there as well, so you always see exactly what’s going on in your application.
Conclusion
In this tutorial we went through all the basic steps of setting up an Appwrite server and connect our Ionic React app to it.
This was my first time using Appwrite and I highly enjoyed the simplicity in many aspects, starting with the docker image and ending with easy file storage.
Appwrite is not yet finished and under active development, for example relations between attributes in collections are still missing (to easily query data with foreign keys), however this feature is already planned for the future!
I’m also having an eye on the Appwrite cloud feature since I do enjoy if someone takes care of hosting my backend - yet for everyone else who wants full control, Appwrite is a perfect solution to host your own secure backend with tons of features out of the box.
Besides all of this Appwrite offers more functionality like creating cloud functions
Got questions? Leave a comment or join the Appwrite Discord server!
Want more Ionic support? Check out the Ionic Academy to learn Ionic fast!
You can also find a video version of this tutorial below.