How to Setup Universal Links in Ionic (iOS & Android) Last update: 2020-02-25
It is possible to open your iOS and Android app directly through special Universal Links or even a standard link these days - but the setup isn’t super easy.
In this tutorial we will go through every step to configure universal links for iOS and app links on Android. They are basically the same but have a different name. For simplicity, let’s just refer to it as deeplinks.
For an even better way to handle deep links, check out the new guide for Deeplinks with Capacitor!
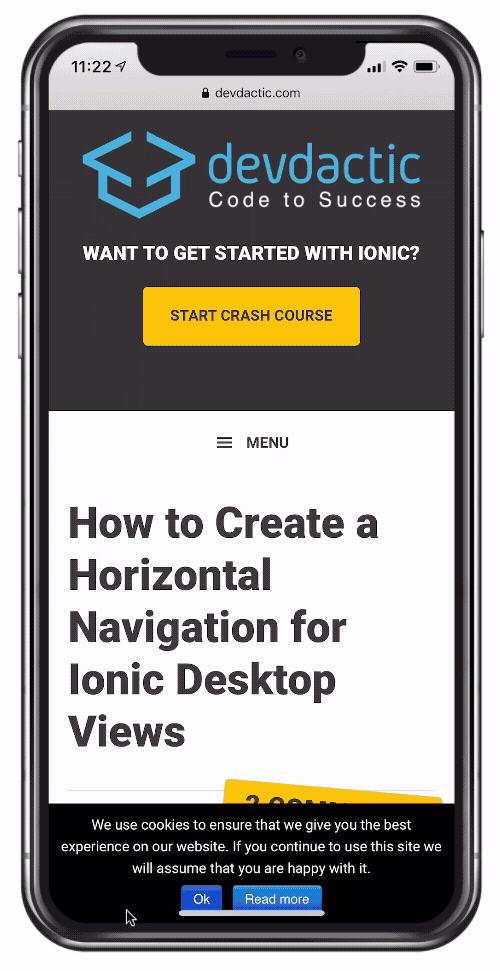
We will then be able to dive directly into a certain page of our Ionic app by simply opening a link inside an email, or like in the gif below with a special bar inside Safari!
Universal Links App Setup
Let’s start with the Ionic part. We are going to build an app that allows to open a certain page and show a post from this blog. This means, we will be able to open the app with e.g. ”https://devdactic.com/horizontal-navigation-ionic-desktop/” and within our app, we will open a page and have access to the slug of our Wordpress post which is “horizontal-navigation-ionic-desktop”.
With this information we can use the WP API to grab the whole article and display it.
But there are tons of use cases, just look at the Amazon app: If you got the app, all links to Amazon products will automatically open the app on your device!
Go ahead and create the app:
ionic start devdacticLinks blank --type=angular
cd devdacticWordpress

ionic g page pages/posts
ionic g page pages/post

npm install @ionic-native/deeplinks

cordova plugin add ionic-plugin-deeplinks --variable URL_SCHEME=devdactic --variable DEEPLINK_SCHEME=https --variable DEEPLINK_HOST=devdactic.com
We are also using the deeplinks plugin, which will set some information for our native platforms. We pass 3 values to it, which you should change to your values:
- URL_SCHEME: A custom URL scheme, which was used in the past to open apps like devdactic://app/whatever
- DEEPLINK_SCHEME: Keep this to https, it’s needed on Android anyway
- DEEPLINK_HOST: The host you want to use for your URLs. You need to have access to the domain and hosting to upload files later!
Now go ahead and import our plugin and add the HttpClientModule to our app/app.module.ts:
import { NgModule } from '@angular/core';
import { BrowserModule } from '@angular/platform-browser';
import { RouteReuseStrategy } from '@angular/router';

import { IonicModule, IonicRouteStrategy } from '@ionic/angular';
import { SplashScreen } from '@ionic-native/splash-screen/ngx';
import { StatusBar } from '@ionic-native/status-bar/ngx';

import { AppComponent } from './app.component';
import { AppRoutingModule } from './app-routing.module';
import { HttpClientModule } from '@angular/common/http';
import { Deeplinks } from '@ionic-native/deeplinks/ngx';

@NgModule({
  declarations: [AppComponent],
  entryComponents: [],
  imports: [BrowserModule, IonicModule.forRoot(), AppRoutingModule, HttpClientModule],
  providers: [
    StatusBar,
    SplashScreen,
    { provide: RouteReuseStrategy, useClass: IonicRouteStrategy },
    Deeplinks
  ],
  bootstrap: [AppComponent]
})
export class AppModule {}
As planned in the beginning, we want to have a page where we can pass information to. We won’t really use our other post list page, but you could follow the original Wordpress tutorial to build that list as well!
So open the app/app-routing.module.ts and change our routing to:
import { NgModule } from '@angular/core';
import { PreloadAllModules, RouterModule, Routes } from '@angular/router';

const routes: Routes = [
  { path: '', redirectTo: 'posts', pathMatch: 'full' },
  {
    path: 'posts',
    loadChildren: () => import('./pages/list/list.module').then( m => m.ListPageModule)
  },
  {
    path: 'posts/:slug',
    loadChildren: () => import('./pages/post/post.module').then( m => m.PostPageModule)
  },
];

@NgModule({
  imports: [
    RouterModule.forRoot(routes, { preloadingStrategy: PreloadAllModules })
  ],
  exports: [RouterModule]
})
export class AppRoutingModule { }
We are now able to route to the posts/:slug page, which we will implement soon.
For now, let’s configure our deeplinks. We can use the installed plugin to match incoming routes and then perform certain actions.
Normally this call used the page and navigation controller directly to open a page, but since v4 I couldn’t find a way to make this work in the expected way. You can still see the initial behaviour in the docs.
Instead, we want to catch the incoming route (the first parameter) and pass “posts” as the second value. The reason is that we are then able to construct the path inside our app based on these values and arguments which we can access inside the subscribe block.
Finally we are able to route inside our app with these values to open our planned page, so go ahead and change the app/app.component.ts:
import { Component } from '@angular/core';

import { Platform } from '@ionic/angular';
import { SplashScreen } from '@ionic-native/splash-screen/ngx';
import { StatusBar } from '@ionic-native/status-bar/ngx';
import { Deeplinks } from '@ionic-native/deeplinks/ngx';
import { Router } from '@angular/router';
import { NgZone } from '@angular/core';

@Component({
  selector: 'app-root',
  templateUrl: 'app.component.html',
  styleUrls: ['app.component.scss']
})
export class AppComponent {
  constructor(
    private platform: Platform,
    private splashScreen: SplashScreen,
    private statusBar: StatusBar,
    private deeplinks: Deeplinks,
    private router: Router,
    private zone: NgZone
  ) {
    this.initializeApp();
  }

  initializeApp() {
    this.platform.ready().then(() => {
      this.statusBar.styleDefault();
      this.splashScreen.hide();
      this.setupDeeplinks();
    });
  }

  setupDeeplinks() {
    this.deeplinks.route({ '/:slug': 'posts' }).subscribe(
      match => {
        console.log('Successfully matched route', match);

        // Create our internal Router path by hand
        const internalPath = `/${match.$route}/${match.$args['slug']}`;

        // Run the navigation in the Angular zone
        this.zone.run(() => {
          this.router.navigateByUrl(internalPath);
        });
      },
      nomatch => {
        // nomatch.$link - the full link data
        console.error("Got a deeplink that didn't match", nomatch);
      }
    );
  }
}
Through this transformation we basically enter the app with a full URL like https://devdactic.com/ionic-4-wordpress-client/ which now becomes /posts/ionic-4-wordpress-client inside our app!
Let’s finally implement our details page, which is of course just an example - but an example on how you can pass the values from the initial real world URL to the page inside your app!
So we are using some code from our initial Wordpress tutorial to grab the post data based on the slug that we can now access from the URL.
Change the app/pages/post/post.page.ts to this:
import { Component, OnInit } from '@angular/core';
import { HttpClient } from '@angular/common/http';
import { ActivatedRoute } from '@angular/router';
import { map } from 'rxjs/operators';

@Component({
  selector: 'app-post',
  templateUrl: './post.page.html',
  styleUrls: ['./post.page.scss']
})
export class PostPage implements OnInit {
  post = null;

  constructor(private http: HttpClient, private route: ActivatedRoute) {}

  ngOnInit() {
    let slug = this.route.snapshot.paramMap.get('slug');
    let url = `https://devdactic.com/wp-json/wp/v2/posts?slug=${slug}&_embed`;

    this.http
      .get<any[]>(url)
      .pipe(
        map(res => {
          let post = res[0];
          // Quick change to extract the featured image
          post['media_url'] =
            post['_embedded']['wp:featuredmedia'][0]['media_details'].sizes['medium'].source_url;
          return post;
        })
      )
      .subscribe(post => {
        this.post = post;
      });
  }
}
Now with the post data in place, a super simple view for this page inside app/pages/post/post.page.html could look like this:
<ion-header>
  <ion-toolbar color="primary">
    <ion-buttons slot="start">
      <ion-back-button defaultHref="/posts"></ion-back-button>
    </ion-buttons>
    <ion-title>{{ post?.title.rendered }}</ion-title>
  </ion-toolbar>
</ion-header>

<ion-content class="ion-padding">

  <div *ngIf="post">
    <img [src]="post.media_url" [style.width]="'100%'">
    <div [innerHTML]="post.content.rendered" padding></div>
  </div>

</ion-content>
That’s all we need for the Ionic app. We can actually run this app already in the browser, which will display an empty list. But you can manually navigate to the details page by including the slug in the URL to show the data from Wordpress and to see that everything works!
It’s actually important to test drive it before we go any further because from now on, things can get tricky and ugly if you just make a tiny mistake…

Wordpress Fix
First fix if you don’t get any Wordpress data (if you are using your own WP instance) is to allow the Ionic origin which is used when performing a call against the WP API from a device.
This has been the issue for many devs here, where the Ionic app with Wordpress worked fine inside the browser but not on a device.
To fix this, you can add the following snippet to the functions.php file of your theme:
add_filter('kses_allowed_protocols', function($protocols) {
    $protocols[] = 'ionic';
    return $protocols;
});
Yes, you have to change the WP code, not your Ionic app!
Android Setup
Now we want to make our links work on Android, where the name for these special links is app links.
First of all a tiny fix that you can add inside the config.xml to make the Android app launch only once from URL:
<preference name="AndroidLaunchMode" value="singleTask" />Now we need to take a few steps to verify that we own a URL and that we have a related app:
- Generate a keystore file used to sign your apps (if you haven’t already)
- Get the fingerprint from the keystore file
- Create/generate an assetlinks.json file
- Upload the file to your server
So first step is to create a keystore file and get the fingerprint data. This file is used to sign your app, so perhaps you already have it. Otherwise, go ahead with these:
keytool -genkey -v -keystore my-release-key.keystore -alias alias_name -keyalg RSA -keysize 2048 -validity 10000
keytool -list -v -keystore my-release-key.keystore
Now we can use the cool tool right here to generate our file by adding your domain data and fingerprint data.
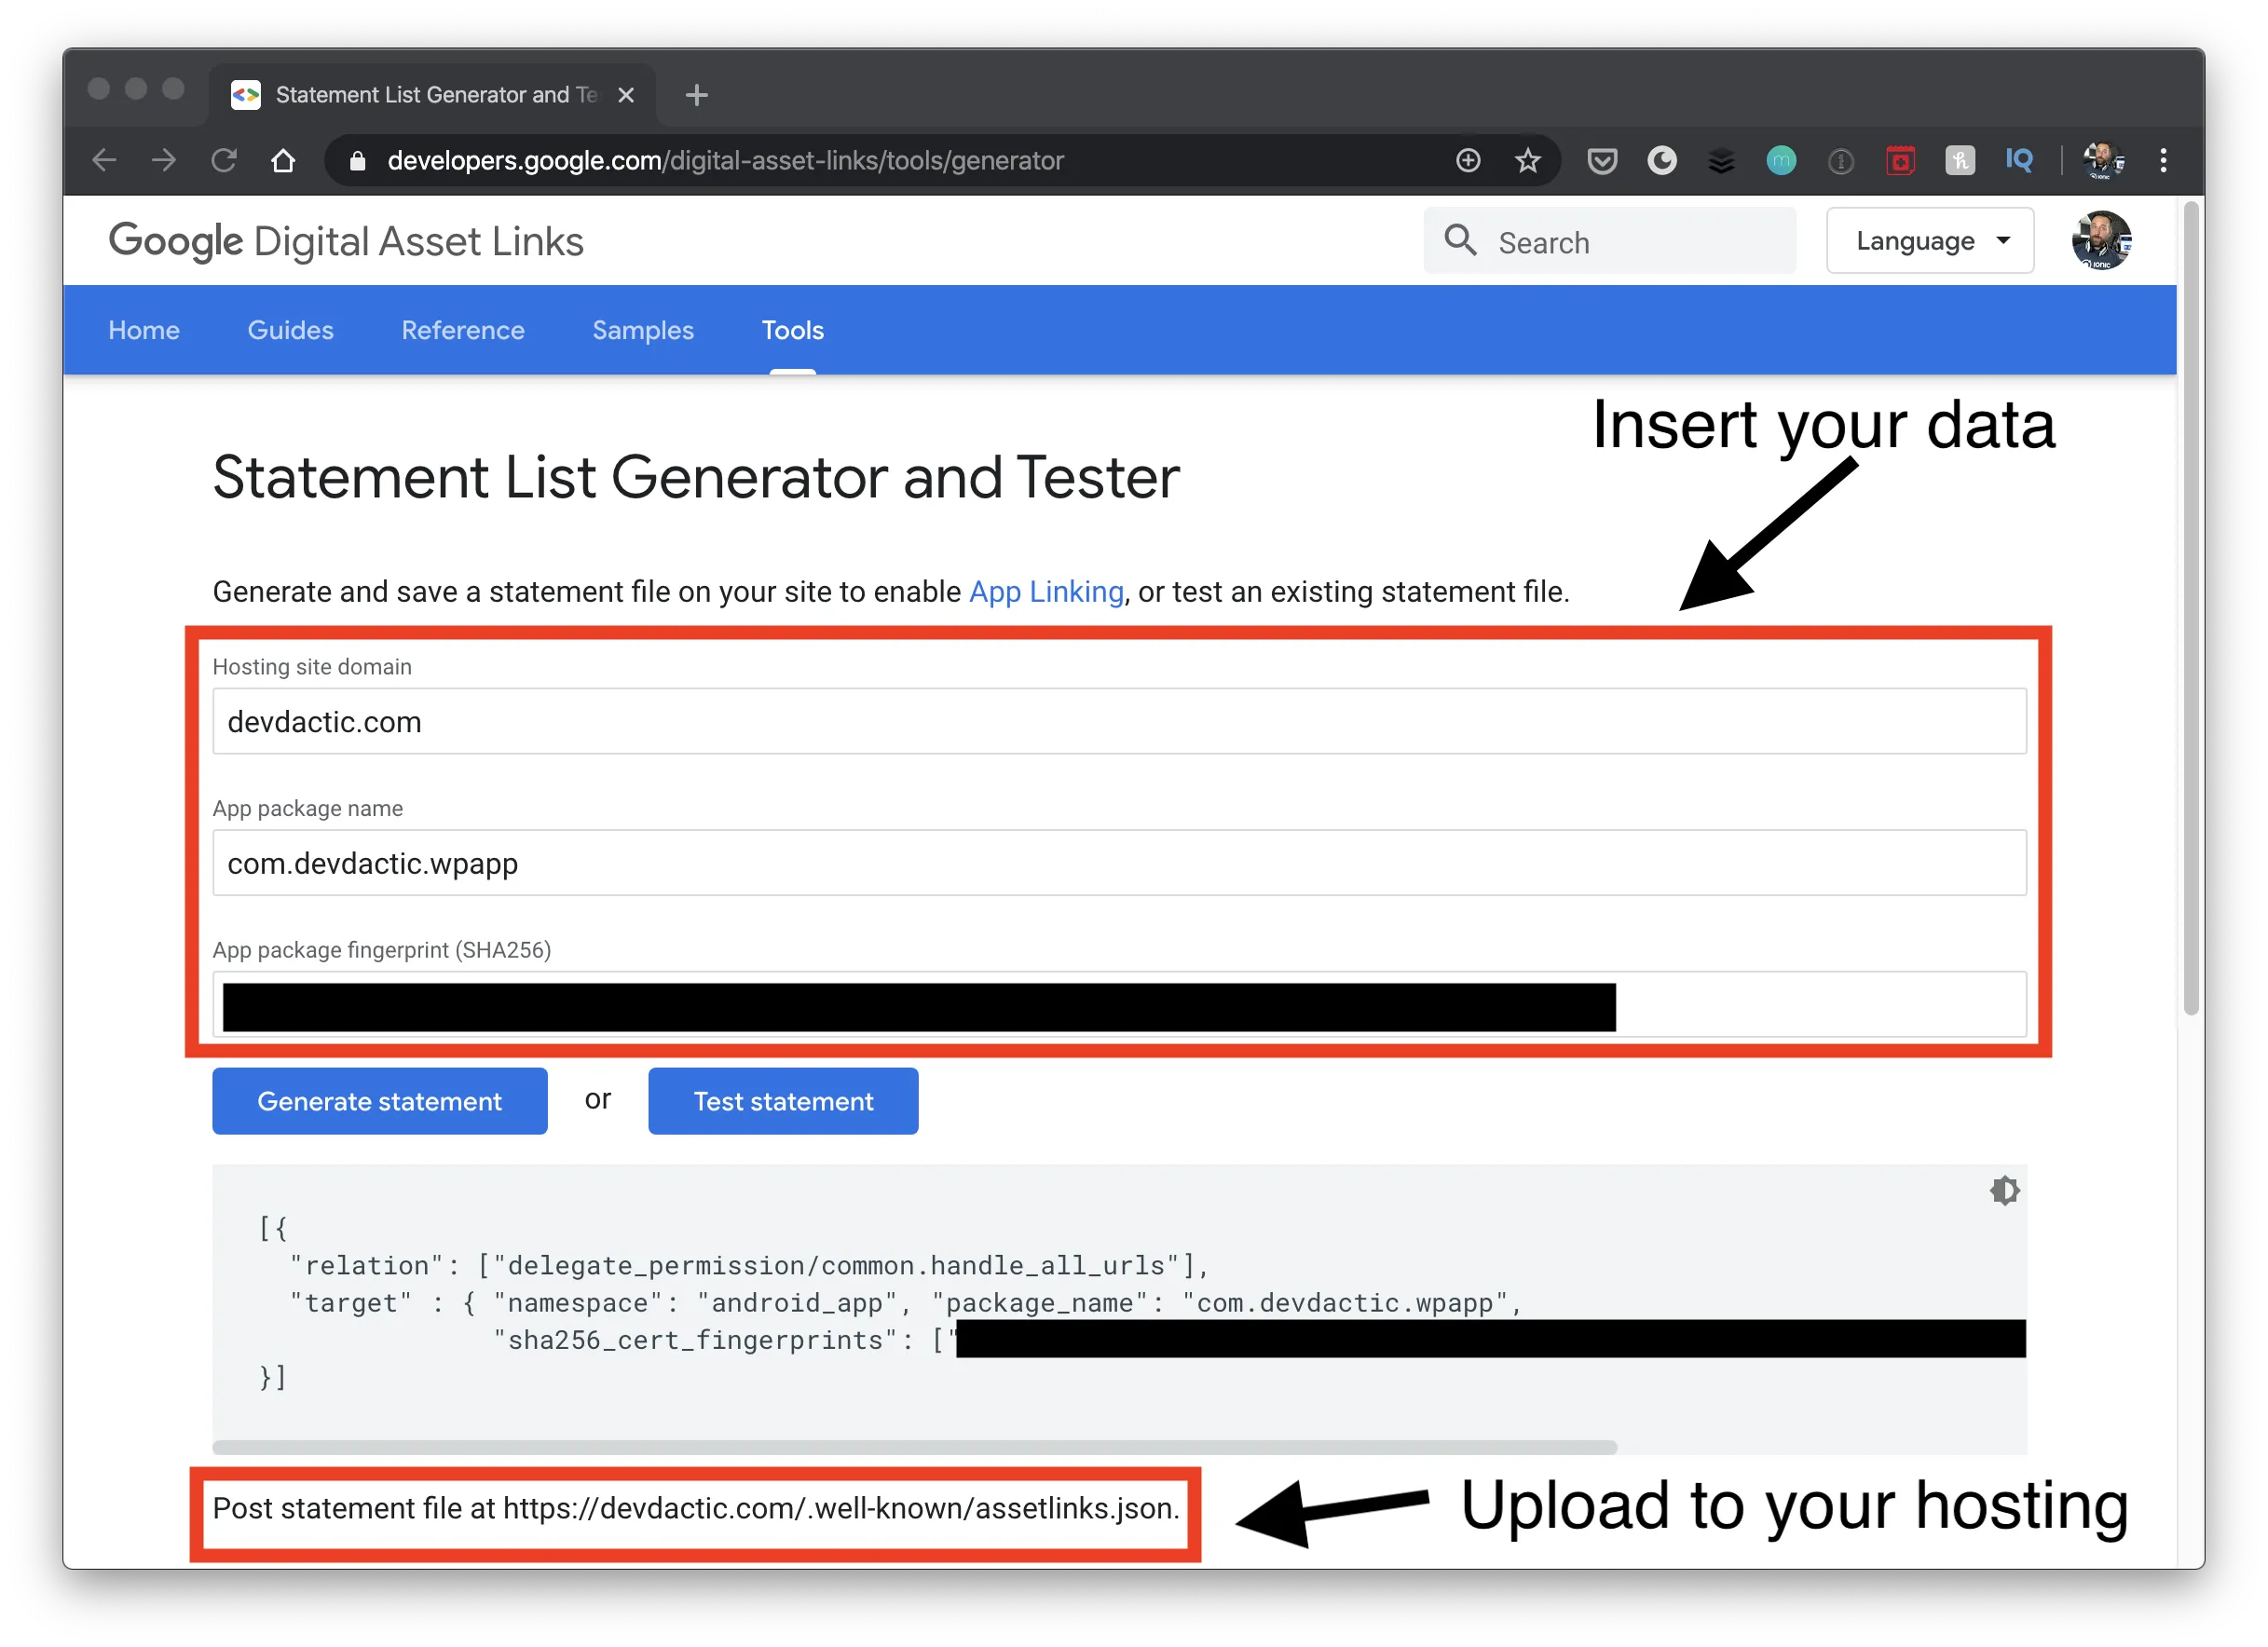
You can paste the generated information into an assetlinks.json file that you need to upload to your domain. The file content has this form:
[
  {
    "relation": ["delegate_permission/common.handle_all_urls"],
    "target": {
      "namespace": "android_app",
      "package_name": "com.your.package",
      "sha256_cert_fingerprints": [
        "YOURFINGERPRINT"
      ]
    }
  }
]
In my case, you can see the file at https://devdactic.com/.well-known/assetlinks.json and you need to upload it to the path on your domain of course as well.
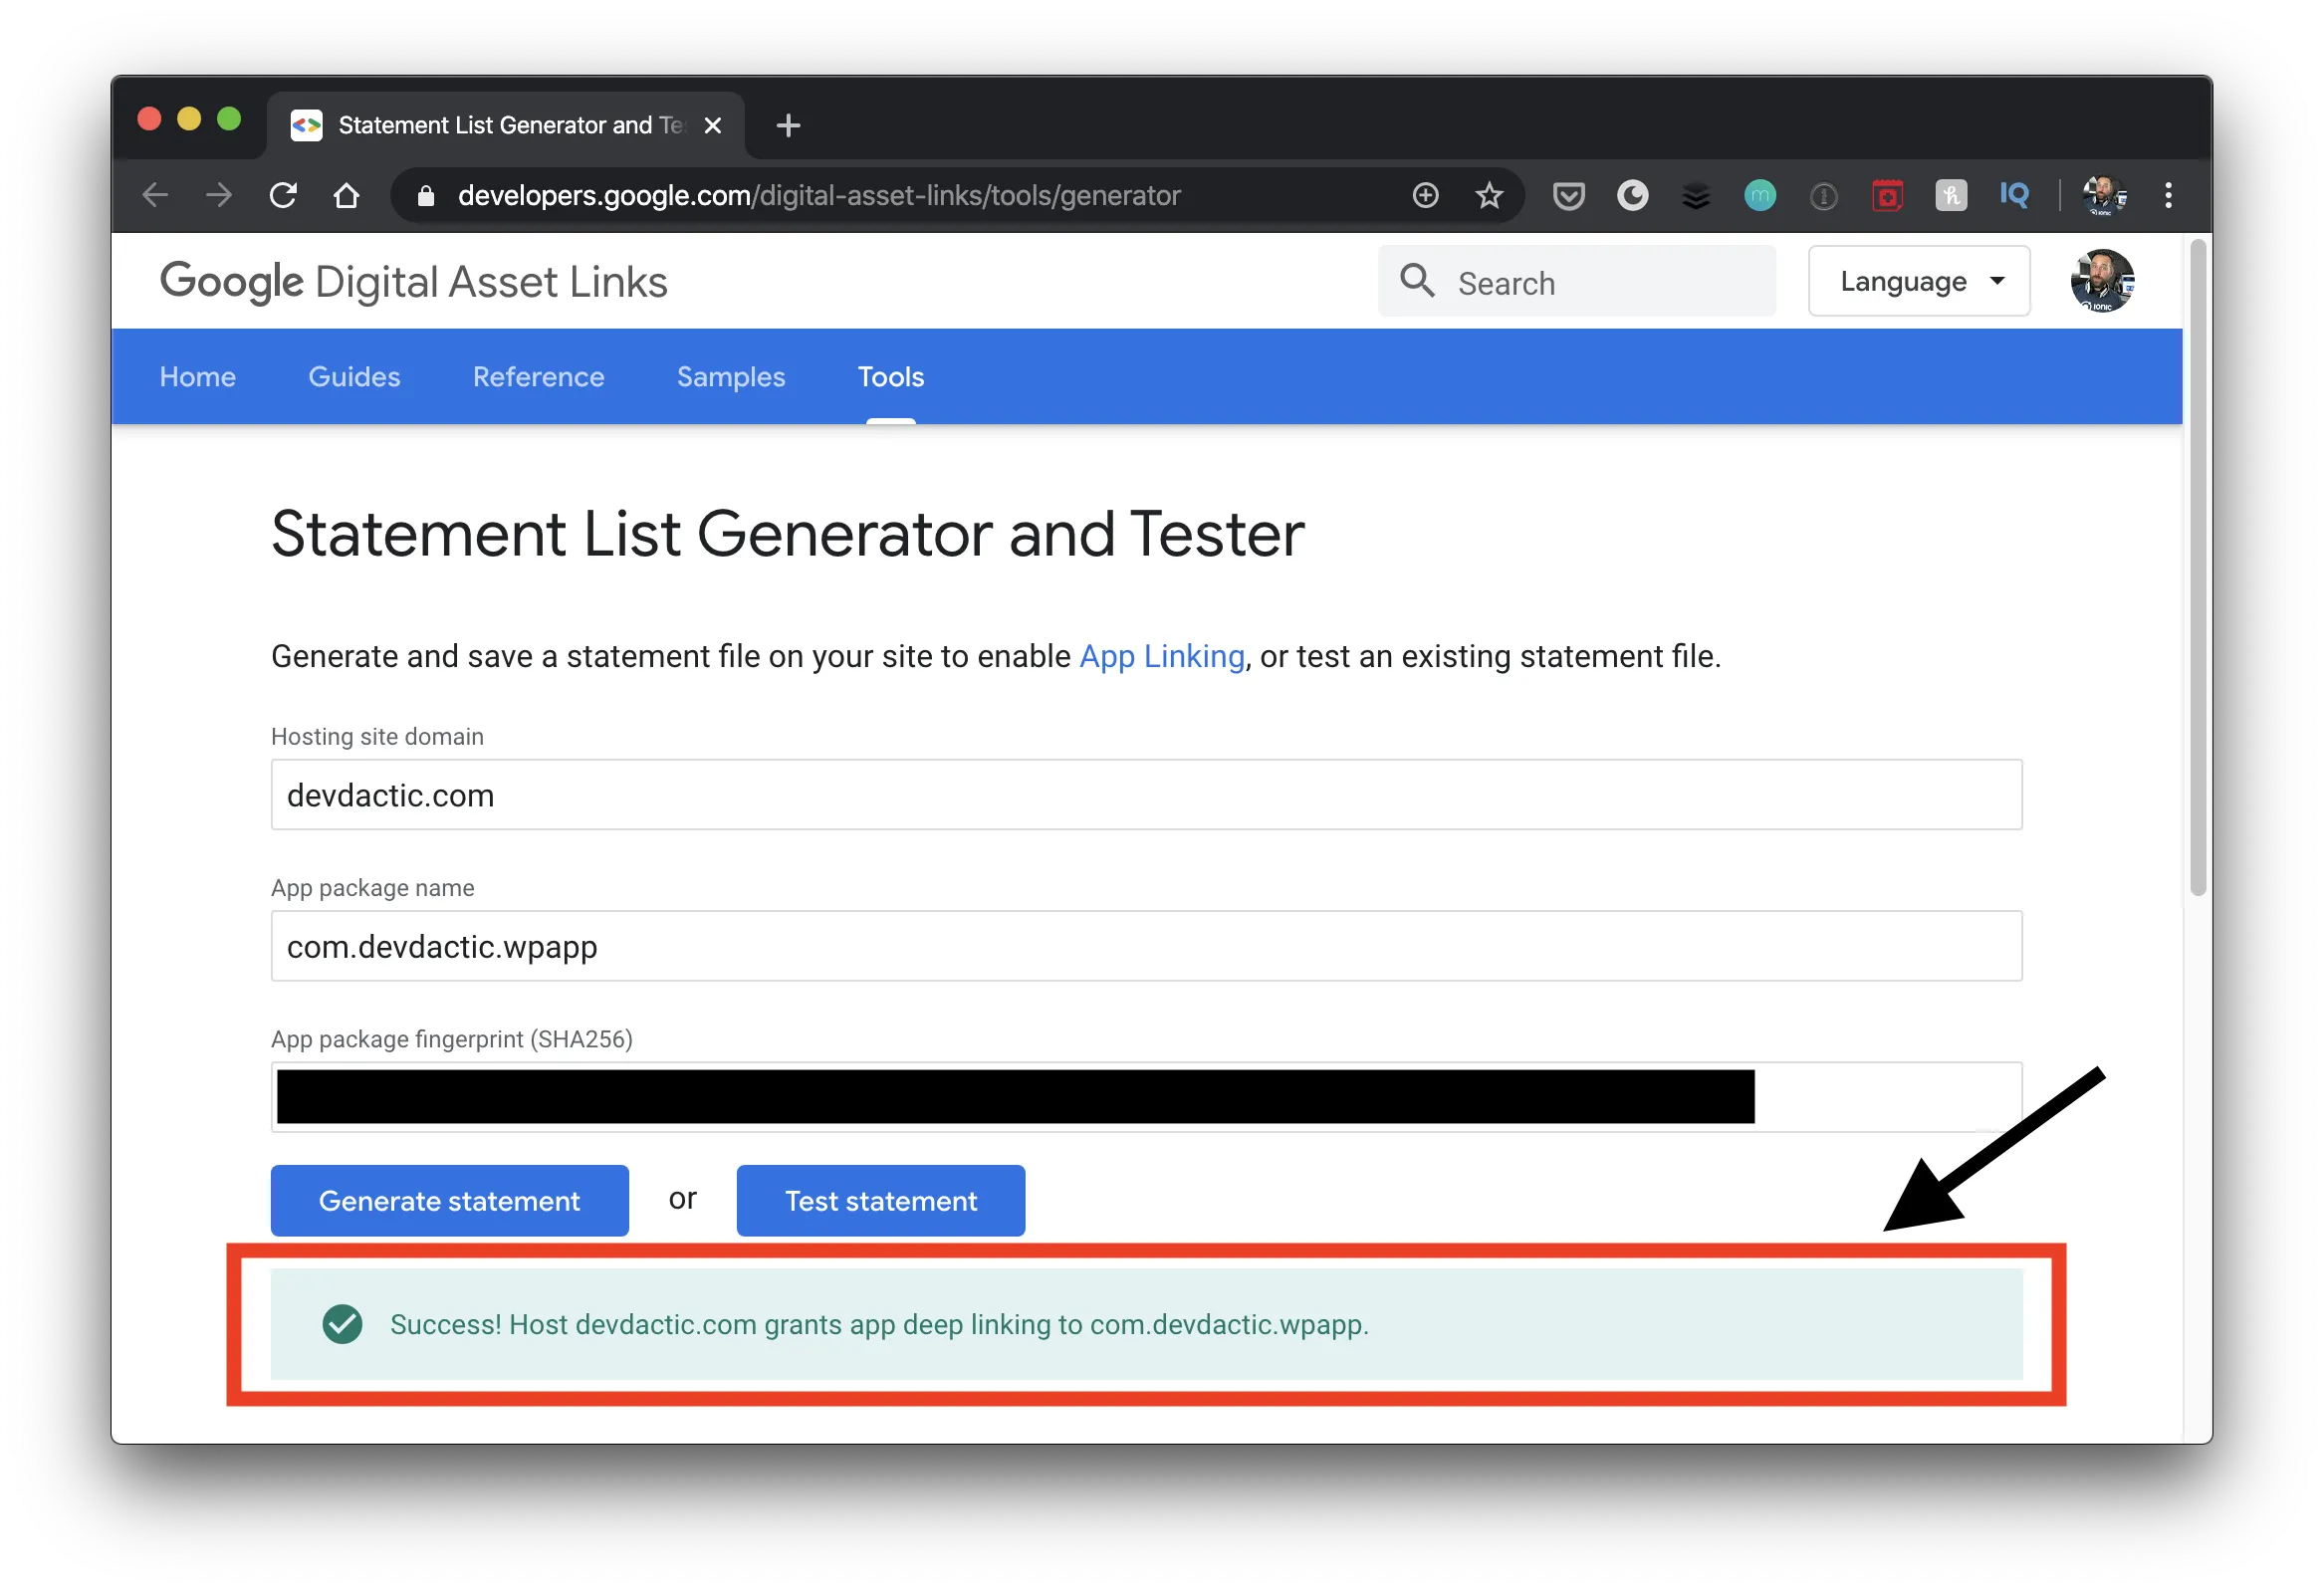
Once you have uploaded the file, you can test if everything is fine right within the testing tool and the result should be a green circle:
Now you just need to build your app and sign it, since I found issues when net signing my app. You can do this by running:
ionic cordova build android --release
jarsigner -verbose -sigalg SHA1withRSA -digestalg SHA1 -keystore my-release-key.keystore platforms/android/app/build/outputs/apk/release/app-release-unsigned.apk alias_name

# You might have to use the absolute path like ~/Android/sdk/build-tools/25.0.2/zipalign
zipalign -v 4 platforms/android/app/build/outputs/apk/release/app-release-unsigned.apk devdactic.apk

adb install devdactic.apk
Run all the commands and the app will be installed on your connected device. You can now create a note and paste in a link and click it, or you can directly fake the behaviour through the shell by running:
adb shell am start -a android.intent.action.VIEW -d "https://devdactic.com/ionic-4-wordpress-client" com.devdactic.wpappIf you are using your own domain, use that link. The “com.devdactic.wpapp” is the package name, which you have to set at the top of your config.xml.
When you performed all steps correctly, your app should open with a details page and show the information!
iOS Setup
Now we focus on iOS - so much fun!
First of all you need to be enrolled in the Apple Developer Program, which is also needed to submit your apps.
You app needs a valid identifier that you also always need when you submit your app. If you want to create a new one, just go to the identifiers list inside your account and add a new App id.
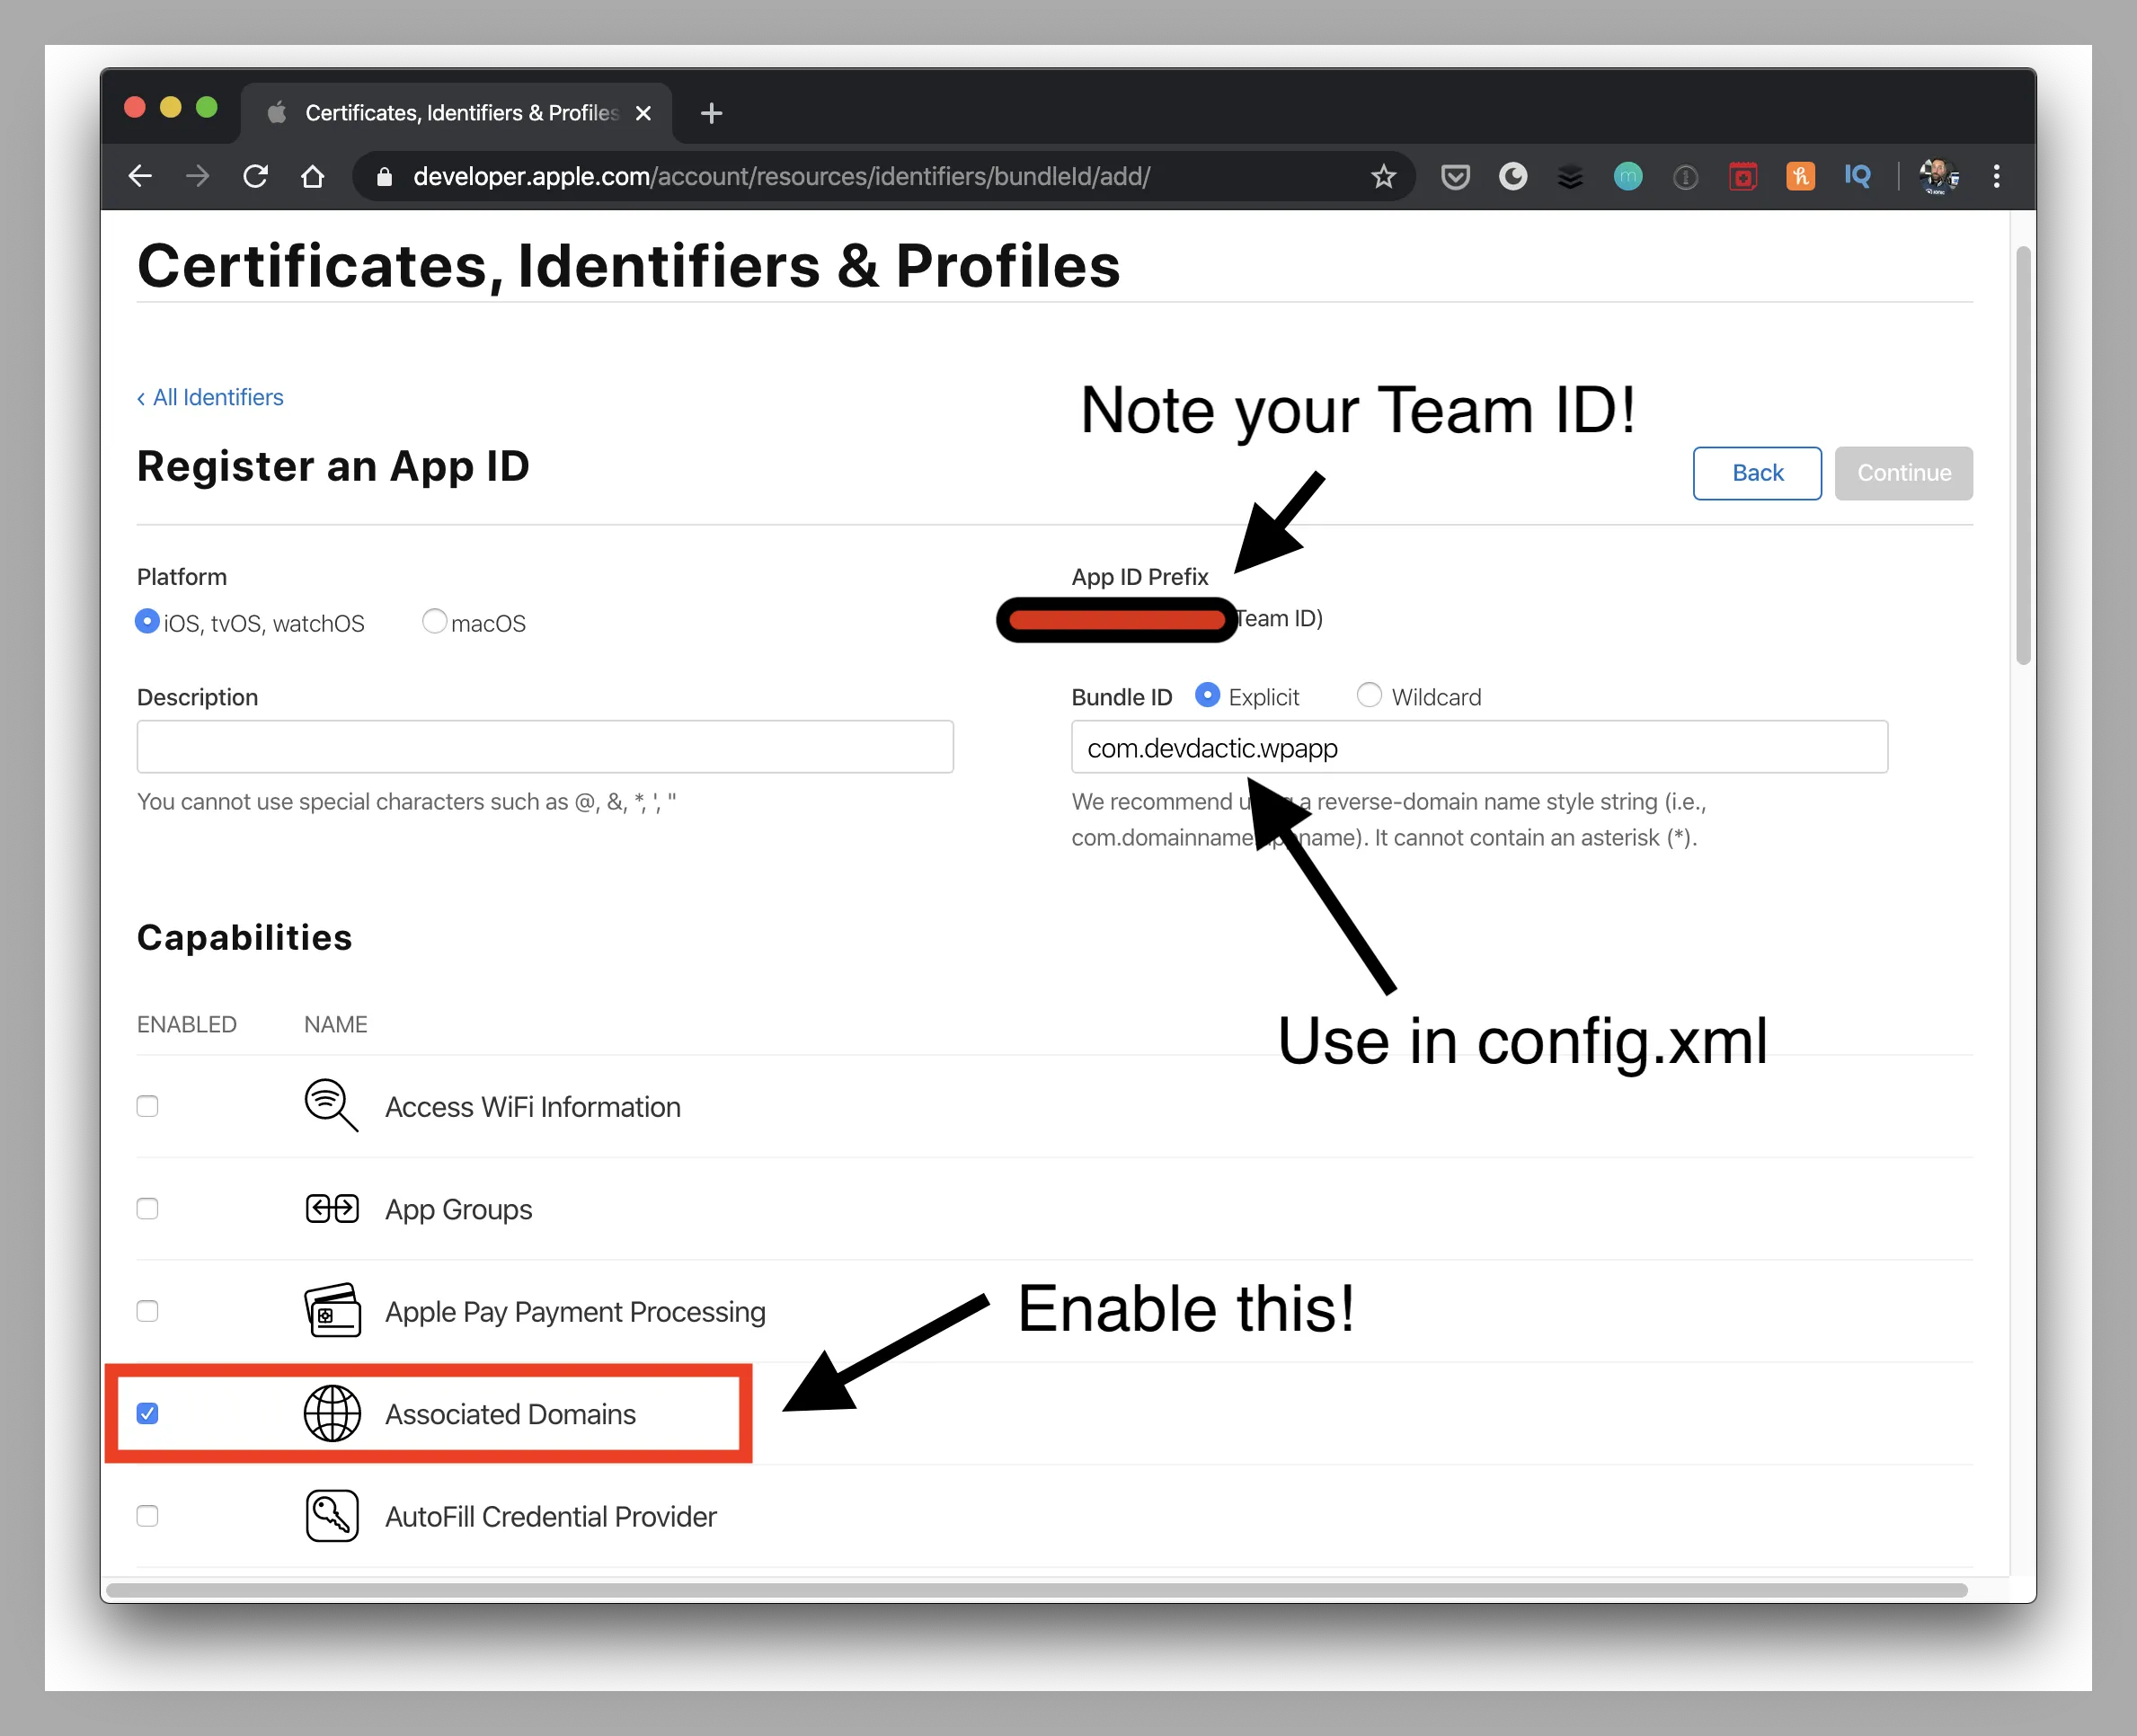
It’s important to enable Associated Domains for your app id in this screen!
In that screen you need to note 2 things (which you can see in the image above):
- The bundle id (app id) you specified
- Your Team id
Now we need to create another validation file, which is called apple-app-site-association. Without any ending, only this name!
The content should look like this, but of course insert your team id and bundle ID, for example “12345.com.devdactic.wpapp”:
{
    "applinks": {
        "apps": [],
        "details": [
            {
                "appID": "YOURTEAMID.com.your.bundleid",
                "paths": ["*"]
            }
        ]
    }
}
Next step, upload the validation file to your hosting. You can add the file to the same .well-known folder we used for Android, and your file needs to be accessible on your domain.
You can find my file here: http://devdactic.com/.well-known/apple-app-site-association
The file validates your domain for iOS, and you can also specify which paths should match. I used the * wildcard to match any routes, but if you only want to open certain paths directly in the app you could specify something like “products/*” or event multiple different paths!
If you think you did everything correctly, you can insert your data in this nice testing tool for iOS.
Update: There seems to be a better version of this testing tool here!
Perhaps your result is the same like I got, because it shows a critical error that we need to fix:
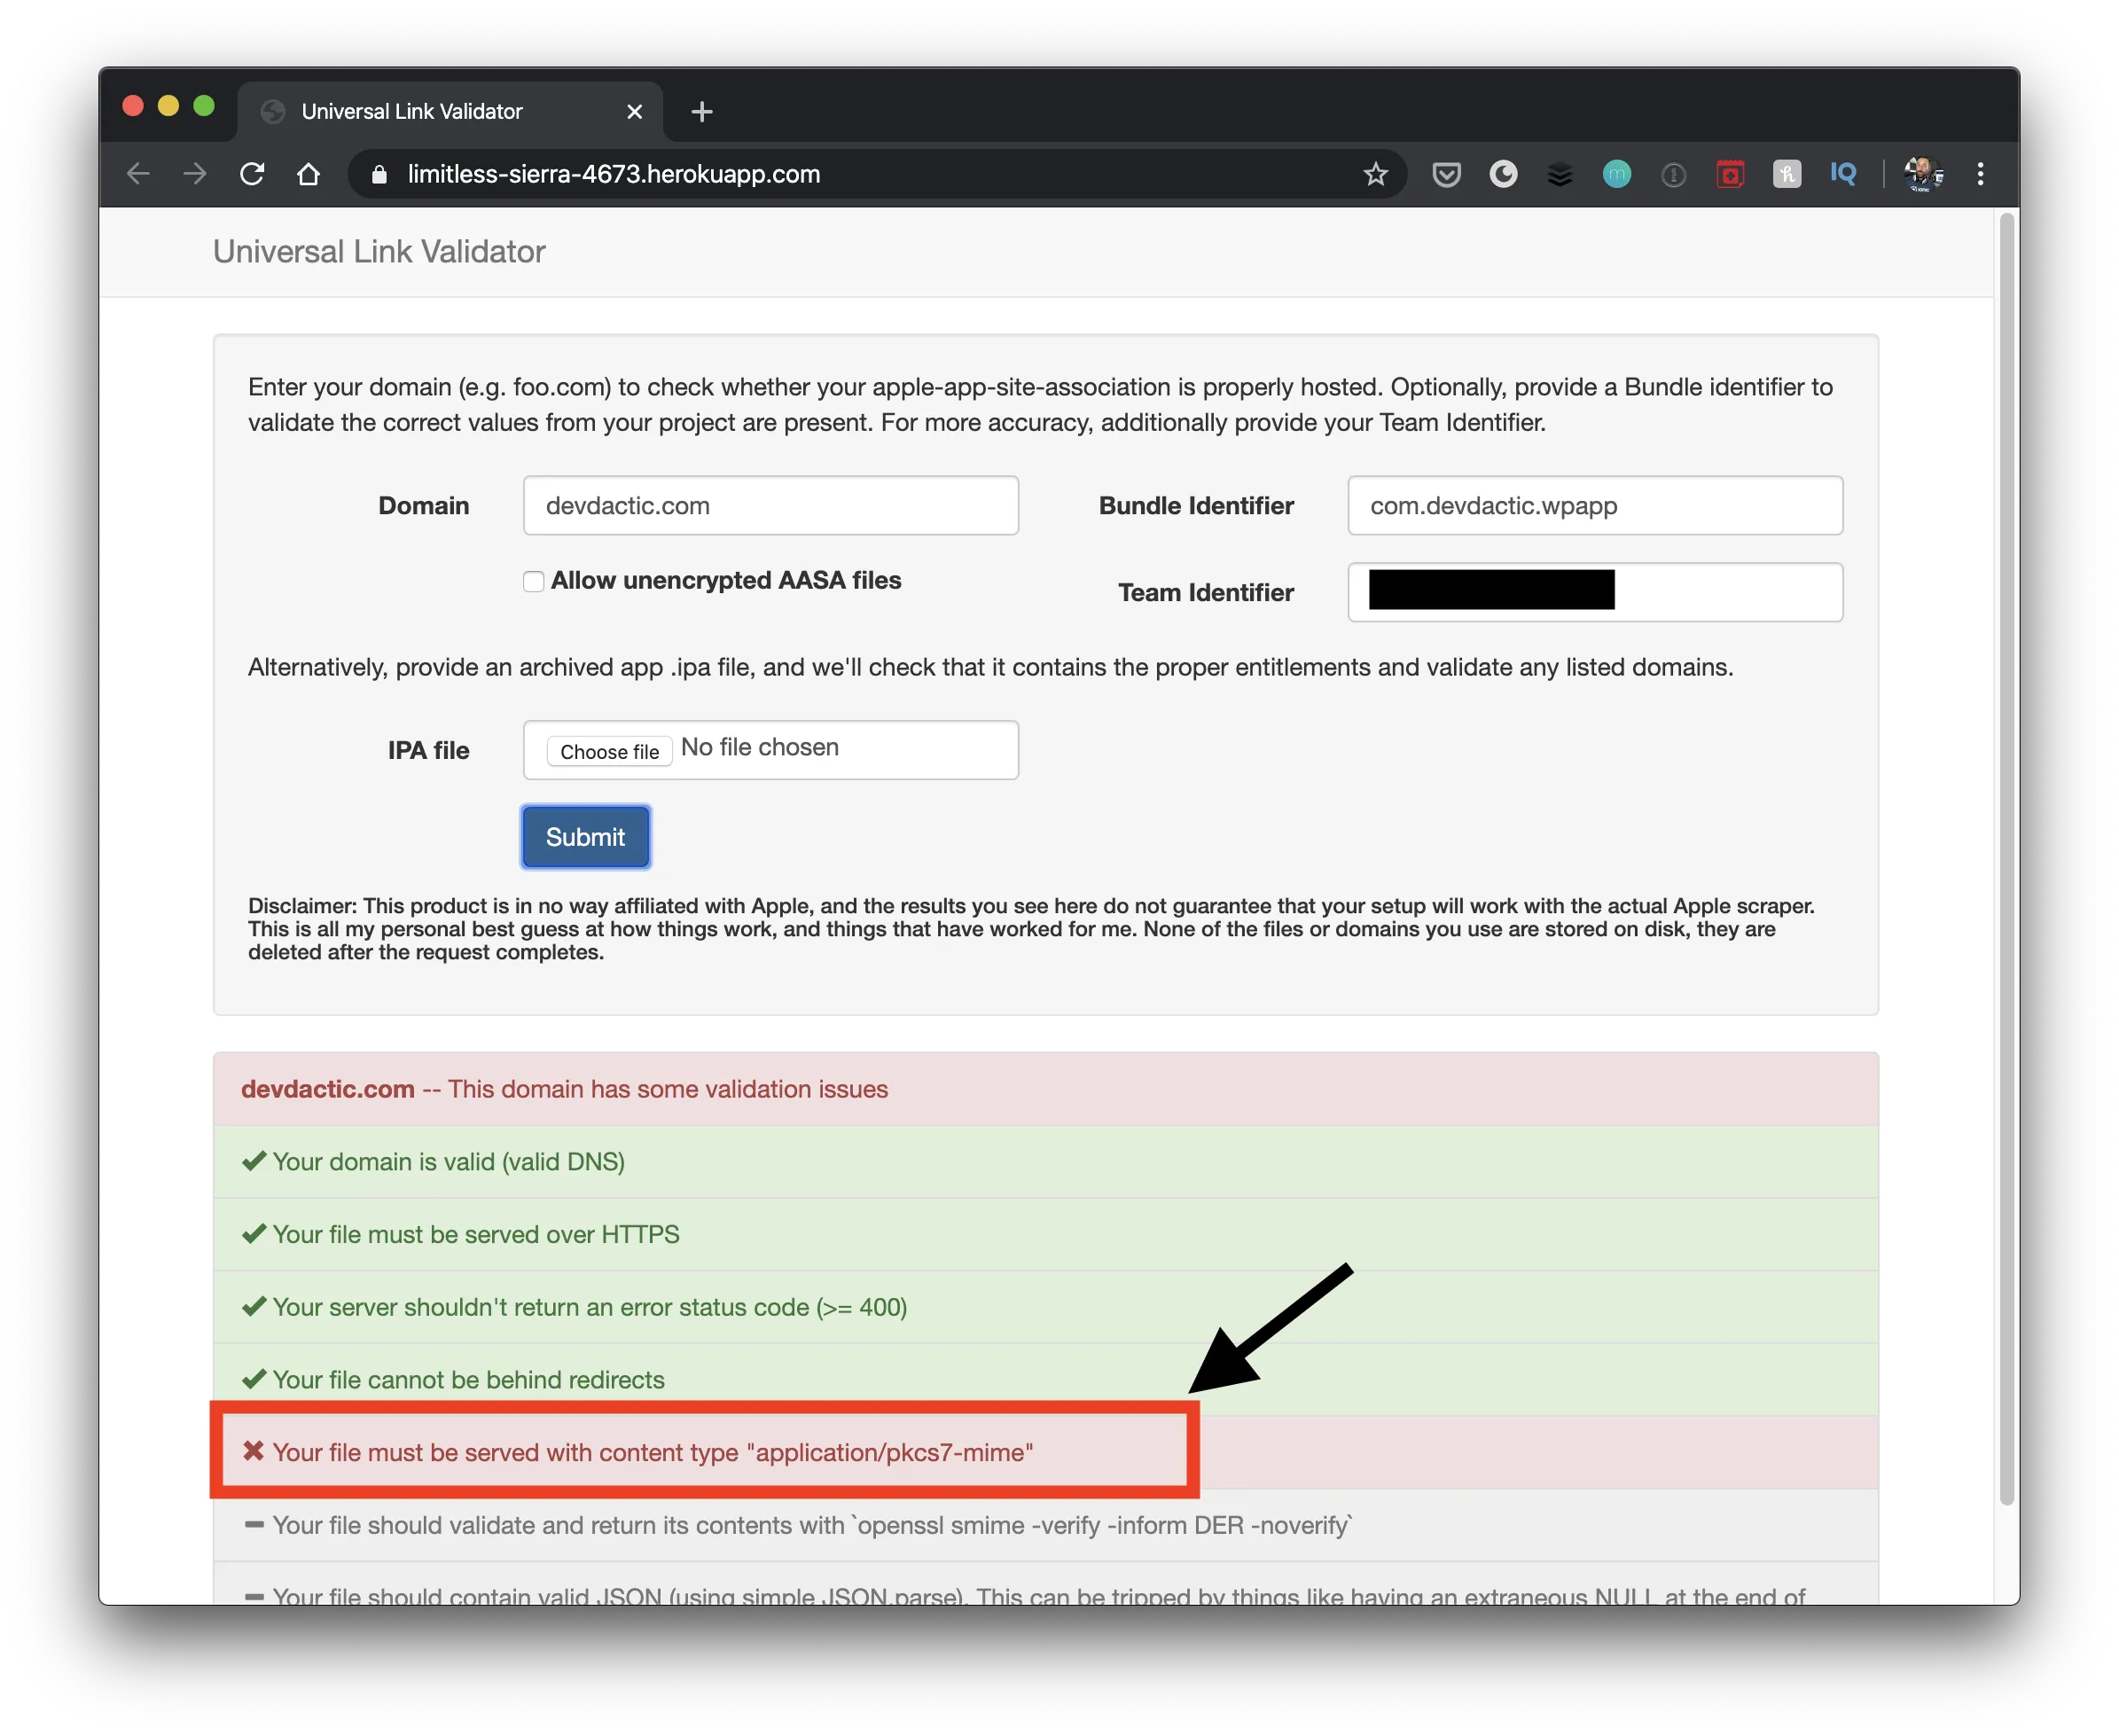
We need to set the right content type for the response of the validation file!
This now depends on your hosting, here’s the solution I could use. I edited my /etc/apache2/sites-available/default-ssl.conf on my server and added this short snippet:
<Directory /var/www/.well-known/>
<Files apple-app-site-association>
Header set Content-type "application/pkcs7-mime"
</Files>
</Directory>
Now the testing tool should mark the header as set correctly, the rest below isn’t important anymore. You don’t need to sign the file anymore, that was only needed in the past!
The last step is to add the domains to your Xcode plist. You can do this directly inside Xcode by adding a new entry and using the format ”applinks:yourdomain.com“.
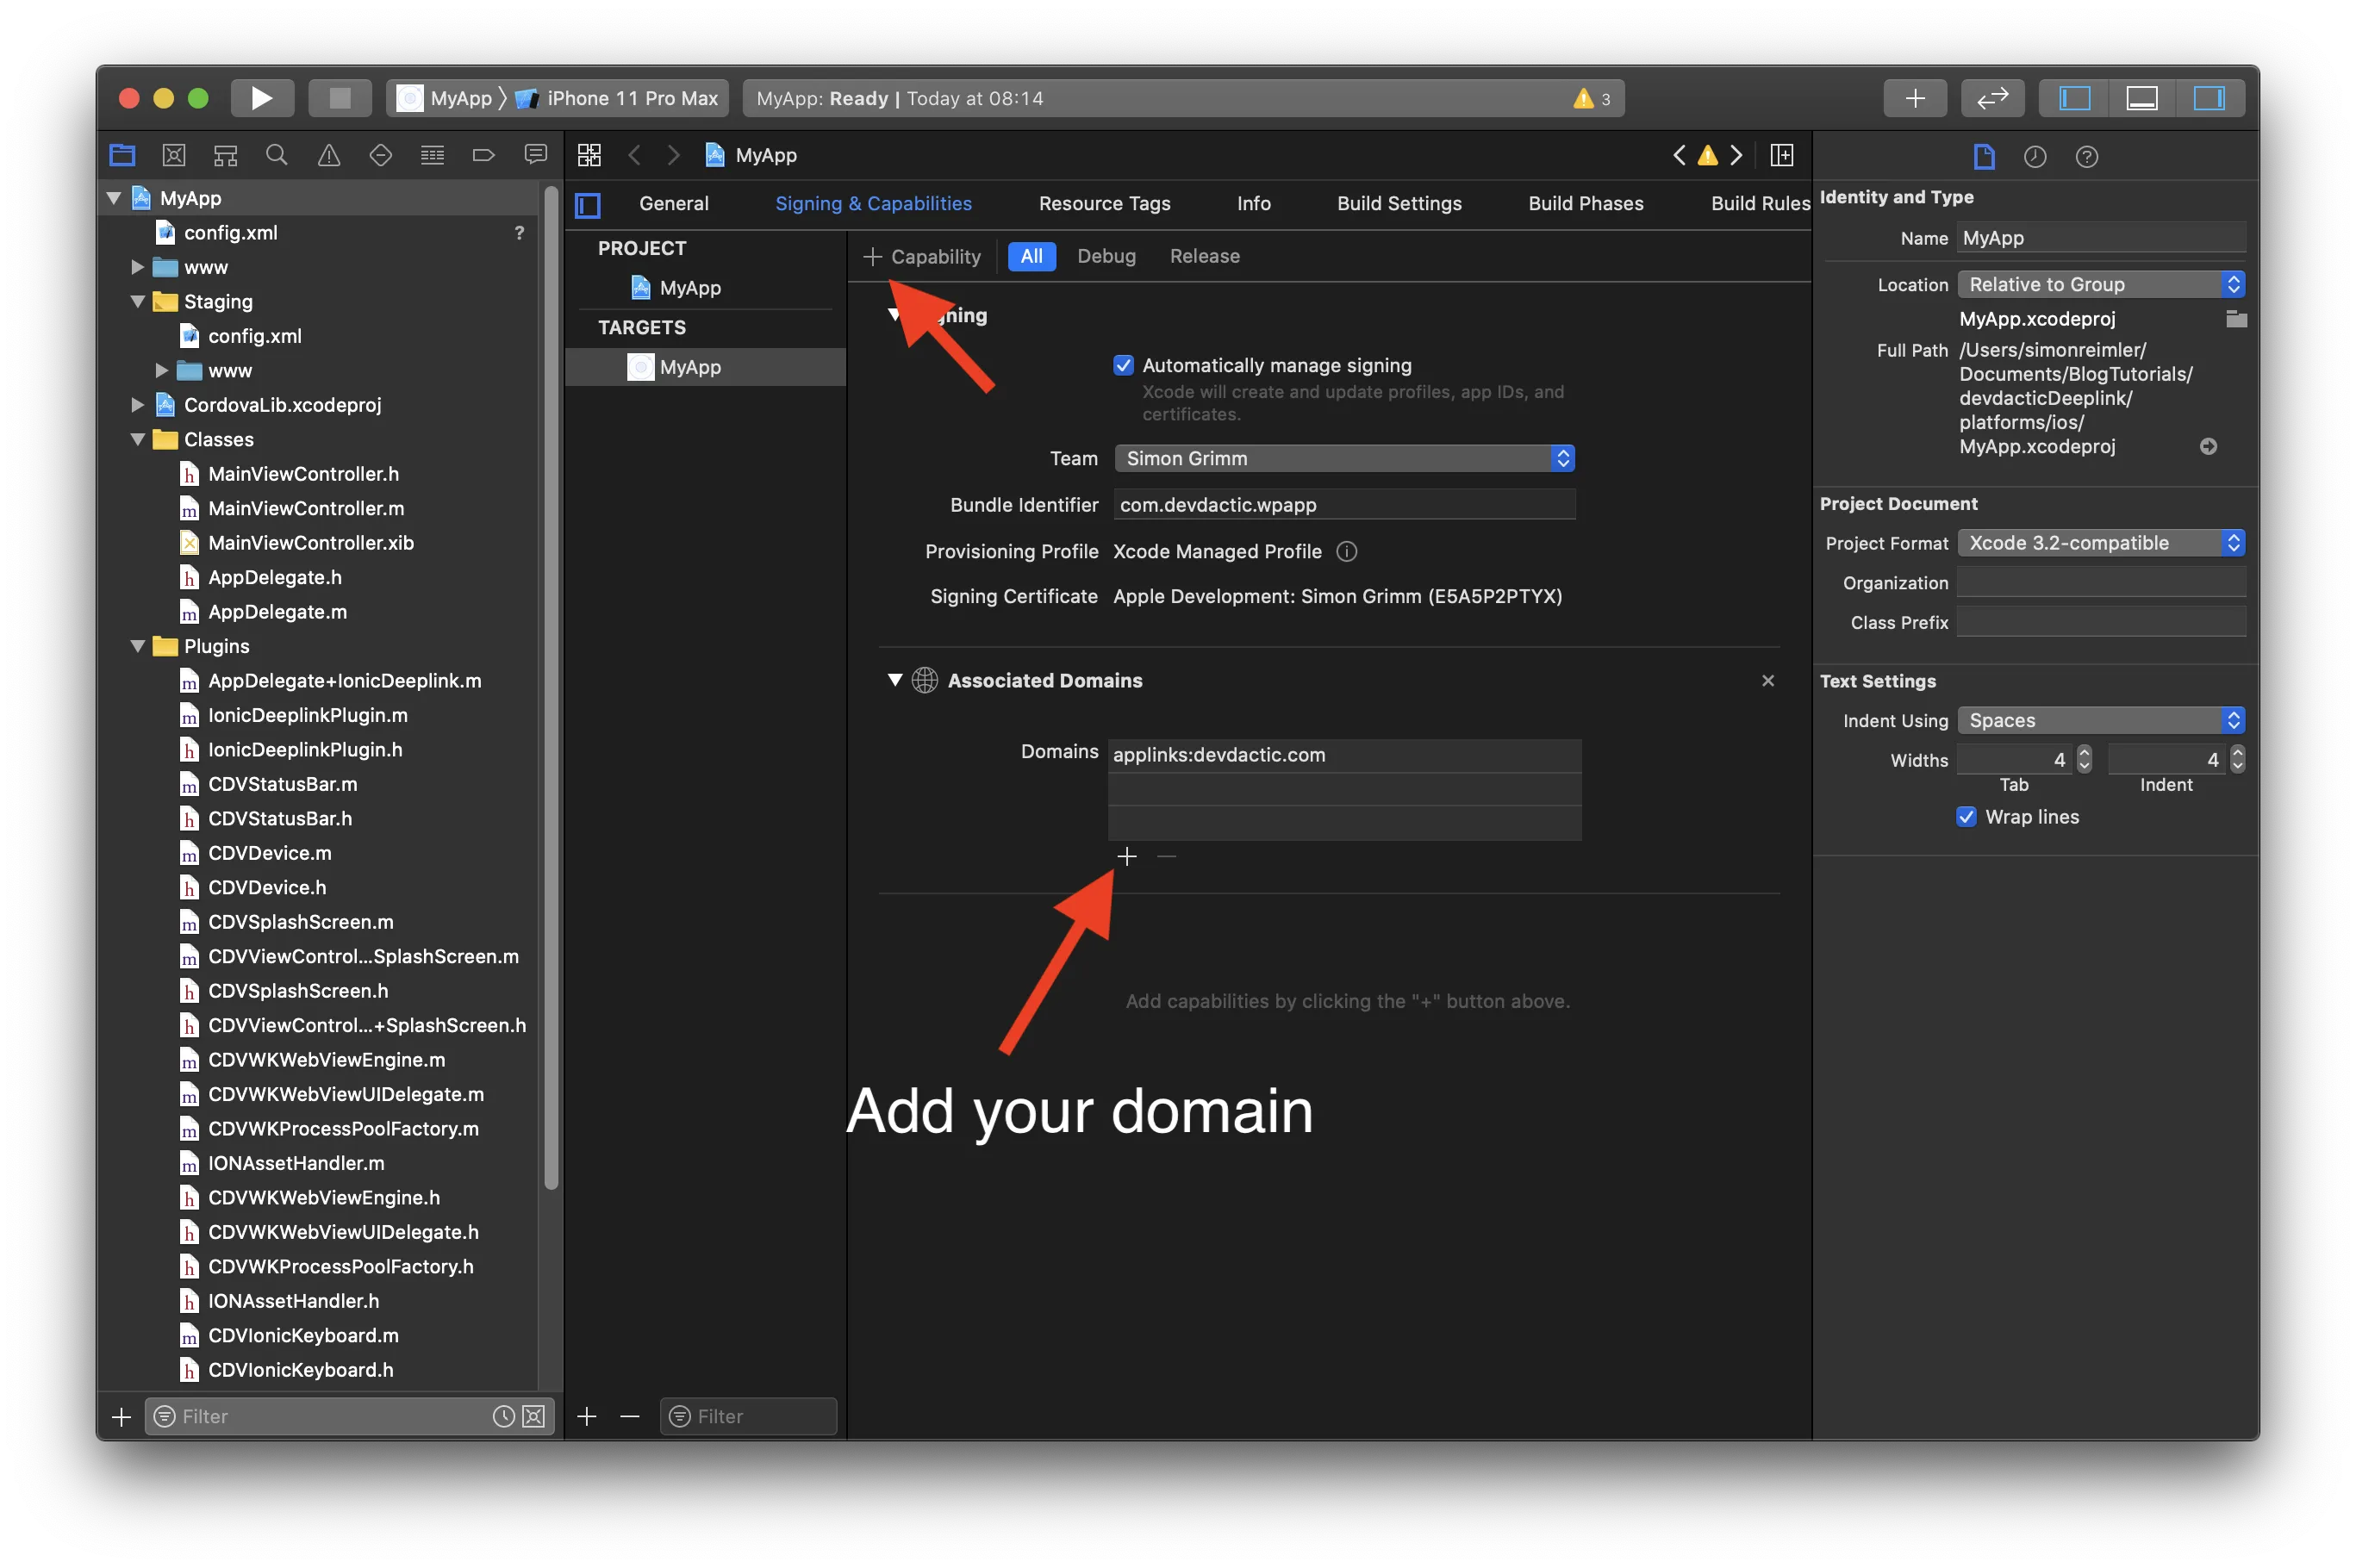
But a better idea is actually to automate the whole process, and you can do this by adding the following snippet into the iOS section of your config.xml:
        <config-file parent="com.apple.developer.associated-domains" target="*-Debug.plist">
            <array>
                <string>applinks:devdactic.com</string>
            </array>
        </config-file>
        <config-file parent="com.apple.developer.associated-domains" target="*-Release.plist">
            <array>
                <string>applinks:devdactic.com</string>
            </array>
        </config-file>
Of course you need to change the value to use your domain, but then it will be automatically added and you don’t need to change the Xcode settings manually!
Conclusion
If you followed all steps correctly you should be able to open your app through a regular link to your domain!
In case it doesn’t work…
- Use the validation tools and check if your files are accessible correctly
- Completely remove the app and install it again while testing
- If your app opens on the list page: Add some logs to the deeplink match function (inside subscribe) to see if your app is actually getting there, and see which arguments you got there
It’s a tricky process, but once you’ve set up everything one time you have a great addition to your Ionic app!
You can also find a video version of this tutorial below.