How to Build A Simple Ionic 4 Wordpress Client Last update: 2019-04-02

As basically the whole internet is powered by Wordpress, chances are high you have to interact with it at if a client approaches you for a mobile app.
Because by now Wordpress includes a great REST API we can easily connect our Ionic app to the data it holds. While we previously used the wp-api-angular package, it seems like the plugin is basically dead and not maintained so let’s just use the API directly!
Setting up our Ionic 4 Wordpress App
We start with a blank Ionic 4 app and just create some additional pages and a service, so no further plugin needed!
ionic start devdacticWordpress blank --type=angular
cd devdacticWordpress

ionic g page pages/posts
ionic g page pages/post
ionic g service services/wordpress
Now we also need to include the module to make Http calls to the API so change your app/app.module.ts to:
import { NgModule } from '@angular/core';
import { BrowserModule } from '@angular/platform-browser';
import { RouteReuseStrategy } from '@angular/router';

import { IonicModule, IonicRouteStrategy } from '@ionic/angular';
import { SplashScreen } from '@ionic-native/splash-screen/ngx';
import { StatusBar } from '@ionic-native/status-bar/ngx';

import { AppComponent } from './app.component';
import { AppRoutingModule } from './app-routing.module';

import { HttpClientModule } from '@angular/common/http';

@NgModule({
  declarations: [AppComponent],
  entryComponents: [],
  imports: [BrowserModule, IonicModule.forRoot(), AppRoutingModule,
    HttpClientModule],
  providers: [
    StatusBar,
    SplashScreen,
    { provide: RouteReuseStrategy, useClass: IonicRouteStrategy }
  ],
  bootstrap: [AppComponent]
})
export class AppModule {}
Finally we need to setup our routing. We will have a list of Wordpress posts and also a details page for one post. Therefore, connect the two pages we created before like this inside our app/app-routing.module.ts:
import { NgModule } from '@angular/core';
import { Routes, RouterModule } from '@angular/router';

const routes: Routes = [
  { path: '', redirectTo: 'posts', pathMatch: 'full' },
  { path: 'posts', loadChildren: './pages/posts/posts.module#PostsPageModule' },
  { path: 'posts/:id', loadChildren: './pages/post/post.module#PostPageModule' },
];

@NgModule({
  imports: [RouterModule.forRoot(routes)],
  exports: [RouterModule]
})
export class AppRoutingModule { }
Now we start at the list page and can navigate into the details of one specific blog post!
Creating the Wordpress Service
Before we go into creating our views we setup the logic to retrieve all data. In our post we will simply make a call to get a list of posts, but you can get basically all data from the Wordpress API like categories, tags, pages…
We will also limit our calls to only retrieve 5 posts at a time and also use the page parameter so we can later add some cool loading to our list.
Besides that we need to make another change if you want to know how many pages/results the API actually holds: First, we have to add the observe key to our options and pass response as the value. But because this results in a Typescript error, we also need to have it as 'body' but maybe this will be fixed anytime soon.
Now the response of the API call holds more information than normally - it also contains the header fields! In this value we can find x-wp-totalpages and x-wp-total which are the actual information we need!
I also added a little conversion directly here so we can later access the image more easily which is buried deep down in the response otherwise. Same for the function to retrieve a single post of course.
All of this goes into your app/services/wordpress.service.ts like this:
import { Injectable } from '@angular/core';
import { HttpClient } from '@angular/common/http';
import { Observable } from 'rxjs';
import { map } from 'rxjs/operators';

@Injectable({
  providedIn: 'root'
})
export class WordpressService {

  url = `https://yourwordpresspage.com/wp-json/wp/v2/`;
  totalPosts = null;
  pages: any;

  constructor(private http: HttpClient) { }

  getPosts(page = 1): Observable<any[]> {
    let options = {
      observe: "response" as 'body',
      params: {
        per_page: '5',
        page: ''+page
      }
    };

    return this.http.get<any[]>(`${this.url}posts?_embed`, options).pipe(
      map(resp => {
        this.pages = resp['headers'].get('x-wp-totalpages');
        this.totalPosts = resp['headers'].get('x-wp-total');

        let data = resp['body'];

        for (let post of data) {
          post.media_url = post['_embedded']['wp:featuredmedia'][0]['media_details'].sizes['medium'].source_url;
        }
        return data;
      })
    )
  }

  getPostContent(id) {
    return this.http.get(`${this.url}posts/${id}?_embed`).pipe(
      map(post => {
        post['media_url'] = post['_embedded']['wp:featuredmedia'][0]['media_details'].sizes['medium'].source_url;
        return post;
      })
    )
  }
}
Just make sure you insert your own Wordpress blog URL of course.
Now we got everything prepared and can use our functions to display our Wordpress posts easily!
Listing Your Wordpress Posts
We start with the list where we need to load our first handful of posts right in the beginning. At this point you also got access to the count and pages variable that we retrieved previously, but we don’t really use it a lot in here.
The reason is that we can also implement infinite scrolling inside our view which will automatically load new posts once we reach (or approach) the end of the list!
That’s also the reason why we keep track of the current page. You could also structure this with some sort of pagination and number of pages like you are used on a website, however this pattern here makes more sense for a mobile app.
Finally, if you reach the final page you should also disable the infinite loading like we do inside our loadMore() function.
Now go ahead and change your pages/posts/posts.page.ts to:
import { WordpressService } from './../../services/wordpress.service';
import { Component, OnInit } from '@angular/core';
import { LoadingController } from '@ionic/angular';
@Component({
selector: 'app-posts',
templateUrl: './posts.page.html',
styleUrls: ['./posts.page.scss'],
})
export class PostsPage implements OnInit {
posts = [];
page = 1;
count = null;
constructor(private wp: WordpressService, private loadingCtrl: LoadingController) { }
ngOnInit() {
this.loadPosts();
}
async loadPosts() {
let loading = await this.loadingCtrl.create({
message: 'Loading Data...'
});
await loading.present();
this.wp.getPosts().subscribe(res => {
this.count = this.wp.totalPosts;
this.posts = res;
loading.dismiss();
});
}
loadMore(event) {
this.page++;
this.wp.getPosts(this.page).subscribe(res => {
this.posts = [...this.posts, ...res];
event.target.complete();
// Disable infinite loading when maximum reached
if (this.page == this.wp.pages) {
event.target.disabled = true;
}
});
}
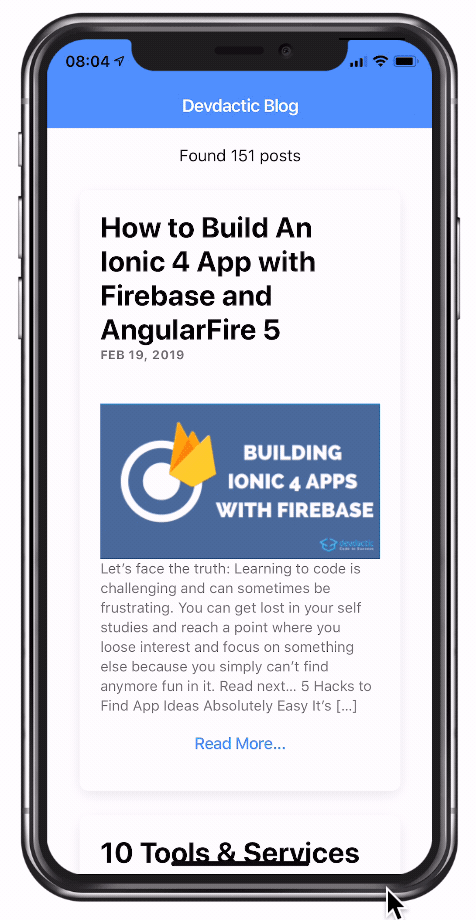
}The view now just consists of a list of cards that make use of some data that is stored in the response. Just log it to your console and you will see a ton of information in there!
Some of those fields contain HTML characters, that’s why we sometimes use the innerHTML of elements and directly use the value which will then be displayed correctly.
If you want infinite loading, simply add it to the bottom of your page and attach the appropriate loading function. You can also define a text or loading indicator like described on the docs!
To build our simple view, go ahead and insert into your pages/posts/posts.page.html:
<ion-header>
  <ion-toolbar color="primary">
    <ion-title>Devdactic Blog</ion-title>
  </ion-toolbar>
</ion-header>

<ion-content padding>
  <div text-center *ngIf="count">Found {{ count }} posts</div>

  <ion-card *ngFor="let post of posts">
    <ion-card-header>
      <ion-card-title [innerHTML]="post.title.rendered"></ion-card-title>
      <ion-card-subtitle>{{ post.date_gmt | date }}</ion-card-subtitle>
    </ion-card-header>
    <ion-card-content>
      <img [src]="post.media_url">
      <div [innerHTML]="post.excerpt.rendered"></div>
      <ion-button expand="full" fill="clear" [routerLink]="['/', 'posts', post.id]" text-right>Read More...</ion-button>
    </ion-card-content>
  </ion-card>

  <ion-infinite-scroll threshold="100px" (ionInfinite)="loadMore($event)">
    <ion-infinite-scroll-content loadingText="Loading more posts...">
    </ion-infinite-scroll-content>
  </ion-infinite-scroll>

</ion-content>
We try to keep it simple so we just use the posts, but we could also easily load all pages and display them in a side menu for example!
Showing The Wordpress Post Details
We also added a button to our cards below the excerpt with the routerLink in order to reach the details page with the ID of the post.
We could actually also pass the whole object to the next page using the state, but I still think using the ID approach is better as we don’t keep the information in the state and we actually got a URL to the post page that will work all the time, even with refresh!
For us this means we need to get the ID from the route snapshot and then retrieve the information for a single post using our service!
I just added a functionality to open the actual post page as well to make some us of the data of the post, but of course there’s a lot more you could do with the data.
For now simply change your pages/post/post.page.ts to:
import { WordpressService } from './../../services/wordpress.service';
import { Component, OnInit } from '@angular/core';
import { ActivatedRoute } from '@angular/router';

@Component({
  selector: 'app-post',
  templateUrl: './post.page.html',
  styleUrls: ['./post.page.scss'],
})
export class PostPage implements OnInit {
  post: any;

  constructor(private route: ActivatedRoute, private wp: WordpressService) { }

  ngOnInit() {
    let id = this.route.snapshot.paramMap.get('id');
    this.wp.getPostContent(id).subscribe(res => {
      this.post = res;
    });
  }

  openOriginal() {
    // Add InAppBrowser for app if want
    window.open(this.post.link, '_blank');
  }
}
Regarding the view of the details page we’ll also keep it simple and just use the image (like we did before, remember the media_url is a field we created in the service!) and the actual post content.
Again, to display the HTML correctly we need to use innerHTML which will render the tags correctly.
There’s really not a lot more to the page, so finish your simple Ionic Wordpress app by changing your pages/post/post.page.html to:
<ion-header>
  <ion-toolbar color="primary">
    <ion-buttons slot="start">
      <ion-back-button defaultHref="/posts"></ion-back-button>
    </ion-buttons>
    <ion-title>{{ post?.title.rendered }}</ion-title>
  </ion-toolbar>
</ion-header>

<ion-content padding>

  <div *ngIf="post">
    <img [src]="post.media_url" [style.width]="'100%'">
    <div [innerHTML]="post.content.rendered" padding></div>
  </div>

</ion-content>

<ion-footer color="secondary">
  <ion-toolbar>
    <ion-button expand="full" fill="clear" (click)="openOriginal()">
      Open Original
    </ion-button>
  </ion-toolbar>
</ion-footer>
Another idea at this point would be to add social sharing which you very well might need if you want your articles to get shared directly from your Wordpress app!
Conclusion
You don’t need a package to make use of the Wordpress REST API - simply make calls to the endpoints like described in their reference and use that data directly inside your Ionic app!
There are so many ways to extend this and build Ionic apps powered with Wordpress data - have you built one before or plan to do so?
You can also find a video version of this tutorial below.