The Ultimate Ionic Server Side Rendering Guide (SSR) Last update: 2020-07-28

Ionic server side rendering wasn’t really possible in the past, but recently this became possible thanks to a new package by the Ionic team.
In this tutorial we will dive into everything SSR related and host our Ionic application on Heroku. We will include SEO tags to rank higher and allow social card previews, and also get deeper into this topic by inspecting the Transfer State API.
After this tutorial you will be able to host your Ionic application with SSR and all the benefits it brings to your app!
There’s now also a whole course on the topic of SSR and building websites with Ionic inside the Ionic Academy!
Why Ionic Server Side Rendering?
The idea is simple: Return a pre rendered HTML file from the server that already contains enough data to quickly present the page to your users. This is not really relevant for your native app, but even more for websites or a PWA.
By using SSR, a server will handle incoming requests and create an HTML string that is returned to the user so the first paint of your page becomes faster (in theory).
After the page has loaded on the client side, Angular will take over when the loading is finished and the page continues to work like a regular SPA we are used to, while the end user should hopefully not notice anything.
As an example, I have hosted the code from this tutorial here: https://devdactic-ssr.herokuapp.com
You can check out the page and view the source, and you will find all the information we will talk about in the following sections.
Starting an Ionic app and adding Angular Universal
To get started with your own app, simply run the standard command for a blank new Ionic app and optionally add two more pages so we can include some cool functionality:
ionic start devdacticSsr blank --type=angular --capacitor
cd ./devdacticSsr

ionic g page pages/details
ionic g page pages/second

npm install @angular/animations @ionic/angular-server
ng add @nguniversal/express-engine
The last two lines make our Ionic app SSR ready. The animations package is needed for Angular universal in general, and the special Ionic angular-server package is required to hydrate our web components on the server side.
The schematic will add a bunch of files and change some files, so if you want to know more about this also check out the video at the bottom of this tutorial!
In general, it adds an Express server that we can run in a Node environment. That also means, we can’t just throw the build folder into our web hosting like usually, and that’s why we will host everything on Heroku in the end.
To use this package in our app, we need to change one of the many server files that were added by the Angular schematic to also include the new module, so change the app/app.server.module.ts to this:
import { NgModule } from '@angular/core';
import { ServerModule } from '@angular/platform-server';

import { AppModule } from './app.module';
import { AppComponent } from './app.component';

import { IonicServerModule } from '@ionic/angular-server';

@NgModule({
  imports: [
    AppModule,
    ServerModule,
    IonicServerModule
  ],
  bootstrap: [AppComponent],
})
export class AppServerModule {}
Since we will later also perform HTTP requests, go open your app/app.module.ts and include it right now:
import { NgModule } from '@angular/core';
import { BrowserModule } from '@angular/platform-browser';
import { RouteReuseStrategy } from '@angular/router';

import { IonicModule, IonicRouteStrategy } from '@ionic/angular';
import { SplashScreen } from '@ionic-native/splash-screen/ngx';
import { StatusBar } from '@ionic-native/status-bar/ngx';

import { AppComponent } from './app.component';
import { AppRoutingModule } from './app-routing.module';

import { HttpClientModule } from '@angular/common/http';

@NgModule({
  declarations: [AppComponent],
  entryComponents: [],
  imports: [
    BrowserModule.withServerTransition({ appId: 'serverApp' }),
    IonicModule.forRoot(),
    AppRoutingModule,
    HttpClientModule,
  ],
  providers: [
    StatusBar,
    SplashScreen,
    { provide: RouteReuseStrategy, useClass: IonicRouteStrategy },
  ],
  bootstrap: [AppComponent],
})
export class AppModule {}
Now your app is actually SSR ready and you can start a dev server (with livereload!) by running:
npm run dev:ssrHow do you notice any difference?
Usually, your Ionic (Angular) apps source code in the browser looks like this:
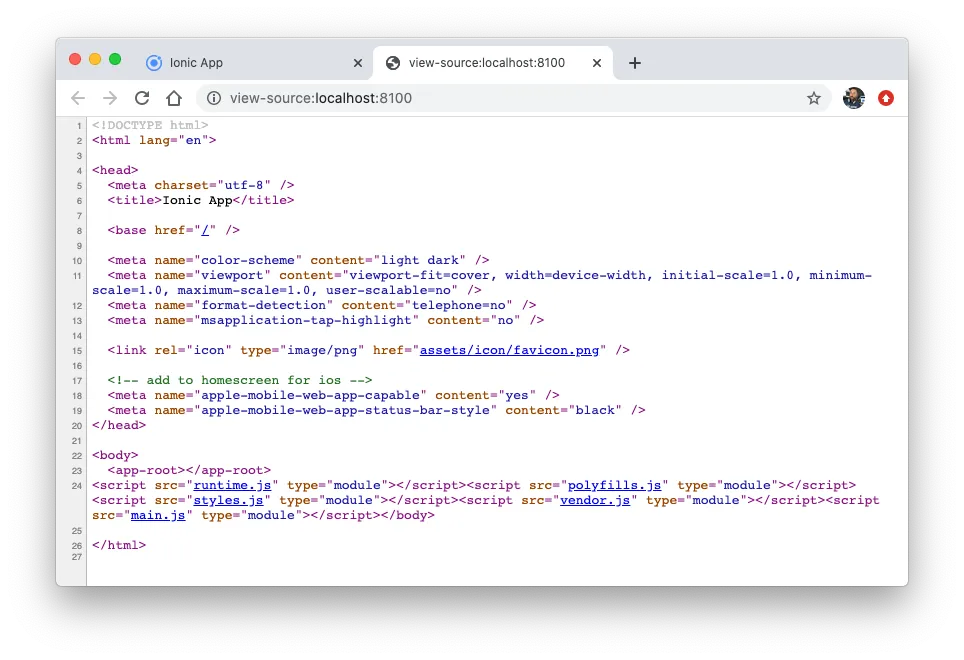
All the DOM population is done by Angular on the client side, which makes it hard for search engines to correctly crawl your page. Basically only Google can do it to some degree.
If you now inspect your source code you will see a completely different picture:
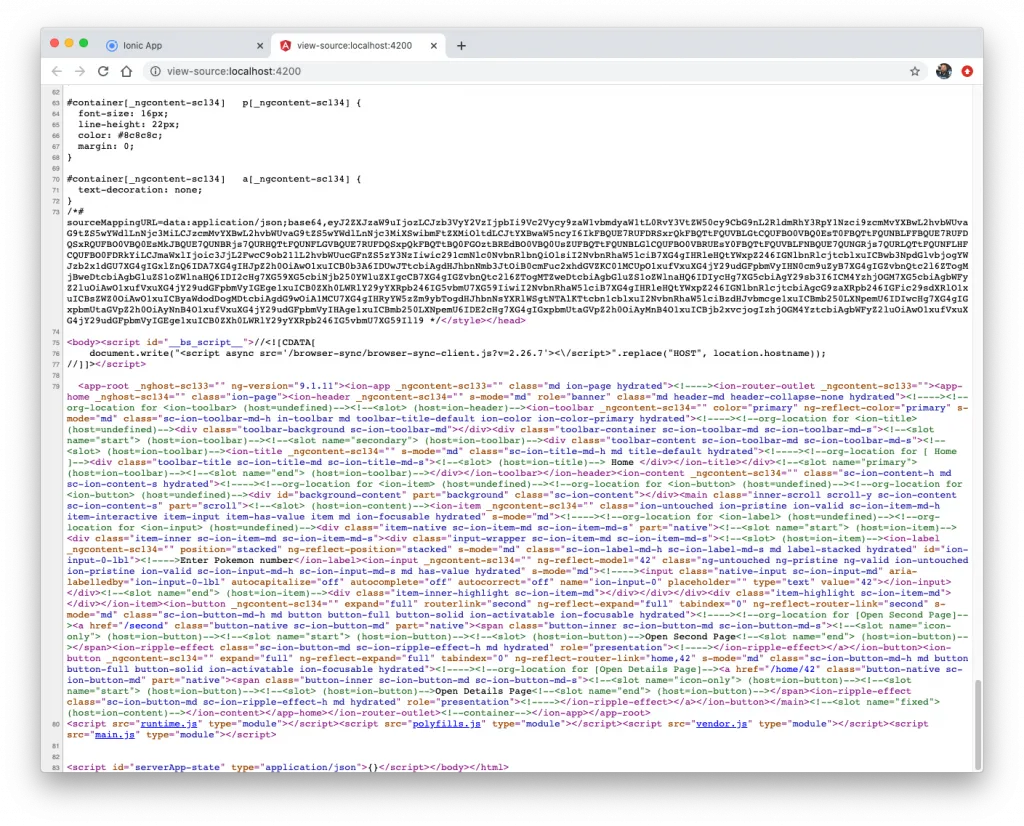
Everything is included in the HTML! Styling, components, everything needed to present and render the page. All of this is returned by the server, which has hydrated our app and injected all the relevant information for us into the website.
Since we added the special Ionic package for web components, you could even disabled Javascript in the debugger section (cmd+shift+p) and reload the page, and it still works! If you leave out the Ionic package, you would see an empty view instead.
Now that we got Ionic server side rendering in place, let’s add some more cool features to it.
Adding more Routes
We only have a home page, but already added some packages. Let’s quickly change our routing to this now inside the app/app-routing.module.ts:
import { NgModule } from '@angular/core';
import { PreloadAllModules, RouterModule, Routes } from '@angular/router';

const routes: Routes = [
  {
    path: '',
    loadChildren: () => import('./home/home.module').then( m => m.HomePageModule)
  },
  {
    path: 'home/:id',
    loadChildren: () => import('./pages/details/details.module').then( m => m.DetailsPageModule)
  },
  {
    path: 'second',
    loadChildren: () => import('./pages/second/second.module').then( m => m.SecondPageModule)
  },
];

@NgModule({
  imports: [
    RouterModule.forRoot(routes, { preloadingStrategy: PreloadAllModules, initialNavigation: 'enabled' })
  ],
  exports: [RouterModule]
})
export class AppRoutingModule { }
To navigate around we also need some simple buttons, so open the home/home.page.html and change it to:
<ion-header>
  <ion-toolbar color="primary">
    <ion-title>
      Home
    </ion-title>
  </ion-toolbar>
</ion-header>

<ion-content>
  <ion-item>
    <ion-label position="stacked">Enter Pokemon ID</ion-label>
    <ion-input [(ngModel)]="id"></ion-input>
  </ion-item>
  <ion-button expand="full" routerLink="second">Open Second Page</ion-button>
  <ion-button expand="full" [routerLink]="['home', id]">Open Details Page</ion-button>
</ion-content>
Really just a super simple example with an input field so we can potentially go to our details route with a dynamic value. To make TS happy also quickly bring up the home/home.page.ts and add the variable to your class:
import { Component } from '@angular/core';

@Component({
  selector: 'app-home',
  templateUrl: 'home.page.html',
  styleUrls: ['home.page.scss'],
})
export class HomePage {
  id = 42;

  constructor() {}

}
This wasn’t really exciting, but now we can implement some more great features!
Using SEO Tags with Ionic
You’ve been waiting for this part, right? SEO ranking is important, and including the right tags in your page can help to rank your (or your clients!) page better on Google.
There has always been a service to set meta tags, but since the JS would only execute on the client side itself, most crawlers would never find your tags.
Enter SSR: How about including the SEO meta tags right in your HTML?
We can set our tags using the meta and title service like this right inside our: pages/second/second.page.ts
import { Component, OnInit } from '@angular/core';
import { Title, Meta } from '@angular/platform-browser';

@Component({
  selector: 'app-second',
  templateUrl: './second.page.html',
  styleUrls: ['./second.page.scss'],
})
export class SecondPage implements OnInit {

  constructor(private titleService: Title, private metaService: Meta) { }

  ngOnInit() {
    this.titleService.setTitle('Devdactic SSR');
    this.metaService.updateTag({ name: 'description', content: 'The Devdactic SSR Page' });
    // Twitter
    this.metaService.updateTag({ property: 'twitter:card', content: 'summary_large_image' });
    this.metaService.updateTag({ property: 'twitter:title', content: 'NEW ARTICLE OUT NOW' });
    this.metaService.updateTag({ property: 'twitter:description', content: 'Check out this cool article' });
    this.metaService.updateTag({ property: 'twitter:image', content: 'https://i0.wp.com/devdactic.com/wp-content/uploads/2020/05/ionic-in-app-purchase-capacitor.webp?w=1620&ssl=1' });
    // Facebook
    this.metaService.updateTag({ property: 'og:url', content: '/second' });
    this.metaService.updateTag({ property: 'og:type', content: 'website' });
    this.metaService.updateTag({ property: 'og:description', content: 'My Ionic SSR Page' });
    this.metaService.updateTag({ property: 'og:title', content: 'My SSR Title!' });
    this.metaService.updateTag({ property: 'og:image', content: 'https://i0.wp.com/devdactic.com/wp-content/uploads/2020/05/ionic-in-app-purchase-capacitor.webp?w=1620&ssl=1' });
  }

}
Again, you could have done this before, but the result would have been very different.
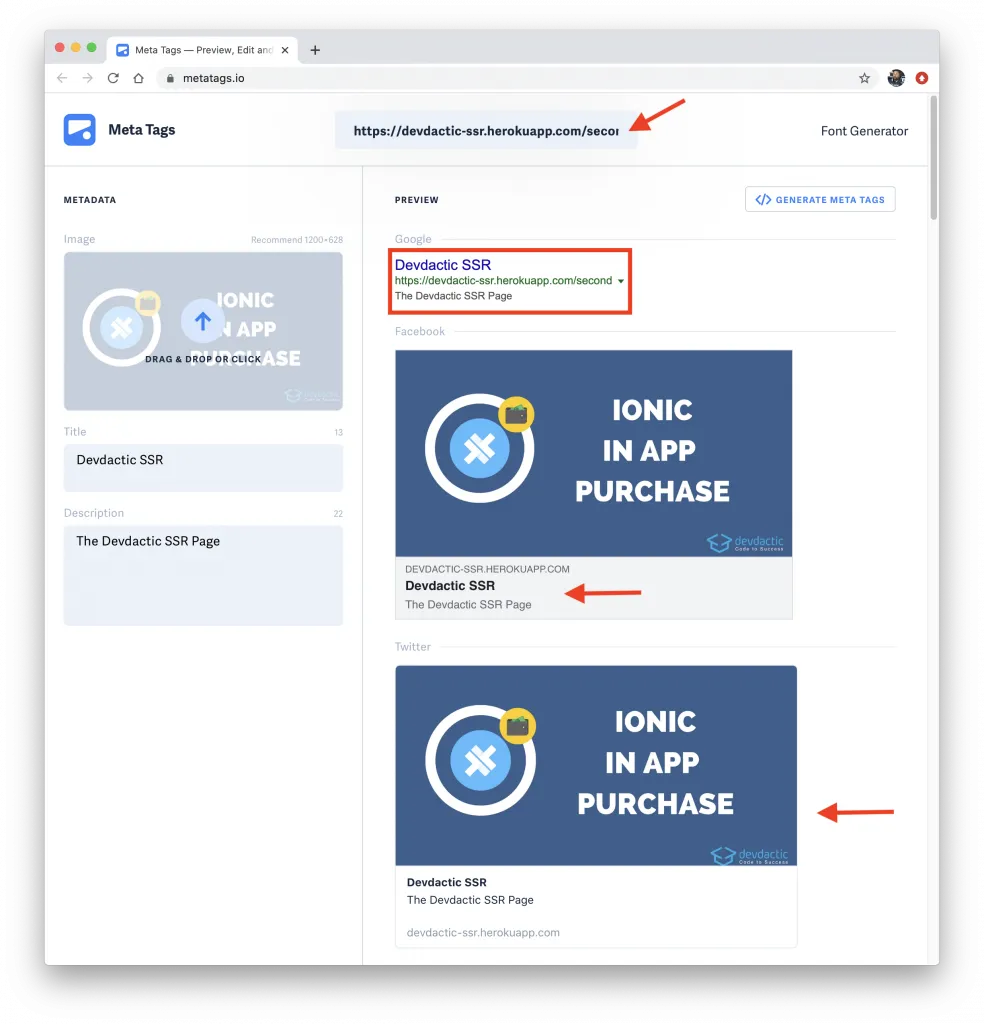
The result in our case is that the page is rendered on the server, and all the tags are now present when you inspect the source code of your page.
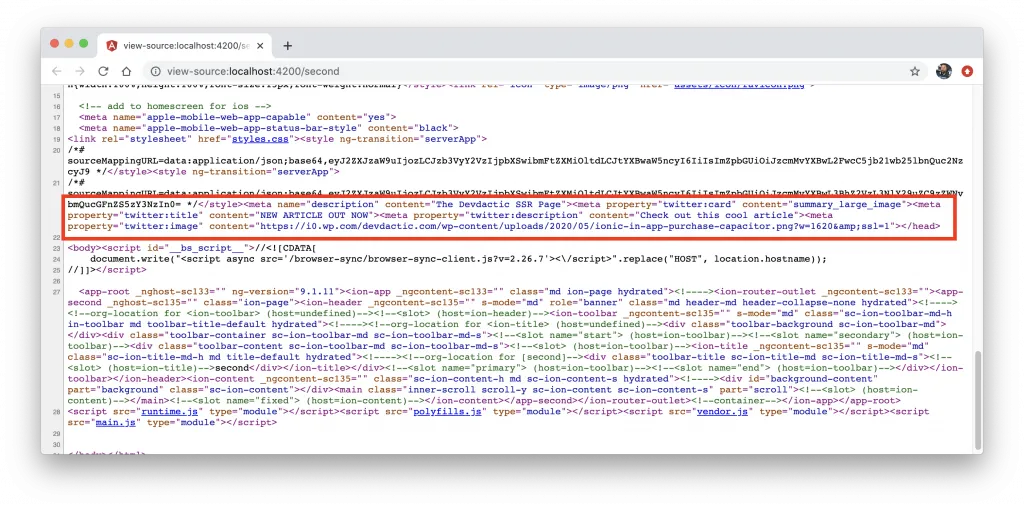
Another big gain from this approach is that you can set the information that are used when your content is shared on social media.
After deployment (not working with your localhost dev environment right now) you can use some SEO tag checker and enter your URL and voila - beautiful social media cards right from your Ionic app!
This might be one of the biggest benefits for people that need to rank on Google or where people share their content, since everything else is these days pretty unacceptable.
Now let’s dive even a bit deeper in one more SSR concept.
Using the State Transfer API
The State Transfer API allows to seamlessly transfer the server state to the client side (in easy words). Imagine the following:
Your page makes an API call, which is now performed on the server. After the HTML is delivered to the client and Angular takes over, the code runs again and you make a second API request, resulting in perhaps another loading indicator and in general, wasted time.
To fix this issue, we can implement a behaviour in which only the server performs the API call, adds the result as stringified JSON to the HTML and the client extracts it from there - and all of this in a pretty easy way!
We need to inject the module into both our server and the client, so first open the app/app.server.module.ts and change it to:
import { NgModule } from '@angular/core';
import { ServerModule, ServerTransferStateModule } from '@angular/platform-server';

import { AppModule } from './app.module';
import { AppComponent } from './app.component';

import { IonicServerModule } from '@ionic/angular-server';

@NgModule({
  imports: [
    AppModule,
    ServerModule,
    IonicServerModule,
    ServerTransferStateModule
  ],
  bootstrap: [AppComponent],
})
export class AppServerModule {}
Now we also need to inject the appropriate module into the client side, therefore open the app/app.module.ts and add the BrowserTransferStateModule:
import { NgModule } from '@angular/core';
import { BrowserModule } from '@angular/platform-browser';
import { RouteReuseStrategy } from '@angular/router';

import { IonicModule, IonicRouteStrategy } from '@ionic/angular';
import { SplashScreen } from '@ionic-native/splash-screen/ngx';
import { StatusBar } from '@ionic-native/status-bar/ngx';

import { AppComponent } from './app.component';
import { AppRoutingModule } from './app-routing.module';

import { HttpClientModule } from '@angular/common/http';
import { BrowserTransferStateModule } from '@angular/platform-browser';

@NgModule({
  declarations: [AppComponent],
  entryComponents: [],
  imports: [
    BrowserModule.withServerTransition({ appId: 'serverApp' }),
    IonicModule.forRoot(),
    AppRoutingModule,
    HttpClientModule,
    BrowserTransferStateModule
  ],
  providers: [
    StatusBar,
    SplashScreen,
    { provide: RouteReuseStrategy, useClass: IonicRouteStrategy },
  ],
  bootstrap: [AppComponent],
})
export class AppModule {}
With that in place we can construct our HTTP call and for now we will simply query the awesome PokeAPI.
The idea is to fetch the data from the API on the server, then write it to the TransferState with a specific key related to that request (in our case using the ID). We can then always check for this key in our TransferState, and if the data exists, we can simply assign it from there and afterwards remove it.
The TransferState has a pretty simple API, so open your pages/details/details.page.ts now and change it to:
import { Component, OnInit, Inject, PLATFORM_ID } from '@angular/core';
import { HttpClient } from '@angular/common/http';
import { ActivatedRoute } from '@angular/router';
import { TransferState, makeStateKey } from '@angular/platform-browser';
import { isPlatformServer } from '@angular/common';

@Component({
  selector: 'app-details',
  templateUrl: './details.page.html',
  styleUrls: ['./details.page.scss'],
})
export class DetailsPage implements OnInit {
  id = null;
  data = null;

  constructor(
    private http: HttpClient,
    private route: ActivatedRoute,
    @Inject(PLATFORM_ID) private platformId,
    private transferState: TransferState
  ) {
    this.id = this.route.snapshot.paramMap.get('id');
    this.loadata();
  }

  ngOnInit() {}

  loadata() {
    const DATA_KEY = makeStateKey('pokemon-' + this.id);
    if (this.transferState.hasKey(DATA_KEY)) {
      console.log('Fetch data from State!');
      this.data = this.transferState.get(DATA_KEY, null);
      this.transferState.remove(DATA_KEY);
    } else {
      console.log('Get Data from API...');
      this.http
        .get(`https://pokeapi.co/api/v2/pokemon/${this.id}`)
        .subscribe((res) => {
          if (isPlatformServer(this.platformId)) {
            this.transferState.set(DATA_KEY, res);
          } else {
            this.data = res;
          }
        });
    }
  }
}
By using the PLATFORM_ID you can also identify if the code is currently running on the server or client side, which makes it easy to perform certain operations only on one side.
To quickly display the information, change the pages/details/details.page.html to:
<ion-header>
  <ion-toolbar color="primary">
    <ion-buttons slot="start">
      <ion-back-button defaultHref="/"></ion-back-button>
    </ion-buttons>
    <ion-title>Details</ion-title>
  </ion-toolbar>
</ion-header>

<ion-content>
  <h2>{{ id }}: {{ data?.name }}</h2>
</ion-content>
It works, but you don’t really see the difference first. But you can see the result again in the source code of your page:

That means, the whole API response was added to the HTML that the server returned, and the app simply read the data from there.
Of course this is not a solution in every case since you don’t want to add your whole API response for every request with potential sensitive information.
Also, you will lose the benefit of SSR if you include tons of JSON data in the HTML page which then takes longer to load on the client side for the first paitn!
Hosting Your Ionic App
As said in the beginning, you now need to run the Express server on your hosting, which is usually not possible if you have just some standard web hosting.
A good alternative is Heroku, on which you can deploy your app for free in the beginning (paid if you want more power later).
For Heroku you need a Git repository that you basically push to Heroku to perform a new build, so I recommend you create a free repository on Github now.
Once you created a repository, you already get the commands you should run in your local repository.
In my example it looks like this:
ngit add .
git commit -am 'Implement SSR.'
git remote add origin https://github.com/saimon24/devdactic-ssr.git
git push -u origin master
This adds all your files to Git, creates a new commit, adds the Github remote and finally pushes your code.
Congrats if this is your first ever Github repository!
Now we need to connect it with Heroku, and therefore create a Heroku account and click on create new app.
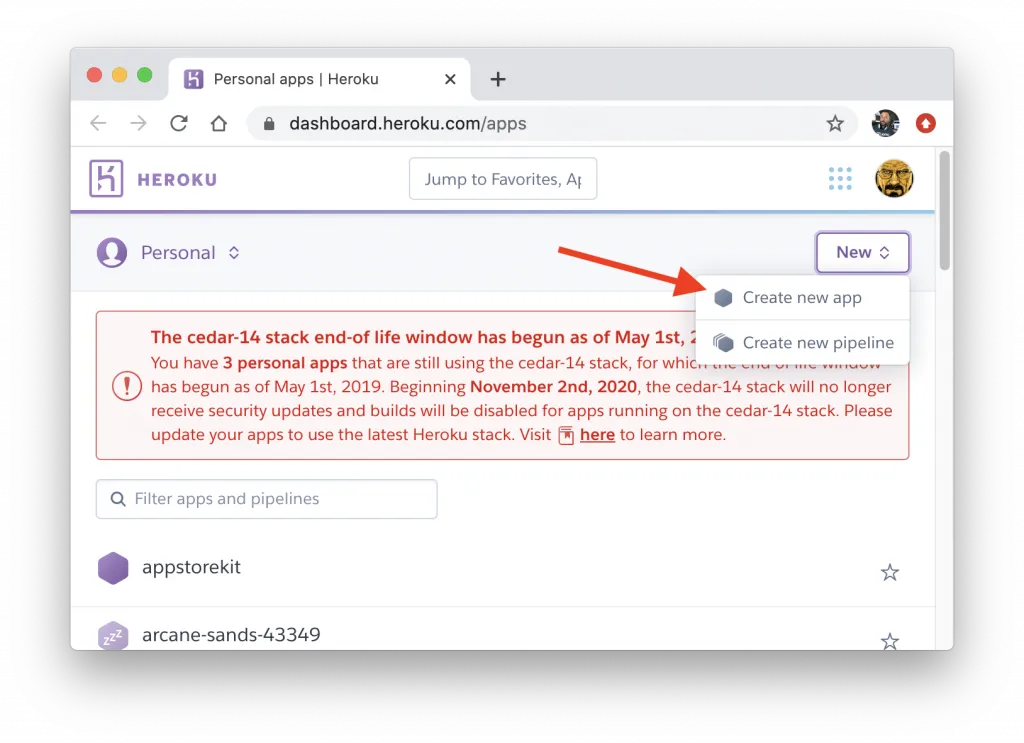
Simply set a name and region and your app is ready here as well.
Now we need to add this Heroku remote to our local repository, and this could look like this:
heroku git:remote -a devdactic-ssr
# Verify everything is fine
git remote -vv show
Make sure to use your own Heroku app name of course, and also make sure you install the Heroku CLI and log in before running these commands.
The last command should now print out your Github URL and Heroku URL as remotes of your repository.
Finally we need to tell Heroku what to do with our app, and we do this by creating a Procfile at the top of our Ionic app folder (only the name Procfile, no extension!). The content is simple:
web: npm run serve:ssrHeroku will call one of your scripts to run the app, but since it should also build the app we can add another postinstall script inside our package.json which will be triggered by Heroku automatically after you deploy your code:
"postinstall": "npm run build:ssr"After applying these changes and adding a new file it’s time for another commit and a final push to our Heroku remote:
ngit add .
git commit -am 'Add profile for Heroku.'
git push heroku master
This will take 5-10 minutes so don’t worry about it. In the end, it should print out the URL of your app or you can visit the Settings -> Domain section directly inside Heroku to find the URL as well.
As a result, you can visit your hosted Ionic app, now running through SSR!
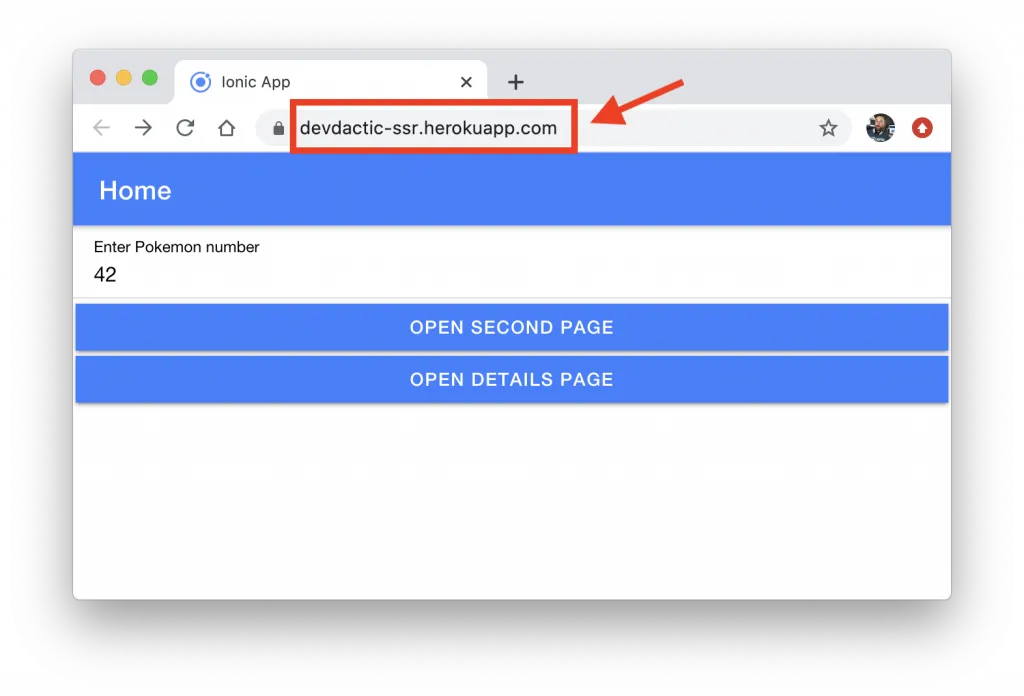
Inspect the source code and check the meta tags - everything will look like a regular website.
Conclusion
Adding server side rendering to your Ionic app has become a lot easier lately, but of course this was just a simple example and your app might need a lot more work to really embrace SSR as a useful tool.
There’s also the possibility to define which part of your App shell should be returned by your server to really make the first print of your app as fast as possible, and if your app uses many more libraries, you will very likely run into some trouble since the node server doesn’t know about window.
Since the Ionic team is working on improvements for SSR at the time writing this, expect many more optimisations in the future!
If you want to see more on SSR or pre rendering (or static sites with Ionic?) just leave a comment below.
You can also find a video version of this tutorial below.