In-App Purchases & Subscriptions for React Native with Glassfy using Expo Last update: 2023-03-14

If you use Expo for your React Native app and want to monetise your app, you will notice that Expo lacks a native plugin for In-App Subscriptions.
On top of that, the setup and usage of iOS and Android In-App purchases is complicated and often requires another custom backedn for validation.
But you can actually make the whole process a lot easier, more transparent and continue to enjoy React Native and use Expo with In-App purchases with a service called Glassfy.
Want to go through all the source code? Check out the React Native Expo In App Subscription app on Github!
Glassfy keeps track of every transaction a user made by bundling your iOS and Android products for easier use. This is not only helpful for statistics, but also to give access to specific content or functions of your app.
Today we will go through the steps of integrating the Glassfy SDK into a React Native app with Expo so you can easily create purchases and subscriptions right through their platform.
In the end we will be able to unlock or hide content in our app simply by grabbing the settings from Glassfy without running our own backend or custom validation!
This tutorial is sponsored by Glassfy, an open source SDK and backend to integrate in-app subscriptions in minutes!
How Glassfy works
The idea of Glassfy is to make it as easy as possible to handle subscriptions and purchases in mobile apps by capturing all relevant information and giving you a better view of your data.
Although we will later only interact with the Glassfy SDK, we still need to setup our iOS and Android items for purchase on their respective platforms. After you have added those products inside the Google Play Console and Appstore Connect, you can then easily access them inside your Glassfy dashboard by their SKU and make them available to your app as offerings.
You can also use this logic to bundle items into groups that give specific permissions for users, so you have not only abstracted away the native purchase flow but also additional information for your app.
On top of that Glassfy can act as a backend to accept webhooks to validate purchases made or events in relation to the subscription status of a user, for which you otherwise would have to run your own solution.
The best part? You can get started for free and use all of this up to $10k revenue!
Note: You can also manage Paddle subscriptions with Glassfy, but in this post we are focusing on iOS and Android purchases only.
Setting up In-App Purchases
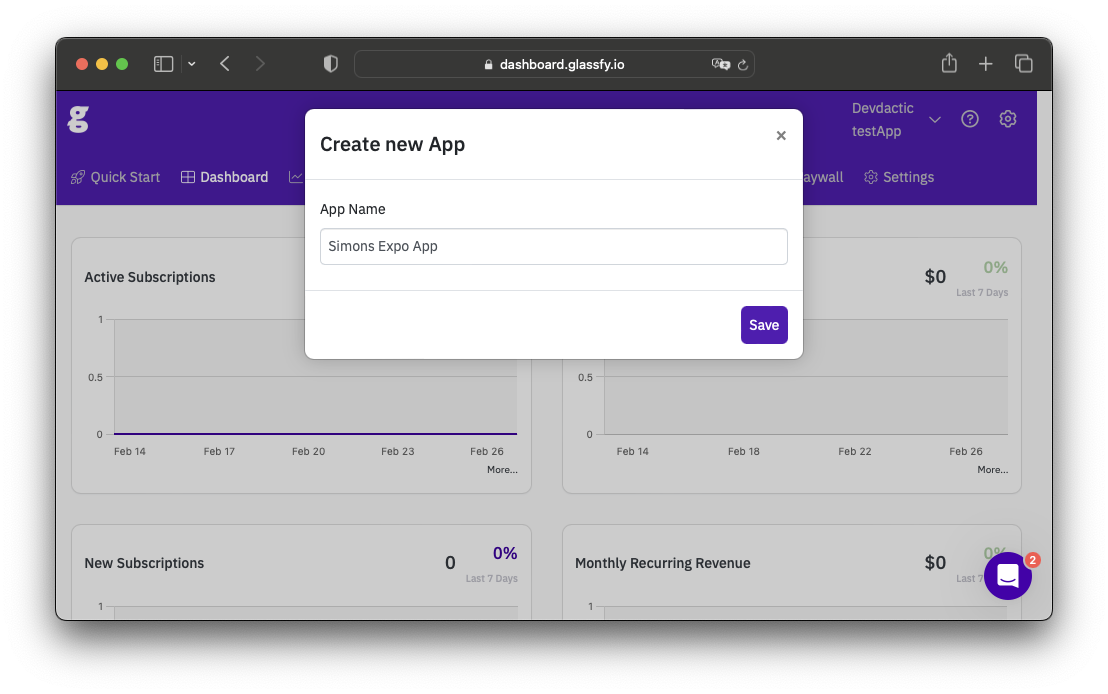
First of all you should create a Glassfy account for free (e.g. using your Github account) and then click “Create App” inside Glassfy to create your new app.
To add IAP to your app you of course need a native app, so make sure you have set up an according app ID for iOS and Android before you continue.
You need to be able to work on your app in the App Store Connect portal for iOS as well as the Google Developer Console for Android where you can add In-App purchases and subscriptions.
We are not going through the full process of setting up items in the native platforms because Glassfy described the process already in detail inside their App Store Configuration guide for iOS and the Play Store Configuration guide for Android - make sure to follow them accordingly to create your items.
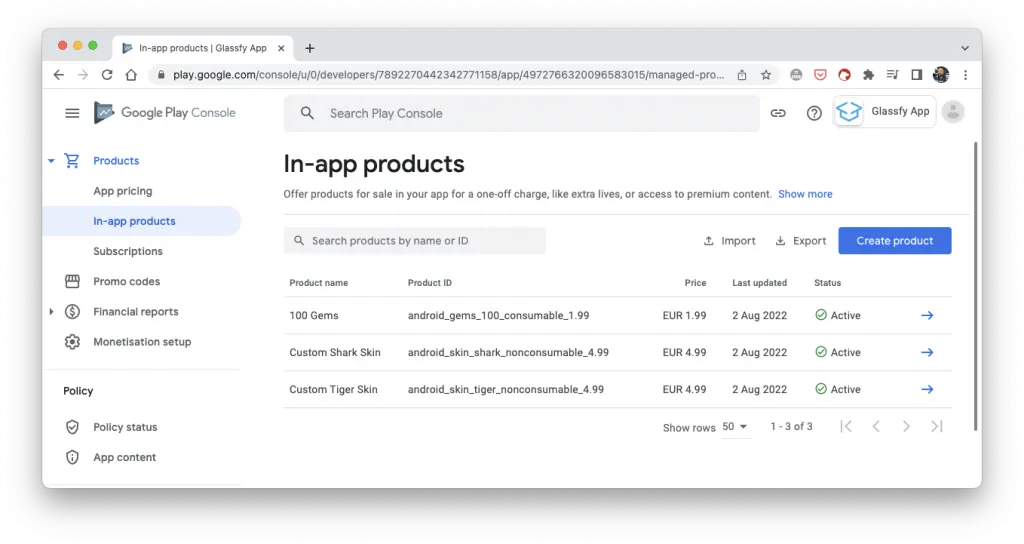
For reference, this is my list of items a user can purchase on iOS:
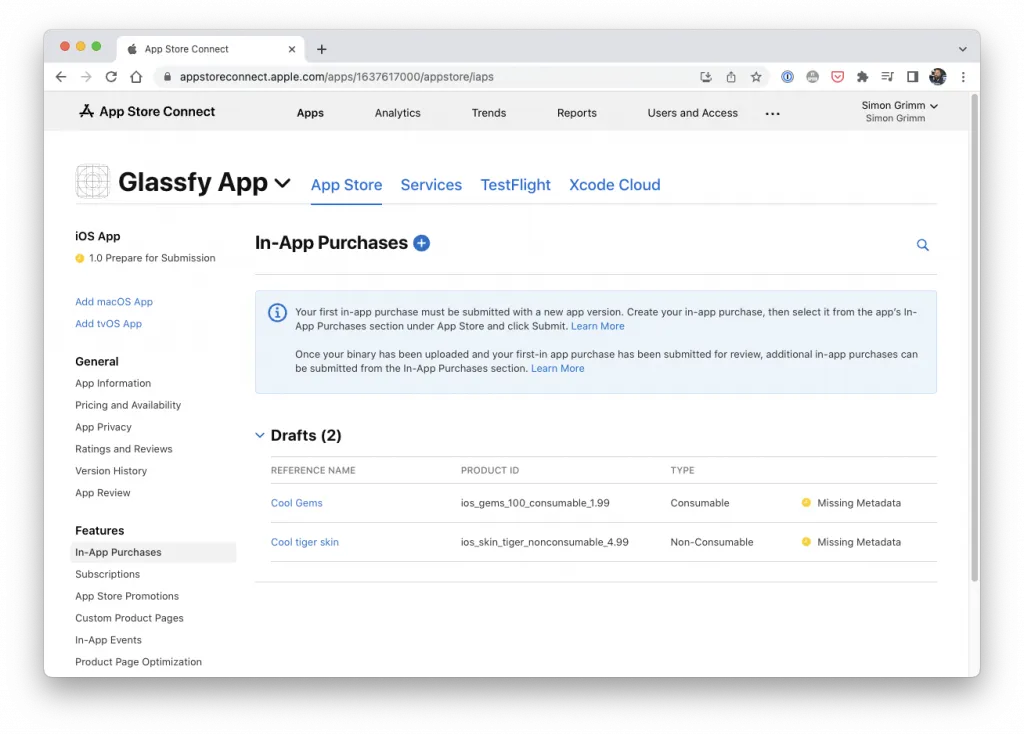
All of this can (and should) be done on Android as well if you want to sell items on both platforms, so create the same kind of items under In-App products inside the Google Play Developer console:
Notice something?
I used almost identical product IDs only containing ios or android at the start, but then following the scheme recommended by Glassfy so you can easily identify and group your items in Glassfy later!
In my example I have created both a consumable item (the 100 gems) and also a non-consumable in form of a custom (fictional) skin.
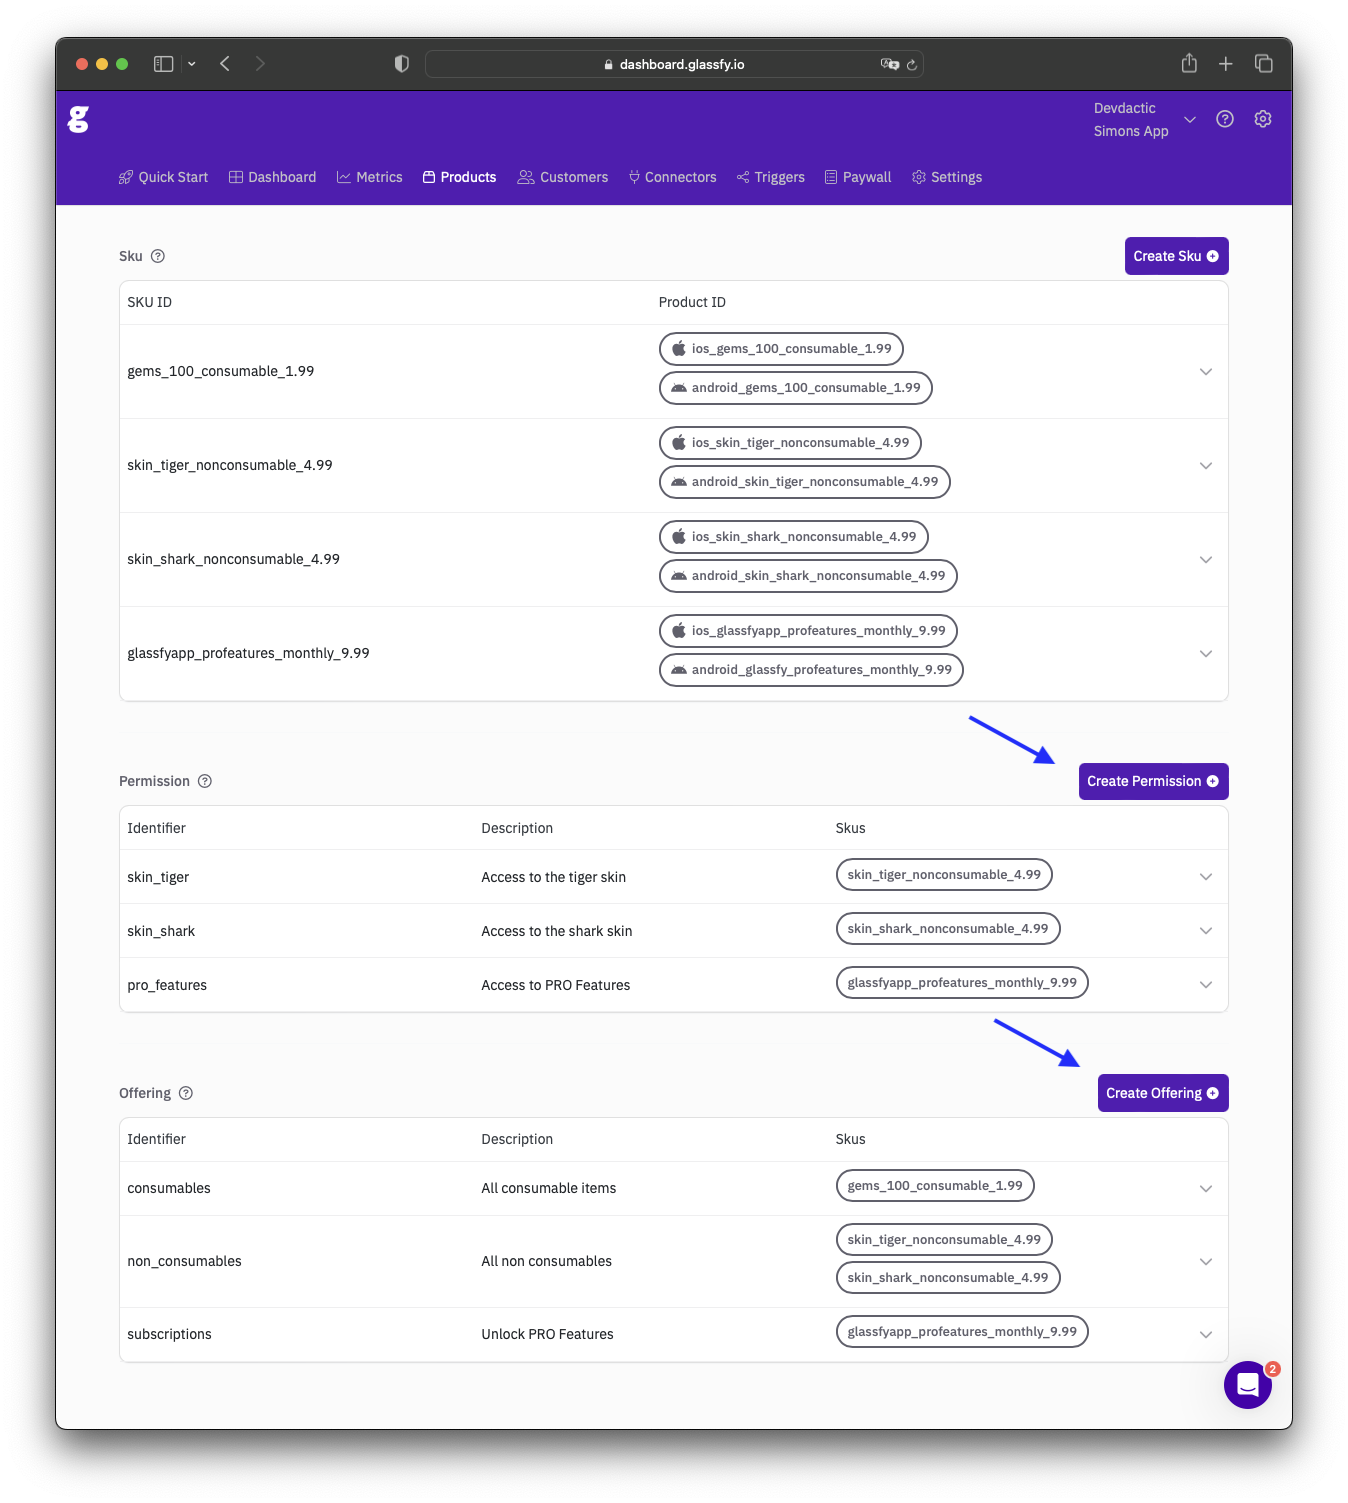
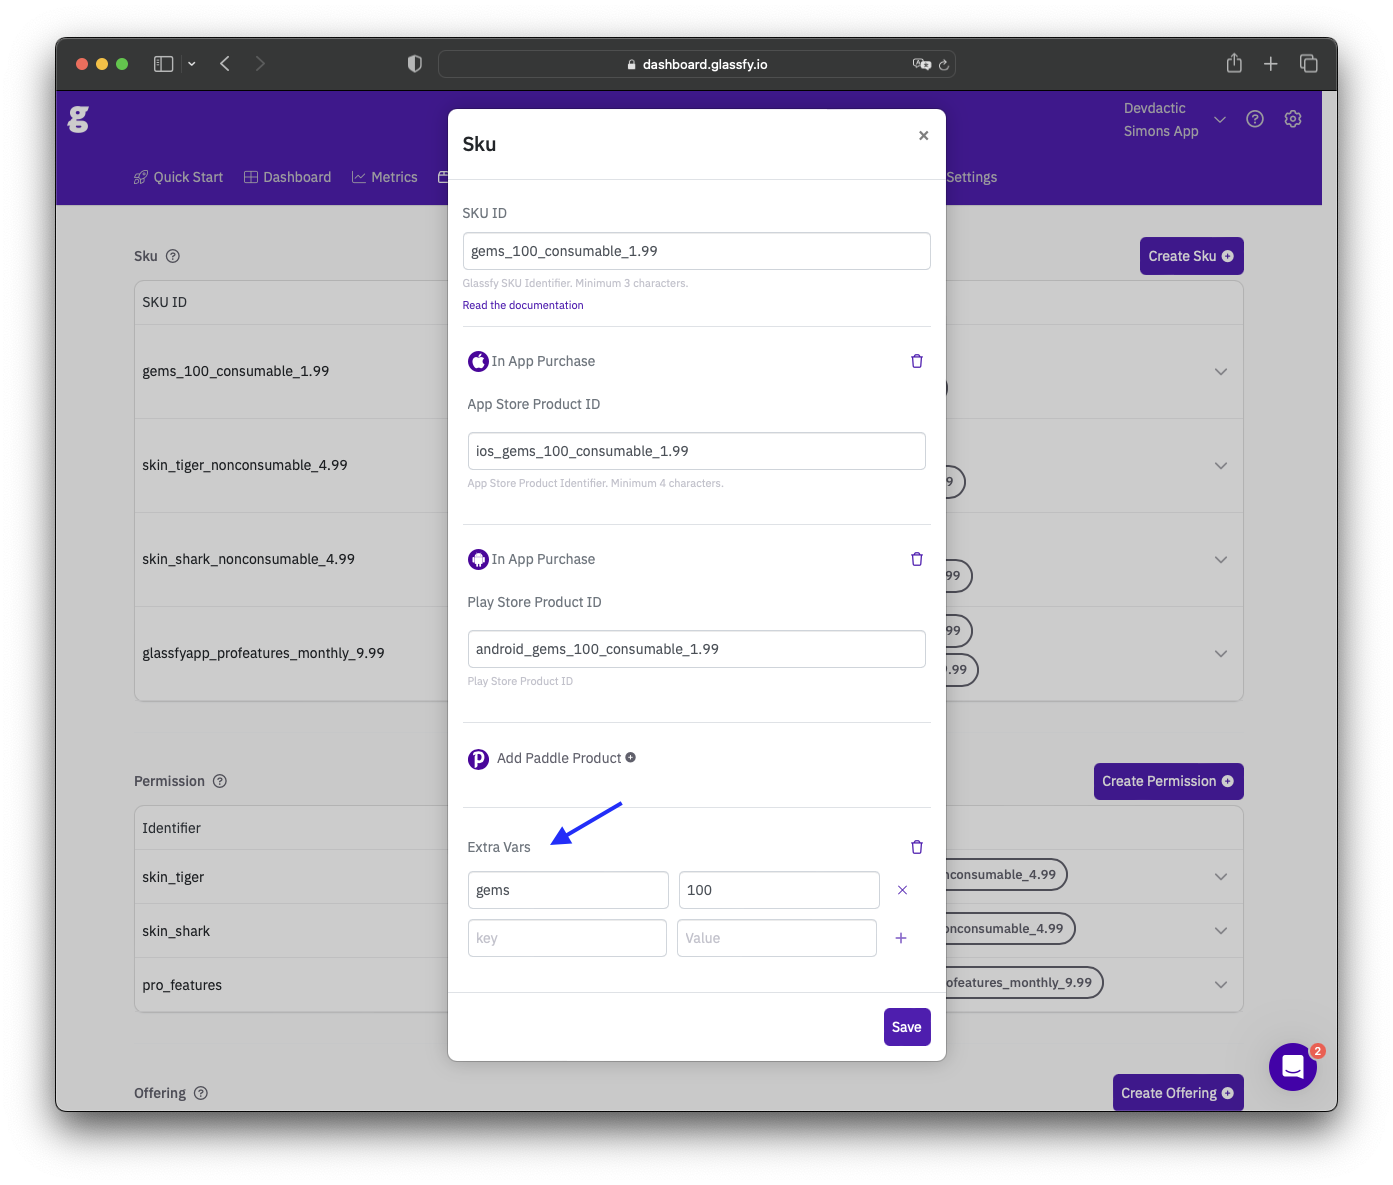
With all this information in place we can now head over to our Glassfy dashboard and click Create Sku to add these items to Glassfy. In the opening dialog you can specify the IDs for both Android and iOS and group them together under one SKU that will be used within Glassfy from now on.
Because I created two different items on iOS and Android I also created the two different SKUs:

At this point we need two more things:
- Give specific permissions to a SKU
- Make something available for purchase as an offering
Just like we did with the SKU before, we can now click create permission to create a permission group that includes a number of SKUs, and then we can click create offering to create an according offer that we can display in our app for users to purchase an item.
At this point we have pretty much abstracted away all native platform logic and work entirely on the information we’ve given to Glassfy - and it will continue like that!
Setting up Subscriptions
So far we have set up normal in-app purchases, items users can simply purchase one or multiple times.
Many times you also want to add a subscription so you can put certain parts of your app behind a paywall, and you can again follow the guide from Glassfy on setting up your subscriptions first of all, which works mostly like setting up a regular item users can purchase.
This process also includes setting up an App-Specific Shared Secret for iOS that you then need to paste into your Glassfy settings.
However, there’s one more thing we now need to take care of: Making sure Apple can send events back to Glassfy!
To achieve this, you can set up App Store Server to Server notifications by grabbing your Apple S2S notification URL from the Glassfy settings page and then pasting it into the production and sandbox server URL inside your App Store Connect entry.
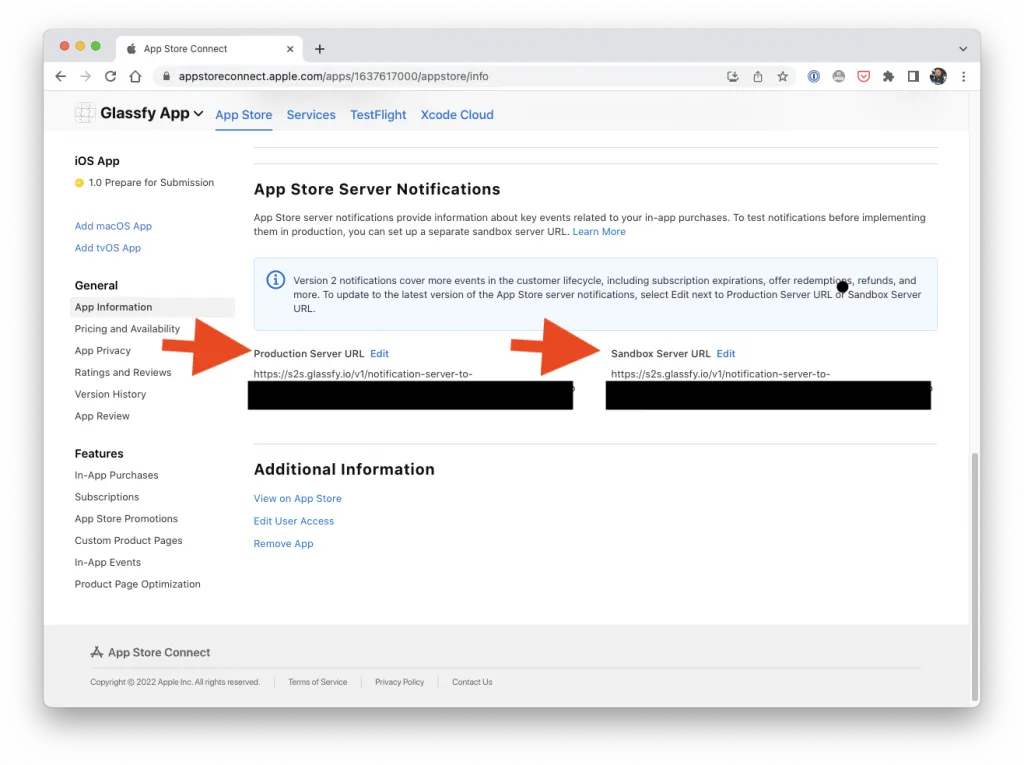
By doing this, Glassfy gets all the subscription relevant events and you can monitor the state of your users better.
You should also follow the same procedure and make sure Glassfy can talk to Google Play Services accordingly to manage subscription events!
After creating your subscriptions for iOS and Android, make sure you group them again under one SKU in Glassfy, create a new permission group and finally an offering.
At this point you should get a good feeling of how the process works, and we are close to seeing the fruits of our labour in action!
React Native App Setup with Expo
To begin with, we start with a new Expo app and add the react-native-glassfy-module:
npx create-expo-app reactGlassfy -t expo-template-blank-typescript
cd ./reactGlassfy

# Add the Glassfy Module
expo add react-native-glassfy-module

# Add some navigation
npm install @react-navigation/native @react-navigation/native-stack
npx expo install react-native-screens react-native-safe-area-context
On top of that I added the React Navigation package so we have a decent stack logic in place as well.
Now although we add an Expo module, we have to use the prebuild of our React Native app with Expo from now on.
The Glassfy module is a native module added to our projects, but today this isn’t any problem with Expo anymore.
Therefore you can create the native iOS and Android projects by generating a prebuild, and later still enjoy the live reload of Expo by running the app directly on a connected device (because in-app purchase is usually not working in a simulator):
# Create the native iOS and Android projects
expo prebuild
# Run your Expo prebuild on a connected devide
expo run:ios --device
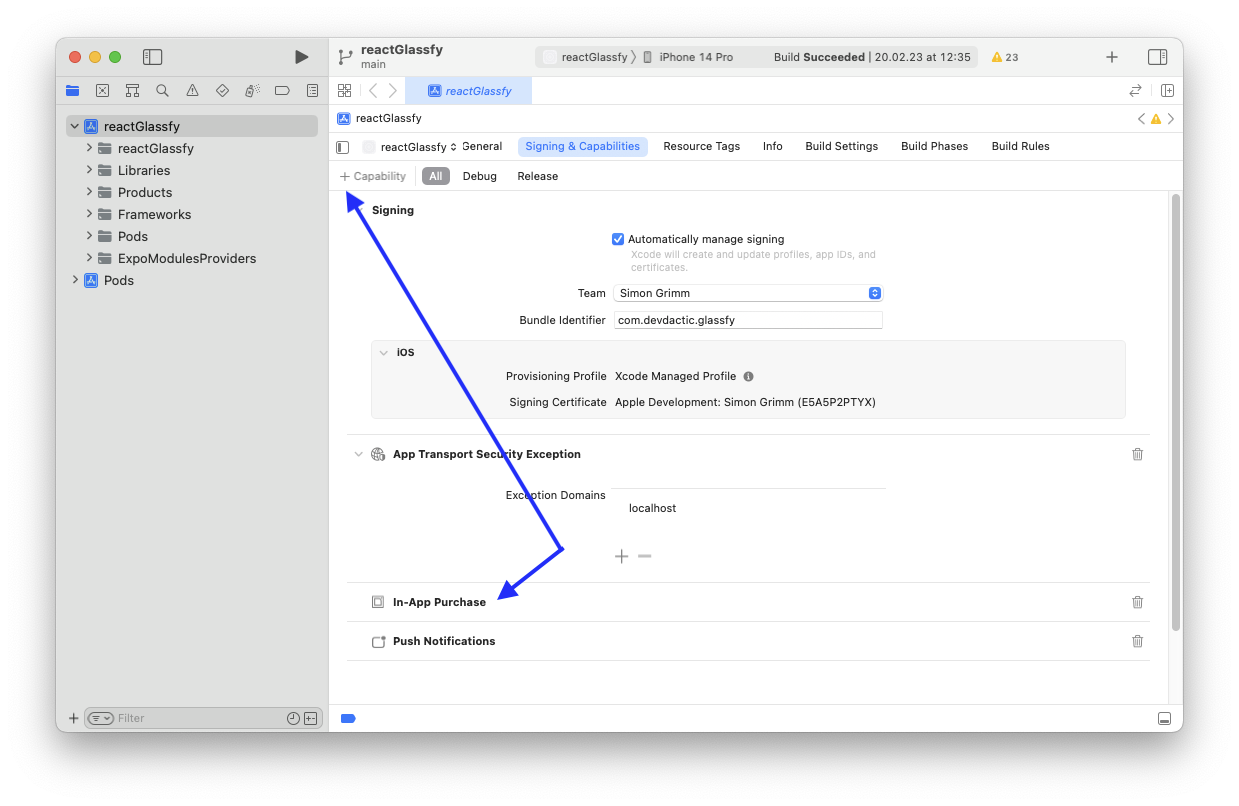
expo run:android --deviceOnce the native projects are created, we need to make sure our native apps are configured correctly, so for iOS we need to add the In-App purchase capability inside our Xcode project:
We also need to make sure we have the right permissions on Android, therefore bring up the android/app/src/main/AndroidManifest.xml and add the following line to the permissions:
<uses-permission android:name="com.android.vending.BILLING" />Now we can get started using the Glassfy SDK in our React Native app!
Creating a Glassfy React Context Provider
We need to make sure Glassfy is initialized before we retrieve any offerings, and in order to manage that state and other interactions with Glassfy we create our own context that provides functionality to the rest of our app.
This provider will have functions to purchase items or restorePermissions which is always a requirement by the app stores, and we also have a dummy user state where we display items the user purchased.
Finally the provider will have the offerings loaded from Glassfy once the conenction is created.
The only thing you need right now is your Glassfy App Key which you can find in the settings of your Glassfy app
To get started, let’s create a new file at app/providers/GlassfyProvider.tsx and insert:
import { createContext, useContext, useEffect, useState } from 'react';
import {
	Glassfy,
	GlassfyOffering,
	GlassfyPermission,
	GlassfySku,
	GlassfyTransaction,
	GLASSFY_LOGLEVEL
} from 'react-native-glassfy-module';

interface GlassfyProps {
	purchase?: (sku: GlassfySku) => Promise<void>;
	restorePermissions?: () => Promise<GlassfySku>;
	user: UserState;
	offerings: GlassfyOffering[];
}

export interface UserState {
	gems: number;
	skins: string[];
	pro: boolean;
}

const GlassfyContext = createContext<GlassfyProps | null>(null);

// Change this to your Glassfy key
// https://dashboard.glassfy.io/0/settings
const GLASSFY_KEY = 'YOUR-GLASSFY-KEY';

// Provide Glassfy functions to our app
export const GlassfyProvider = ({ children }: any) => {
	const [user, setUser] = useState<UserState>({ gems: 0, skins: [], pro: false });
	const [offerings, setOfferings] = useState<GlassfyOffering[]>([]);

	const [isReady, setIsReady] = useState(false);

	useEffect(() => {
		const init = async () => {
			// Intialise Glassfy and set our provider ready
			await Glassfy.initialize(GLASSFY_KEY, false);
			setIsReady(true);

			// Use more logging during debug if want!
			// Glassfy.setLogLevel(GLASSFY_LOGLEVEL.ALL);

			// Load all offerings (products) and permissions (previous purchases)
			await loadOfferings();
			await loadPermissions();
		};
		init();
	}, []);

	const value = {
		loadPermissions,
		purchase,
		restorePermissions,
		user,
		offerings
	};

	// Return empty fragment if provider is not ready (Glassfy not yet initialised)
	if (!isReady) return <></>;

	return <GlassfyContext.Provider value={value}>{children}</GlassfyContext.Provider>;
};

// Export context for easy usage
export const useGlassfy = () => {
	return useContext(GlassfyContext) as GlassfyProps;
};
Make sure you replace YOUR-GLASSFY-KEY with your own key before you continue!
We are now loading all user merissions (previous purchases) and offerings (items we can purchase) in the beginning, so let’s add the functions for that next:
// Load all offerings a user can purchase
const loadOfferings = async () => {
	let offerings = await Glassfy.offerings();
	setOfferings(offerings.all);
};

// Load all permissions a user has
const loadPermissions = async () => {
	let permissions = await Glassfy.permissions();
	handleExistingPermissions(permissions.all);
};

// Restore previous purchases
const restorePermissions = async () => {
	let sku = await Glassfy.restorePurchases();
	return sku;
};

// Update user state based on previous purchases
const handleExistingPermissions = (permissions: GlassfyPermission[]) => {
	const newUser: UserState = { gems: 0, skins: [], pro: false };

	for (const perm of permissions) {
		if (perm.isValid) {
			if (perm.permissionId === 'skin_shark') {
				newUser.skins.push('Shark');
			} else if (perm.permissionId === 'skin_tiger') {
				newUser.skins.push('Tiger');
			} else if (perm.permissionId === 'pro_features') {
				newUser.pro = true;
			}
		}
	}
	setUser(newUser);
};
Pretty straight forward - most stuff can be done super easy through the Glassfy SDK!
I’ve added a simple function to go through our permissions and update the user state according to the previous purchases.
This is pretty cool as Glassfy holds the information about user purchases which means in many cases we don’t have to set up our own backend.
Last step for the provider is handling purchases, but here we jsut need to pass the SKU to the SDK and everything will happen under the hood:
// Purchase one SKU and handle a successful transaction
const purchase = async (sku: GlassfySku) => {
	const transaction = await Glassfy.purchaseSku(sku);

	if (transaction.receiptValidated) {
		handleSuccessfulTransactionResult(transaction, sku);
	}
};

// Update the user state based on what we purchased
const handleSuccessfulTransactionResult = (transaction: GlassfyTransaction, sku: GlassfySku) => {
	const productID = (transaction as any).productId;

	if (productID.indexOf('gems_100_consumable_1.99') >= 0) {
		setUser({ ...user, gems: (user.gems += +sku.extravars.gems) });
	}

	if (productID.indexOf('skin_tiger_nonconsumable_4.99') >= 0) {
		const skins = user.skins;
		skins.push(sku.extravars.skin);
		setUser({ ...user, skins });
	}

	if (productID.indexOf('skin_shark_nonconsumable_4.99') >= 0) {
		const skins = user.skins;
		skins.push(sku.extravars.skin);
		setUser({ ...user, skins });
	}

	if (productID.indexOf('glassfyapp_profeatures_monthly_9.99') >= 0) {
		setUser({ ...user, pro: true });
	}
};
Additionally we perform some logic to handle the purchase and update our state again.
Note how we now extract the sku.extravars.gems from the item - this is actually information we can add in Glassfy to an SKU in order to retrieve it after a successful purchase.
Now we can put that provider to use and wrap it around our React Native app.
At this point we also create a simple stack navigation using the React Navigation package we installed before, so bring up the App.tsx and change it to:
import { NavigationContainer } from '@react-navigation/native';
import { createNativeStackNavigator } from '@react-navigation/native-stack';
import Home from './app/pages/Home';
import { GlassfyProvider } from './app/providers/GlassfyProvider';

const Stack = createNativeStackNavigator();

export default function App() {
	return (
		<GlassfyProvider>
			<NavigationContainer>
				<Stack.Navigator>
					<Stack.Screen name="Glassfy React Native" component={Home} />
				</Stack.Navigator>
			</NavigationContainer>
		</GlassfyProvider>
	);
}
Oopps looks like we don’t have a home page yet?
Let’s quickl create one and use the context we created.
From the context we can use the restorePermissions function, and also directly access the offerings which we can then use to display some text elements on our page.
Create a new file at app/pages/Home.tsx and fill it with:
import { Button, ScrollView, Text } from 'react-native';
import React, { useLayoutEffect } from 'react';
import { useGlassfy } from '../providers/GlassfyProvider';
import { useNavigation } from '@react-navigation/native';

const Home = () => {
	const navigation = useNavigation();
	const { restorePermissions, user, offerings } = useGlassfy();

	// Add a button to the top bar
	useLayoutEffect(() => {
		navigation.setOptions({
			headerRight: () => <Button onPress={restore} title="Restore" color={'#4000A4'}></Button>
		});
	}, []);

	const restore = async () => {
		try {
			const permissions = await restorePermissions!();
			console.log(permissions);
			// Handle those permissions!
		} catch (e) {
			alert(e);
		}
	};

	return (
		<ScrollView>
			{offerings.map((group) => (
				<>
					<Text key={group.offeringId}>{group.offeringId}</Text>
					{group.skus.map((sku) => (
						<Text key={sku.skuId}>{sku.skuId}</Text>
					))}
				</>
			))}
		</ScrollView>
	);
};

export default Home;
While not winning any beauty awards, you should now finally see the fruits of your hard (configuration) work upfront!
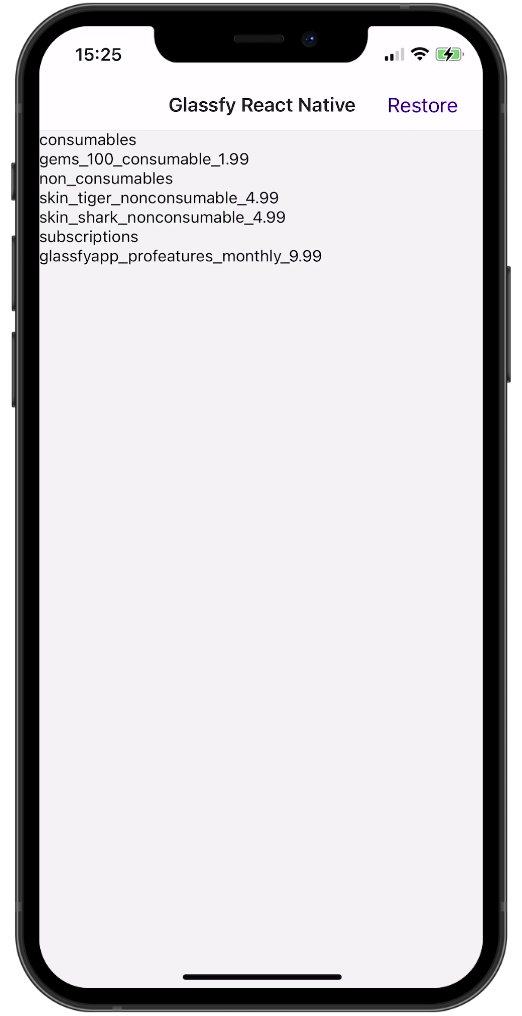
This should display a list of your different Glassfy offerings, and for every offering the SKUs you bundled within.
Let’s now polish this up a bit and add the option to purchase items.
Presenting an Offering group
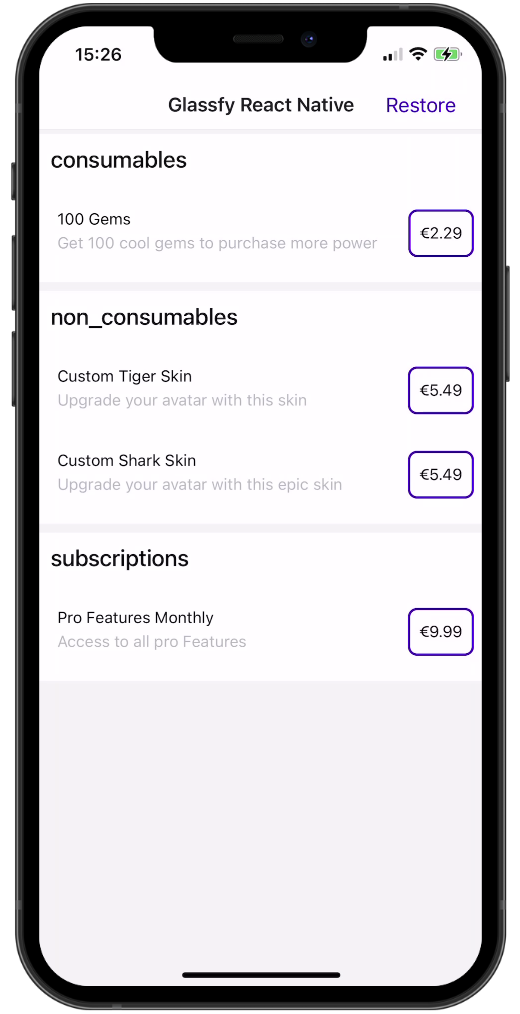
We gonna extract the logic for one offering into a new component where we also access the purchase function from our context.
Because the GlassfyOffering has a nice TS interface, all of this works pretty flawless and we can present the information, the price (with a little number formatting function) and a button to purchase that item.
For this, create a new app/components/OfferingGroup.tsx and insert:
import { View, Text, TouchableOpacity, StyleSheet } from 'react-native';
import React from 'react';
import { GlassfyProduct, GlassfySku, GlassfyOffering } from 'react-native-glassfy-module';
import { useGlassfy } from '../providers/GlassfyProvider';

interface OfferingGroupProps {
	group: GlassfyOffering;
}

// Represents one offering group with n SKU items to purchase
const OfferingGroup = ({ group }: OfferingGroupProps) => {
	const { purchase } = useGlassfy();

	const shouldPurchase = (sku: GlassfySku) => {
		purchase!(sku);
	};

	// FOrmat the price of a product
	const numberFormat = (product: GlassfyProduct) =>
		new Intl.NumberFormat('en-EN', {
			style: 'currency',
			currency: product.currencyCode
		}).format(product.price);

	return (
		<View style={styles.offeringContainer}>
			<Text style={styles.offering}>{group.offeringId}</Text>

			<View style={styles.skuContainer}>
				{group.skus.map((sku) => (
					<TouchableOpacity
						key={sku.skuId}
						onPress={() => shouldPurchase(sku)}
						style={styles.skuButton}
					>
						<View style={styles.skuText}>
							<Text>{(sku.product as any).title}</Text>
							<Text style={styles.skuDesc}>{sku.product.description}</Text>
						</View>
						<View style={styles.skuPrice}>
							<Text>{numberFormat(sku.product)}</Text>
						</View>
					</TouchableOpacity>
				))}
			</View>
		</View>
	);
};

const styles = StyleSheet.create({
	offeringContainer: {
		flexDirection: 'column',
		alignItems: 'flex-start',
		backgroundColor: '#fff',
		marginVertical: 4
	},
	skuButton: {
		padding: 12,
		borderRadius: 4,
		margin: 4,
		flexDirection: 'row',
		width: '100%'
	},
	offering: {
		padding: 10,
		fontWeight: '500',
		width: '100%',
		fontSize: 20
	},
	skuContainer: {
		marginVertical: 6,
		justifyContent: 'center'
	},
	skuText: {
		flexGrow: 1
	},
	skuDesc: {
		color: '#B6B7C0',
		paddingVertical: 4
	},
	skuPrice: {
		justifyContent: 'center',
		borderWidth: 2,
		borderRadius: 8,
		paddingHorizontal: 8,
		borderColor: '#4000A4'
	}
});

export default OfferingGroup;
You won’t see the new component until you change your app/pages/Home.tsx and update the return function to this:
return (
<ScrollView>
{offerings.map((group) => (
<OfferingGroup group={group} key={group.offeringId} />
))}
</ScrollView>
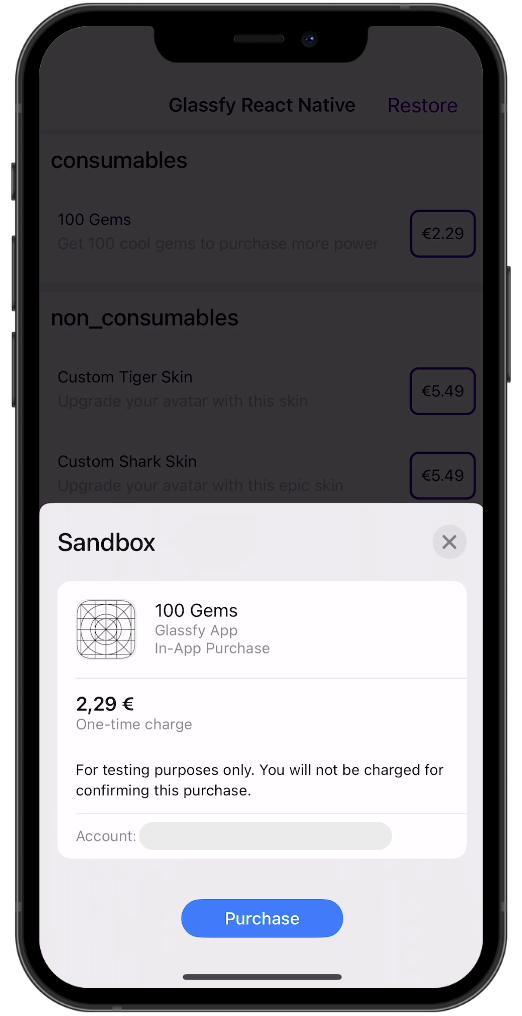
);Now we are displaying some nice groups, and you are actually ready to purchase one of the SKUs!
You can use a sandbox user for this and go through the whole purchase without actually paying for anything, and besides seeing some logs you could also see information about purchases and transactions inside your Glassfy customers dashboard.
To wrap this up, let’s present the user state with purchases in our app.
Showing User Permissions
Just like before we will create another custom component and this time display all information we get through the user state from our context.
There’s no real magic to it besides displaying some data, so let’s quickly wrap it up and create a file at app/components/UserPermissions.tsx with:
import { View, Text, StyleSheet } from 'react-native';
import React from 'react';
import { UserState } from '../providers/GlassfyProvider';

interface UserPermissionsProps {
	user: UserState;
}

// Display the user state based on permissions (previous purchases)
const UserPermissions = ({ user }: UserPermissionsProps) => {
	return (
		<View style={styles.card}>
			<Text style={styles.text}>Gems: {user.gems}</Text>
			<Text style={styles.text}>
				Skins: {user.skins.length === 0 && 'No Skins purchased yet!'} {user.skins.join(', ')}
			</Text>
			<Text style={styles.text}>Pro Features: {user.pro ? 'True' : 'False'}</Text>
		</View>
	);
};

const styles = StyleSheet.create({
	card: {
		margin: 20,
		padding: 20,
		backgroundColor: '#fff',
		shadowColor: '#',
		shadowOffset: { width: -1, height: 2 },
		shadowOpacity: 0.2,
		shadowRadius: 3
	},
	text: {
		fontSize: 20,
		color: '#4000A4',
		paddingVertical: 6
	}
});

export default UserPermissions;
And again we need to update our app/pages/Home.tsx to include the new component:
return (
	<ScrollView>
		{offerings.map((group) => (
			<OfferingGroup group={group} key={group.offeringId} />
		))}
		<UserPermissions user={user} />
	</ScrollView>
);
Now you can see the effect of purchases on the user state in your app!
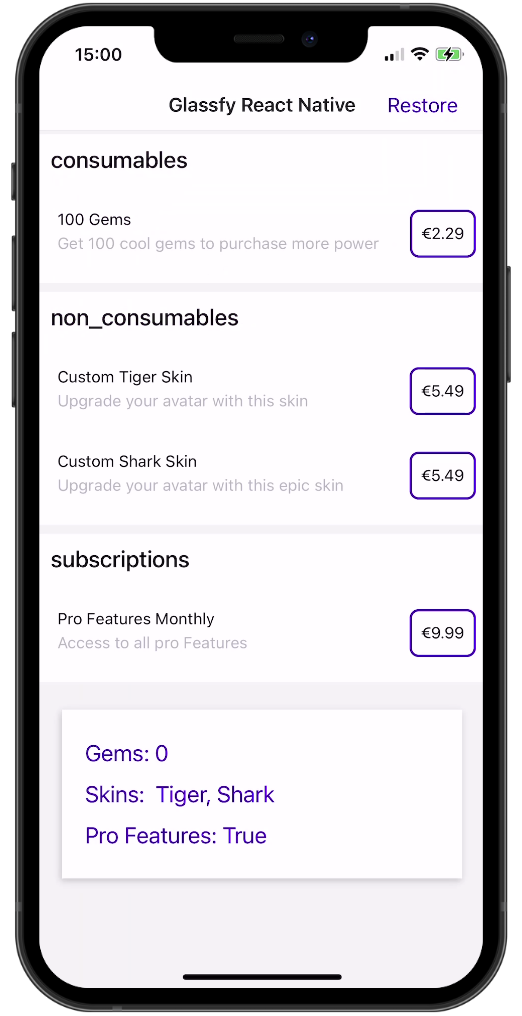
Note that we don’t keep track of the gems, which are a consumable and therefore not returned as a permission from Glassfy.
Only non-consumables give the user permanent permissions, and that’s the information we get back from Glassfy about a user.
But you can see even more information about a user history!
Sandbox Mode & Glassfy Customer
In sandbox mode subscriptions work way faster, so a week is probably 5 minutes, and after 4 cycles (or when you manually cancel it) the subscription expires.
Usually this happens somewhere in the background without a place for you to see what’s going on, and this is where the customers view of Glassfy comes in handy.
This is how my view looked after purchasing a few items with a test user:
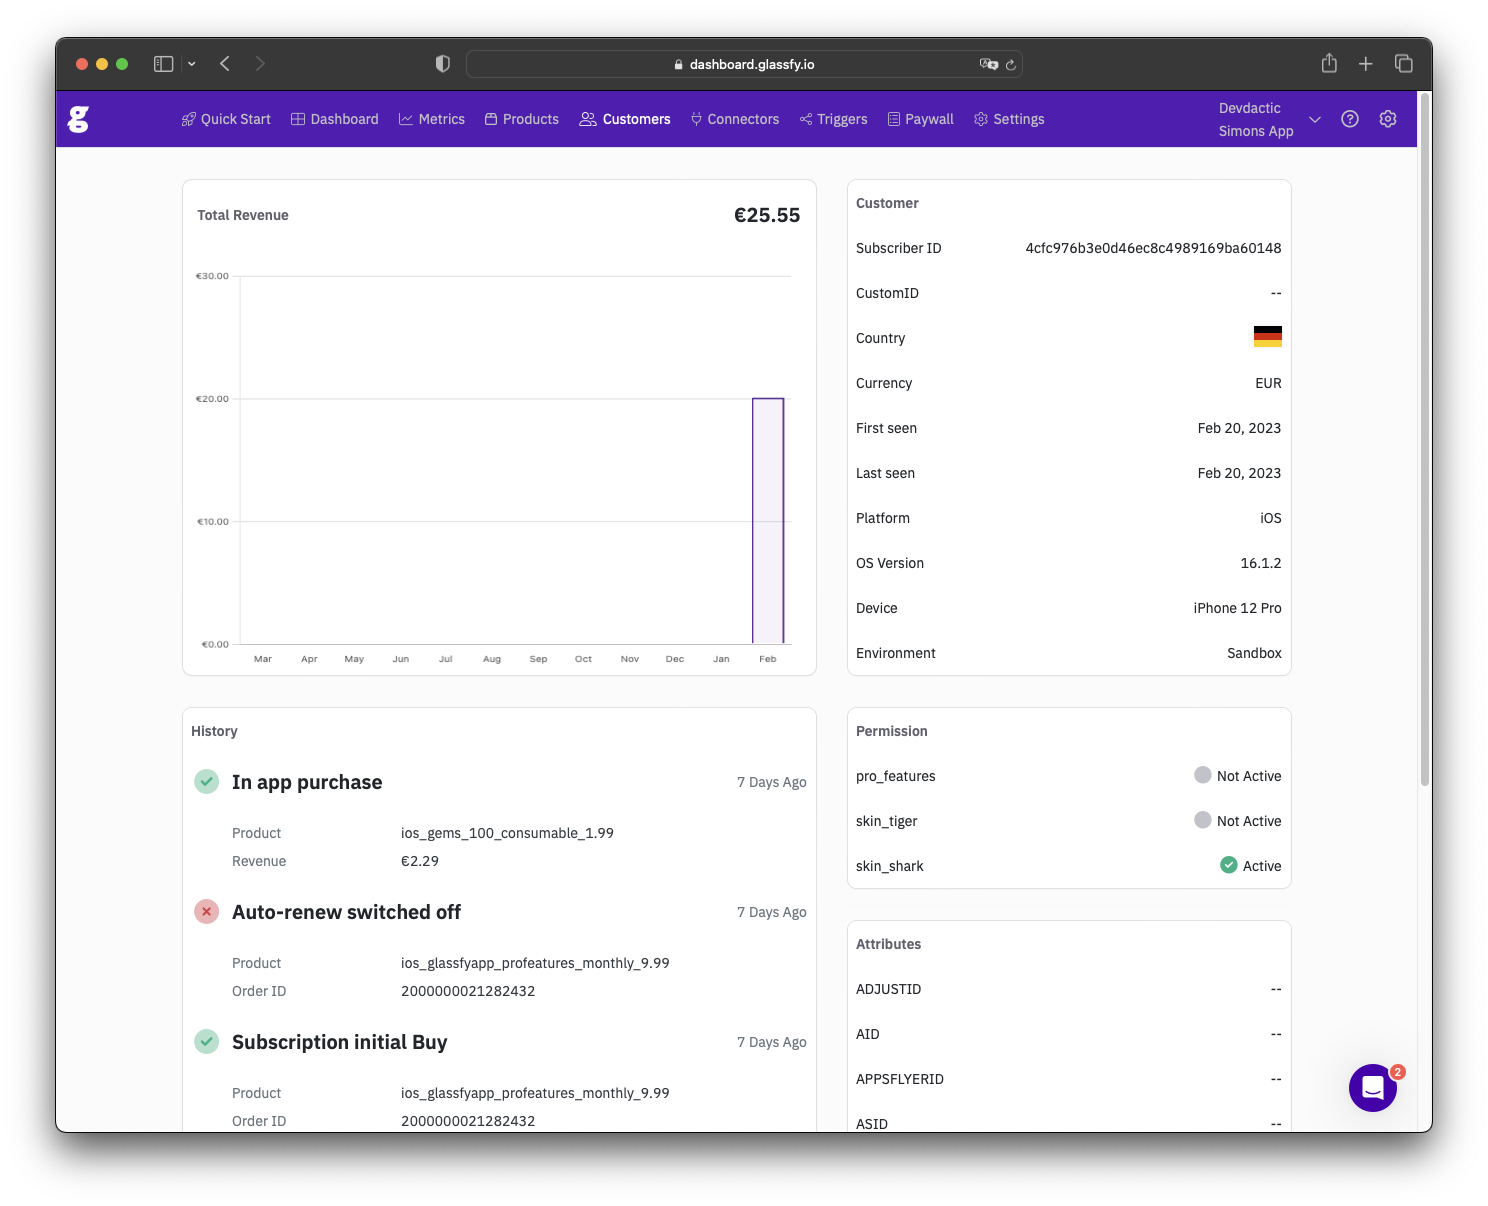
That means I can exactly see the purchases of a user and even get into some more metrics and analytics within Glassfy to better understand how and what customers are purchasing in my React Native app.
Helpful: During testing you can actually reset your iOS Sandbox user purchases again through App Store Connect. Thank me later!
Conclusion
I have previously used Glassfy with Capacitor and most developers found the process of using Glassfy for managing subscriptions a lot easier than the native way of doing it.
On top of that the whole management of In App Purchases & Subscriptions in combination with Apple and Android always felt mysterious and it was hard to debug, but with Glassfy the whole process becomes a lot more transparent.
Setting up the information in Glassfy and combining iOS/Android under one roof makes the usage of In App Purchases with React Native a lot easier.
Most of all I enjoyed seeing the events around subscriptions which are handled by their own backend, so it’s one item less I need to worry about when implementing in app purchases with Expo!
You can also find a video version of this tutorial below!