How to Store Files on Firebase Storage with Ionic Last update: 2018-01-30
We all know that Firebase is pretty amazing when it comes to realtime updates of your data. But what Firebase is also great for is uploading data and files to the private Firebase Storage each of your Apps has!
In this tutorial we will connect our Ionic app to Firebase and use both the database and storage for writing simple text files to the storage. The database is needed to keep track of the documents stored, and of course you cold store all kind of data there not just texts!
Once we are done our app will work like in the gif below.
Preparing your Firebase App
First of all you need a Firebase account (which is free) and create a new app there. Inside your app navigate to the Database section and select Rules as we want to disable any authentication checks for this tutorial. Paste in the following dummy rules there:
{
  "rules": {
    ".read": "true",
    ".write": "true"
  }
}
Of course for production you might want to add more advanced security rules and also create user accounts and so on. If you want to learn more on Firebase check out the courses of the Ionic Academy where we got multiple courses on different Firebase topics!
To finish your setup go to the overview of your Firebase app and select ”Add Firebase to your web app” and copy the config which we will need soon inside Ionic.
Setting up the Firebase Storage ionic App
We start with a blank new Ionic app and install a bunch of plugins an packages. We will use the Storage through AngularFire but currently the interface is only available in the latest version of the RC5. Perhaps this might change if you go through the tutorial at a later time!
We also add a new page and provider plus the InAppBrowser plugin to download/open our text files later. Now go ahead and run:
ionic start devdacticFbStorage blank
cd devdacticFbStorage
npm i angularfire2@5.0.0-rc.5-next firebase@4.8.0
ionic g page myFiles
ionic g provider data
ionic cordova plugin add cordova-plugin-inappbrowser
npm i @ionic-native/in-app-browser
Next you can delete the pages/Home folder as we have created a new file for that list. To finally use the lazy loading with our new page change your app/app.component.ts to:
import { Component } from '@angular/core';
import { Platform } from 'ionic-angular';
import { StatusBar } from '@ionic-native/status-bar';
import { SplashScreen } from '@ionic-native/splash-screen';

@Component({
  templateUrl: 'app.html'
})
export class MyApp {
  rootPage:any = 'MyFilesPage';

  constructor(platform: Platform, statusBar: StatusBar, splashScreen: SplashScreen) {
    platform.ready().then(() => {
      statusBar.styleDefault();
      splashScreen.hide();
    });
  }
}
Next we need to load the plugins and also connect our app to Firebase. Here we need the configuration you copied earlier, so replace the values with yours in the code below. Also, add all the needed AngularFire modules to your imports so we can use them later.
Open your app/app.modules.ts and change it to:
import { BrowserModule } from '@angular/platform-browser';
import { ErrorHandler, NgModule } from '@angular/core';
import { IonicApp, IonicErrorHandler, IonicModule } from 'ionic-angular';
import { SplashScreen } from '@ionic-native/splash-screen';
import { StatusBar } from '@ionic-native/status-bar';

import { MyApp } from './app.component';
import { DataProvider } from '../providers/data/data';

import { AngularFireModule } from 'angularfire2';
import { AngularFireDatabaseModule } from 'angularfire2/database';
import { AngularFireStorageModule } from 'angularfire2/storage';

import { InAppBrowser } from '@ionic-native/in-app-browser';

var firebaseConfig = {
  apiKey: "",
  authDomain: "",
  databaseURL: "",
  projectId: "",
  storageBucket: "",
  messagingSenderId: ""
};

@NgModule({
  declarations: [
    MyApp
  ],
  imports: [
    BrowserModule,
    IonicModule.forRoot(MyApp),
    AngularFireModule.initializeApp(firebaseConfig),
    AngularFireDatabaseModule,
    AngularFireStorageModule
  ],
  bootstrap: [IonicApp],
  entryComponents: [
    MyApp
  ],
  providers: [
    StatusBar,
    SplashScreen,
    {provide: ErrorHandler, useClass: IonicErrorHandler},
    DataProvider,
    InAppBrowser
  ]
})
export class AppModule {}
We are now ready to use both the Database and the Storage through AngularFire, so let’s dive into the fun!
Firebase Storage Upload and Database Sync
Our created page needs to display a list of files and be able to add a new text file to the storage. Our Provider will hold all the functionality for those actions and make all the calls to Firebase.
To get a list of files we will simply use a ref() on the files node and map the result so we also get all the keys of the objects which we need to delete entries and files later on.
The upload to the storage happens through the afStorage provider where we create a new uniqueish name for the file with a date and then use the putString() function to write the data to Firebase. That’s all to for uploading!
As you can see, you could also write base64 data as images to the storage which is discussed inside the advanced course inside the Ionic Academy.
Once a file is uploaded we need to store its meta information to the database, which can be achieved by calling push() on the reference to our files list.
Finally deleting files takes place in both the storage and the database to clean up our mess if we no longer need the data.
Now go ahead and change your providers/data/data.ts to:
import { Injectable } from '@angular/core';
import { AngularFireDatabase } from 'angularfire2/database';
import { AngularFireStorage, AngularFireUploadTask } from 'angularfire2/storage';
@Injectable()
export class DataProvider {
constructor(private db: AngularFireDatabase, private afStorage: AngularFireStorage) { }
getFiles() {
let ref = this.db.list('files');
return ref.snapshotChanges().map(changes => {
return changes.map(c => ({ key: c.payload.key, ...c.payload.val() }));
});
}
uploadToStorage(information): AngularFireUploadTask {
let newName = `${new Date().getTime()}.txt`;
return this.afStorage.ref(`files/${newName}`).putString(information);
}
storeInfoToDatabase(metainfo) {
let toSave = {
created: metainfo.timeCreated,
url: metainfo.downloadURLs[0],
fullPath: metainfo.fullPath,
contentType: metainfo.contentType
}
return this.db.list('files').push(toSave);
}
deleteFile(file) {
let key = file.key;
let storagePath = file.fullPath;
let ref = this.db.list('files');
ref.remove(key);
return this.afStorage.ref(storagePath).delete();
}
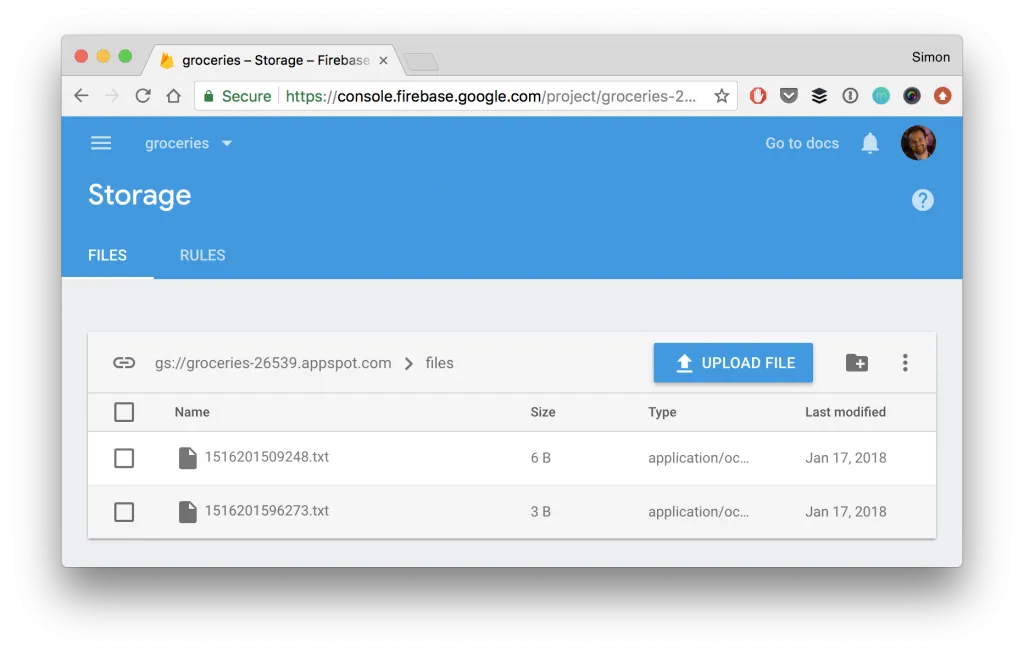
}Once we upload a file they will be visible inside the storage like in the image below! Now we only need to connect everything with our view.
Building Our File Upload and List
Like most of the time the actual view is not that hard if your got the provider and needed functions already set up. When starting our page we can load the list of files through the provider, and as this is an Observable we will automatically get the new files added and don’t need any more logic to update the list!
When we add a new file we bring up a little alert with one input to write a short text. Probably not the most common use case but we are here to learn about the functionality!
After the alert is closed, we use both of our provider functions to first upload the new information and then store the meta information (after the upload) to the database.
You might notice a strange upload.then().then(...) which is currently needed exactly like this, but perhaps this might change in the future as it looks quite weird in the beginning.
Deleting a file is as easy as one call to the provider, and viewing a file is handled by the In App Browser which we can give the full path to the file hosted on Firebase storage!
Now finish your page by changing the pages/home/home.ts to:
import { InAppBrowser } from '@ionic-native/in-app-browser';
import { DataProvider } from './../../providers/data/data';
import { Component } from '@angular/core';
import { IonicPage, NavController, NavParams } from 'ionic-angular';
import { AlertController } from 'ionic-angular/components/alert/alert-controller';
import { ToastController } from 'ionic-angular/components/toast/toast-controller';
import { Observable } from 'rxjs/Observable';

@IonicPage()
@Component({
  selector: 'page-my-files',
  templateUrl: 'my-files.html',
})
export class MyFilesPage {
  files: Observable<any[]>;

  constructor(public navCtrl: NavController, private dataProvider: DataProvider, private alertCtrl: AlertController, private toastCtrl: ToastController, private iab: InAppBrowser) {
    this.files = this.dataProvider.getFiles();
  }

  addFile() {
    let inputAlert = this.alertCtrl.create({
      title: 'Store new information',
      inputs: [
        {
          name: 'info',
          placeholder: 'Lorem ipsum dolor...'
        }
      ],
      buttons: [
        {
          text: 'Cancel',
          role: 'cancel'
        },
        {
          text: 'Store',
          handler: data => {
            this.uploadInformation(data.info);
          }
        }
      ]
    });
    inputAlert.present();
  }

  uploadInformation(text) {
    let upload = this.dataProvider.uploadToStorage(text);

    // Perhaps this syntax might change, it's no error here!
    upload.then().then(res => {
      this.dataProvider.storeInfoToDatabase(res.metadata).then(() => {
        let toast = this.toastCtrl.create({
          message: 'New File added!',
          duration: 3000
        });
        toast.present();
      });
    });
  }

  deleteFile(file) {
    this.dataProvider.deleteFile(file).subscribe(() => {
      let toast = this.toastCtrl.create({
        message: 'File removed!',
        duration: 3000
      });
      toast.present();
    });
  }

  viewFile(url) {
    this.iab.create(url);
  }
}
Last missing piece is the view to display an array of files as cards using the async pipe. Each card displays some information as well as two buttons for opening and deleting that file.
To add new files we use a FAB at the bottom right corner which always looks pretty nice with Ionic!
Nothing special here, so finish the code by changing the pages/home/home.html to:
<ion-header>
<ion-navbar color="primary">
<ion-title>My Files</ion-title>
</ion-navbar>
</ion-header>
<ion-content>
<ion-card *ngFor="let file of files | async">
<ion-card-header>
{{ file.created | date:'medium' }}
</ion-card-header>
<ion-card-content>
<button ion-button block icon-left outline (click)="viewFile(file.url)">
<ion-icon name="eye"></ion-icon>
{{ file.fullPath }}
</button>
<button ion-button block outline icon-left color="danger" (click)="deleteFile(file)">
<ion-icon name="trash"></ion-icon> Delete
</button>
</ion-card-content>
</ion-card>
<ion-fab right bottom>
<button ion-fab color="primary" (click)="addFile()">
<ion-icon name="cloud-upload"></ion-icon>
</button>
</ion-fab>
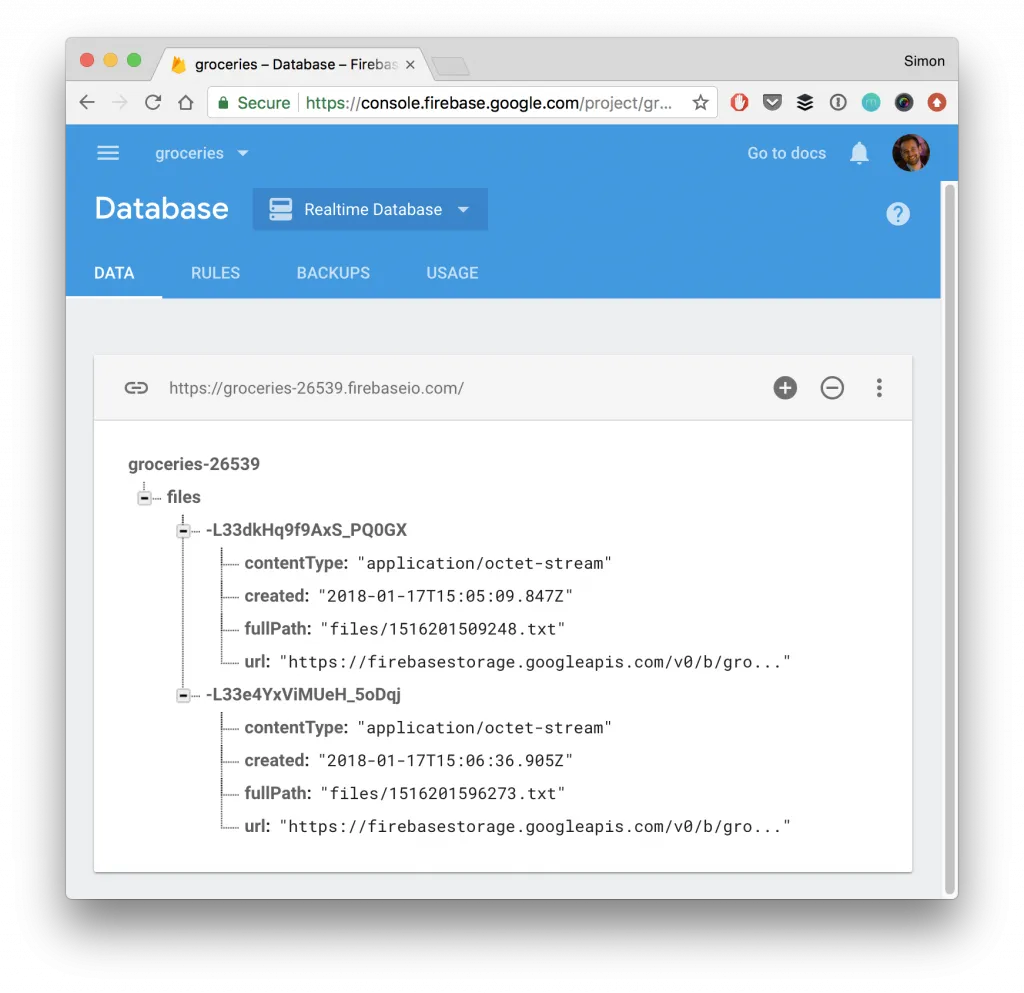
</ion-content>Now you should be able to run your app either on a device or the browser and see your data roll into the storage of your Firebase app and also inside the realtime database with entries like the one below.
Conclusion
Although we have used a very early version of AngularFire to use the Storage it already works as expected. Of course the syntax might change but everything else is working flawless!
What else can you think of to store inside the Firebase Storage of your App?
let me know if you encounter any troubles!
You can also find a video version of this article below.
Happy Coding, Simon