Building a Signature Drawpad using Ionic Last update: 2016-11-10

Some time ago I wrote a tutorial on building a signature pad using Ionic 1, and today we are going to do the same but now it’s time for Ionic and Angular 2+!
This Tutorial was updated for Ionic 3.1!
In this tutorial we will use the external angular2-signaturepad library to build a simple app where users can draw/sign something and save that image as data using the Ionic storage.
Prerequisite
Learning Ionic can become overwhelming, I know that feeling. Is learning from tutorials and videos sometimes not enough for you? Then I got something for you.
If you want to learn Ionic with step-by-step video courses, hands-on training projects and a helpful community who has your back, then take a look at the Ionic Academy.
Setting up our Signature Pad Ionic App
As usual we start with a blank Ionic app. We install the signaturepad library and also the Ionic storage which is by now a standalone package and should already be added if you start a new Ionic 2+ app. If you want to use this storage on a device in a safe way make sure to also install the cordova package for sqlite so the storage can use an underlying sqlite database.
ionic start devdactic-pad --blank --v2
cd devdactic-pad
npm install angular2-signaturepad --save
# If you don't already have storage
# npm install @ionic/storage --save
# Install the cordova plugin to use storage on the device!
cordova plugin add cordova-sqlite-storage --save
Once we are done it’s time to include all of our needed imports and providers inside the src/app.module.ts, so open it and insert:
import { BrowserModule } from '@angular/platform-browser';
import { ErrorHandler, NgModule } from '@angular/core';
import { IonicApp, IonicErrorHandler, IonicModule } from 'ionic-angular';
import { SplashScreen } from '@ionic-native/splash-screen';
import { StatusBar } from '@ionic-native/status-bar';

import { MyApp } from './app.component';
import { HomePage } from '../pages/home/home';
import { SignaturePadModule } from 'angular2-signaturepad';
import { IonicStorageModule } from '@ionic/storage';

@NgModule({
  declarations: [
    MyApp,
    HomePage
  ],
  imports: [
    BrowserModule,
    IonicModule.forRoot(MyApp),
    SignaturePadModule,
    IonicStorageModule.forRoot()
  ],
  bootstrap: [IonicApp],
  entryComponents: [
    MyApp,
    HomePage
  ],
  providers: [
    StatusBar,
    SplashScreen,
    {provide: ErrorHandler, useClass: IonicErrorHandler}
  ]
})
export class AppModule {}
As you can see we import the Signaturepad library and also the module for the Ionic Storage. Let’s get into the real code now!
Adding the Signature Pad class
Most of the configuration for our Signaturepad comes from inside our HomePage. Inside the view it will be a simple element with some options, so if you want to configure some parameters do it inside the class.
To get a reference to the signaturePad we use the @ViewChild syntax which will give us the according element of the view. We also define an object with some parameters we would like to set, which will be set as configuration object on the element in the view itself.
Whenever we enter this class, we want to check whether we have some stored data of a previous drawing. In that case we set our signature variable to that value as it will be simply loaded inside an image. To save the data was a previously often asked question, so you can see it’s as simple as storing the data you get from the Signaturepad!
Open your src/pages/home/home.ts and replace everything with:
import { Component, ViewChild } from '@angular/core';
import { NavController } from 'ionic-angular';
import { SignaturePad } from 'angular2-signaturepad/signature-pad';
import { Storage } from '@ionic/storage';
import { ToastController } from 'ionic-angular';

@Component({
  selector: 'page-home',
  templateUrl: 'home.html'
})
export class HomePage {
  signature = '';
  isDrawing = false;

  @ViewChild(SignaturePad) signaturePad: SignaturePad;
  private signaturePadOptions: Object = { // Check out https://github.com/szimek/signature_pad
    'minWidth': 2,
    'canvasWidth': 400,
    'canvasHeight': 200,
    'backgroundColor': '#f6fbff',
    'penColor': '#666a73'
  };

  constructor(public navController: NavController, public storage: Storage, public toastCtrl: ToastController) {}

  ionViewDidEnter() {
    this.signaturePad.clear()
    this.storage.get('savedSignature').then((data) => {
      this.signature = data;
    });
  }

  drawComplete() {
    this.isDrawing = false;
  }

  drawStart() {
    this.isDrawing = true;
  }

  savePad() {
    this.signature = this.signaturePad.toDataURL();
    this.storage.set('savedSignature', this.signature);
    this.signaturePad.clear();
    let toast = this.toastCtrl.create({
      message: 'New Signature saved.',
      duration: 3000
    });
    toast.present();
  }

  clearPad() {
    this.signaturePad.clear();
  }
}
We got 2 more functions that are called whenever the drawing starts and is complete. We simply change a boolean, as I wanted to show you how you can apply flexible styling to some components, so more on this very soon inside the view.
The last 2 functions can be called from our view to save the current data and clear the pad. In both cases we can use our reference to the pad object and perform actions on it. If we wan to save it we simply get the data of the current image by calling toDataURL(). Afterwards we show a little toast to confirm that it has been saved to the storage.
Creating the Signaturepad view
The final piece that connects everything is our view. We need one drawing area (the area of the Signaturepad) and one image that displays the last piece of fine drawing. Between those elements we put 2 buttons to call our clear and safe functions of our class, so go ahead and put this into your app/src/home/home.html:
<ion-header>
  <ion-navbar color="primary">
    <ion-title>
      Devdactic Signature
    </ion-title>
  </ion-navbar>
</ion-header>

<ion-content>
  <div class="title">Please draw your Signature</div>
  <ion-row [ngClass]="{'drawing-active': isDrawing}">
    <ion-col></ion-col>
    <ion-col>
      <signature-pad [options]="signaturePadOptions" (onBeginEvent)="drawStart()" (onEndEvent)="drawComplete()"></signature-pad>
    </ion-col>
    <ion-col></ion-col>

  </ion-row>
  <button ion-button full color="danger" (click)="clearPad()">Clear</button>
  <button ion-button full color="secondary" (click)="savePad()">Save</button>

  <ion-row>
    <ion-col></ion-col>
    <ion-col width-80>
      <img [src]="signature"/>
    </ion-col>
    <ion-col></ion-col>
  </ion-row>

</ion-content>
As said before we pass the options and the 2 event functions to the signature-pad element which is enough for it to work. We also apply a class to the surrounding row using ngClass to check if a value is set and then apply a special class.
The class is defined inside the src/home/home.scss and just looks like this:
page-home {
.drawing-active {
background: #d6fffc;
}
.title {
text-align: center;
font-weight: bold;
padding: 10px;
}
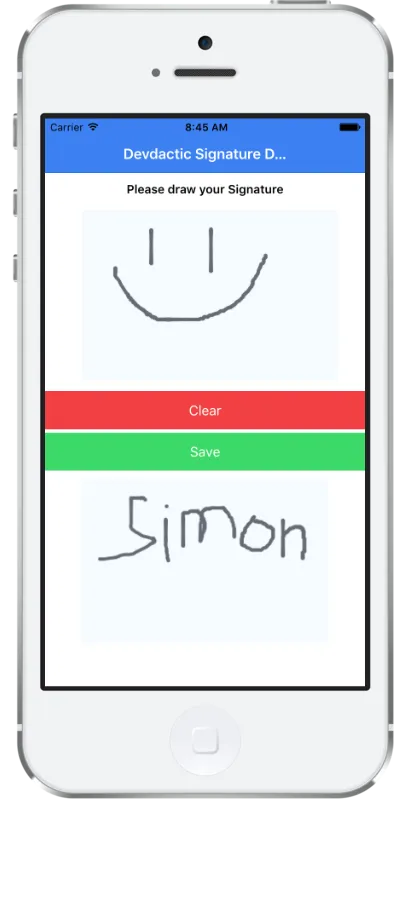
}So now we got everything we need ready! If you run your app (even inside the browser works) you should see 2 empty areas on first startup. Try to draw on the top area and it safe, you image will be copied to the area below. The result will look like the image below, depending on your drawing skills (mine are very high as you can see):
Conclusion
In this article you learned how to create a simple drawing input for your Ionic 2 app using the Signaturepad library. Most of the stuff we did some time ago using AngularJS 1 works already with Ionic 2, and it’s sometimes even easier to use. If you have used the Signaturepad with Ionic let me know below how and where you used it!
Happy Coding, Simon