How to Build a Shopping Cart with Ionic 4 Last update: 2019-10-29
When you are building a shopping app with Ionic there is no way around having a decent cart. And displaying a cart plus keeping track of all items can be challenging depending on your data.
In this tutorial we will implement a shopping cart which keeps track of our items, displays a list of all items and calculates the total amount.
Oh and we will also animate part of our app to create an even richer user experience by using the simple but awesome animate.css.
This topic was actually selected by the community in our voting so here we go!
Starting our Shopping Cart
We start as always with a blank app and add another page that will be the modal of our cart and a service to manage all cart interaction in the background. Also we can directly install our animation package with npm, so go ahead and run:
ionic start shoppingCart blank
cd ./shoppingCart

ionic g page pages/cartModal
ionic g service services/cart

npm install animate.css
Because we will use the generated page as a modal and not just a regular page, we need to add its module to our main app module. If you skip this step you will later encounter a problem when presenting the modal, so go ahead and change your app/app.module.ts to:
import { CartModalPageModule } from './pages/cart-modal/cart-modal.module';
import { NgModule } from '@angular/core';
import { BrowserModule } from '@angular/platform-browser';
import { RouteReuseStrategy } from '@angular/router';

import { IonicModule, IonicRouteStrategy } from '@ionic/angular';
import { SplashScreen } from '@ionic-native/splash-screen/ngx';
import { StatusBar } from '@ionic-native/status-bar/ngx';

import { AppComponent } from './app.component';
import { AppRoutingModule } from './app-routing.module';

@NgModule({
  declarations: [AppComponent],
  entryComponents: [],
  imports: [BrowserModule, IonicModule.forRoot(), AppRoutingModule, CartModalPageModule],
  providers: [
    StatusBar,
    SplashScreen,
    { provide: RouteReuseStrategy, useClass: IonicRouteStrategy }
  ],
  bootstrap: [AppComponent]
})
export class AppModule {}
We also need to import the CSS of the animation library which we can do right in our src/global.scss, simply add the import after the already existing imports:
@import '~animate.css/animate.min.css';

.cart-modal {
  --height: 50%;
  --border-radius: 10px;
  padding: 25px;
}
Oh and while we are here, let’s leave some CSS for the modal that we will create to make it look smaller on our screen, just like a simple overlay. The app I had in mind was the German “pizza.de” which looks kinda like this: 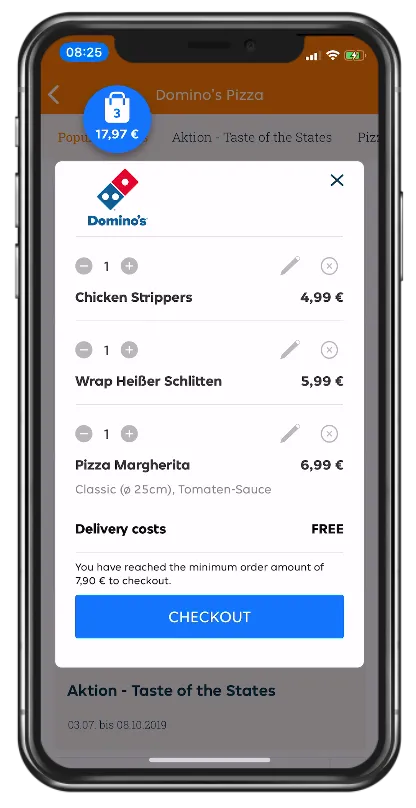
Building the Cart Service
Before we dive into all the view elements we need to take of the engine of our app - the cart service.
You should always use a service to keep track of your data and perform operations in order to call it from all places and pages of your app. A page should simply handle the view clicks and be the layer between the view and the logic to handle all interaction.
Our service needs to keep track of all items added to the cart and provide functions to get the cart or all product items which you might normally get from an API.
In order to make it easier to get the current count of products we can use a BehaviourSubject like we did many times before. With this variable, all other pages can simply subscribe to the cartItemCount and automatically receive any updates without further logic! We just need to make sure the call next() on the variable whenever we change the cart.
The functions to change our cart are pretty self-explanatory: Add an item, reduce the item count or completely remove a stack of items.
The logic looks more complicated than it actually is, we just need to find the right item in our cart array and then work with the amount property to change the count and finally update the BehaviourSubject.
For now that’s enough, so go into your services/cart.service.ts and change it to:
import { Injectable } from '@angular/core';
import { BehaviorSubject } from 'rxjs';

export interface Product {
  id: number;
  name: string;
  price: number;
  amount: number;
}
@Injectable({
  providedIn: 'root'
})
export class CartService {
  data: Product[] = [
    { id: 0, name: 'Pizza Salami', price: 8.99, amount: 0 },
    { id: 1, name: 'Pizza Classic', price: 5.49, amount: 0 },
    { id: 2, name: 'Sliced Bread', price: 4.99, amount: 0 },
    { id: 3, name: 'Salad', price: 6.99, amount: 0 }
  ];

  private cart = [];
  private cartItemCount = new BehaviorSubject(0);

  constructor() {}

  getProducts() {
    return this.data;
  }

  getCart() {
    return this.cart;
  }

  getCartItemCount() {
    return this.cartItemCount;
  }

  addProduct(product) {
    let added = false;
    for (let p of this.cart) {
      if (p.id === product.id) {
        p.amount += 1;
        added = true;
        break;
      }
    }
    if (!added) {
      product.amount = 1;
      this.cart.push(product);
    }
    this.cartItemCount.next(this.cartItemCount.value + 1);
  }

  decreaseProduct(product) {
    for (let [index, p] of this.cart.entries()) {
      if (p.id === product.id) {
        p.amount -= 1;
        if (p.amount == 0) {
          this.cart.splice(index, 1);
        }
      }
    }
    this.cartItemCount.next(this.cartItemCount.value - 1);
  }

  removeProduct(product) {
    for (let [index, p] of this.cart.entries()) {
      if (p.id === product.id) {
        this.cartItemCount.next(this.cartItemCount.value - p.amount);
        this.cart.splice(index, 1);
      }
    }
  }
}
Now we have a powerful service in the background that we can inject into all of our pages to manage our cart.
Adding the Order Page
First of all we now need a page to display the products (that we get from the service) and let the user add these items.
We also grab a reference to the cart and the item count of the cart, and after doing it once in the beginning the page is basically set up. The addToCart will simply call the function of our service and that’s it - the cart count will be updated through the BehaviourSubject to which our view in the next step will be subscribed
When we open the cart we present the page we created in the beginning and also apply our custom CSS class to it. The additional logic in the dismiss is only for our animations, more on that in a second.
For now open your app/home/home.page.ts and change it to:
import { CartService } from './../services/cart.service';
import { Component, ViewChild, ElementRef } from '@angular/core';
import { ModalController } from '@ionic/angular';
import { CartModalPage } from '../pages/cart-modal/cart-modal.page';
import { BehaviorSubject } from 'rxjs';

@Component({
  selector: 'app-home',
  templateUrl: 'home.page.html',
  styleUrls: ['home.page.scss']
})
export class HomePage {
  cart = [];
  products = [];
  cartItemCount: BehaviorSubject<number>;

  @ViewChild('cart', {static: false, read: ElementRef})fab: ElementRef;

  constructor(private cartService: CartService, private modalCtrl: ModalController) {}

  ngOnInit() {
    this.products = this.cartService.getProducts();
    this.cart = this.cartService.getCart();
    this.cartItemCount = this.cartService.getCartItemCount();
  }

  addToCart(product) {
    this.cartService.addProduct(product);
    this.animateCSS('tada');
  }

  async openCart() {
    this.animateCSS('bounceOutLeft', true);

    let modal = await this.modalCtrl.create({
      component: CartModalPage,
      cssClass: 'cart-modal'
    });
    modal.onWillDismiss().then(() => {
      this.fab.nativeElement.classList.remove('animated', 'bounceOutLeft')
      this.animateCSS('bounceInLeft');
    });
    modal.present();
  }

  animateCSS(animationName, keepAnimated = false) {
    const node = this.fab.nativeElement;
    node.classList.add('animated', animationName)

    //https://github.com/daneden/animate.css
    function handleAnimationEnd() {
      if (!keepAnimated) {
        node.classList.remove('animated', animationName);
      }
      node.removeEventListener('animationend', handleAnimationEnd)
    }
    node.addEventListener('animationend', handleAnimationEnd)
  }
}
The only tricky thing in our page is applying animations, but with the help of the animateCSS() function we can easily add new animations to our cart element. You just need to make sure that you either remove the animation class that you add afterwards to trigger it again, or keep the class (like when we open the modal) so the item stays out of the view.
That’s why the openCart has some additional code to keep the cart item out of view and later fly it in back again!
This element is accessed as a ViewChild and is actually a FAB button that also displays the item count using the async pipe in our view.
Besides that our view consists of a simple list for our products and a button to add each element. Most of the code below is also for aligning the rows inside an item accordingly to achieve a somewhat acceptable presentation.
For an even cooler list of items also check out my dynamic slides app or a complete implementation of an accordion list with product items!
Right now simply change your app/home/home.page.html to:
<ion-header>
  <ion-toolbar color="primary">
    <ion-title>
      Ionic Shopping
    </ion-title>
  </ion-toolbar>
</ion-header>

<ion-content>
  <ion-fab vertical="top" horizontal="end" slot="fixed">
    <ion-fab-button (click)="openCart()" #cart>
      <div class="cart-length">{{ cartItemCount | async }}</div>
      <ion-icon name="cart" class="cart-icon"></ion-icon>
    </ion-fab-button>
  </ion-fab>
  <ion-list>
    <ion-card *ngFor="let p of products">
      <ion-card-header>
        <ion-card-title>{{ p.name }}</ion-card-title>
      </ion-card-header>
      <ion-card-content>
        <ion-row class="ion-align-items-center">
          <ion-col size="8">
            <ion-label color="secondary">
              <b>{{ p.price | currency:'USD' }}</b>
            </ion-label>
          </ion-col>
          <ion-col size="4" class="ion-text-right">
            <ion-button fill="clear" (click)="addToCart(p)">
              <ion-icon name="add"></ion-icon>
            </ion-button>
          </ion-col>
        </ion-row>
      </ion-card-content>
    </ion-card>
  </ion-list>
</ion-content>
We are now able to add items to our cart, but the fab is a bit small and also the number is kinda in the wrong place. But we can easily tweak this by applying some custom CSS to the button, the icon and the label right inside our app/home/home.page.scss:
ion-fab-button {
  height: 70px;
  width: 70px;
}

.cart-icon {
  font-size: 50px;
}

.cart-length {
  color: var(--ion-color-primary);
  position: absolute;
  top: 18px;
  left: 25px;
  font-weight: 600;
  font-size: 1em;
  min-width: 25px;
  z-index: 10;
}
Now your whole view is functional so far and even the modal of our shopping cart opens, but there’s no list of items yet.
Creating our Cart Modal Page
The last missing piece, the calculation and list of all selected items before a user continues with the checkout.
Our modal should show all information (like you saw in the screenshot before) and allow to quickly change the amount of selected items. Therefore we need some functions, but basically all of them are just making the right calls to our service!
So heres the code for our app/pages/cart-modal/cart-modal.page.ts:
import { Product, CartService } from './../../services/cart.service';
import { Component, OnInit } from '@angular/core';
import { ModalController, AlertController } from '@ionic/angular';

@Component({
  selector: 'app-cart-modal',
  templateUrl: './cart-modal.page.html',
  styleUrls: ['./cart-modal.page.scss'],
})
export class CartModalPage implements OnInit {

  cart: Product[] = [];

  constructor(private cartService: CartService, private modalCtrl: ModalController, private alertCtrl: AlertController) { }

  ngOnInit() {
    this.cart = this.cartService.getCart();
  }

  decreaseCartItem(product) {
    this.cartService.decreaseProduct(product);
  }

  increaseCartItem(product) {
    this.cartService.addProduct(product);
  }

  removeCartItem(product) {
    this.cartService.removeProduct(product);
  }

  getTotal() {
    return this.cart.reduce((i, j) => i + j.price * j.amount, 0);
  }

  close() {
    this.modalCtrl.dismiss();
  }

  async checkout() {
    // Perfom PayPal or Stripe checkout process

    let alert = await this.alertCtrl.create({
      header: 'Thanks for your Order!',
      message: 'We will deliver your food as soon as possible',
      buttons: ['OK']
    });
    alert.present().then(() => {
      this.modalCtrl.dismiss();
    });
  }
}
As you can see, only the getTotal actually performs a calculation in here (which we could/should also move to the service actually) to iterate over all items in the cart and add up the amount times the price of each selected item.
Regarding the checkout, that’s actually another story for a full post. Some interesting material on this can be found here, but simply let me know if you would like to see Paypal/Stripe/Alipay integration with this shopping cart and we’ll add a part 2!
For now though let’s finish the modal by implementing the view. Again, a lot of code but most of it is styling and aligning the items correctly, so go ahead with your app/pages/cart-modal/cart-modal.page.html and change it to:
<ion-content fullscreen>

  <div class="ion-text-end">
    <ion-button (click)="close()" fill="clear" color="dark">
      <ion-icon name="close" slot="start"></ion-icon>
    </ion-button>
  </div>

  <div class="ion-padding">

    <ion-list>
      <ion-item *ngFor="let p of cart" class="ion-text-wrap">
        <ion-grid>
          <ion-row class="ion-align-items-center">
            <ion-col size="2" class="ion-align-self-center">
              <ion-button color="medium" fill="clear" (click)="decreaseCartItem(p)">
                <ion-icon name="remove-circle" slot="icon-only"></ion-icon>
              </ion-button>
            </ion-col>

            <ion-col size="1" class="ion-align-self-center">
              {{ p.amount }}
            </ion-col>

            <ion-col size="2" class="ion-align-self-center">
              <ion-button color="medium" fill="clear" (click)="increaseCartItem(p)">
                <ion-icon name="add-circle" slot="icon-only"></ion-icon>
              </ion-button>
            </ion-col>

            <ion-col size="2" offset="5">
              <ion-button color="medium" fill="clear" (click)="removeCartItem(p)">
                <ion-icon name="close-circle" slot="icon-only"></ion-icon>
              </ion-button>
            </ion-col>
          </ion-row>
          <ion-row>
            <ion-col size="9">
              <b>{{ p.name }}</b>
            </ion-col>
            <ion-col size="3" class="ion-text-end">
              {{ p.amount * p.price | currency:'USD' }}
            </ion-col>
          </ion-row>
        </ion-grid>
      </ion-item>
      <ion-item>
        <ion-grid>
          <ion-row>
            <ion-col size="9">
              Total:
            </ion-col>
            <ion-col size="3" class="ion-text-end">
              {{ getTotal() | currency:'USD' }}
            </ion-col>
          </ion-row>
        </ion-grid>
      </ion-item>
    </ion-list>

    <ion-button expand="full" (click)="checkout()">
      Checkout
    </ion-button>
  </div>

</ion-content>
And now your shopping cart app is ready and working, with cool animations.
Who said cross platform apps can’t look good?
Conclusion
Implementing a shopping cart in your Ionic 4 app is basically about developing the right functionality in a service to keep track of the cart. The view will only present the items, and using a BehaviourSubject makes it even easier to display changes if they only happen in one single place of your app!
Again, if you want more information about payments just let me know in the comments.
You can also find a video version of this tutorial below.