How to Setup Deep Links With Capacitor (iOS & Android) Last update: 2022-01-25
Taking your users directly into your app with a universal link on iOS or App Link on Android is one of the easiest ways to open a specific app of your Ionic page, and becomes a super easy task with Capacitor.
In this post we will integrate these links, also known as deep links for both platforms so we are able to jump right into the app if it is installed.
For this we won’t need a lot of code, but a bit of additional setup to make those deep links work correctly. In the end, you will be able to open a URL like ”www.yourdomain.com/details/22” in the browser and your app will automatically open the right page!
Ionic Deeplink Setup
Let’s begin with the easiest part, which is actually setting up a new Ionic app and generating one details page for testing:
ionic start devdacticLinks blank --type=angular
cd ./devdacticLinks
ionic g page details

ionic build
ionic cap add ios
ionic cap add android
You can also create the native builds after creating the app since we will have to work with the native files later as well. For this I recommend you put your correct bundle ID into the capacitor.config.json or TS file, because it will be used only during this initial setup.
In my case I used “com.devdactic.deeplinks” as the ID like this inside the file:
{
	"appId": "com.devdactic.deeplinks",
	"appName": "devdacticLinks",
	"webDir": "www",
	"bundledWebRuntime": false
}
Next step is some basic routing, and we will simply make our details page accessible with a wildcard in the URL that we will later use in the deep link to see that our setup works.
Go ahead now and change the src/app/app-routing.module.ts to:
import { NgModule } from '@angular/core';
import { PreloadAllModules, RouterModule, Routes } from '@angular/router';

const routes: Routes = [
	{
		path: 'home',
		loadChildren: () => import('./home/home.module').then((m) => m.HomePageModule)
	},
	{
		path: 'details/:id',
		loadChildren: () => import('./details/details.module').then((m) => m.DetailsPageModule)
	},
	{
		path: '',
		redirectTo: 'home',
		pathMatch: 'full'
	}
];

@NgModule({
	imports: [RouterModule.forRoot(routes, { preloadingStrategy: PreloadAllModules })],
	exports: [RouterModule]
})
export class AppRoutingModule {}
Now we can retrieve the ID information from the URL just like we do in a normal Angular routing scenario on our src/app/details/details.page.ts:
import { Component, OnInit } from '@angular/core';
import { ActivatedRoute } from '@angular/router';

@Component({
	selector: 'app-details',
	templateUrl: './details.page.html',
	styleUrls: ['./details.page.scss']
})
export class DetailsPage implements OnInit {
	id = '';

	constructor(private route: ActivatedRoute) {}

	ngOnInit() {
		this.id = this.route.snapshot.paramMap.get('id');
	}
}
Finally let’s also display the information we got from the URL on the src/app/details/details.page.html:
<ion-header>
	<ion-toolbar color="primary">
		<ion-buttons slot="start">
			<ion-back-button defaultHref="/"></ion-back-button>
		</ion-buttons>
		<ion-title>Details</ion-title>
	</ion-toolbar>
</ion-header>

<ion-content> My ID: {{ id }} </ion-content>
All of this was basic Ionic Angular stuff and by no means related to deep links at all!
The magic now comes from handling the appUrlOpen event, which we can do easily by using Capacitor.
We simply add a listener on this event and from there get access to the URL with which our app was opened from the outside!
Since that URL contains your domain as well, we need to split the URL to remove that part, and then use the rest of the URL for our app routing.
This might be different for your own app since you have other pages or a different routing, but you could also simply add some logic in there and check the different path components of the URL and then route the user to the right place in your app!
Go ahead and change the src/app/app.component.ts to this now:
import { Component, NgZone } from '@angular/core';
import { Router } from '@angular/router';
import { App, URLOpenListenerEvent } from '@capacitor/app';

@Component({
	selector: 'app-root',
	templateUrl: 'app.component.html',
	styleUrls: ['app.component.scss']
})
export class AppComponent {
	constructor(private router: Router, private zone: NgZone) {
		this.initializeApp();
	}

	initializeApp() {
		App.addListener('appUrlOpen', (event: URLOpenListenerEvent) => {
			this.zone.run(() => {
				const domain = 'devdactic.com';

				const pathArray = event.url.split(domain);
				// The pathArray is now like ['https://devdactic.com', '/details/42']

				// Get the last element with pop()
				const appPath = pathArray.pop();
				if (appPath) {
					this.router.navigateByUrl(appPath);
				}
			});
		});
	}
}
Also notice that we didn’t install a single additional plugin? No more Cordova plugins with specific parameters, everything we need is already available inside the Capacitor App package!
But this was the easy part - now we need some customisation for iOS and Android to actually make deep links work.
iOS Configuration
If you don’t have an app ID created inside your iOS Developer account, now is the time.
First of all you need to be enrolled in the Apple Developer Program, which is also necessary to submit your apps in the end.
Your app needs a valid identifier that you also always need when you submit your app. If you want to create a new one, just go to the identifiers list inside your account and add a new App id.
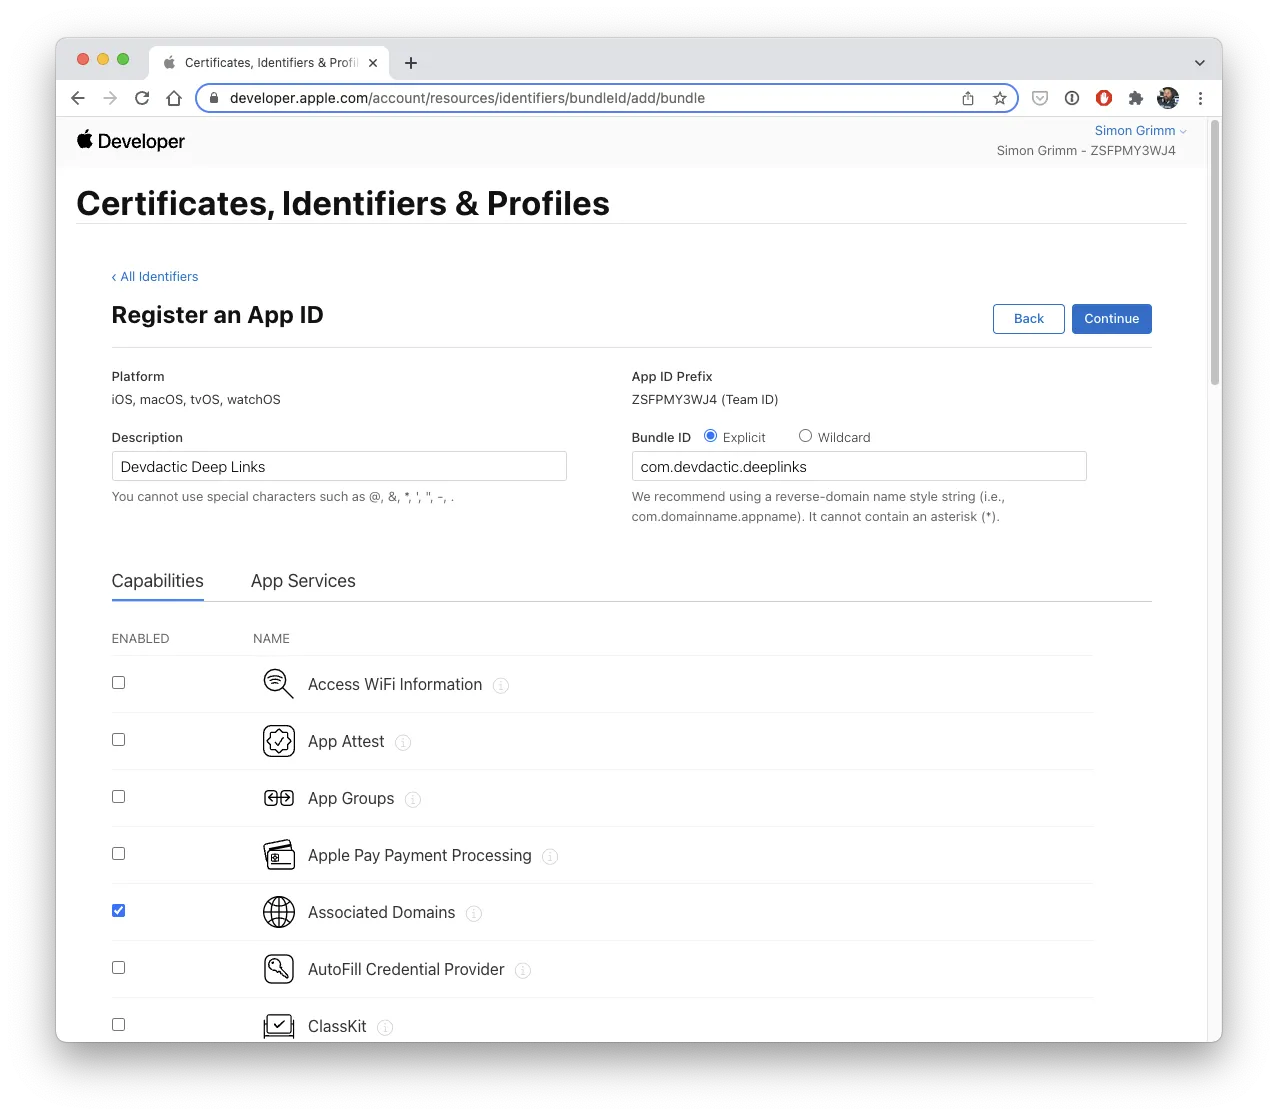
It’s important to enable Associated Domains for your app id in this screen!
In that screen you need to note 2 things (which you can see in the image above):
- The bundle id (app id) you specified
- Your Team id
Now we need to create another validation file, which is called apple-app-site-association. Without any ending, only this name!
The content should look like this, but of course insert your team id and bundle ID, for example “12345.com.devdactic.wpapp”:
{
	"applinks": {
		"apps": [],
		"details": [
			{
				"appID": "YOURTEAMID.com.your.bundleid",
				"paths": ["*"]
			}
		]
	}
}
You can create that file simply anywhere on your computer, it doesn’t have to be inside the project. It doesn’t matter, because it actually needs to be served on your domain!
So the next step is upload the validation file to your hosting.
You can add the file to the same .well-known folder, and your file needs to be accessible on your domain.
You can find my file here: https://devdactic.com/.well-known/apple-app-site-association
The file validates your domain for iOS, and you can also specify which paths should match. I used the * wildcard to match any routes, but if you only want to open certain paths directly in the app you could specify something like “products/*” or event multiple different paths!
If you think you did everything correctly, you can insert your data in this nice testing tool for iOS.
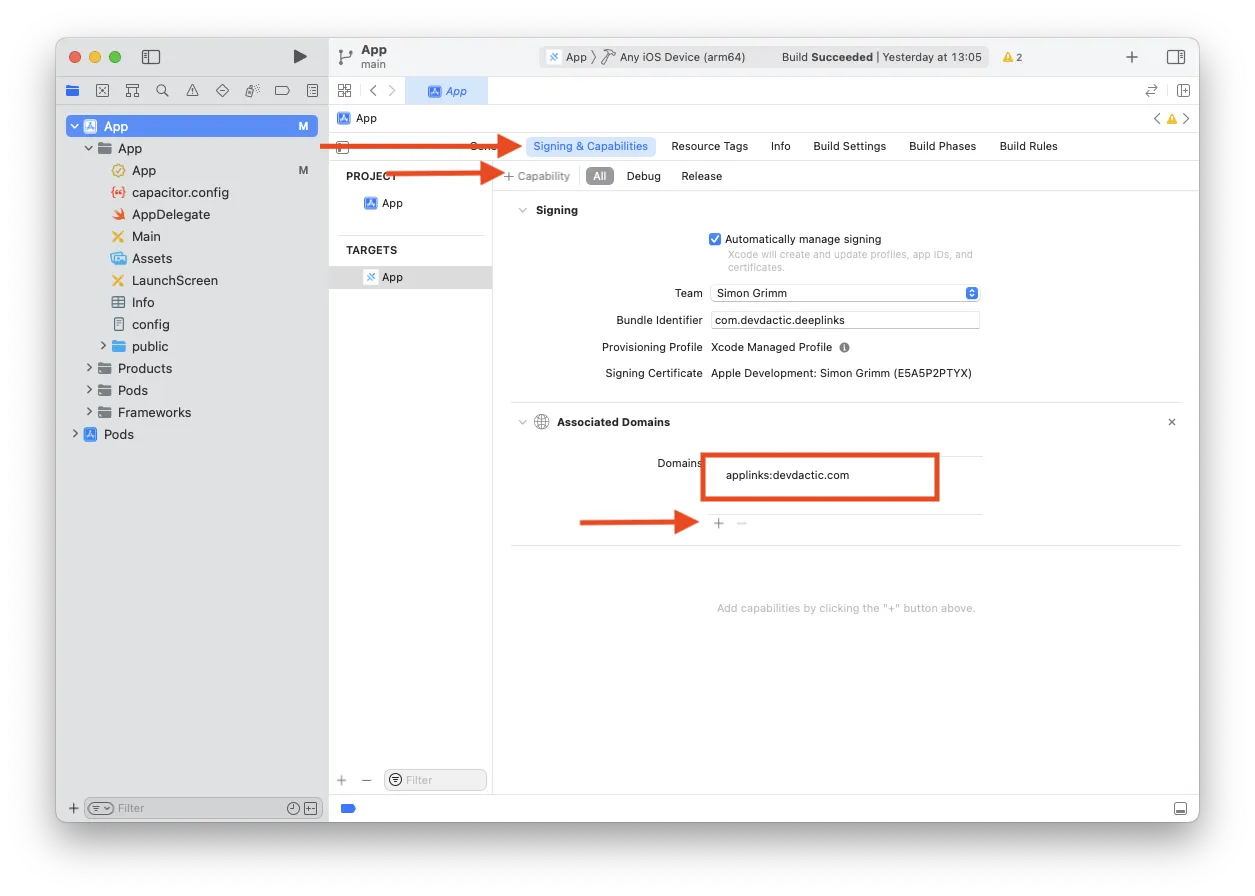
The last step is to add the domains to your Xcode plist. You can do this directly inside Xcode by adding a new entry and using the format ”applinks:yourdomain.com“.
At the end of this tutorial I also share another way to do this kind of customisation directly from code with a cool Capacitor tool.
Note: After going through this process I noticed a bug with Chrome on iOS which you should keep an eye on.
Anyway, that’s already everything we need to create universal links for iOS with Ionic!
Android Configuration
Now we want to make our links work on Android, where the name for these special links is App Links.
We need to take a few steps to verify that we own a URL (just like we did for iOS) and that we have a related app:
- Generate a keystore file used to sign your apps (if you haven’t already)
- Get the fingerprint from the keystore file
- Create/generate an assetlinks.json file
- Upload the file to your server
So first step is to create a keystore file and get the fingerprint data. This file is used to sign your app, so perhaps you already have it. Otherwise, go ahead with these:
keytool -genkey -v -keystore my-release-key.keystore -alias alias_name -keyalg RSA -keysize 2048 -validity 10000
keytool -list -v -keystore my-release-key.keystore
Now we can use the cool tool right here to generate our file by adding your domain data and fingerprint data.
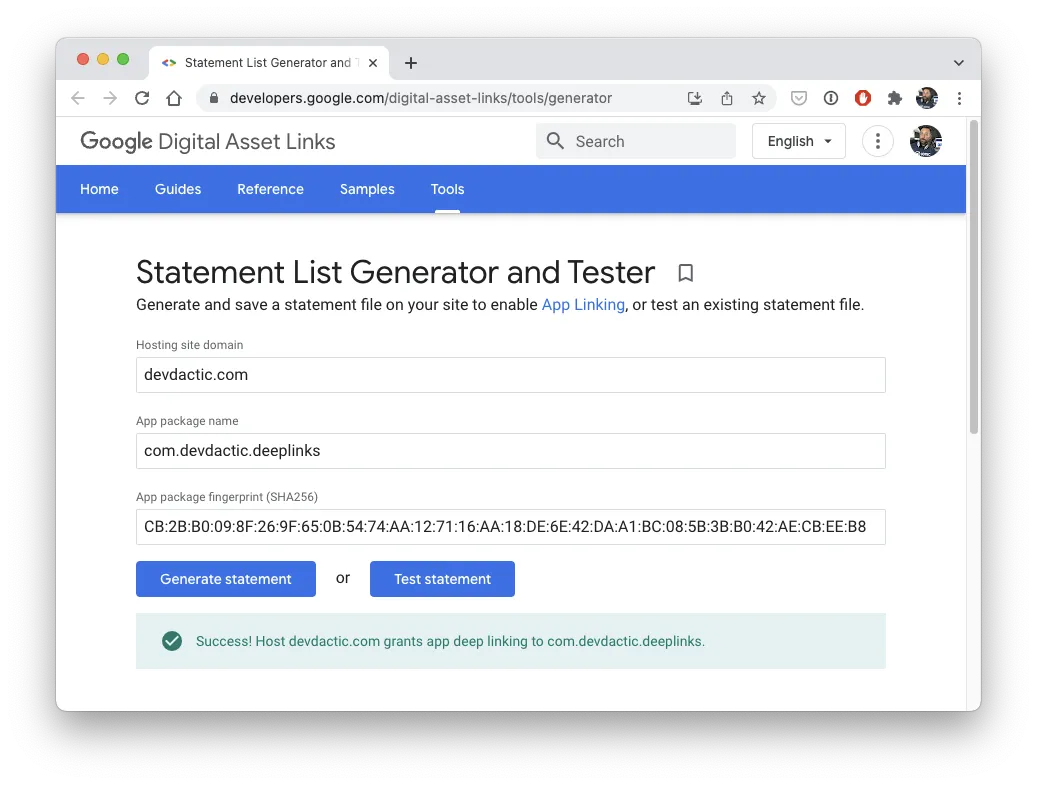
You can paste the generated information into an assetlinks.json file that you need to upload to your domain. The file content has this form:
[
  {
    "relation": ["delegate_permission/common.handle_all_urls"],
    "target": {
      "namespace": "android_app",
      "package_name": "com.devdactic.deeplinks",
      "sha256_cert_fingerprints": [
        "CB:2B:..."
      ]
    }
  }
]
In my case, you can see the file at https://devdactic.com/.well-known/assetlinks.json and you need to upload it to the path on your domain of course as well.
Once you have uploaded the file, you can test if everything is fine right within the testing tool again and the result should be a green circle!
The last step is to change your android/app/src/main/AndroidManifest.xml and include and additional intent-filter inside the activity element:
 <activity ....>
            <intent-filter android:autoVerify="true">
                <action android:name="android.intent.action.VIEW" />
                <category android:name="android.intent.category.DEFAULT" />
                <category android:name="android.intent.category.BROWSABLE" />
                <data android:scheme="https" android:host="devdactic.com" />
            </intent-filter>
</activity>
Now you just need to build your app and sign it, since I found issues when not signing my app. You can do this by running:
cd ./android
./gradlew assembleRelease
cd ..

jarsigner -verbose -sigalg SHA1withRSA -digestalg SHA1 -keystore my-release-key.keystore ./android/app/build/outputs/apk/release/app-release-unsigned.apk alias_name
zipalign -v 4 ./android/app/build/outputs/apk/release/app-release-unsigned.apk devdactic.apk

adb install devdactic.apk
Run all the commands and the app will be installed on your connected device.
You could also create a signed APK from Android Studio, just make sure you specify the same keystore file for signing as you used for generating the SHA information in the beginning.
Capacitor Configure for native project settings
We have applied a custom setting for iOS by changing it inside Xcode, but you can also automate a bunch of things with a new tool as well.
If you want to do this in a cooler way, I highly recommend you integrate the new Capacitor configure package and do this from the command line instead. It’s a super helpful tool for customising your native iOS and Android projects! Get started by installing it inside your project first:
npm i @capacitor/configureNow you can create a config.yaml at the root level of your project with the following content_
vars:
  BUNDLE_ID:
    default: com.devdactic.deeplinks
  PACKAGE_NAME:
    default: com.devdactic.deeplinks

platforms:
  ios:
    targets:
      App:
        bundleId: $BUNDLE_ID

        entitlements:
          - com.apple.developer.associated-domains: ["applinks:devdactic.com"]
  android:
    packageName: $PACKAGE_NAME
Of course you should use your own bundle ID and package name, and insert your domain name for the entitlements. All you need to do now is run the configure tool with this config by executing:
npx cap-config run config.yamlAnd voila, the settings you specified in the YAML file are applied to your native projects!
Conclusion
Compared to deep links with Cordova, the process for links with Capacitor is a lot easier since we don’t need any additional plugin and only the core Capacitor functionalities.
Still, the important part remains the setup and verification of your domains for both iOS and Android, so make sure the according testing tools show a green light after uploading your file.
If that’s not the case, this is the place to debug and potentially fix permissions or serving headers for your files so that Android and Apple accept your domain as authorised for deep links!
You can also find a video version of this tutorial below.