How to Build a PWA QR Code Scanner with Ionic for iOS & Android Last update: 2020-02-11

If you want to build a QR scanner into your Ionic app, you are using a Cordova plugin most of the time. But what if you want to use it as a website, or perhaps PWA?
Just recently a member of the Ionic Academy asked this question in our community, and here’s finally a way to build a QR scanner with Ionic - by simply relying on the web API and one Javascript package. No Corodova, no Capacitor! 
In this tutorial we will use the jsQR package which will read the image data of a stream (using an additional canvas) to grab any QR code that might be inside the image/frame.
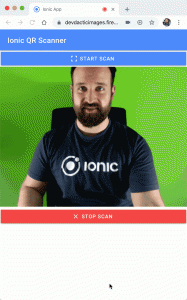
If you want to test it upfront, you can also find my demo application hosted on Firebase: https://devdacticimages.firebaseapp.com/home
And of course you can install it as a PWA (I just didn’t change the default icons/names. Deal with that!).
Getting Started
To get started with our QR scanner, simply start a blank new project and install the before mentioned package:
ionic start qrScanner blank --type=angular
cd ./qrScanner
npm install jsqr
The good thing about jsQR is that it is written in Typescript so we don’t need any additional steps to make it work in our app.
Creating the QR Scanner View
Before we dive into the JS logic for the scanner, let’s create a simple view. We need a bunch of buttons, some of them hidden in certain states (which we will explore soon) and 3 elements that deserve special attention:
- Right at the top a file input - this is actually a fallback for when you don’t want a camera stream and just snap a picture or load a photo. The input is hidden and will be triggered by the a button, which we will do at the end of the tutorial
- The video element. Inside this element we will render the preview of the selected camera once we start scanning
- A Canvas element. This element will be hidden all the time and is used to render a frame of the video, grab the image data and pass it to the jsQR lib so it can recognise a code in the image
The rest of the view isn’t really interesting, so for now go ahead by changing your app/home/home.page.html to:
<ion-header>
  <ion-toolbar color="primary">
    <ion-title>
      Ionic QR Scanner
    </ion-title>
  </ion-toolbar>
</ion-header>

<ion-content>
  <!-- Fallback for iOS PWA -->
  <input #fileinput type="file" accept="image/*;capture=camera" hidden (change)="handleFile($event.target.files)">

  <!-- Trigger the file input -->
  <ion-button expand="full" (click)="captureImage()">
    <ion-icon slot="start" name="camera"></ion-icon>
    Capture Image
  </ion-button>

  <ion-button expand="full" (click)="startScan()">
    <ion-icon slot="start" name="qr-scanner"></ion-icon>
    Start scan
  </ion-button>

  <ion-button expand="full" (click)="reset()" color="warning" *ngIf="scanResult">
    <ion-icon slot="start" name="refresh"></ion-icon>
    Reset
  </ion-button>

  <!-- Shows our camera stream -->
  <video #video [hidden]="!scanActive" width="100%"></video>

  <!-- Used to render the camera stream images -->
  <canvas #canvas hidden></canvas>

  <!-- Stop our scanner preview if active -->
  <ion-button expand="full" (click)="stopScan()" color="danger" *ngIf="scanActive">
    <ion-icon slot="start" name="close"></ion-icon>
    Stop scan
  </ion-button>

  <ion-card *ngIf="scanResult">
    <ion-card-header>
      <ion-card-title>QR Code</ion-card-title>
    </ion-card-header>
    <ion-card-content>
      {{ scanResult }}
    </ion-card-content>
  </ion-card>

</ion-content>
The different variables like scanActive or scanResult will make more sense soon!
Connecting our View
Now we start with the initial setup of our class. We need access to a few view elements, so we make them available through the @ViewChild annotation. Because we also need access to the native elements, we store a reference to them inside the ngAfterViewInit to make life easier!
In the constructor I also added a little check because…
Disclaimer: The live QR scanner won’t work inside a PWA installed on iOS. The scanner works in the regular Safari browser, but not when installed as a PWA that runs in “standalone” mode. It’s a security topic, and we don’t know when Apple will change this behaviour and allow access to the device media from the PWA context.
Therefore you could hide the scan elements if you detect iOS and the standalone mode, in all other cases this app works fine. The fallback with the file input is the attempt to at least offer the general functionality inside an iOS PWA!
Besides that the base for our class has some helpers, but nothing fancy so far. Go ahead and change your app/home/home.page.ts to:
import { Component, ViewChild, ElementRef } from '@angular/core';
import { ToastController, LoadingController, Platform } from '@ionic/angular';
import jsQR from 'jsqr';

@Component({
  selector: 'app-home',
  templateUrl: 'home.page.html',
  styleUrls: ['home.page.scss']
})
export class HomePage {
  @ViewChild('video', { static: false }) video: ElementRef;
  @ViewChild('canvas', { static: false }) canvas: ElementRef;
  @ViewChild('fileinput', { static: false }) fileinput: ElementRef;

  canvasElement: any;
  videoElement: any;
  canvasContext: any;
  scanActive = false;
  scanResult = null;
  loading: HTMLIonLoadingElement = null;

  constructor(
    private toastCtrl: ToastController,
    private loadingCtrl: LoadingController,
    private plt: Platform
  ) {
    const isInStandaloneMode = () =>
      'standalone' in window.navigator && window.navigator['standalone'];
    if (this.plt.is('ios') && isInStandaloneMode()) {
      console.log('I am a an iOS PWA!');
      // E.g. hide the scan functionality!
    }
  }

  ngAfterViewInit() {
    this.canvasElement = this.canvas.nativeElement;
    this.canvasContext = this.canvasElement.getContext('2d');
    this.videoElement = this.video.nativeElement;
  }

  // Helper functions
  async showQrToast() {
    const toast = await this.toastCtrl.create({
      message: `Open ${this.scanResult}?`,
      position: 'top',
      buttons: [
        {
          text: 'Open',
          handler: () => {
            window.open(this.scanResult, '_system', 'location=yes');
          }
        }
      ]
    });
    toast.present();
  }

  reset() {
    this.scanResult = null;
  }

  stopScan() {
    this.scanActive = false;
  }
}
Using the Camera Stream to Scan a QR Code
It’s about time to scan! To start the scanner, we need to set up a few things before we start the scanning process:
- Get a stream of video by passing your desired constraints to
getUserMedia - Set the stream as the source of our video object
- Start our scan function with every redraw by passing it to
requestAnimationFrame
We also need to bind(this)to the call of our scan function to preserve the context of “this” and allow access of our class variables and functions.
Inside the scan function we have to wait until the stream delivers enough data and then perform our magic.
With every redraw of the view, we paint the current frame of the video element on the canvas, then call getImageData() to get the image from the canvas and finally pass this image information to the jsQR library in order to check for a QR code!
That’s what happening inside our function, and if we don’t find a code we simply continue with the process.
Only if we encounter a real code (or the scanner was stopped through setting the scanActive to false) we stop calling the function again and instead present a toast with the information. The assumption here was a website inside the QR code, so therefore we can immediately open it.
With all of that theory in place, paste the below code into your existing app/home/home.page.ts HomePage class:
async startScan() {
  // Not working on iOS standalone mode!
  const stream = await navigator.mediaDevices.getUserMedia({
    video: { facingMode: 'environment' }
  });

  this.videoElement.srcObject = stream;
  // Required for Safari
  this.videoElement.setAttribute('playsinline', true);

  this.loading = await this.loadingCtrl.create({});
  await this.loading.present();

  this.videoElement.play();
  requestAnimationFrame(this.scan.bind(this));
}

async scan() {
  if (this.videoElement.readyState === this.videoElement.HAVE_ENOUGH_DATA) {
    if (this.loading) {
      await this.loading.dismiss();
      this.loading = null;
      this.scanActive = true;
    }

    this.canvasElement.height = this.videoElement.videoHeight;
    this.canvasElement.width = this.videoElement.videoWidth;

    this.canvasContext.drawImage(
      this.videoElement,
      0,
      0,
      this.canvasElement.width,
      this.canvasElement.height
    );
    const imageData = this.canvasContext.getImageData(
      0,
      0,
      this.canvasElement.width,
      this.canvasElement.height
    );
    const code = jsQR(imageData.data, imageData.width, imageData.height, {
      inversionAttempts: 'dontInvert'
    });

    if (code) {
      this.scanActive = false;
      this.scanResult = code.data;
      this.showQrToast();
    } else {
      if (this.scanActive) {
        requestAnimationFrame(this.scan.bind(this));
      }
    }
  } else {
    requestAnimationFrame(this.scan.bind(this));
  }
}
Now you are able to start the scanner from a browser (no Cordova!) and also inside a PWA. Let’s just quickly add our special iOS fallback..
Getting a QR Code from a single image
If you want a fallback for iOS or just in general a function to handle a previously capture photo, we can follow the same pattern like before.
This time we simply use the result of the file input (which we trigger with a click from code) and create a new Image from the file.
The image will be drawn on the canvas, we grab the image data and pass it to jsQR - same process like before!
So if you want this additional, simply put the code below after your previous functions:
captureImage() {
  this.fileinput.nativeElement.click();
}

handleFile(files: FileList) {
  const file = files.item(0);

  var img = new Image();
  img.onload = () => {
    this.canvasContext.drawImage(img, 0, 0, this.canvasElement.width, this.canvasElement.height);
    const imageData = this.canvasContext.getImageData(
      0,
      0,
      this.canvasElement.width,
      this.canvasElement.height
    );
    const code = jsQR(imageData.data, imageData.width, imageData.height, {
      inversionAttempts: 'dontInvert'
    });

    if (code) {
      this.scanResult = code.data;
      this.showQrToast();
    }
  };
  img.src = URL.createObjectURL(file);
}
Now you got everything covered, from live stream to photo handling with QR codes.
Hosting Your PWA
If you want to check it out as your own little PWA, you can simply follow the official Ionic PWA guide.
The steps are basically these:
ng add @angular/pwa
firebase init --project YOURPROJECTNAME

ionic build --prod
firebase deploy
Add the schematics, which makes your app PWA ready. Then connect it to Firebase (if you want, or host on your own server), run the Ionic build process and deploy it!
Conclusion
It’s always amazing to see what the web and browser are already capable of. If we didn’t have the small issue with iOS, this would be the perfect cross-platform solution for a Javascript QR Code scanner. Hopefully we will see changes in the future around this topic from Apple!
If you want to see more about PWA functionality with Ionic, just leave a comment below. I’d love to do more with PWAs since it’s a super hot and interesting topic.
You can also find a video version of this tutorial below.
