How to Send Push Notifications to Your Ionic 4 App With OneSignal Last update: 2019-05-14
Push notifications have become pretty much standard and needed for almost any app, but many people still fear the setup process as it was very cumbersome in the past.
However, this has become a lot easier and with the help of a great service called OneSignal the whole process becomes so easy that you can’t hide behind any excuse anymore. Of course the same can be done with Firebase, in fact there’s a whole course on Firebase push notifications inside the Ionic Academy.
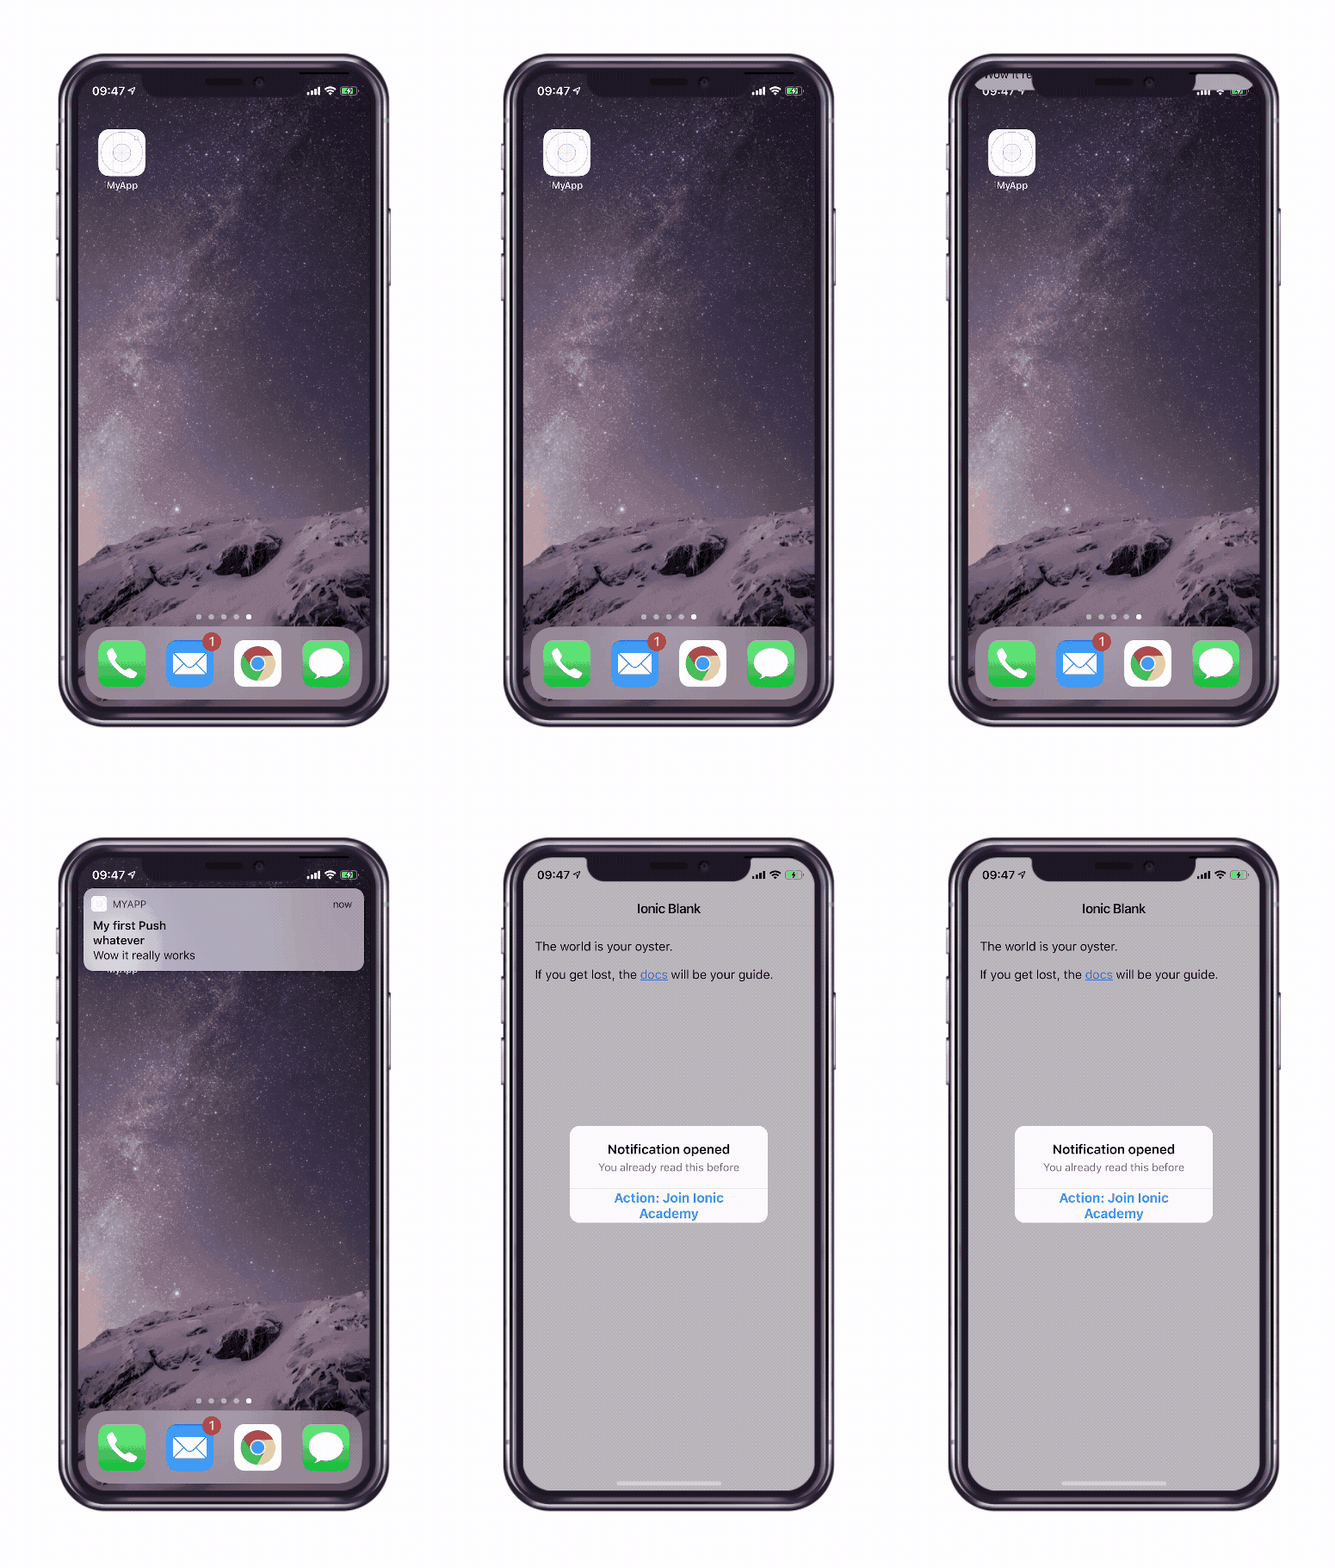
In this tutorial we will setup a new Ionic 4 app, integrate push notifications for both iOS and Android using OneSignal and finally push out some messages to our users so let’s go!
About Push Notifications
Chances are high you have seen a push notification on your mobile device before, but how does it actually work?
If you do everything from your own servers, handling device tokens, expiration times, failed notifications and so on can become very complicated especially given some iOS rules. Therefore, it makes sense to use a service for this part of your app.
The flow of events then looks roughly like this:
- A user opens the app the first time and the device is registered at OneSignal. This is mostly happening in the background if we integrate the plugin into our Ionic app.
- At some point you want to send a push to your users, most of the time even automated from your own server. We will do this from the OneSignal page, but it’s also easily possible through their REST API.
- What we don’t see now is how OneSignal fulfils the push: The service will make a request to the Apple or Android servers which then actually send out the notification to the final device.
- Finally, the message will arrive on the device of the user. Inside our Ionic app we can catch the event and also perform actions based on the data we added to the notification.
That’s basically how push works, so now let’s create our app on OneSignal.
Creating Your OneSignal App
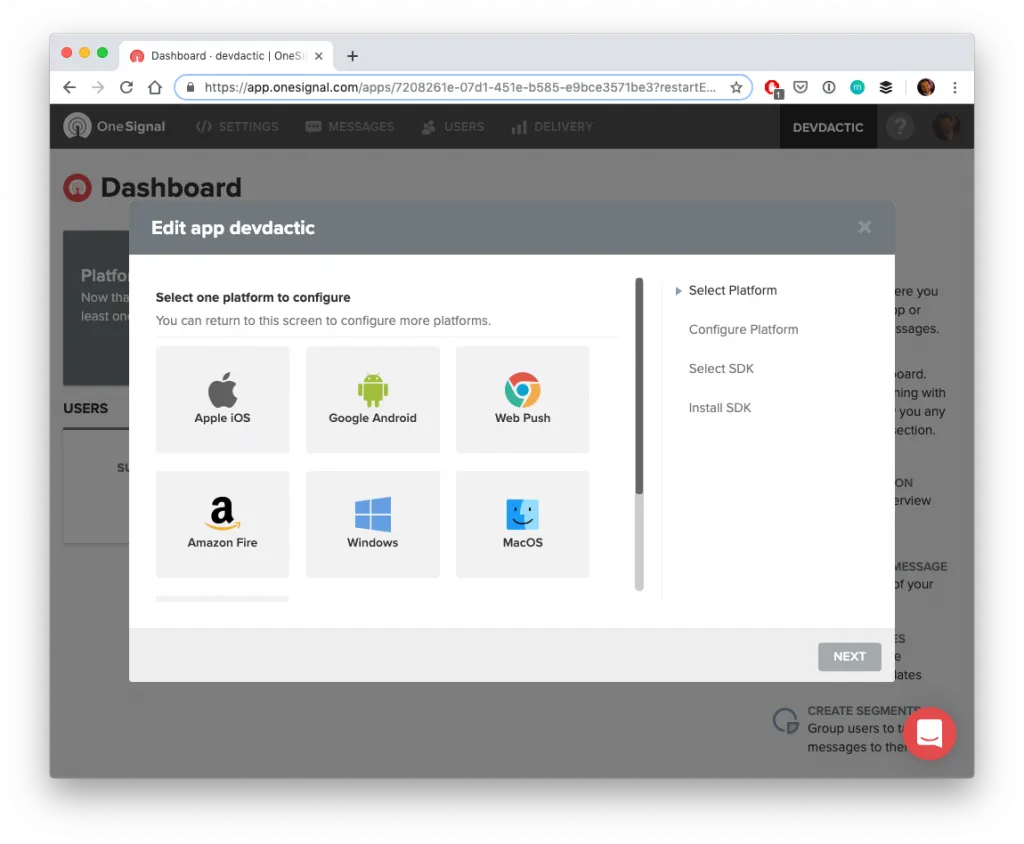
Inside your OneSignal dashboard click + Add a new App which is the project for our new app. Give it a reasonable name and continue. You will see an introduction dialog where you can add different platforms to the project, but we haven’t worked on our app so we will set those things up later.
When you now navigate to the settings and select Keys & IDs of your app you will find a ONESIGNAL APP ID and REST API KEY.
These 2 values are needed in order to connect your server to the OneSignal REST API to create new notifications, but for our next step we only need the app id for our Ionic app.
Integrating OneSignal into our Ionic App
Once you got the OneSignal app, it’s time to integrate it into out app. So let’s start a blank new Ionic app and install the Ionic native package and the Cordova plugin for OneSignal:
ionic start devdacticPush blank --type=angular
cd devdacticPush
ionic cordova plugin add onesignal-cordova-plugin
npm install @ionic-native/onesignal
To make use of the plugin we need to include it in our app/app.module.ts like always:
import { NgModule } from '@angular/core';
import { BrowserModule } from '@angular/platform-browser';
import { RouteReuseStrategy } from '@angular/router';

import { IonicModule, IonicRouteStrategy } from '@ionic/angular';
import { SplashScreen } from '@ionic-native/splash-screen/ngx';
import { StatusBar } from '@ionic-native/status-bar/ngx';

import { AppComponent } from './app.component';
import { AppRoutingModule } from './app-routing.module';

import { OneSignal } from '@ionic-native/onesignal/ngx';

@NgModule({
	declarations: [AppComponent],
	entryComponents: [],
	imports: [BrowserModule, IonicModule.forRoot(), AppRoutingModule],
	providers: [
		StatusBar,
		SplashScreen,
		{ provide: RouteReuseStrategy, useClass: IonicRouteStrategy },
		OneSignal
	],
	bootstrap: [AppComponent]
})
export class AppModule {}
Now the actual easy part follows, which is in our case just to react to incoming push notifications. In order to do so, you need to perform a little initialisation in your app where your app will connect to OneSignal.
We are not going deeper into sending tags or other data to OneSignal, but there’s a lot more that you can do at this point. If you want more guidance, just check out the according course in the Ionic Academy.
For now we just want to react to incoming messages and subscribe to both the handleNotificationReceived and handleNotificationOpened and then try to extract the data from the push notification that we received.
Therefore, open your app/app.component.ts and change it to:
import { Component } from '@angular/core';

import { Platform, AlertController } from '@ionic/angular';
import { SplashScreen } from '@ionic-native/splash-screen/ngx';
import { StatusBar } from '@ionic-native/status-bar/ngx';

import { OneSignal } from '@ionic-native/onesignal/ngx';

@Component({
	selector: 'app-root',
	templateUrl: 'app.component.html'
})
export class AppComponent {
	constructor(
		private platform: Platform,
		private splashScreen: SplashScreen,
		private statusBar: StatusBar,
		private oneSignal: OneSignal,
		private alertCtrl: AlertController
	) {
		this.initializeApp();
	}

	initializeApp() {
		this.platform.ready().then(() => {
			this.statusBar.styleDefault();
			this.splashScreen.hide();

			if (this.platform.is('cordova')) {
				this.setupPush();
			}
		});
	}

	setupPush() {
		// I recommend to put these into your environment.ts
		this.oneSignal.startInit('YOUR ONESIGNAL APP ID', 'YOUR ANDROID ID');

		this.oneSignal.inFocusDisplaying(this.oneSignal.OSInFocusDisplayOption.None);

		// Notifcation was received in general
		this.oneSignal.handleNotificationReceived().subscribe((data) => {
			let msg = data.payload.body;
			let title = data.payload.title;
			let additionalData = data.payload.additionalData;
			this.showAlert(title, msg, additionalData.task);
		});

		// Notification was really clicked/opened
		this.oneSignal.handleNotificationOpened().subscribe((data) => {
			// Just a note that the data is a different place here!
			let additionalData = data.notification.payload.additionalData;

			this.showAlert('Notification opened', 'You already read this before', additionalData.task);
		});

		this.oneSignal.endInit();
	}

	async showAlert(title, msg, task) {
		const alert = await this.alertCtrl.create({
			header: title,
			subHeader: msg,
			buttons: [
				{
					text: `Action: ${task}`,
					handler: () => {
						// E.g: Navigate to a specific screen
					}
				}
			]
		});
		alert.present();
	}
}
As you can see, besides the message and title we also extract additional data and specific a task key. You can supply whatever information here through the push notifications so that’s a great way if you want to perform a specific action in your app later!
That’s it for our Ionic code today - but the real work to connect our app follows now. We’ll see how to test this code at the end of the tutorial!
Just make sure that you add the native platforms with the commands below and only test on them - these push notifications wont work inside your browser.
# iOS
ionic cordova platform add ios
ionic cordova build ios

# Android
ionic cordova platform add android
ionic cordova build android
Preparing Push for iOS
In order to receive push notifications on iOS we need to create some certificates inside our Developer Account, then add these to OneSignal and then our app is ready, so let’s go through each of those steps.
Note: You can only build iOS apps from a Mac environment, not Windows! Also, you need to be a member in the Apple Developer Program!
Your Bundle ID
Your iOS app (and Android as well) needs a bundle id, something it can be identified with. This should be something like “com.yourcomapny.appname” and we need to set it inside our config.xml file right at the beginning as the id of the widget:
<widget
	id="com.devdactic.ionpush"
	version="0.0.1"
	xmlns="http://www.w3.org/ns/widgets"
	xmlns:cdv="http://cordova.apache.org/ns/1.0"
></widget>
If you now build your app for a native platform this id will be used. You might have to remove the iOS platform once and add it again if there are any complaints.
Register App ID
Now you need to log in to your Developer account and create an app id which is also mandatory for submitting your app to the app store later. To do so, navigate to the Certificates, Identifiers & Profiles area of your account.
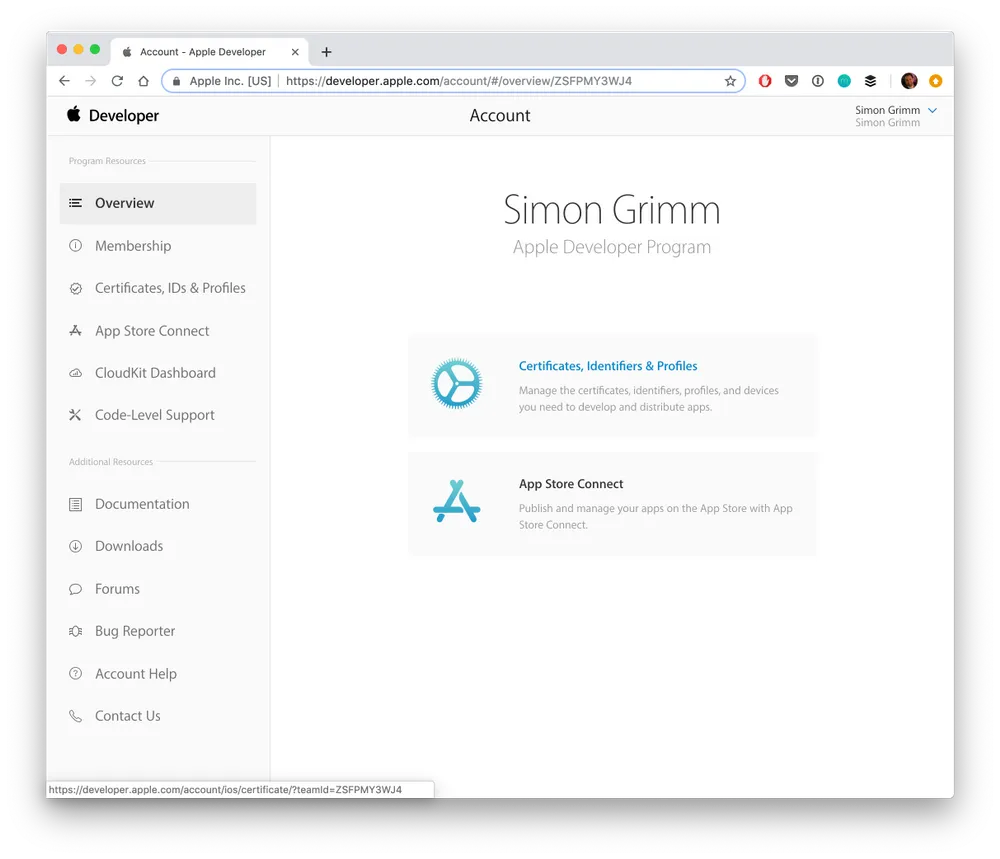
Inside that new area, go to Identifiers -> App IDs and click the plus icon at the top right to create a new ID. Now insert a name and below the bundle ID you have previously also used for your config.xml file.

That’s all we need to do manually in our Apple developer account - the rest will be done with a cool tool!
OneSignal Integration
The process for creating the right certificates involves a few more steps normally but OneSignal created an awesome tool to handle the creation of those certificates for us.
Therefore, head over to your OneSignal account and open the Provisionator tool and go through the steps and select the App ID you created in the previous step.
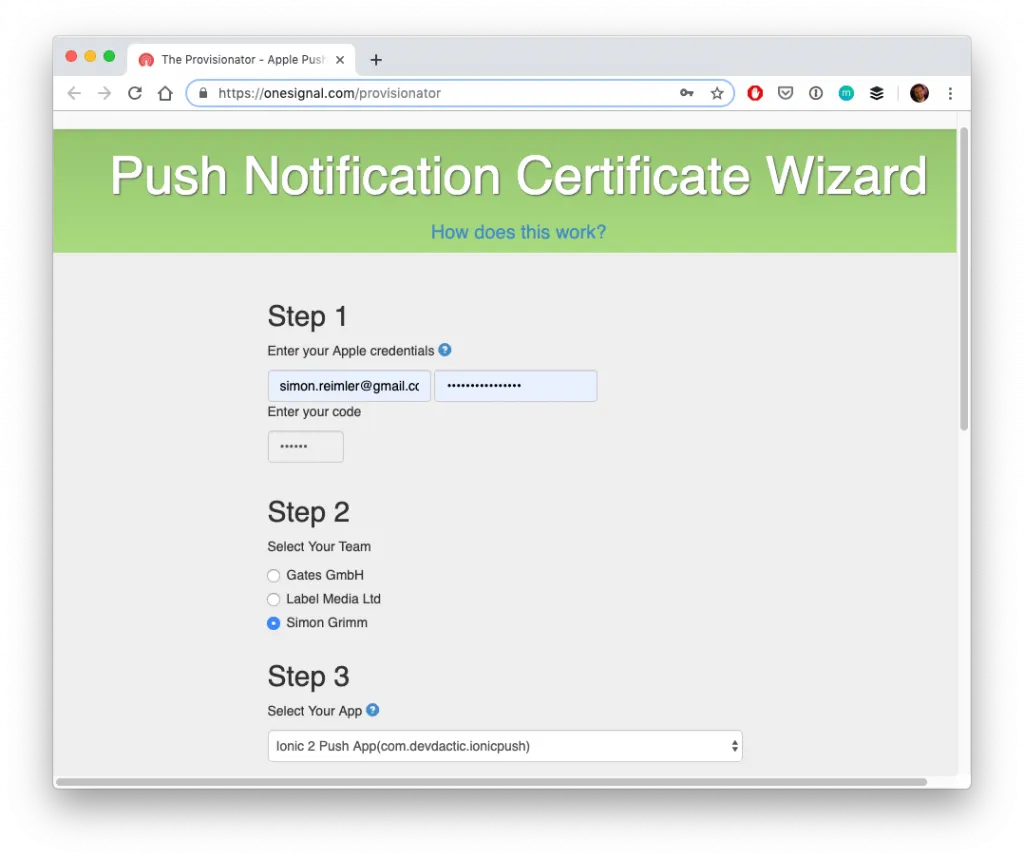
This will give you a .p12 file that is secured with a password. Now locate that file on your Mac and go to the app settings page inside your OneSignal app. From there, click on Apple iOS to bring up the dialog where you can add your p12 file from before and add its password.
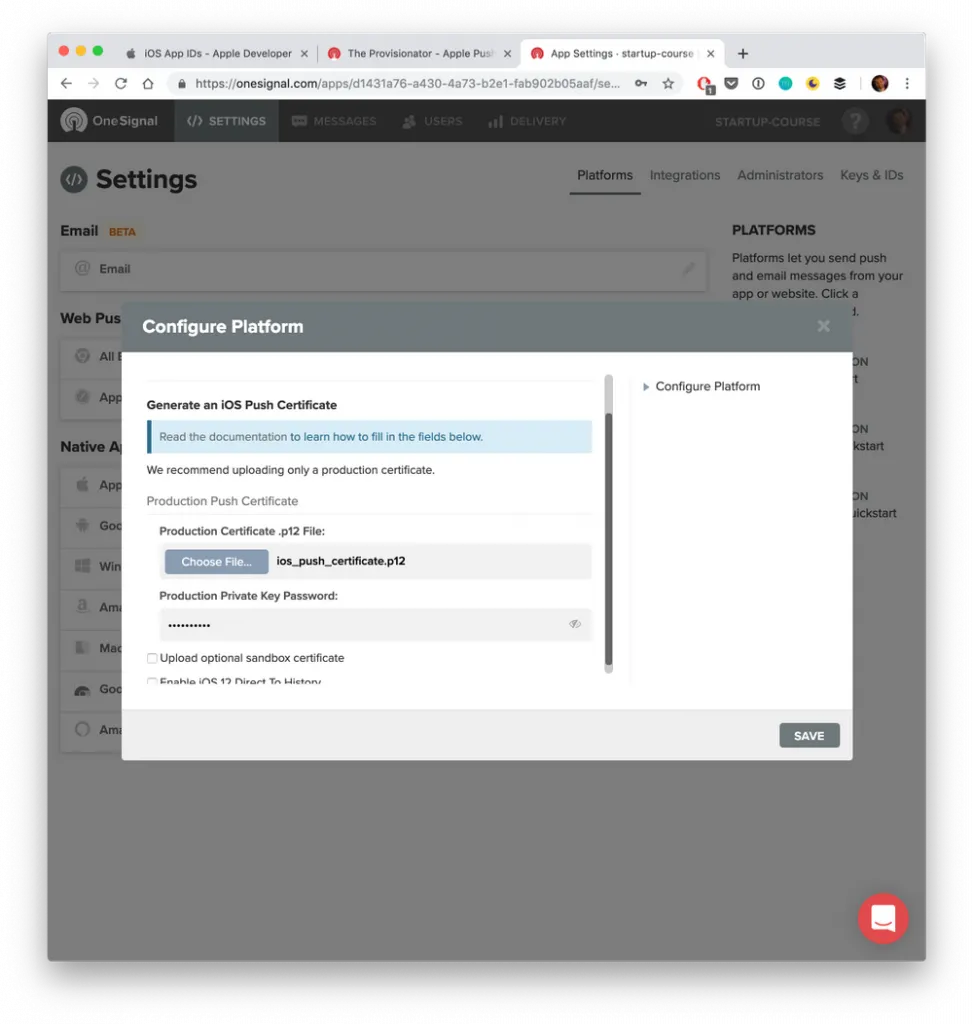
Upload and save the dialog and now you should see your app id linked to your OneSignal app inside that screen for iOS. If the dialog asks to select a SDK now, you can select Phonegap, Cordova, Ionic & Intel XDK Installation but this will only give you some tips for the installation and won’t change the settings for your OneSignal app!
Xcode Settings
To wrap things up open your native Xcode project by opening the platforms/ios/*.workspace file.
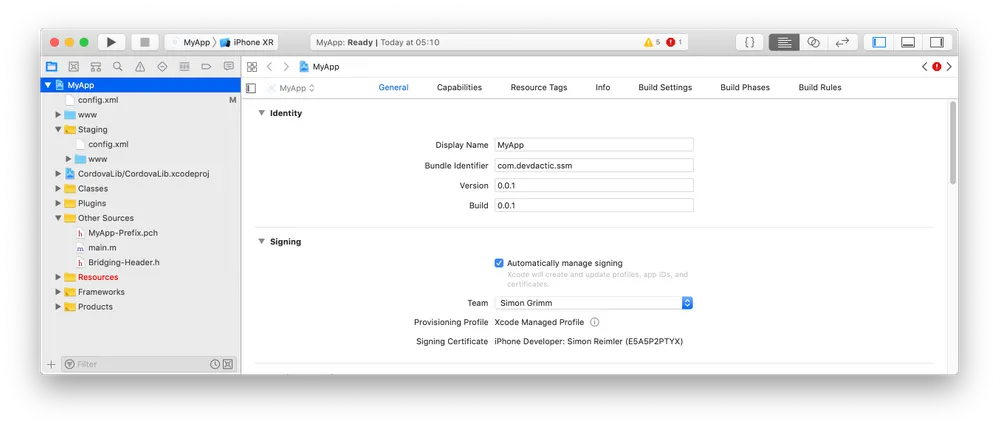
If you select your app and then general tab you should now see your app id (otherwise rebuild with the commands from before) and below you should select ”automatically manage signing” if it’s not yet selected.
If this is your first time using it you might also have to create a Development Certificate for your machine but Xcode should help you with that as well.
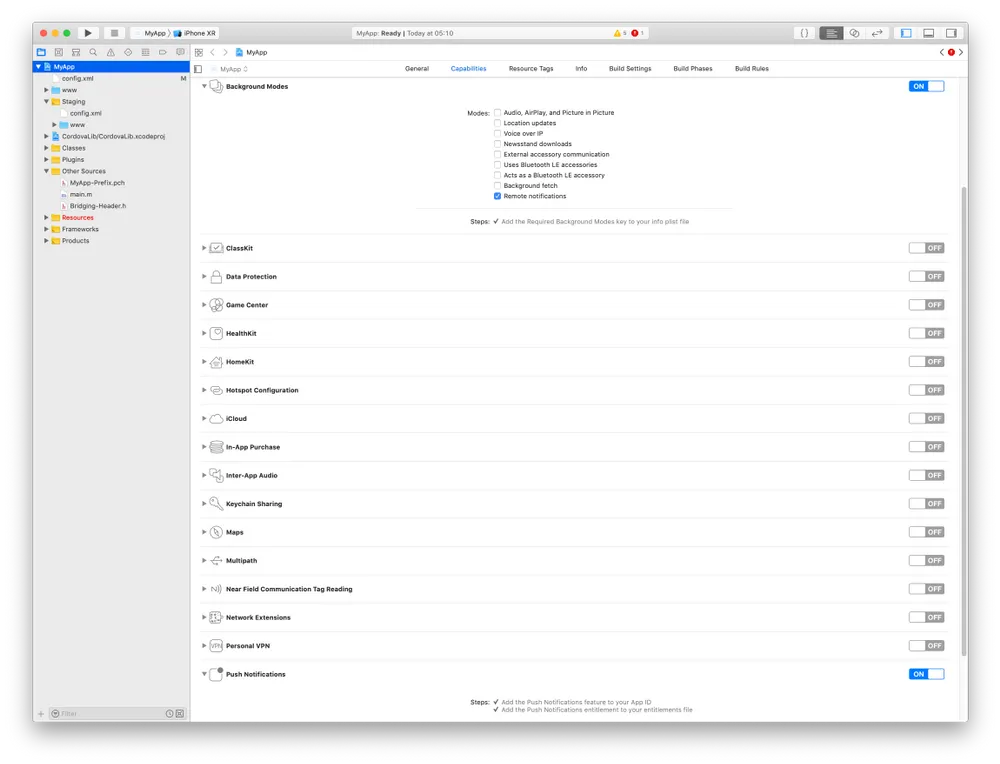
When you go to the Capabilities tab of your project you should also see the Push notifications enabled, and if not activate them which should give you a checkmark if you configured everything correctly!
Because you very likely have the latest Xcode version you need to change one setting in order to build the app without any problems. For this, click on File -> Workspace settings in the top bar of your screen. Set this to Legacy Build System and now your are ready to deploy your app to your phone!
All these steps are important because we can’t test push notifications on the browser or even simulator (or at least not real push, web push is a different story), so make sure that you are able to build the app for iOS using the build command, connect your device to your Mac and hit the play button at the top left inside Xcode to deploy it to your device (and make sure the device is selected, not a simulator)!
Preparing Push for Android
The push integration for Android is a lot easier, but also make sure that you have set the bundle ID like described before!
The way things go for Android is through Firebase, a great service that you can use as a backend for your app (there are also many courses on that topic inside the Ionic Academy).
If you haven’t used it before make sure to create a free Firebase account now and then head over to your console in order to create a new project.
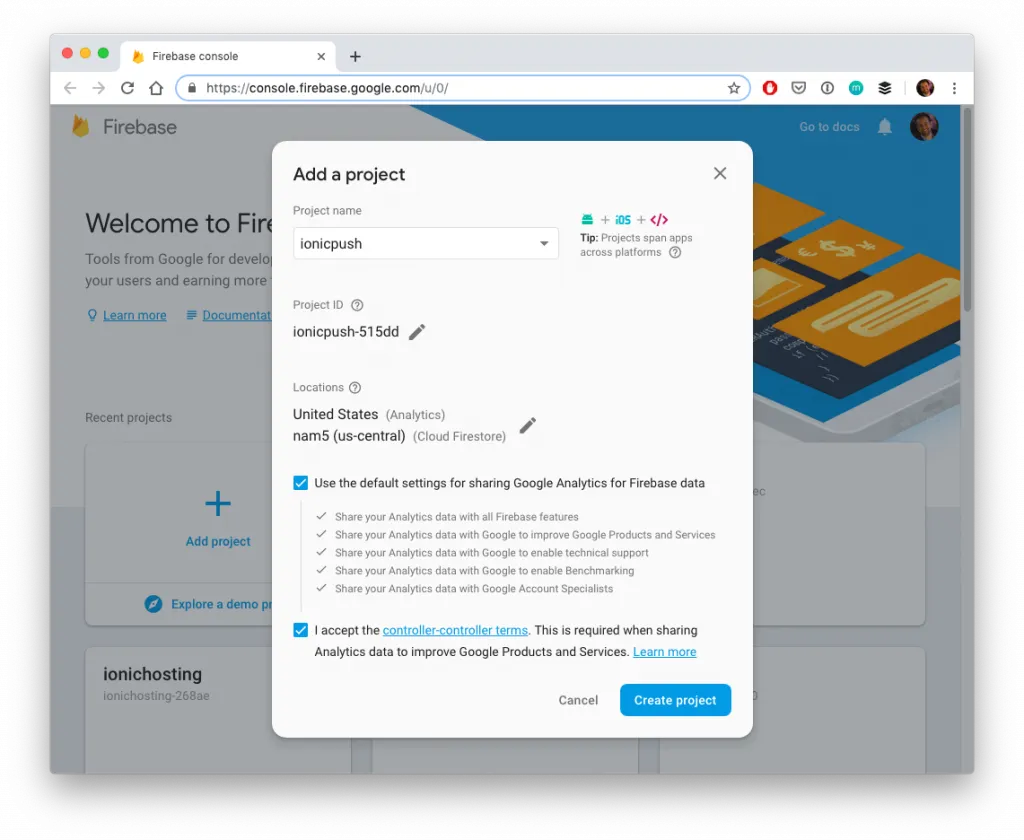
Once your new project is ready you will be on the dashboard of the Firebase project. From here, click the little gear icon and go to the Project settings.
We don’t need to generate anything as we can find all important information already inside the Cloud messaging tab ready for us to use.
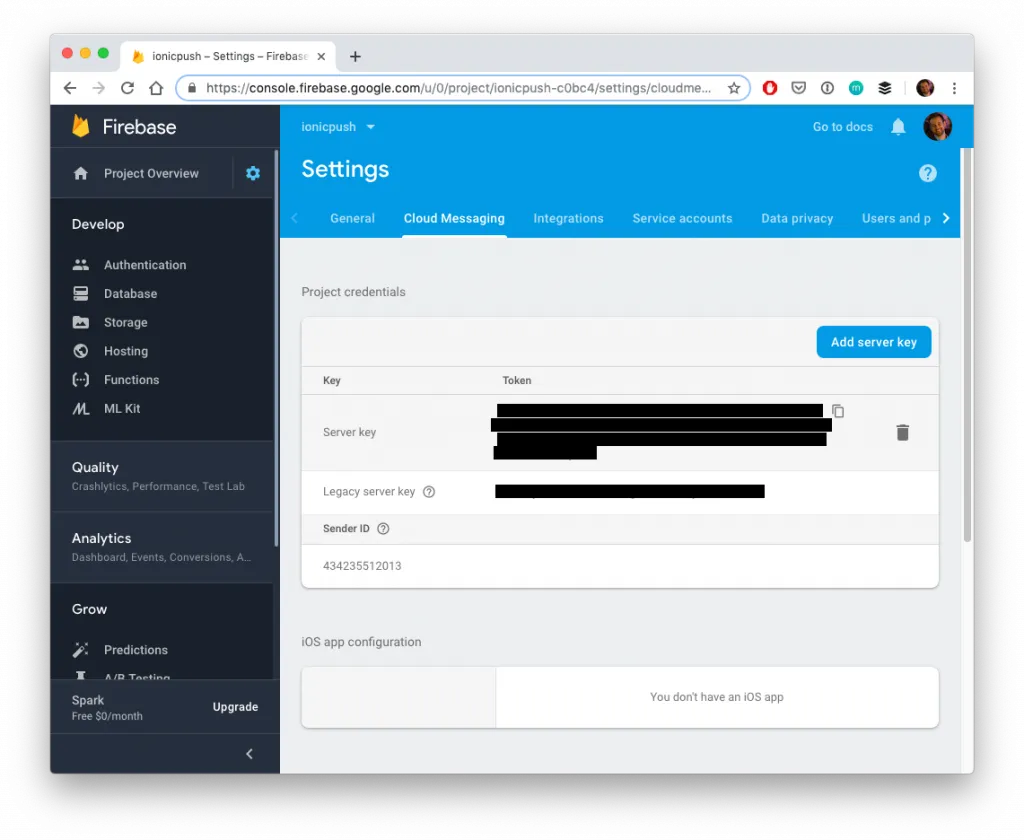
Leave that screen open and now also open the OneSignal app settings again and this time click on Google Android in order to bring up a dialog where you need to paste the Server key from your Firebase project and also the Sender ID in the according fields!
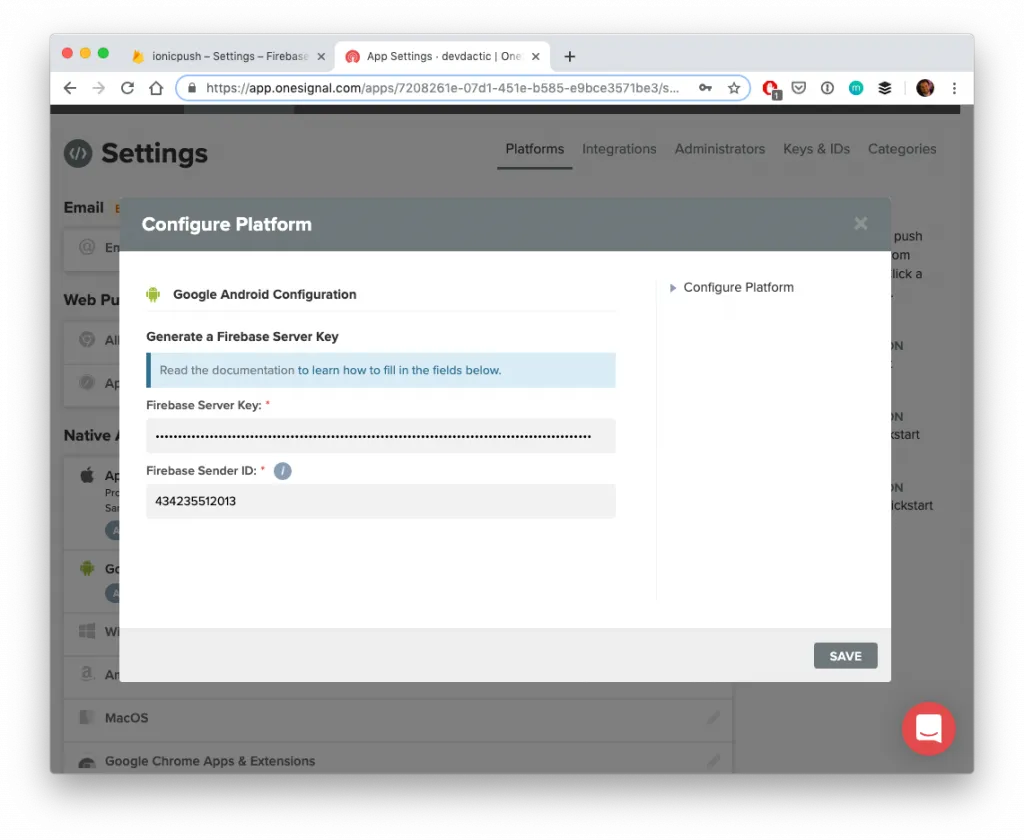
That’s all you need to handle for Android upfront - pretty comfortable, right?
Sending Push Notifications
Hope you are still with me, because now the fun of sending push notifications can finally begin! We have connected all of our apps and once we launch our app on a device, the user will be asked for permission to receive notifications.
If we accept that dialog we will see that a new user was added to the records of our OneSignal app. I recommend you add your own user to the test user segment like you see below so you can find yourself easily later on during the testing!
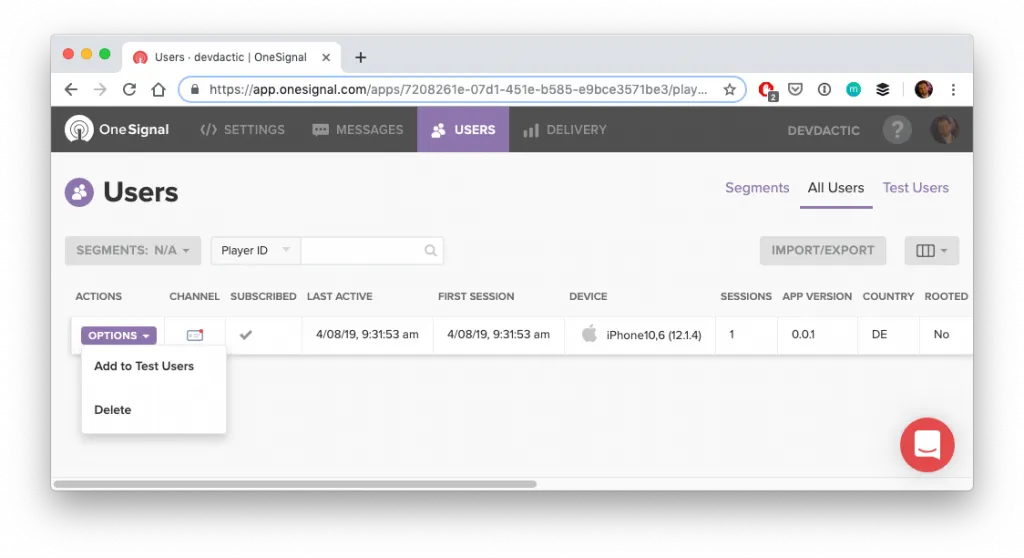
One Signal Dashboard
Now we can head over to the messages tab of our app and compose a new message. Simply select your test device, add the message you want to send.
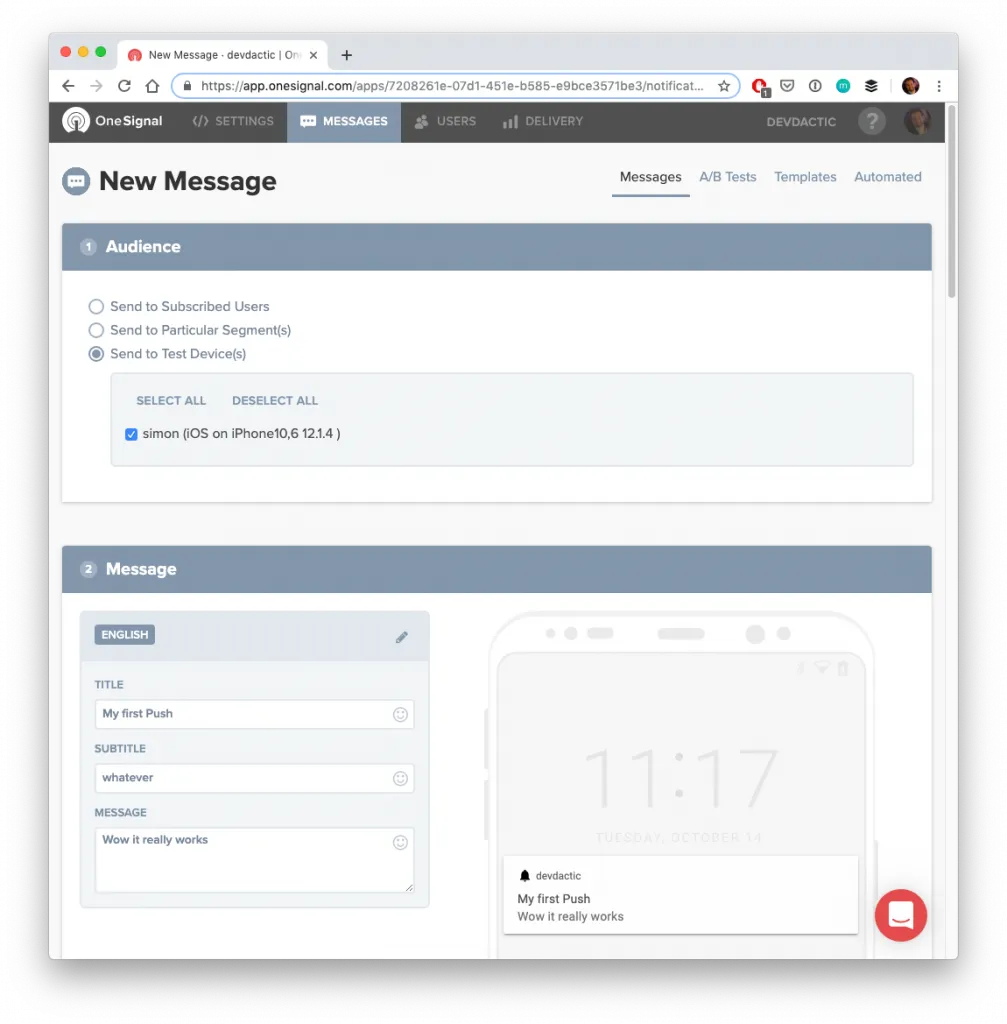
But we can also add additional data at this point! Just scroll down all the information (that you don’t need to fill out now) and find the additional data block. Here you can send whatever information you want with your push, and in our case we wrote some code to extract a task field from this data, so simply supply something like this:

Hit the send button and you should immediately see the push - either if your app is opened the alert or otherwise the notification at the top you know from so many other apps!
One Signal REST API
The last thing I wanted to show you and why I think OneSignal can be used basically with every project is the REST API. You know that you normally get some data from your server through such an API, but in this case we can perform all operations we can do inside the web dashboard of OneSignal also through this API.
I recommend you use a testing tool like Postman for this, and if you do so, here’s basically the information you need to put into the body of your POST call:
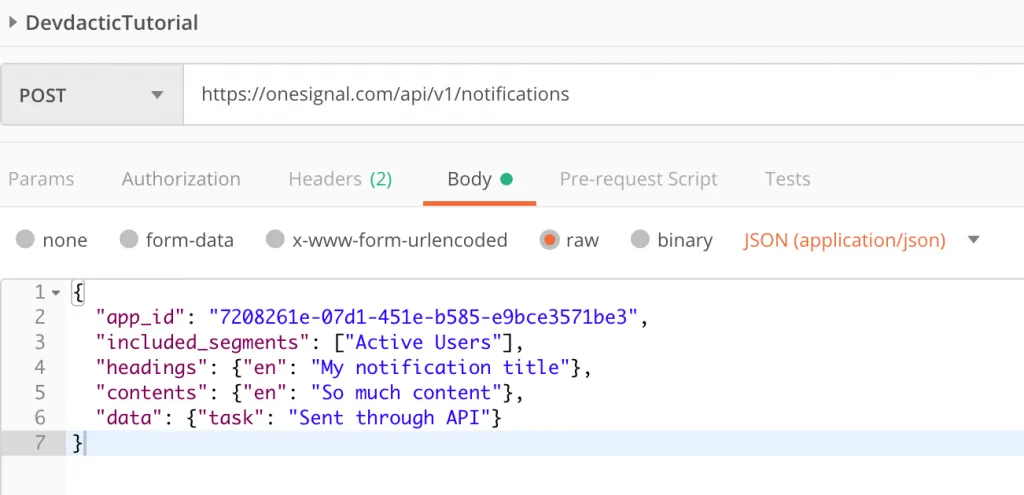
Also, you will have to add a header field with the key Authorization and the value Basic RESTAPIKEY” where you insert the REST API KEY that you can find in the Keys & IDs page of your OneSignal app!
Conclusion
Push notification integration takes some initial time to set up but isn’t something you need to be scared about anymore. With a ton of great services out there, this task becomes more easy all the time!
OneSignal is just one great example which offers a lot of segmentation and filtering features plus their amazing API. If you want more information on this great service or use Firebase instead, check out the Ionic Academy for great courses on both topics!
You can also find a video version of this tutorial below.
