The Push Notifications Guide for Ionic & Capacitor Last update: 2020-07-14
To send push notifications to your users with Ionic and Capacitor you don’t need a specific service, but you need to configure a bunch of things upfront to make it work.
In this tutorial we will integrate Push Notifications using Firebase, since Firebase is basically required for Android anyway and you can easily use it to send our notifications, even without using the database at all!
Another way to integrate push would be to use a service like OneSignal, which is a great alternative as well!
Ionic Capacitor Push Notifications Setup
First of all we will create the Ionic app with Capacitor enabled and directly specify our package id which is the ID you usually used within your config with Cordova, and what you use within your iOS Developer Portal and for Android as well. It’s basically the unique identifier for your app.
We can also build our app and add the native platforms already since we need to work on them in the next steps, so go ahead and run:
ionic start pushApp blank --type=angular --capacitor --package-id=com.devdactic.devpush
cd ./pushApp
ionic build
npx cap add ios
npx cap add android
If you already have an app you can also simply change the capacitor.config.json to include your appId (which is automatically set with our command above), but if your native folders already exist you would have to replace the id in all files where it appears as well since Capacitor only creates the folder once, and won’t update the id itself! Inside the capacitor.config.json you can also specify to update the badge count of your app, play sound on push and show an alert when a notification arrives, so that’s what we specify additionally inside the plugins block:
{
  "appId": "com.devdactic.devpush",
  "appName": "pushApp",
  "bundledWebRuntime": false,
  "npmClient": "npm",
  "webDir": "www",
  "plugins": {
    "SplashScreen": {
      "launchShowDuration": 0
    },
    "PushNotifications": {
      "presentationOptions": ["badge", "sound", "alert"]
    }
  },
  "cordova": {}
}
Let’s continue with our push configuration outside the app now.
Firebase Configuration
Get started by creating a new Firebase project or use an existing project that you already created for your app.
Simply specify a name and the default options to get started with a new project.
If you have a blank new app you should now see “Get started by adding Firebase to your app” in the dashboard of your app, otherwise you can also simply click the gear icon and move to the project settings from where you can also add an app.
The dialog looks basically the same for both iOS and Android like in the image below, and the only import thing here is to use your package id for the apps!
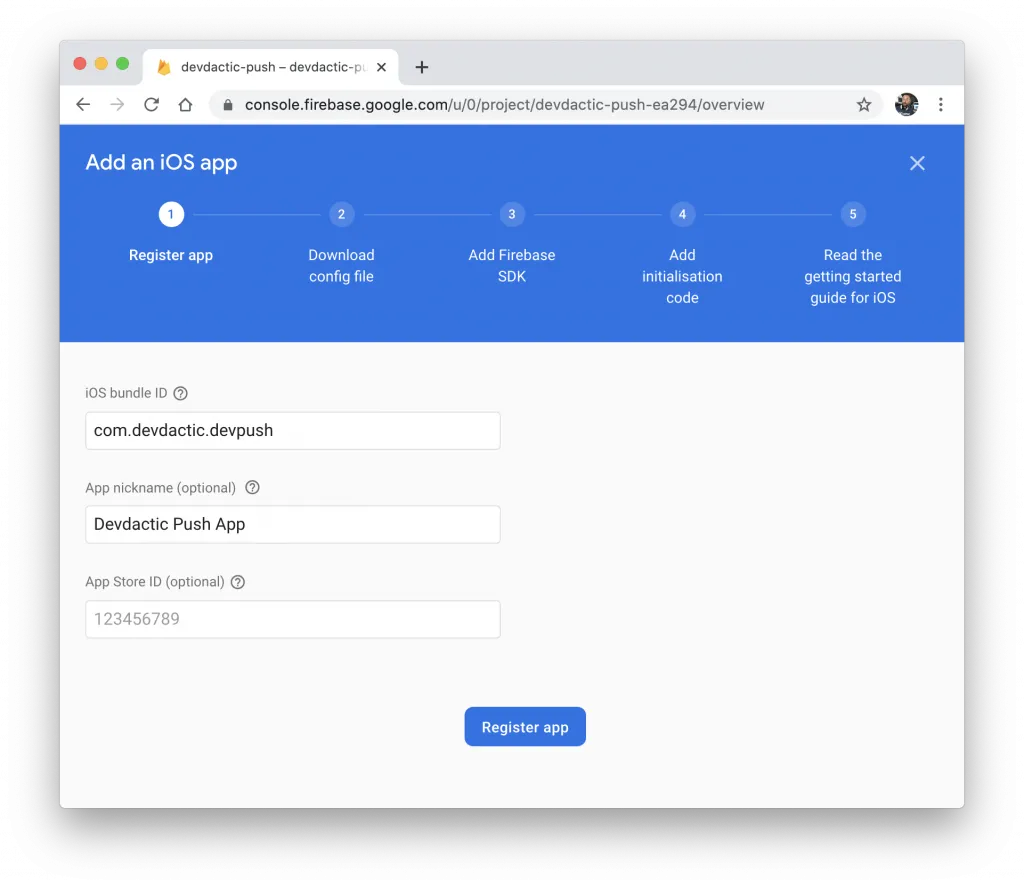
After the initial step you can download a file, which you can for now simply download anywhere. The files are:
- google-services.json file for Android
- GoogleService-info.plist file for iOS
Now we can configure our two platforms, for which one is a lot easier..
Android Push Preparation
There is only one thing to do for Android, and that’s moving the google-services.json that you downloaded to the android/app/ folder like in the image below.
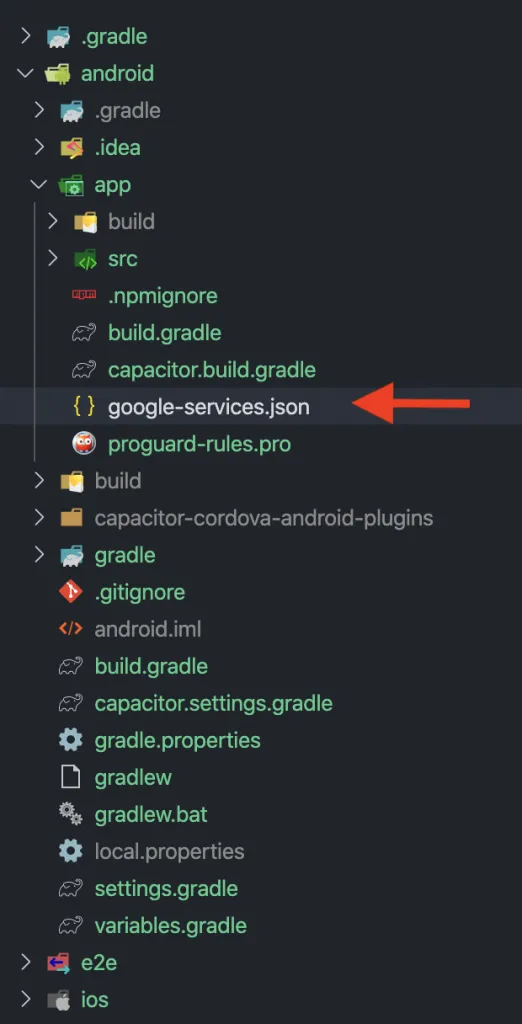
Really that’s all, you could now start to send out push notifications to Android devices but we also want iOS, which takes a bit more time.
iOS Push Preparation
This part is going to be a lot more complicated. First of all, you need to create an App ID for your app within the identifiers list of your Apple Developer account.
Maybe you’ve already done this for your app, if not simply add an app and make sure you select the Push Notifications capability from the list!
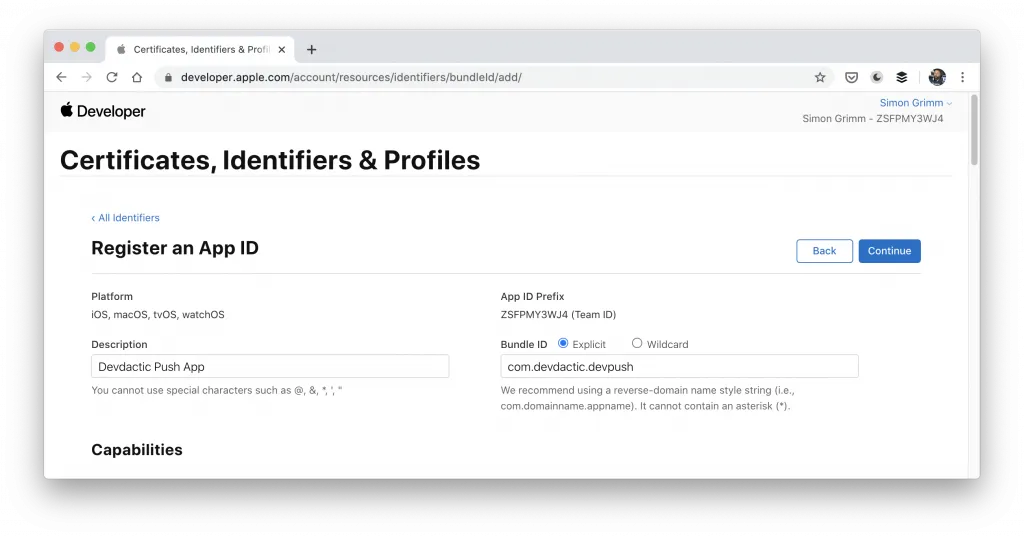
The Bundle ID here should be what you used before as your App ID within Capacitor and Firebase.
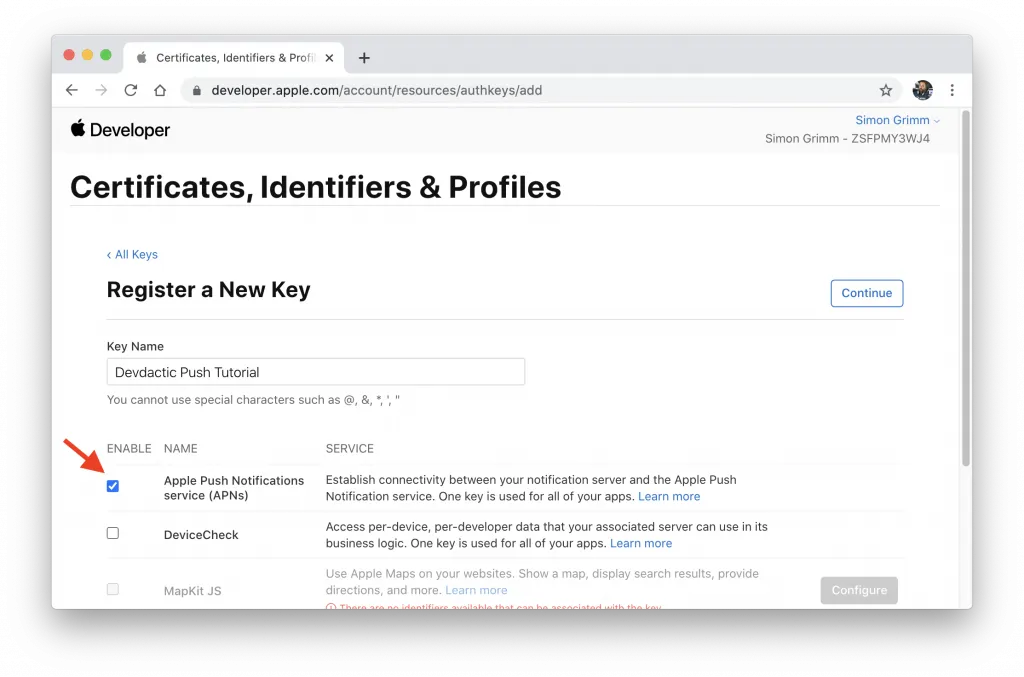
Now you could create a Certificate for push notifications, but the easier way is actually to create a Key instead.
So create a new key and enable the Apple Push Notifications service (APNs). If you have already reached the maximum amount of keys, you can also use an existing key or use a certificate instead, but the process then is a bit more complicated.
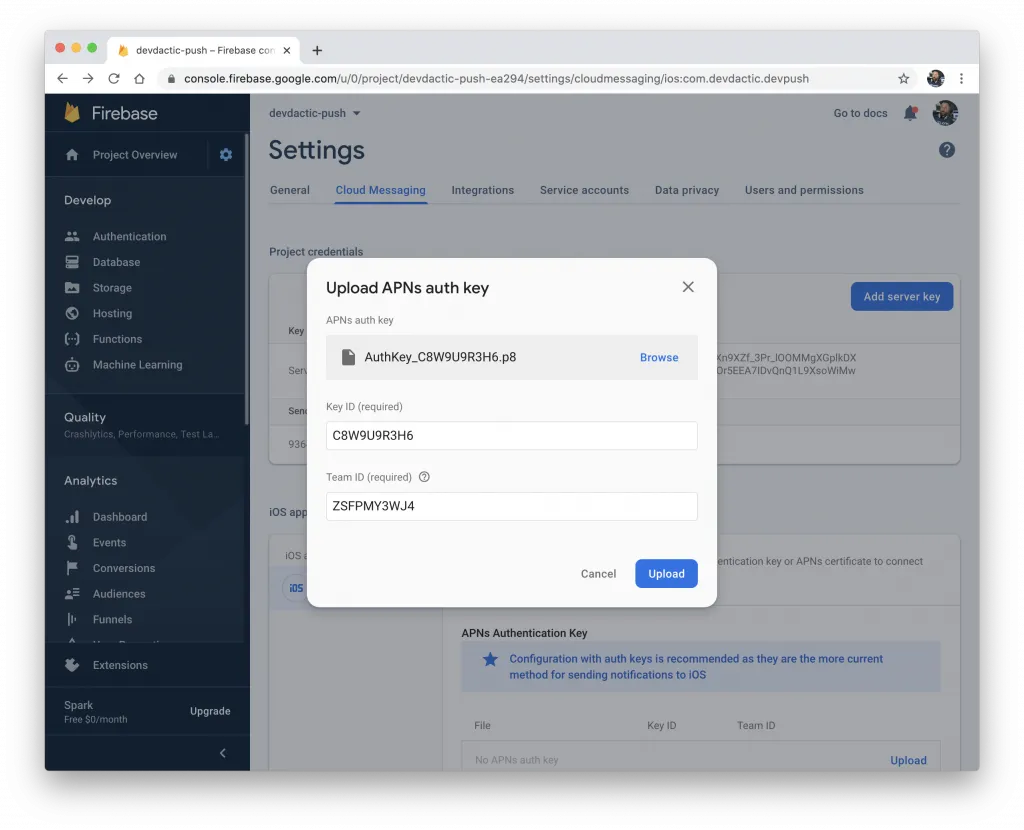
After downloading this .p8 file, we need to upload it to Firebase.
To do so, open the Cloud Messaging tab inside your Firebase project settings, upload the file and enter the details for the Key ID (which is already inside the name of the file) and your Team ID from iOS (you can find it usually in the top right corner below your name).
Now we are done in the developer portal and Firebase and need to apply some changes to our Xcode project, so simply run the following to open it:
npx cap open iosFirst of all we need to copy our GoogleService-Info.plist that we downloaded in the beginning from Firebase into our iOS project, and you should drag the file into the Xcode project right inside the app/app folder like in the image below.
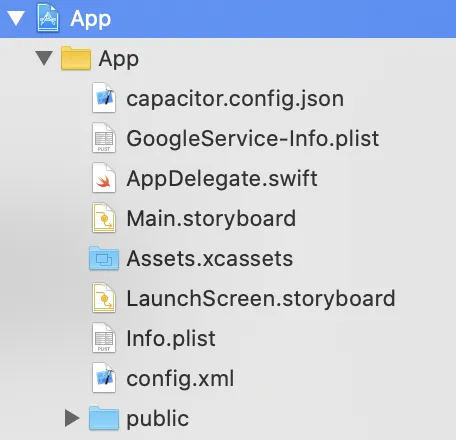
It’s important to do this inside Xcode and select Copy items if needed so the file is really added to your target.
Next step is adding a new Pod, which is basically like an additional dependency for our iOS project. Therefore, open the ios/App/Podfile and within the existing block add the highlighted line below the comment:
target 'App' do
  capacitor_pods
  # Add your Pods here
  pod 'Firebase/Messaging'
end
This makes sure the Firebase Pod is installed, and to perform the installation we need to update our native platform with this command:
npx cap update iosApparently that’s not all, we also need to change a bit of the native Swift code in order to register with Firebase and to return the correct token to our app.
Therefore, open the ios/App/App/AppDelegate.swift and apply the following changes:
import UIKit
import Capacitor
import Firebase

@UIApplicationMain
class AppDelegate: UIResponder, UIApplicationDelegate {

  var window: UIWindow?


  func application(_ application: UIApplication, didFinishLaunchingWithOptions launchOptions: [UIApplication.LaunchOptionsKey: Any]?) -> Bool {
    // Override point for customization after application launch.
    FirebaseApp.configure()
    return true
  }

  // All the existing functions
  // ...

  // Update this one:
    func application(_ application: UIApplication, didRegisterForRemoteNotificationsWithDeviceToken deviceToken: Data) {
        Messaging.messaging().apnsToken = deviceToken
        InstanceID.instanceID().instanceID { (result, error) in
            if let error = error {
                NotificationCenter.default.post(name: Notification.Name(CAPNotifications.DidFailToRegisterForRemoteNotificationsWithError.name()), object: error)
            } else if let result = result {
                NotificationCenter.default.post(name: Notification.Name(CAPNotifications.DidRegisterForRemoteNotificationsWithDeviceToken.name()), object: result.token)
            }
        }
    }
}
The changes are basically:
- Import Firebase in the file
- Call the configure function when the app starts
- Return the token correctly to our app after registration with Firebase
The last part is achieve by overriding one of the existing functions that you already have in that file at the bottom!
Now the last step is to add the Capability for Push Notifications within your Xcode project, so open the Signing & Capabilities tab and add it.
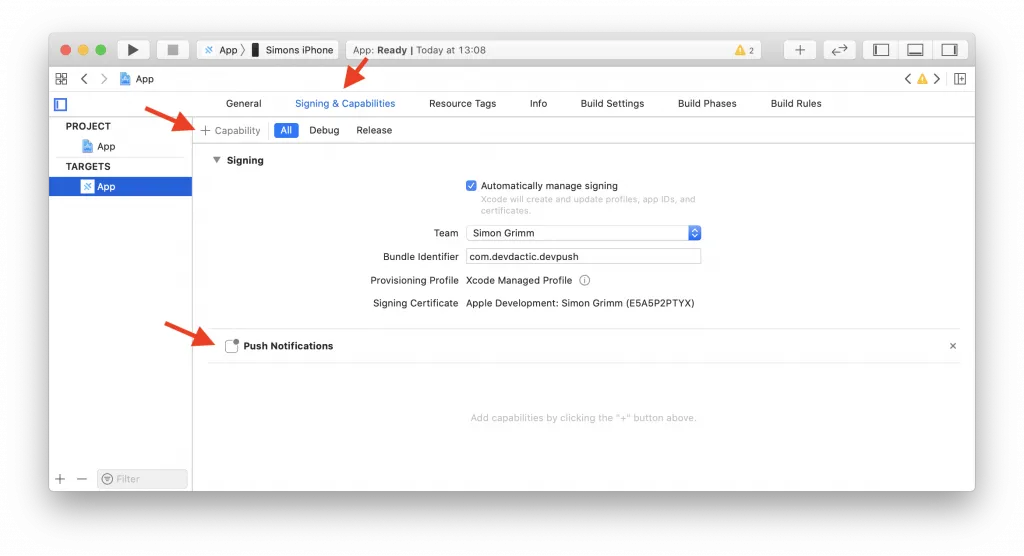
That’s everything for our iOS configuration - a lot more than Android but now we can finally build our app!
Ionic Push Notification Integration
Inside our app we want to perform all the push logic inside a service, and we will also add another page so we can implement some deeplink behaviour with push notifications for which we don’t really need any additional plugin! Go ahead and run inside your Ionic project:
ionic g service services/fcm
ionic g page pages/details
To include our new page in the routing, we will change the default entry to contain a dynamic id inside the path like this inside our app/app-routing.module.ts:
import { NgModule } from '@angular/core';
import { PreloadAllModules, RouterModule, Routes } from '@angular/router';

const routes: Routes = [
  {
    path: 'home',
    loadChildren: () => import('./home/home.module').then( m => m.HomePageModule)
  },
  {
    path: '',
    redirectTo: 'home',
    pathMatch: 'full'
  },
  {
    path: 'home/:id',
    loadChildren: () => import('./pages/details/details.module').then( m => m.DetailsPageModule)
  },
];

@NgModule({
  imports: [
    RouterModule.forRoot(routes, { preloadingStrategy: PreloadAllModules })
  ],
  exports: [RouterModule]
})
export class AppRoutingModule { }
The service we created takes care of asking for permission to send a push, registers our device and catches a bunch of events with additional listeners.
In detail, these listeners are:
- registration: Executed after a successful registration, and the place where you receive back the token of the device to which you can send a push
- registrationError: Shouldn’t happen and indicates something went wrong!
- pushNotificationReceived: Triggered whenever a notification was catched from your app
- pushNotificationActionPerformed: Called when a user really taps on a notification when it pops up or from the notification center
Go ahead now with our services/fcm.service.ts:
import { Injectable } from '@angular/core';
import {
  Plugins,
  PushNotification,
  PushNotificationToken,
  PushNotificationActionPerformed,
  Capacitor
} from '@capacitor/core';
import { Router } from '@angular/router';

const { PushNotifications } = Plugins;

@Injectable({
  providedIn: 'root'
})
export class FcmService {

  constructor(private router: Router) { }

  initPush() {
    if (Capacitor.platform !== 'web') {
      this.registerPush();
    }
  }

  private registerPush() {
    PushNotifications.requestPermission().then((permission) => {
      if (permission.granted) {
        // Register with Apple / Google to receive push via APNS/FCM
        PushNotifications.register();
      } else {
        // No permission for push granted
      }
    });

    PushNotifications.addListener(
      'registration',
      (token: PushNotificationToken) => {
        console.log('My token: ' + JSON.stringify(token));
      }
    );

    PushNotifications.addListener('registrationError', (error: any) => {
      console.log('Error: ' + JSON.stringify(error));
    });

    PushNotifications.addListener(
      'pushNotificationReceived',
      async (notification: PushNotification) => {
        console.log('Push received: ' + JSON.stringify(notification));
      }
    );

    PushNotifications.addListener(
      'pushNotificationActionPerformed',
      async (notification: PushNotificationActionPerformed) => {
        const data = notification.notification.data;
        console.log('Action performed: ' + JSON.stringify(notification.notification));
        if (data.detailsId) {
          this.router.navigateByUrl(`/home/${data.detailsId}`);
        }
      }
    );
  }
}
Inside the pushNotificationActionPerformed listener you can now also see our deeplinkish behaviour: When the payload of the push notification contains some data that we loog for (in this case a detailsId) we will use the router to navigate to a specific page and pass the information in the URL that we created previously.
This service has basically only one public function that we can call from the outside, which will trigger all the permission and registration, and for us a good place is the app/app.component.ts:
import { Component } from '@angular/core';

import { Platform } from '@ionic/angular';
import { SplashScreen } from '@ionic-native/splash-screen/ngx';
import { StatusBar } from '@ionic-native/status-bar/ngx';
import { FcmService } from './services/fcm.service';

@Component({
  selector: 'app-root',
  templateUrl: 'app.component.html',
  styleUrls: ['app.component.scss']
})
export class AppComponent {
  constructor(
    private platform: Platform,
    private splashScreen: SplashScreen,
    private statusBar: StatusBar,
    private fcmService: FcmService
  ) {
    this.initializeApp();
  }

  initializeApp() {
    this.platform.ready().then(() => {
      this.statusBar.styleDefault();
      this.splashScreen.hide();

      // Trigger the push setup
      this.fcmService.initPush();
    });
  }
}
If you don’t want to perform this in your app right in the beginning, simply call it when it’s a better time in your user flow!
The last part now is to handle the information on our details page, so not really related to push anymore but general Angular routing.
We can catch the details inside our pages/details/details.page.ts like this:
import { Component, OnInit } from '@angular/core';
import { ActivatedRoute } from '@angular/router';
import { Plugins } from '@capacitor/core';
const { PushNotifications } = Plugins;

@Component({
  selector: 'app-details',
  templateUrl: './details.page.html',
  styleUrls: ['./details.page.scss'],
})
export class DetailsPage implements OnInit {
  id = null;

  constructor(private route: ActivatedRoute) { }

  ngOnInit() {
    this.route.paramMap.subscribe(params => {
      this.id = params.get('id');
    });
  }

  resetBadgeCount() {
    PushNotifications.removeAllDeliveredNotifications();
  }

}
Additionally we might wanna clear the badge of our app during testing, which is what we do with our resetBadgeCount function! Normally you would call this when a user has seen/read all the relevant notifications of course.
Now just finish everything by displaying our details inside the pages/details/details.page.html:
<ion-header>
  <ion-toolbar>
    <ion-buttons slot="start">
      <ion-back-button defaultHref="/"></ion-back-button>
    </ion-buttons>
    <ion-title>Details</ion-title>
  </ion-toolbar>
</ion-header>

<ion-content>
  My Id from push: {{ id }}

  <ion-button (click)="resetBadgeCount()" expand="block">
    Reset Badge Count
  </ion-button>
</ion-content>
And that’s it for the Ionic code - now you just need to build the app, sync your changes and deploy your app to your device.
ionic build
npx cap sync
Open either Android Studio or Xcode and deploy to your device, then head on to sending a push.
Sending Push Notifications with Firebase
There are now many ways to send a push notification with Firebase, let’s take a look at them in detail.
Specific Device Test
When you deploy your app to a device you can catch the console logs and see the token being logged after registration.
With this token you are able to send a targeted test push to confirm your integration is working.
Simply navigate to Cloud Messaging and select Send test message within Firebase and add the device token you got from the logs.
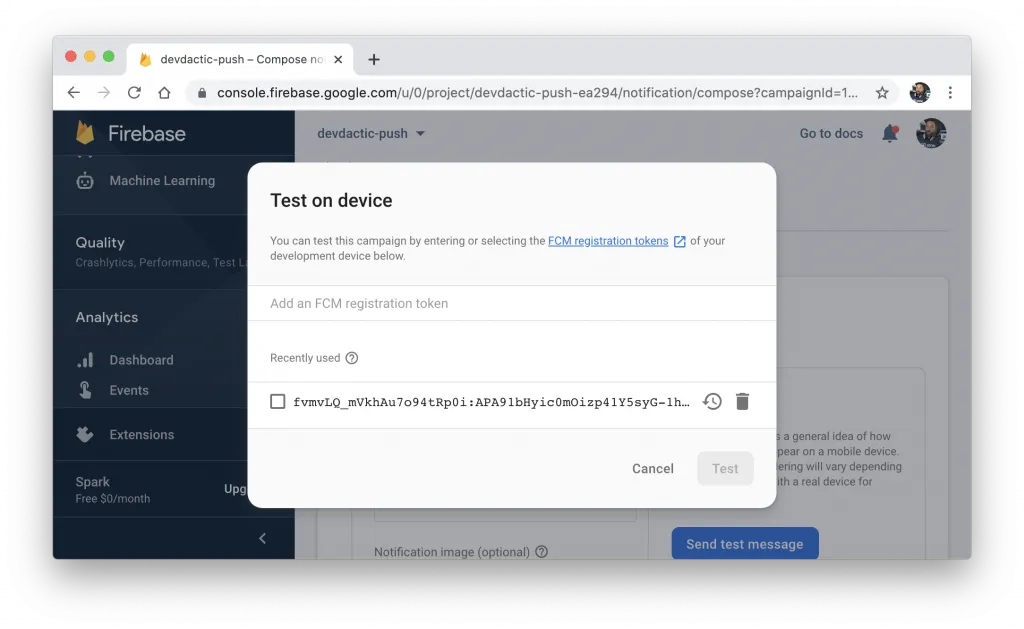
If you did everything correctly before you should now see a push notification on your device!
Push Message with Payload
If you want to test a more realistic push with additional information, you can simply follow the wizard on the same page to first specify some general information and select the platform that you want to target.
Additionally we now want to pass some additional options as a payload of our push, and that’s the place where we make use of the detailsId that we used before in our code, so simply add some value to it like in the image below.
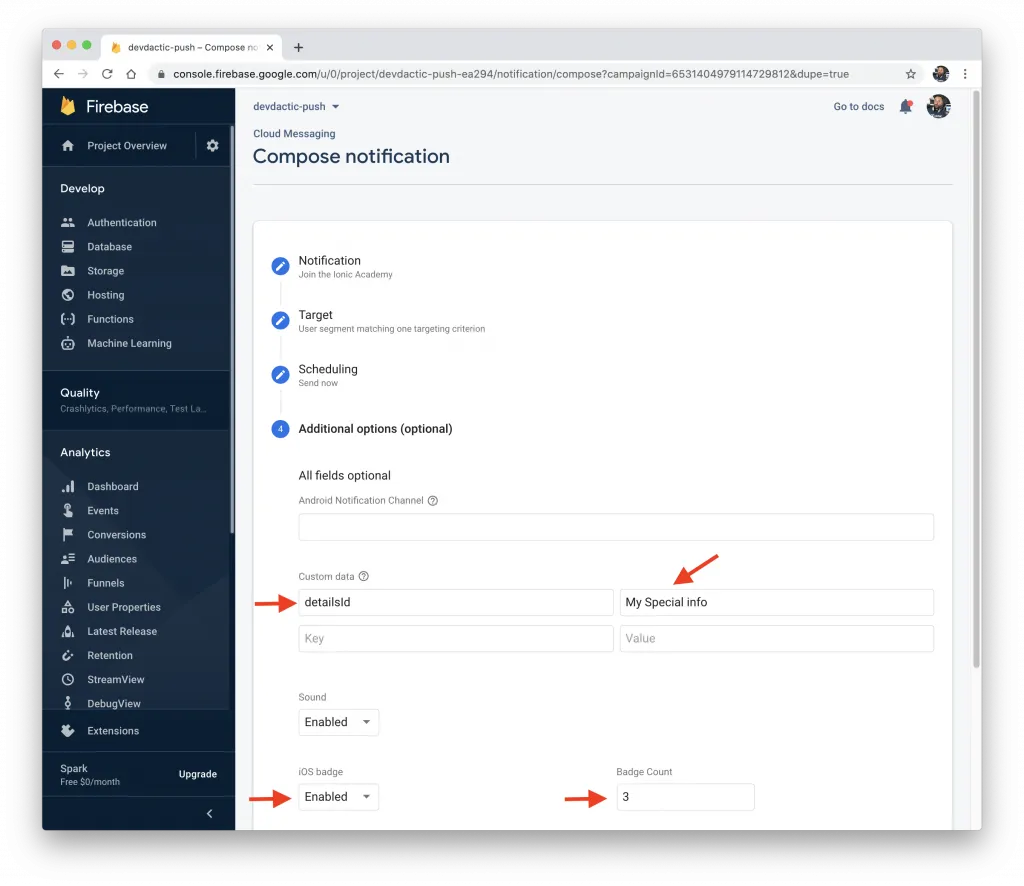
When you now receive a push and click it, your app should take you to the details page and display the value you added for this key - easy deeplink with the Angular router!
Conclusion
Push notifications are mandatory for a lot of apps, and while the steps look like a lot of work, it’s actually done in an hour and you have a powerful feature for your app.
There’s also an API for Firebase that you could use from your own server, so if you want to see some additional material on that topic, let me know in the comments!
You can also find a video version of this tutorial below.