How to Build a Native App from Angular Projects with Capacitor Last update: 2021-11-30
The popularity of Capacitor is constantly rising, and given the fact that you can turn basically any web project into a native mobile app with Capacitor is the simple reason for Capacitors fame.
This blog is usually about Ionic, but I’ve used plain Angular web projects for many of my own projects in the past.
So how can we transform a web project that’s using Angular into a native mobile app?
We’ll go through all necessary steps in this tutorial and finally even add on device live reload to our Angular Capacitor app on both iOS and Android!
Setting up the Angular App
If you already got your Angular app you don’t need to start a new one, otherwise simply follow along for testing and generate a new one using the Angular CLI:
ng new angularCapacitor --routing --style=scss
cd ./angularCapacitor

# Add Capacitor
npm install @capacitor/core
npm install @capacitor/cli --save-dev

# Setup the Capacitor config
npx cap init
After creating the Angular app we have now installed two packages for Capacitor:
- @capacitor/core: The core package necessary for adding any other plugin
- @capacitor/cli: The CLI as a dev dependency to run Capacitor commands in our project
After the installation I’ve triggered the init command using npx to run a local script, which will ask you some general questions about the app:
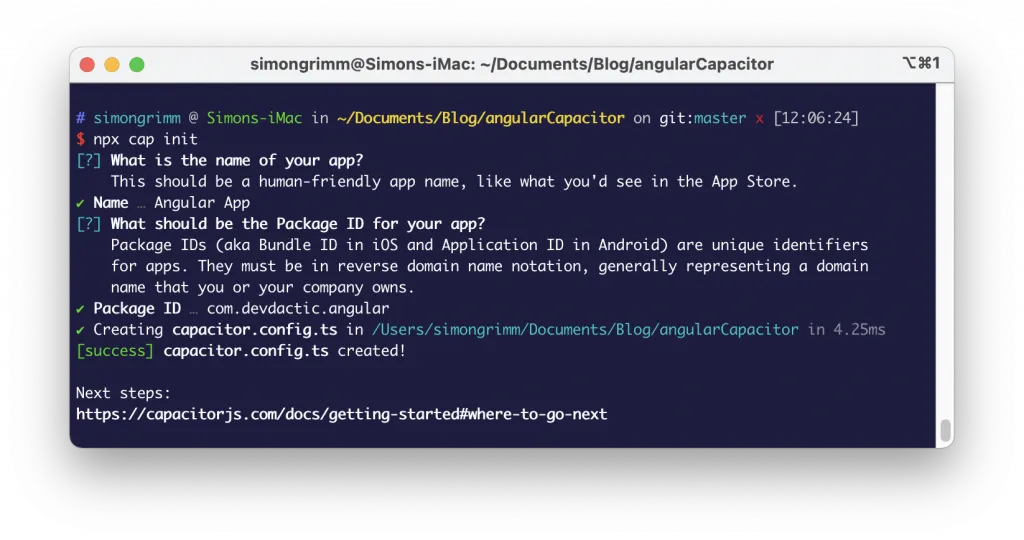
Don’t worry too much about this, you could easily see and change this after this afterwwards inside your capacitor.config.ts, the file that was created within this step:
import { CapacitorConfig } from '@capacitor/cli';

const config: CapacitorConfig = {
	appId: 'com.devdactic.angular',
	appName: 'Angular App',
	webDir: 'dist/angularCapacitor',
	bundledWebRuntime: false
};

export default config;
This file contains information about the native iOS and Android project like the appId, which is used as the bundle identifier for your app.
Note: I have changed the webDir because in plain Angular projects the output of your project is in a subfolder of dist, so make sure you use the right path to the output of your usual build command in here!
Otherwise Capacitor won’t be able to find your web assets and your native app will be blank.
Adding Native iOS & Android
So far we’ve only installed the core packages for Capacitor, but how do we turn our app into a native app? This can be done by first of all installing the according packages for iOS and Android (if you want both!) and then running the Capacitor CLI commands to add the native projects to your app:
npm install @capacitor/ios @capacitor/android
npx cap add ios
npx cap add android
As a result, this will add two new folders in your project. These folders contain native projects, just like you would have when developing a native iOS or Android app!

Note: While you can change some of the settings through the previously generated Capacitor config, usually Capacitor won’t overwrite your native project settings as that’s one of the core Capacitor philosophies! Now that we got those folders, it’s time to build our Angular app the usual way and then sync our changes to the native projects by running:
# Build the Angular app
ng build --prod

# Sync the build folder to native projects
npx cap sync
This will copy over the build folder in the right place of the iOS/Android project, and you can finally see the result of your work on a device.
How?
The Capacitor CLI got you again. There’s a command to directly open Android Studio or Xcode (install them if you haven’t used them before!) with your project:
npx cap open ios
npx cap open android
If you never touched mobile development, make sure you set up your environment now with all necessary packages!
You can now use the native tooling of AS and Xcode to deploy your app directly to a connected device.
Using Native Device Features: The Camera
So far we have only used Capacitor to build our native app, but you can use Capacitor as well to access native device functionality, which is the second big reason to use Capacitor.
Let’s try and add the Camera plugin so we can easily capture images within our app.
Since Capacitor 3 we need to install every plugin separately, so go ahead and run:
npm install @capacitor/camera

# If used inside a PWA also install
npm install @ionic/pwa-elements
The second installation of pwa-elements is only necessary if you want a nice little camera overlay in your PWA or for testing locally. To use the package you would also need to define it inside the src/main.ts like this:
import { enableProdMode } from '@angular/core';
import { platformBrowserDynamic } from '@angular/platform-browser-dynamic';

import { AppModule } from './app/app.module';
import { environment } from './environments/environment';

import { defineCustomElements } from '@ionic/pwa-elements/loader';

if (environment.production) {
	enableProdMode();
}

platformBrowserDynamic()
	.bootstrapModule(AppModule)
	.catch((err) => console.error(err));

defineCustomElements(window);
Again, not necessary if you only want to use the camera on iOS and Android.
Let’s now quickly throw in a button to trigger a function in the automatically generated src/app/app.component.html, somewhere inside the content area:
  <div class="card-container">
    <button class="card card-small" (click)="captureImage()">
      <span>Capture image</span>
    </button>
  </div>

  <img [src]="image" *ngIf="image" [style.width]="'300px'">
On click we will now call the Capacitor camera to capture an image and hopefully assign the result to the image variable.
The call to native plugins is always async, so we await the getPhoto() call and use the resultType base64 in our example.
After we get the result, we simply assign the value to our image including the base64 information and hopefully the image comes up.
Go ahead and change the src/app/app.component.ts to:
import { Component } from '@angular/core';
import { Camera, CameraResultType, CameraSource } from '@capacitor/camera';

@Component({
	selector: 'app-root',
	templateUrl: './app.component.html',
	styleUrls: ['./app.component.scss']
})
export class AppComponent {
	title = 'angularCapacitor';
	image = '';

	async captureImage() {
		const image = await Camera.getPhoto({
			quality: 90,
			allowEditing: true,
			source: CameraSource.Prompt,
			resultType: CameraResultType.Base64
		});

		if (image) {
			this.image = `data:image/jpeg;base64,${image.base64String}`!;
		}
	}
}
Since you are now adding functionality that runs inside a native mobile app you need to think about permissions as well.
For the camera plugin, we need to change the ios/App/App/Info.plist of our iOS project to include information why we want to use this particular functionality:
	<key>NSCameraUsageDescription</key>
		<string>To capture images</string>
	<key>NSPhotoLibraryAddUsageDescription</key>
		<string>To add images</string>
	<key>NSPhotoLibraryUsageDescription</key>
		<string>To select images</string>
Make sure you use reasonable information in here, otherwise your app has a high chance of being rejected (not kidding).
Same is true for Android, here we need to touch the bottom of the android/app/src/main/AndroidManifest.xml and include two new permissions for the storage to use the camera:
    <!-- Permissions -->

    <uses-permission android:name="android.permission.INTERNET" />
    <uses-permission android:name="android.permission.READ_EXTERNAL_STORAGE"/>
    <uses-permission android:name="android.permission.WRITE_EXTERNAL_STORAGE" />
You can now run another build of your app and sync the changes to your native projects and run the app on a device again or…
Or is there maybe a faster way to achieve all of this?
Capacitor Live Reload
By now you are used to have live reload with all modern frameworks, and we can have the same functionality even on a mobile device with minimum effort!
Usually this can be achieved quite easily with the Ionic CLI, however I wanted to find a more Capacitor like way without adding another dependency and turns out, it’s possible.
The idea is to make your locally served app with live reload available on your network, and the Capacitor app will simply load the content from that URL.
First step is figuring out your local IP, which you can get on a Mac by running:
ipconfig getifaddr en0On Windows, run ipconfig and look for the IPv4 address.
With that information you can now tell Angular to use it directly as a host (instead of the keyword localhost) or you can simply use 0.0.0.0 which did the same in my test:
ng serve -o --host 0.0.0.0

# Alternative
ng serve -o --host 192.168.x.xx
Now we only need to tell Capacitor to load the app directly from this server, which we can do right in our capacitor.config.ts with another entry:
import { CapacitorConfig } from '@capacitor/cli';

const config: CapacitorConfig = {
	appId: 'com.devdactic.angular',
	appName: 'Angular App',
	webDir: 'dist/angularCapacitor',
	bundledWebRuntime: false,
	server: {
		url: 'http://192.168.x.xx:4200',
		cleartext: true
	}
};

export default config;
Make sure you use the right IP and port, I’ve simply used the default Angular port in here.
To apply those changes we can now copy over the changes to our native project:
npx cap copyCopy is mostly like sync, but will only copy over the changes of the web folder and config, not update the native project.
Now you can deploy your app one more time through Android Studio or Xcode and then change something in your Angular app - the app will automatically reload and show the changes!
Caution: If you install new plugins like the camera, this still requires a rebuild of your native project because native files are changed which can’t be done on the fly.
What about Ionic UI components?
At this point you have a native Angular app which can access native device functionality - pretty impressive already!
If you now also want a more native like styling of components, you could still add Ionic to your project as it’s basically a UI toolkit for developing mobile apps.
This step is completely optional, but if you want to follow along, simply install the according Ionic package for Angular:
npm i @ionic/angularTo use it we need to add the import of the Ionic module to our root module in src/app/app.module.ts:
import { NgModule } from '@angular/core';
import { BrowserModule } from '@angular/platform-browser';

import { AppRoutingModule } from './app-routing.module';
import { AppComponent } from './app.component';
import { IonicModule } from '@ionic/angular';

@NgModule({
	declarations: [AppComponent],
	imports: [BrowserModule, AppRoutingModule, IonicModule.forRoot()],
	providers: [],
	bootstrap: [AppComponent]
})
export class AppModule {}
Since Ionic components rely heavily on custom styling for iOS and Android, you should also import the default Ionic styling files inside your src/styles.scss like this:
/* Core CSS required for Ionic components to work properly */
@import "~@ionic/angular/css/core.css";

/* Basic CSS for apps built with Ionic */
@import "~@ionic/angular/css/normalize.css";
@import "~@ionic/angular/css/structure.css";
@import "~@ionic/angular/css/typography.css";
@import '~@ionic/angular/css/display.css';

/* Optional CSS utils that can be commented out */
@import "~@ionic/angular/css/padding.css";
@import "~@ionic/angular/css/float-elements.css";
@import "~@ionic/angular/css/text-alignment.css";
@import "~@ionic/angular/css/text-transformation.css";
@import "~@ionic/angular/css/flex-utils.css";
What’s missing is the import for Ionic variables for default colors, which are normally included in Ionic projects. That means right now only the default styling is used, but you could add those CSS variables as well to use them just like inside any other Ionic project!
If you want to test wether your Ionic UI integration works, simple add a card or other component to your markup like this:
  <ion-card>
    <ion-card-header>
      <ion-card-title>My Ionic card</ion-card-title>
    </ion-card-header>
    <ion-card-content>
      This really works!
    </ion-card-content>
    <ion-button expand="full" color="secondary">My Button</ion-button>
  </ion-card>
If you see a styled card that looks different on iOS and Android you’ve finished your integration!
Tip: To quickly check out different styling you can enable the device preview inside the developer tools of your browser and switch between iOS and Android devices. Make sure you reload the page once when changing platforms to see the new styling in action!
Conclusion
As Capacitor is growing in popularity, it becomes clear why people choose it to build native apps: The ease of adding Capacitor to any web app (Angular, React, Vue…) and the access to native device functionality makes it super easy for web developers to get into mobile app development.
And as a result you have one codebase for web and native iOS + Android.
If you enjoy working with native apps and want to learn more about it, check out the Ionic Academy - my online school that helps you build epic mobile apps using Ionic and Capacitor!
You can also find a video version of this tutorial below.