Simple Ionic Login with Angular 2+ Last update: 2016-10-27

Almost every mobile app nowadays has a login, and using Ionic 2 and Angular it’s pretty easy to craft the UI and logic for a simple Login. My post on simple login with Ionic 1 is one of the most viewed articles, so with the stable release of Ionic 3 already it’s time for an updated (and more stylish) version of that!
This Tutorial was updated for Ionic 3.0.1 and uses lazy loading now!
In this tutorial we will craft a simple login without a real backend, but with a login screen, register page and a potential logged in screen plus the logic to get to the right screens and perform the right actions.
Prerequisite
Learning Ionic can become overwhelming, I know that feeling. Is learning from tutorials and videos sometimes not enough for you? Then I got something for you.
If you want to learn Ionic with step-by-step video courses, hands-on training projects and a helpful community who has your back, then take a look at the Ionic Academy.
Setting up a new Ionic app
As always we start with a blank new app and use the Ionic generator command to add 2 pages and a service. Otherwise we don’t need any additional stuff, so go ahead an run:
ionic start devdactic-simpleLogin blank
cd devdactic-simpleLogin
ionic g provider authService
ionic g page register
ionic g page login
With the release 2.2.3 of the CLI we actually don’t need the —v2 flag anymore!
This will setup all the needed files in the right places. We now have to hook up everything inside the src/app/app.module.ts so open the file and replace everything with:
import { AuthService } from './../providers/auth-service';
import { BrowserModule } from '@angular/platform-browser';
import { ErrorHandler, NgModule } from '@angular/core';
import { IonicApp, IonicErrorHandler, IonicModule } from 'ionic-angular';
import { SplashScreen } from '@ionic-native/splash-screen';
import { StatusBar } from '@ionic-native/status-bar';

import { MyApp } from './app.component';

@NgModule({
  declarations: [
    MyApp
  ],
  imports: [
    BrowserModule,
    IonicModule.forRoot(MyApp)
  ],
  bootstrap: [IonicApp],
  entryComponents: [
    MyApp
  ],
  providers: [
    StatusBar,
    SplashScreen,
    {provide: ErrorHandler, useClass: IonicErrorHandler},
    AuthService
  ]
})
export class AppModule {}
We don’t need to add our pages to the declarations and entryComponents anymore since we are now making use of lazy loading with Ionic 3! We still need to add our provider to the providers array, but that’s almost all.
Finally we need to tell our app to start with our generated LoginPage instead of the default home me page, so open the src/app/app.component.ts and change it to:
import { Component } from '@angular/core';
import { Platform } from 'ionic-angular';
import { StatusBar } from 'ionic-native';
import { SplashScreen } from '@ionic-native/splash-screen';

@Component({
  templateUrl: 'app.html'
})
export class MyApp {
  rootPage:any = 'LoginPage';

  constructor(platform: Platform, statusBar: StatusBar, splashScreen: SplashScreen) {
    platform.ready().then(() => {
      // Okay, so the platform is ready and our plugins are available.
      // Here you can do any higher level native things you might need.
      statusBar.styleDefault();
      splashScreen.hide();
    });
  }
}
That’s everything for the basic stuff we need to handle, let’s get to the code for our Ionic Login.
Creating the Authentication service
We use a service to handle the login, register and handling the current user. This service will use hard coded values so you would have to fit in your backend calls at the correct positions. I already choose to return promises because in a real scenario you would have asynchronous calls at these points. If you plan to use this template in your app, it’s easier to integrate those calls later!
We also define a very simple User object which consists of a name and email. It’s easier to work with these classes than always using some object with undefined values, so embrace TypeScript and use classes.
Open the src/providers/auth-service.ts and insert:
import { Injectable } from '@angular/core';
import {Observable} from 'rxjs/Observable';
import 'rxjs/add/operator/map';

export class User {
  name: string;
  email: string;

  constructor(name: string, email: string) {
    this.name = name;
    this.email = email;
  }
}

@Injectable()
export class AuthService {
  currentUser: User;

  public login(credentials) {
    if (credentials.email === null || credentials.password === null) {
      return Observable.throw("Please insert credentials");
    } else {
      return Observable.create(observer => {
        // At this point make a request to your backend to make a real check!
        let access = (credentials.password === "pass" && credentials.email === "email");
        this.currentUser = new User('Simon', 'saimon@devdactic.com');
        observer.next(access);
        observer.complete();
      });
    }
  }

  public register(credentials) {
    if (credentials.email === null || credentials.password === null) {
      return Observable.throw("Please insert credentials");
    } else {
      // At this point store the credentials to your backend!
      return Observable.create(observer => {
        observer.next(true);
        observer.complete();
      });
    }
  }

  public getUserInfo() : User {
    return this.currentUser;
  }

  public logout() {
    return Observable.create(observer => {
      this.currentUser = null;
      observer.next(true);
      observer.complete();
    });
  }
}
As you can see we are working with Observables all the time which would in a real case simply be http calls. But working manually with Observables is also sometimes required so this is a good practice to understand the syntax as well.
At the login we just check if the login is granted (for email “email” and password “pass”) and set the current user. Here you would normally perform your backend request and maybe store a token if you get one. We simply set our current user information and finish the observable.
Inside the register function we can’t do anything as we have no backend, so we only check if we got any values and then return success. This is the place to make a POST request to your server and create the new user!
Let’s see how to use our service in action!
Building the Login
Our login view will consists of 2 input fields and 2 buttons to either login or create a new account. The input fields are connected to the object registerCredentials inside our class and will be passed to the authService once we hit login.
On register we take the user to another screen. In our example this screen is almost the same as login, but most of the time you want to have some additional input fields for user registration so like the rest of the tutorial this is geared towards a future use case.
Besides these functions the Login has functions to display errors that might arise from the auth service, if the auth service returns that the user is allowed to login we set our root navigation to the HomePage which stands for the logged in area of our app.
Go ahead and open the src/pages/login/login.ts and replace it with:
import { Component } from '@angular/core';
import { NavController, AlertController, LoadingController, Loading, IonicPage } from 'ionic-angular';
import { AuthService } from '../../providers/auth-service';

@IonicPage()
@Component({
  selector: 'page-login',
  templateUrl: 'login.html',
})
export class LoginPage {
  loading: Loading;
  registerCredentials = { email: '', password: '' };

  constructor(private nav: NavController, private auth: AuthService, private alertCtrl: AlertController, private loadingCtrl: LoadingController) { }

  public createAccount() {
    this.nav.push('RegisterPage');
  }

  public login() {
    this.showLoading()
    this.auth.login(this.registerCredentials).subscribe(allowed => {
      if (allowed) {
        this.nav.setRoot('HomePage');
      } else {
        this.showError("Access Denied");
      }
    },
      error => {
        this.showError(error);
      });
  }

  showLoading() {
    this.loading = this.loadingCtrl.create({
      content: 'Please wait...',
      dismissOnPageChange: true
    });
    this.loading.present();
  }

  showError(text) {
    this.loading.dismiss();

    let alert = this.alertCtrl.create({
      title: 'Fail',
      subTitle: text,
      buttons: ['OK']
    });
    alert.present(prompt);
  }
}
The class is ready, now the view. As said before, we need 2 input fields connected to our registerCredentials and 2 buttons. All of that will be wrapped inside a little box so we can apply some cool styling in the next step! Open the src/pages/login/login.html and insert:
<ion-content class="login-content" padding>
  <ion-row class="logo-row">
    <ion-col></ion-col>
    <ion-col width-67>
      <img src="http://placehold.it/300x200"/>
    </ion-col>
    <ion-col></ion-col>
  </ion-row>
  <div class="login-box">
    <form (ngSubmit)="login()" #registerForm="ngForm">
      <ion-row>
        <ion-col>
          <ion-list inset>

            <ion-item>
              <ion-input type="text" placeholder="Email" name="email" [(ngModel)]="registerCredentials.email" required></ion-input>
            </ion-item>

            <ion-item>
              <ion-input type="password" placeholder="Password" name="password" [(ngModel)]="registerCredentials.password" required></ion-input>
            </ion-item>

          </ion-list>
        </ion-col>
      </ion-row>

      <ion-row>
        <ion-col class="signup-col">
          <button ion-button class="submit-btn" full type="submit" [disabled]="!registerForm.form.valid">Login</button>
          <button ion-button class="register-btn" block clear (click)="createAccount()">Create New Account</button>
        </ion-col>
      </ion-row>

    </form>
  </div>
</ion-content>
The input fields use the [(ngModel)] syntax almost like in AngularJS. Our whole login form is actually wrapped inside the form tag where we can set the action for (ngSubmit) which is login in our case. If we now add a button of type=submit we will trigger this form submit function defined in the beginning.
We also set an id for this form which is #registerForm which helps to use it to disable the buttons until all required input fields are filled out!
Pretty cool and easy to use, huh?
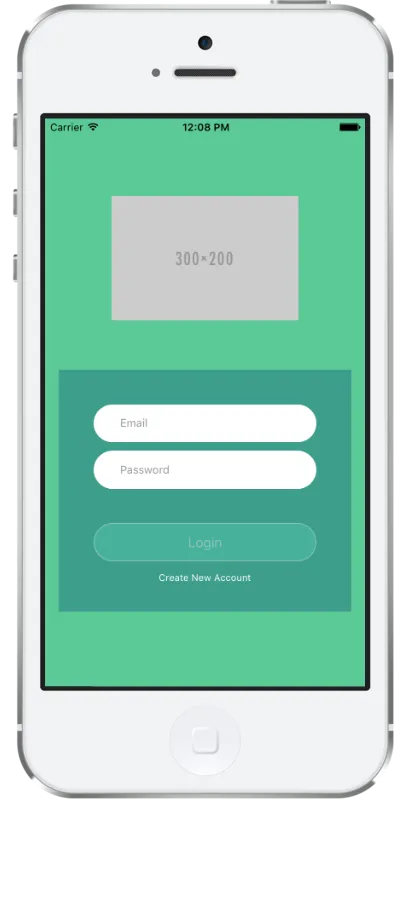
Let’s finish the view with some styling to make it look more like a login, so open the src/pages/login/login.scss and insert:
page-login {

  .login-content {
    background: #56CA96;

    .logo-row {
      padding-top: 50px;
      padding-bottom: 20px;
    }

    .login-box {
      background: #399F8B;
      padding: 20px 20px 0px 20px;
      margin-top: 30px;
    }

    ion-row {
       align-items: center;
       text-align: center;
     }

     ion-item {
         border-radius: 30px !important;
         padding-left: 30px !important;
         font-size: 0.9em;
         margin-bottom: 10px;
         border: 1px solid #ffffff;
         border-bottom: 0px !important;
         box-shadow: none !important;
     }

     .signup-col {
       margin: 0px 16px 0px 16px;
       padding-bottom: 20px;
     }

     .item-inner {
       border-bottom-color: #ffffff !important;
       box-shadow: none !important;
     }

     .submit-btn {
       background: #51CFB1;
       border-radius: 30px !important;
       border: 1px solid #ffffff;
     }

     .register-btn {
       color: #ffffff;
       font-size: 0.8em;
     }
  }

}
You resulting login screen will now look like this:
Crafting the Register page
As our register page will consist of the same fields, it’s more or less the same structure and stuff we already had on our login page.
Let’s start with the class which only needs the register function. On successful registration (in our case almost always) we guide the user back to the login page by calling popToRoot on our navigation.
Open the src/pages/register/register.ts and replace with:
import { Component } from '@angular/core';
import { NavController, AlertController, IonicPage } from 'ionic-angular';
import { AuthService } from '../../providers/auth-service';

@IonicPage()
@Component({
  selector: 'page-register',
  templateUrl: 'register.html',
})
export class RegisterPage {
  createSuccess = false;
  registerCredentials = { email: '', password: '' };

  constructor(private nav: NavController, private auth: AuthService, private alertCtrl: AlertController) { }

  public register() {
    this.auth.register(this.registerCredentials).subscribe(success => {
      if (success) {
        this.createSuccess = true;
        this.showPopup("Success", "Account created.");
      } else {
        this.showPopup("Error", "Problem creating account.");
      }
    },
      error => {
        this.showPopup("Error", error);
      });
  }

  showPopup(title, text) {
    let alert = this.alertCtrl.create({
      title: title,
      subTitle: text,
      buttons: [
        {
          text: 'OK',
          handler: data => {
            if (this.createSuccess) {
              this.nav.popToRoot();
            }
          }
        }
      ]
    });
    alert.present();
  }
}
The rest of our class is more or less the same and the register flow is quite easy as well. We can use our authentication service and the observable it returns which is almost like in a real scenario.
We continue with the simple HTML view for the register page, which contains the same fields but now has a header bar. As we have pushed the page onto the navigation stack before, we will get the back arrow for free by simply using the nav bar here!
So go ahead an insert in your src/pages/register/register.html:
<ion-header>
  <ion-navbar color="dark">
    <ion-title>Register</ion-title>
  </ion-navbar>
</ion-header>

<ion-content class="login-content" padding>
  <div class="login-box">

    <form (ngSubmit)="register()" #registerForm="ngForm">
      <ion-row>
        <ion-col>
          <ion-list inset>

            <ion-item>
              <ion-input type="text" placeholder="Email" name="email" [(ngModel)]="registerCredentials.email" required></ion-input>
            </ion-item>

            <ion-item>
              <ion-input type="password" placeholder="Password" name="password" [(ngModel)]="registerCredentials.password" required></ion-input>
            </ion-item>

          </ion-list>
        </ion-col>
      </ion-row>

      <ion-row>
        <ion-col class="signup-col">
          <button ion-button class="submit-btn" full type="submit" [disabled]="!registerForm.form.valid">Register</button>
        </ion-col>
      </ion-row>

    </form>
  </div>
</ion-content>
Like before we finish this we by applying some styling so it matches our general color schema. Open the src/pages/register/register.scss and insert:
page-register {
  .login-content {
    background: #56CA96;

    .login-box {
      background: #509287;
      padding: 20px 20px 0px 20px;
      margin-top: 30px;
    }

    ion-row {
       align-items: center;
       text-align: center;
     }

     ion-item {
         border-radius: 30px !important;
         padding-left: 30px !important;
         font-size: 0.9em;
         margin-bottom: 10px;
         border: 1px solid #ffffff;
         border-bottom: 0px !important;
         box-shadow: none !important;
     }

     .signup-col {
       margin: 0px 16px 0px 16px;
       padding-bottom: 20px;
     }

     .item-inner {
       border-bottom-color: #ffffff !important;
       box-shadow: none !important;
     }

     .submit-btn {
       background: #51CFB1;
       border-radius: 30px !important;
       border: 1px solid #ffffff;
     }
  }
}
Nothing really special here, but without it wouldn’t look like a cool login! The last part missing is the inside area after people have logged in.
The inside Member area
If a login was successful people will be send to the HomePage which represents the starting point of our member area. On that page we we now have the ability to access information of a user through our authenticationService.
If you have a real authentication mechanism you would now have perhaps some of the general parameters of the user in his object so you can easily display stuff like his name or an image.
Besides providing this information for the view the HomePage also has the logout function which will inform our AuthenticationService and finally guide the user back to the Login page.
Go ahead and fill the src/pages/home/home.ts with:
import { Component } from '@angular/core';
import { NavController, IonicPage } from 'ionic-angular';
import { AuthService } from '../../providers/auth-service';

@IonicPage()
@Component({
  selector: 'page-home',
  templateUrl: 'home.html'
})
export class HomePage {
  username = '';
  email = '';
  constructor(private nav: NavController, private auth: AuthService) {
    let info = this.auth.getUserInfo();
    this.username = info['name'];
    this.email = info['email'];
  }

  public logout() {
    this.auth.logout().subscribe(succ => {
      this.nav.setRoot('LoginPage')
    });
  }
}
The view is again nothing fancy, but we display the information of our logged in user and show the logout button inside the top bar. Create the view inside the src/pages/home/home.html like this:
<ion-header>
  <ion-navbar color="dark">
    <ion-title>
      Member Area
    </ion-title>
    <ion-buttons end>
      <button ion-button (click)="logout()">
        <ion-icon name="log-out"></ion-icon>
      </button>
    </ion-buttons>
  </ion-navbar>
</ion-header>

<ion-content class="home" padding>
  <h3>Welcome inside, {{username}}!</h3>
  Your Email is: {{email}}
</ion-content>
Because we want to have a smooth UI that looks the same on all of our pages do me a favour and finish the styling for the template with some color for the home page inside src/pages/home/home.scss:
page-home {
  .home {
    background: #56CA96;
  }
}
That’s it! Now you got your very basic template for navigating from outside to inside plus a register form.
Conclusion
In this tutorial we have created a very basic Ionic 2 login template which can be the base for your next project. Of course you need to plugin your real backend at the correct spots, so this is only the start of your app.
Let me know if you would like to see an in-depth authentication tutorial covering even more aspects in the next tutorial!
Happy Coding, Simon