Building Your Own Ionic Wordpress Client with WP-API Last update: 2017-05-02

If you are familiar with Wordpress you know that since a few versions ago all instances have a public REST API. Of course I had to jump in when I saw a new Wordpress API wrapper library for Angular 2+, created by the awesome Julien Renaux which we will use to build our Ionic Wordpress App!
Although you could use the Wordpress REST API without any additional library directly from your Ionic app, we will still make use of Juliens package because we don’t have to use the URLs for the routes but just the functions of the library.
In this tutorial we will start by integrating the library into a new Ionic project. We will then write our own Ionic Wordpress Provider to separate the calls from our code view even more.
Finally, we will create a list of latest Wordpress posts fetched from the API and a single view to show each article in full length.
If you want to get the full app ready to start simply insert your email below!
Prerequisite
Before going through this tutorial you should be familiar with Angular 2+ and Observables. You also need to have the latest version of Ionic set up on your machine.
If you want to learn Ionic with step-by-step video courses, hands-on training projects and a helpful community who has your back, then take a look at the Ionic Academy.
Setting up our Ionic Wordpress App
We start as always with a blank new Ionic app. By now we can skip the “—v2” flag because our app will be automatically started with that version since a recent update, so Ionic 3+ is now the standard for your new apps.
Additional we install the wp-api-angular which is the wrapper for our Wordpress instance. If you haven’t installed typings yet, you might also want to do that now.
Finally, generate a provider for our logic and a page for a single post item. Go ahead and run:
ionic start devdacticWordpress blank
cd devdacticWordpress
npm install -g typings
npm install wp-api-angular --save
ionic g provider wpProvider
ionic g page PostPage
To make use of the Wp-api-angular package we need to configure it so it can play nicely with our Ionic app. Therefore, we have to export a function with the URL to our own Wordpress page. We also need to load a few more dependencies (and our own created provider WpProvider) and use our special WpApiLoaderFactory for the WpApiModule.
Now go to your src/app.module.ts and insert:
import { BrowserModule } from '@angular/platform-browser';
import { ErrorHandler, NgModule } from '@angular/core';
import { IonicApp, IonicErrorHandler, IonicModule } from 'ionic-angular';
import { SplashScreen } from '@ionic-native/splash-screen';
import { StatusBar } from '@ionic-native/status-bar';

import { MyApp } from './app.component';
import { HomePage } from '../pages/home/home';
import { HttpModule } from '@angular/http';

import { Http } from '@angular/http';
import { WpProvider } from '../providers/wp-provider';
import {
  WpApiModule,
  WpApiLoader,
  WpApiStaticLoader
} from 'wp-api-angular'

export function WpApiLoaderFactory(http) {
  return new WpApiStaticLoader(http, 'https://devdactic.com//wp-json/');
}

@NgModule({
  declarations: [
    MyApp,
    HomePage
  ],
  imports: [
    BrowserModule,
    HttpModule,
        WpApiModule.forRoot({
      provide: WpApiLoader,
      useFactory: (WpApiLoaderFactory),
      deps: [Http]
    }),
    IonicModule.forRoot(MyApp)
  ],
  bootstrap: [IonicApp],
  entryComponents: [
    MyApp,
    HomePage
  ],
  providers: [
    StatusBar,
    SplashScreen,
    {provide: ErrorHandler, useClass: IonicErrorHandler},
    WpProvider
  ]
})
export class AppModule {}
Of course this currently uses the Devdactic URL, so make sure to change that URL to your own. If you can serve the app now without any problems everything is configured fine and we can continue with actually using the library.
Creating a Wordpress Provider
We could use the library directly for our calls, but I still prefer to put the logic into an additional provider. Therefore, we wrap our calls to Wordpress using the wp-api library into our created provider.
Also, we create 2 classes Post and User and map our REST call results into more friendly objects.
Inside the constructor of our provider we also grab the list of users from Wordpress so we can easily show an avatar for each user at the post list later. Otherwise, we would have to make the call to retrieve user information over and over, so this saves us some http calls.
To get a list of posts we use the getList function which will return as an array of objects. For each of those objects we create a new Post object, and to get the image of each post we get a bit freaky: We assign an Observable to the media_url property which will also use the wp-api and load the link to the image.
This helps to easily create the view later, as we can just use the property with the aync pipe and our image will be displayed, no further crazy loading of stuff there!
Now open your src/providers/wp-provider.ts and insert:
import { Injectable } from '@angular/core';
import 'rxjs/add/operator/map';
import { Observable } from 'rxjs/Observable';
import { WpApiPosts, WpApiMedia, WpApiUsers } from 'wp-api-angular';

export class Post {
  public media_url: Observable<string>;
  constructor(public authorId: number, public id: number, public title: string, public content: string, public excerpt: string, public date: string, public mediaId?: number) { }
}

export class User {
  constructor(public id: number, public name: string, public userImageUrl: string) { }
}

@Injectable()
export class WpProvider {
  users: User[];

  constructor(public wpApiPosts: WpApiPosts, public wpApiMedia: WpApiMedia, public wpApiUsers: WpApiUsers) {
    this.wpApiUsers.getList()
      .map(res => res.json())
      .subscribe(data => {
        this.users = [];
        for (let user of data) {
          let oneUser = new User(user[ 'id' ], user[ 'name' ], user[ 'avatar_urls' ][ '96' ]);
          this.users.push(oneUser);
        }
      })
  }

  getPosts(): Observable<Post[]> {
    return this.wpApiPosts.getList()
      .map(res => res.json())
      .map(data => {
        var posts = [];
        for (let post of data) {
          let onePost = new Post(post[ 'author' ], post[ 'id' ], post[ 'title' ][ 'rendered' ], post[ 'content' ][ 'rendered' ], post[ 'excerpt' ][ 'rendered' ], post[ 'date' ], post[ 'featured_media' ]);
          onePost.media_url = this.getMedia(onePost.mediaId);
          posts.push(onePost);
        }
        return posts;
      });
  }

  getMedia(id: number): Observable<string> {
    return this.wpApiMedia.get(id)
      .map(res => res.json())
      .map(data => {
        return data[ 'source_url' ];
      });
  }

  getUserImage(userId: number) {
    for (let usr of this.users) {
      if (usr.id === userId) {
        return usr.userImageUrl;
      }
    }
  }

  getUserName(userId: number) {
    for (let usr of this.users) {
      if (usr.id === userId) {
        return usr.name;
      }
    }
  }
}
As we load and fill the array of users inside the constructor, we can create 2 plain functions to search for the right user by id inside this array to get the user image and user name.
If you want to load more attributes of a post, just inspect the result of getList() and add those to the Post class. For example you could grab Tags or categories as well, but for new we keep it simple and move on!
Loading our Wordpress data
We haven’t seen much of our code in action by now, so we now implement the view and class to load and display our list of Wordpress posts.
As our provider still returns an Observable, our array of posts here is of the type Observable which can be handled easily inside our view later.
I also added a loading controller to indicate that we are loading stuff at the start of the app, and we dismiss this loading after we got data from our provider using .do().
To get the name and image of a user, we can easily rely on our provider and those calls are not asynchronous as we have preloaded the users and information before!
If we want to open a single post, we push a new page on our navigation stack and pass the post object through the navParams to our next page. We are only using the name ‘PostPage’ as we make use of lazy loading, which was introduced with Ionic 3!
If you want more information on lazy loading and upgrading to Ionic 3, check out this quick win. Otherwise, continue and open your src/pages/home/home.ts and insert:
import { Component } from '@angular/core';
import { NavController, LoadingController, Loading } from 'ionic-angular';
import { WpProvider, Post } from '../../providers/wp-provider';
import { Observable } from 'rxjs/Observable';

@Component({
  selector: 'page-home',
  templateUrl: 'home.html'
})
export class HomePage {
  loader: Loading;
  posts: Observable<Post[]>;

  constructor(public navCtrl: NavController, public wpProvider: WpProvider, public loadingCtrl: LoadingController) {
    this.presentLoading();
    this.posts = this.wpProvider.getPosts();
    this.posts.subscribe(data =>
        this.loader.dismiss();
    });
  }

  getUserImage(id: number) {
    return this.wpProvider.getUserImage(id);
  }

  getUserName(id: number) {
    return this.wpProvider.getUserName(id);
  }

  openPost(post: Post) {
    this.navCtrl.push('PostPage', {post: post});
  }

  presentLoading() {
    this.loader = this.loadingCtrl.create({
      content: "Loading..."
    });
    this.loader.present();
  }
}
The last step to show something in our app is to hook up the according view.
As we have prepared all of our data and types in a good way, we can now iterate over our array of posts using the async pipe. Each Ionic card will be tappable and calls our function to open the next page.
Inside the card the image of the featured image of the post is displayed (remember, we assigned an Observable to that property!) and below the image we display the information about the author.
Inside the content of the card we now have the title and the excerpt, which we assign to the innerHTML property as this has some HTML tags inside most of the time and by doing this we trust the HTML (potential harmful!) and see the formatted HTML code like a end user inside the card. Otherwise you would see all the tags printed out, which is of course not a good idea.
Prepare your view inside src/pages/home/home.html and insert:
<ion-header>
  <ion-navbar color="primary">
    <ion-title>
      Ionic + Wordpress
    </ion-title>
  </ion-navbar>
</ion-header>

<ion-content>
  <ion-card *ngFor="let post of posts | async" (click)="openPost(post)" tappable>
    <img [src]="post.media_url | async">
    <ion-item>
      <ion-avatar item-left>
        <img [src]="getUserImage(post.authorId)">
      </ion-avatar>
      <h2>{{ getUserName(post.authorId) }}</h2>
    </ion-item>
    <ion-card-content>
      <ion-card-title>
        {{ post.title }}
      </ion-card-title>
      <div [innerHTML]="post.excerpt"></div>
    </ion-card-content>
  </ion-card>
</ion-content>
Our app is now ready to run, so if you start it up you should see a list of post elements displayed nicely like in the image below! 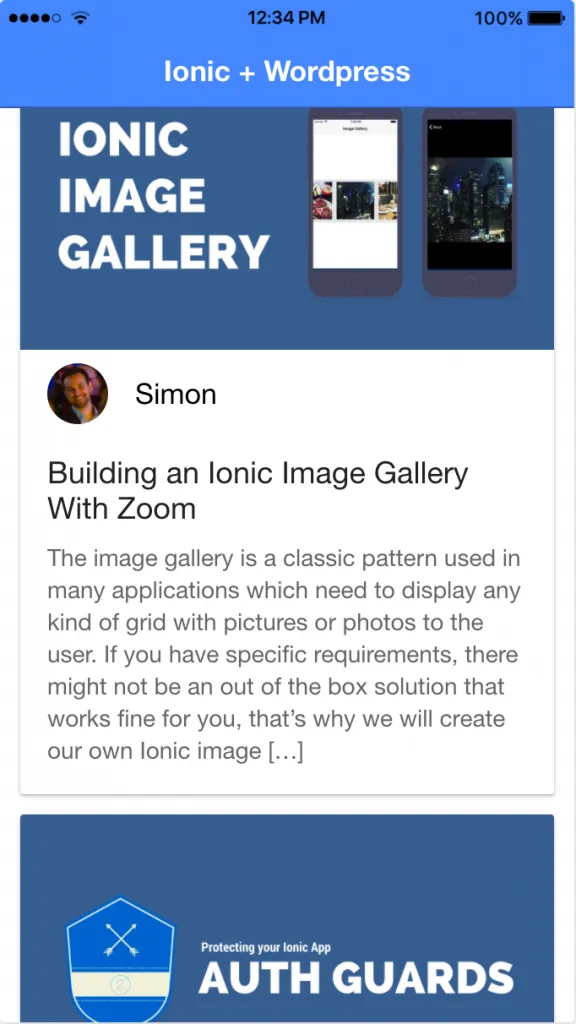
Showing a Single Wordpress Post
The last missing piece is to display a full post, but we have already prepared everything for this as well. If we click a card, the next page will be pushed along with the post object.
Note: If might be the case that the CLI is generating your page and module file in a strange way, therefore make sure you import the IonicPageModule inside your module file at src/pages/post-page/post-page.module.ts, like below:
import { NgModule } from '@angular/core';
import { IonicPageModule } from 'ionic-angular';
import { PostPage } from './post-page';

@NgModule({
  declarations: [
    PostPage,
  ],
  imports: [
    IonicPageModule.forChild(PostPage),
  ],
  exports: [
    PostPage
  ]
})
export class PostPageModule {}
If all of that is correct, we just have to assign the navParams value to a post object inside the src/pages/post-page/post-page.ts like this:
import { Component } from '@angular/core';
import { IonicPage, NavController, NavParams } from 'ionic-angular';
import { Post } from '../../providers/wp-provider';

@IonicPage()
@Component({
  selector: 'page-post-page',
  templateUrl: 'post-page.html',
})
export class PostPage {
  post: Post;

  constructor(public navCtrl: NavController, public navParams: NavParams) {
    this.post = navParams.get('post');
  }
}
Finally, to display the elements of the post we use again the innerHTML syntax but this time the content of our post object. Go ahead and finish the view inside src/pages/post-page/post-page.html:
<ion-header>
  <ion-navbar color="primary">
    <ion-title>{{ post.title }}</ion-title>
  </ion-navbar>
</ion-header>

<ion-content>
  <img [src]="post.media_url | async">
  <div [innerHTML]="post.content" padding></div>
</ion-content>
Now your own little Ionic Wordpress client is ready and can be extended with all kinds of features you like!
Conclusion
The wp-api-angular package makes it really easy to connect your Ionic app to a Wordpress page. You can easily craft an Ionic Wordpress app for you or your customers around their Wordpress page by following this approach.
There is a lot more you can do with the wrapper, we have only touched a few functions by now so go ahead and inspect what else is possible.
Kudos again to Julien for developing this awesome helper!
You can find a video version of this article below!
Happy Coding, Simon