Building an Ionic Spotify App - Part 2: Spotify API Last update: 2018-06-12

After our initial setup for the Spotify OAuth dialog we are now ready to create a simple Ionic Spotify client that can access the Web API of Spotify to retrieve all kinds of information about the user, playlists or tracks!
If you haven’t went through the first part of this series, make sure to complete it first and then come back to this tutorial.
Go back to the first part: Building an Ionic Spotify App - Part 1: OAuth
Inside this second part we will use the web API JS wrapper that only needs our access token and allows us to contact all the endpoints without having to lookup everything inside the documentation.
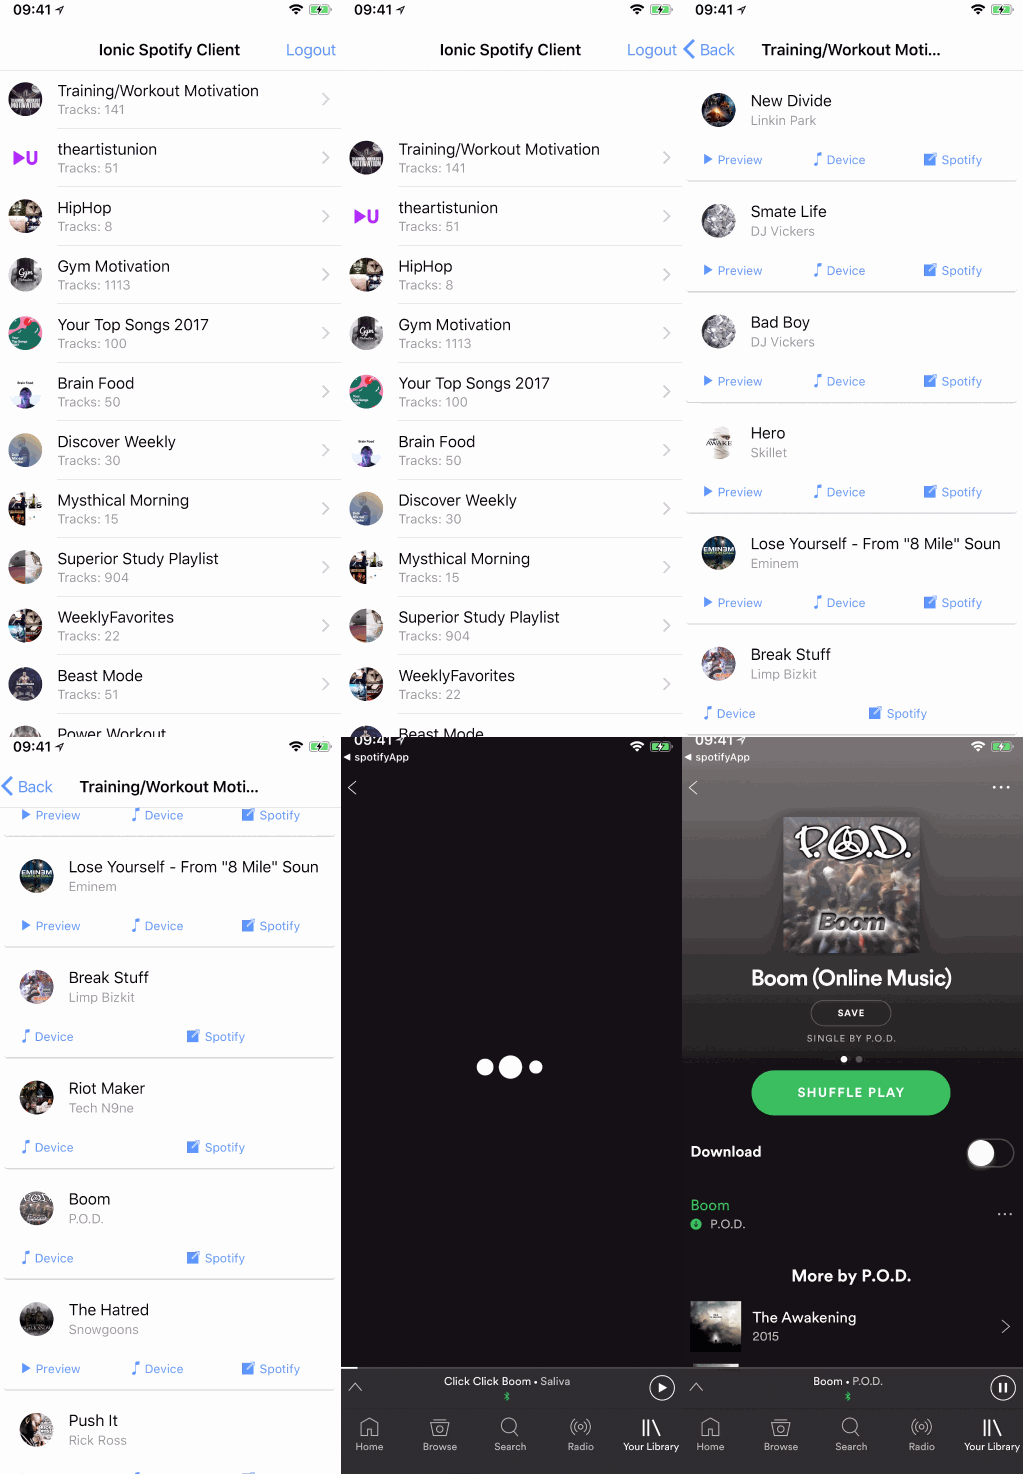
Once we are finished our app will display our playlists and also allow some options for the tracks inside those lists like you can see below. 
Setting up the Ionic Spotify Client
We finished the first tutorial with a simple login to try our OAuth flow, and we’ll continue with that but you can also simply start your app now if you haven’t. For those coming from part 1 make sure to run the additional commands as well!
ionic start devdacticSpotify blank
cd devdacticSpotify
ionic cordova plugin add cordova-spotify-oauth
ionic cordova plugin add cordova-plugin-customurlscheme --variable URL_SCHEME=devdacticspotify

# Additional commands
ionic cordova plugin add cordova-plugin-media
npm i @ionic-native/media
npm i spotify-web-api-js
ionic g page playlist
Now we got a basic app with all the plugins and pages we need. Make sure you have used your own custom URL scheme that you used within the first part! Also, we now need the Media plugin to play a track preview later. Therefore, make sure to add it to your app/app.module.ts like this:
import { BrowserModule } from '@angular/platform-browser';
import { ErrorHandler, NgModule } from '@angular/core';
import { IonicApp, IonicErrorHandler, IonicModule } from 'ionic-angular';
import { SplashScreen } from '@ionic-native/splash-screen';
import { StatusBar } from '@ionic-native/status-bar';

import { MyApp } from './app.component';
import { HomePage } from '../pages/home/home';
import { Media } from '@ionic-native/media';

import { IonicStorageModule } from '@ionic/storage';

@NgModule({
  declarations: [
    MyApp,
    HomePage
  ],
  imports: [
    BrowserModule,
    IonicModule.forRoot(MyApp),
    IonicStorageModule.forRoot()
  ],
  bootstrap: [IonicApp],
  entryComponents: [
    MyApp,
    HomePage
  ],
  providers: [
    StatusBar,
    SplashScreen,
    {provide: ErrorHandler, useClass: IonicErrorHandler},
    Media
  ]
})
export class AppModule {}
I’ve also included the Ionic Storage so we can better keep track whether a user was previously logged in and automate parts of the token exchange flow under the hood when the user comes back.
Login with Spotify & User Playlists
The first part of the login was already discussed before, but now we finally make real use of the access token we get back after login. We can directly pass it to an instance of the SpotifyWebApi so ll the future requests can use the token and make a valid request against the API.
We’ll also keep track of the loggedIn state of a user to show a logout button and also try to see if a user was previously logged in from the storage to automatically trigger our authorise flow again. Remember, this won’t open the whole dialog again but simply request a new access token from our server using the refresh token!
At this point I also encountered some problems with CryptoJS and decoding the refresh token, so in case you run into any problems just let me know below. It looks like for some reason the params that are sent to the server are not escaped and the ”+” character gets replaced with an empty space sometimes..
Anyway, if everything works fine we can then use the API to retrieve the playlists of a user by calling getUserPlaylists(). You can also checkout all the functions inside the documentation of the library! We then got a nice array of playlists that we can present inside the view, so go ahead and change your pages/home/home.ts to:
import { Component } from '@angular/core';
import { NavController, Platform, LoadingController, Loading } from 'ionic-angular';
import * as SpotifyWebApi from 'spotify-web-api-js';
import { Storage } from '@ionic/storage';

declare var cordova: any;

@Component({
  selector: 'page-home',
  templateUrl: 'home.html'
})
export class HomePage {
  result = {};
  data = '';
  playlists = [];
  spotifyApi: any;
  loggedIn = false;
  loading: Loading;

  constructor(public navCtrl: NavController, private storage: Storage, private plt: Platform, private loadingCtrl: LoadingController) {
    this.spotifyApi = new SpotifyWebApi();

    this.plt.ready().then(() => {
      this.storage.get('logged_in').then(res => {
        if (res) {
          this.authWithSpotify(true);
        }
      });
    });
  }

  authWithSpotify(showLoading = false) {
    const config = {
      clientId: "your-spotify-client-id",
      redirectUrl: "devdacticspotify://callback",
      scopes: ["streaming", "playlist-read-private", "user-read-email", "user-read-private"],
      tokenExchangeUrl: "https://spotifyoauthserver.herokuapp.com/exchange",
      tokenRefreshUrl: "https://spotifyoauthserver.herokuapp.com/refresh",
    };

    if (showLoading) {
      this.loading = this.loadingCtrl.create();
      this.loading.present();
    }

    cordova.plugins.spotifyAuth.authorize(config)
      .then(({ accessToken, encryptedRefreshToken, expiresAt }) => {
        if (this.loading) {
          this.loading.dismiss();
        }

        this.result = { access_token: accessToken, expires_in: expiresAt, refresh_token: encryptedRefreshToken };
        this.loggedIn = true;
        this.spotifyApi.setAccessToken(accessToken);
        this.getUserPlaylists();
        this.storage.set('logged_in', true);
      }, err => {
        console.error(err);
        if (this.loading) {
          this.loading.dismiss();
        }
      });
  }

  getUserPlaylists() {
    this.loading = this.loadingCtrl.create({
      content: "Loading Playlists...",
    });
    this.loading.present();

    this.spotifyApi.getUserPlaylists()
      .then(data => {
        if (this.loading) {
          this.loading.dismiss();
        }
        this.playlists = data.items;
      }, err => {
        console.error(err);
        if (this.loading) {
          this.loading.dismiss();
        }
      });
  }

  openPlaylist(item) {
    this.navCtrl.push('PlaylistPage', { playlist: item });
  }

  logout() {
    // Should be a promise but isn't
    cordova.plugins.spotifyAuth.forget();

    this.loggedIn = false;
    this.playlists = [];
    this.storage.set('logged_in', false);
  }

}
We’ve also added a logout function now, but the plugin was not working 100% like described so for me it’s not returning a Promise, therefore we just call it and remove all the other stored information.
Finally, we add a function to push a second page that will then display all the tracks of a single playlist!
Now we move on to the view which basically consists of our playlist list (is this correct?) and images that are already contained within the API response. There are far more information so simply log out the JSON to find the values you want to present. For now though simply change your pages/home/home.html to:
<ion-header>
  <ion-navbar>
    <ion-title>
      Ionic Spotify Client
    </ion-title>
    <ion-buttons end>
      <button ion-button clear (click)="authWithSpotify()" *ngIf="!loggedIn">Login</button>
      <button ion-button clear (click)="logout()" *ngIf="loggedIn">Logout</button>
    </ion-buttons>
  </ion-navbar>
</ion-header>

<ion-content>

  <div *ngIf="!loggedIn" text-center padding>Please Login to load your Playlists!</div>

  <ion-list>
    <button ion-item *ngFor="let item of playlists" (click)="openPlaylist(item)">
      <ion-avatar item-start *ngIf="item.images.length > 0">
        <img [src]="item.images[0].url">
      </ion-avatar>
      {{ item.name }}
      <p>Tracks: {{ item.tracks.total }}</p>
    </button>
  </ion-list>
</ion-content>
Now you are able to log in with Spotify and retrieve your own Playlists!
Working with Spotify Tracks
To add some more features we now dive into the tracks of our playlist. Beware: There is currently now way to stream the whole song through the API (*at least from mobile devices)!
The Spotify team is working on this, but right now we can’t build a true Spotify app, but you can do almost everything else from your app.
In our case we will offer 3 options for every track:
- Play the preview of the track (if it exists)
- Play the track on our active Spotify device
- Open the Spotify client and play the track
Especially the second option is kinda crazy and you can see it in action in the video linked at the end of this tutorial!
Inside our page we will use the library again and call getPlaylist() where we also pass in the ID of the owner and the playlist ID itself. The result contains an array of tracks that we can use later inside our view to iterate over all the entries.
As for the functions, the play/stop logic for the preview works with the Media plugin and starts the song in the background. Make sure to enable sound and turn it up on your device if you can’t hear anything ;)
The ”Open in Spotify” function is using the URL of the link, which will then automatically open the Spotify app with the track. The mechanism in the background is a universal link and we might talk about this in a future tutorial as well, so raise you hand below if you want more information on that topic.
Finally, we can even play the track on the last device that was using Spotify! I’m not sure what exactly happens in the background but being able to control the Spotify client on my Mac from my Ionic app felt kinda epic. And that’s just one function, you could even control the sound and seek to a position and much more..
To get all of this, simply change your pages/playlist/playlist.ts to:
import { Component } from '@angular/core';
import { IonicPage, NavController, NavParams, LoadingController, Loading } from 'ionic-angular';
import * as SpotifyWebApi from 'spotify-web-api-js';
import { Media, MediaObject } from '@ionic-native/media';

@IonicPage()
@Component({
  selector: 'page-playlist',
  templateUrl: 'playlist.html',
})
export class PlaylistPage {
  tracks = [];
  playlistInfo = null;
  playing = false;
  spotifyApi: any;
  currentTrack: MediaObject = null;
  loading: Loading;

  constructor(public navCtrl: NavController, public navParams: NavParams, private media: Media, private loadingCtrl: LoadingController) {
    let playlist = this.navParams.get('playlist');
    this.spotifyApi = new SpotifyWebApi();

    this.loadPlaylistData(playlist);
  }

  loadPlaylistData(playlist) {
    this.loading = this.loadingCtrl.create({
      content: "Loading Tracks...",
    });
    this.loading.present();

    this.spotifyApi.getPlaylist(playlist.owner.id, playlist.id).then(data => {
      this.playlistInfo = data;
      this.tracks = data.tracks.items;
      if (this.loading) {
        this.loading.dismiss();
      }
    });
  }

  play(item) {
    this.playing = true;

    this.currentTrack = this.media.create(item);

    this.currentTrack.onSuccess.subscribe(() => {
      this.playing = false;
    });
    this.currentTrack.onError.subscribe(error => {
      this.playing = false;
    });

    this.currentTrack.play();
  }

  playActiveDevice(item) {
    this.spotifyApi.play({ uris: [item.track.uri] });
  }

  stop() {
    if (this.currentTrack) {
      this.currentTrack.stop();
      this.playing = false;
    }
  }

  open(item) {
    window.open(item.track.external_urls.spotify, '_system', 'location=yes');
  }

}
Alright we are close to finishing this, now we only need the view for our tracks which is again a simple iteration over the tracks we received from the API.
Additionally we add some controls below each card in order to play the preview, play it on our active device or open the track inside Spotify. No real magic in here, so simply change your pages/playlist/playlist.html to:
<ion-header>
  <ion-navbar>
    <ion-title *ngIf="playlistInfo">{{ playlistInfo.name }}</ion-title>
  </ion-navbar>
</ion-header>

<ion-content>
  <ion-list>

    <ion-card *ngFor="let item of tracks">
      <ion-item>
        <ion-avatar item-start>
          <img [src]="item.track.album.images[0].url">
        </ion-avatar>
        <h2>{{ item.track.name }}</h2>
        <p>{{ item.track.artists[0].name}}</p>
      </ion-item>

      <ion-row>
        <ion-col *ngIf="item.track.preview_url && !playing">
          <button ion-button icon-left (click)="play(item.track.preview_url)" clear small>
            <ion-icon name="play"></ion-icon>
            Preview
          </button>
        </ion-col>
        <ion-col *ngIf="item.track.preview_url && playing">
          <button ion-button icon-left (click)="stop()" clear small>
            <ion-icon name="close"></ion-icon>
            Stop
          </button>
        </ion-col>
        <ion-col>
          <button ion-button icon-left (click)="playActiveDevice(item)" clear small>
            <ion-icon name="musical-note"></ion-icon>
            Device
          </button>
        </ion-col>
        <ion-col>
          <button ion-button icon-left (click)="open(item)" clear small>
            <ion-icon name="open"></ion-icon>
            Spotify
          </button>
        </ion-col>

      </ion-row>
    </ion-card>
  </ion-list>
</ion-content>
And that’s it!
Make sure to run your app on a device and make sure that your OAuth server is reachable on Heroku. Then you should be able to use the full power of the Spotify API within your Ionic app!
Conclusion
The process to connect safely to the Spotify API is not trivial but it’s possible and once your are authenticated you can do almost all actions like searching, editing playlists and almost everything besides streaming the tracks.
We might see the new SDK over the next time so perhaps we’ll then be even able to build a full Ionic Spotify client app, until then enjoy what the API offers and build great Ionic apps with it (and of course show them)!
You can also find a video version of this article below.
