How to Create an Ionic PWA with Web Push Notifications Last update: 2020-09-08
If you plan to build a website or PWA with Ionic, you can’t rely on standard push notifications. But instead, you can easily integrate web push instead!
The integration of web push notifications is super easy with Firebase, but we need to configure a few things upfront if you want to make this work in a PWA.
We will take all of the steps together and finally send push notifications through Firebase to our Ionic app/website in the end.
Disclaimer
If you are super excited now I must tell you that this only works on specific browsers right now. And with that I mean it doesn’t work inside Safari.
That means, the whole benefit of push on the web and PWA won’t work on iOS at all. The push API is simply not included in Safari as of now, so the only chance for iOS push notifications is a native app. You can also see that it’s not even working inside a regular Safari browser on a Mac.
Setting up Firebase Messaging
But that doesn’t mean the functionality is obsolete, we can make this work on Android and other web browsers anyway, so let’s start a new Ionic app, add the schematics for PWA and Angular Fire and finally generate a service for our messaging logic:
ionic start devdacticPush blank --type=angular --capacitor
cd ./devdacticPush
ng add @angular/pwa
ng add @angular/fire

ionic g service services/messaging
Now the configuration begins.. First of all you need a Firebase project, and from the the configuration object.
Check out my other tutorials on how to get that information.
With that information, go ahead and update your environments/environment.ts to include the configuration:
export const environment = {
  production: false,
  firebase: {
    apiKey: "",
    authDomain: "",
    databaseURL: "",
    projectId: "",
    storageBucket: "",
    messagingSenderId: "",
    appId: ""
  }
};
To make Firebase messanging work, we need to create a new file and include our information in here again. Go ahead and create a file at src/firebase-messaging-sw.js(exactly the name please!):
importScripts('https://www.gstatic.com/firebasejs/7.16.1/firebase-app.js');
importScripts('https://www.gstatic.com/firebasejs/7.16.1/firebase-messaging.js');

firebase.initializeApp({
    apiKey: '<your-key>',
    authDomain: '<your-project-authdomain>',
    databaseURL: '<your-database-URL>',
    projectId: '<your-project-id>',
    storageBucket: '<your-storage-bucket>',
    messagingSenderId: '<your-messaging-sender-id>'
});

const messaging = firebase.messaging();
It’s important to use the same Firebase version in this file like in your package.json! In this example, the version would be 7.16.1.
Now things get tricky: Because we already added the PWA schematic, Angular injected a default service worker. But we need also need the service worker for Firebase messaging, so the solution is to have a combined file.
So create a new file at src/combined-sw.js and then simply import both service workers like this:
importScripts('ngsw-worker.js');
importScripts('firebase-messaging-sw.js');
To include these 2 new files, we also need to apply a little change to the angular.json so quite at the top inside the assets array, find the webmanifest entry and add your two new service workers below:
"assets":[
  ..
 "src/manifest.webmanifest",
 "src/combined-sw.js",
 "src/firebase-messaging-sw.js"
]
Almost done… We now also need to add a generic ID to our src/manifest.webmanifest, which is in fact the same for every app as it’s the GCM ID of Google. Found this strange, but it’s correct!
Therefore, also open the src/manifest.webmanifest and add this line:
"gcm_sender_id": "103953800507",Last step is to change the main module file of our app so we can load our new combined service worker instead of the default Angular service worker.
Besides that we initialise AngularFire and the messaging module within our app, so go ahead and change the app/app.module.ts to this:
import { NgModule } from '@angular/core';
import { BrowserModule } from '@angular/platform-browser';
import { RouteReuseStrategy } from '@angular/router';

import { IonicModule, IonicRouteStrategy } from '@ionic/angular';
import { SplashScreen } from '@ionic-native/splash-screen/ngx';
import { StatusBar } from '@ionic-native/status-bar/ngx';

import { AppComponent } from './app.component';
import { AppRoutingModule } from './app-routing.module';
import { ServiceWorkerModule } from '@angular/service-worker';
import { environment } from '../environments/environment';

import { AngularFireModule } from '@angular/fire';
import { AngularFireMessagingModule } from '@angular/fire/messaging';

@NgModule({
  declarations: [AppComponent],
  entryComponents: [],
  imports: [
    BrowserModule,
    IonicModule.forRoot(),
    AppRoutingModule,
    ServiceWorkerModule.register('combined-sw.js', {
      enabled: environment.production,
    }),
    AngularFireModule.initializeApp(environment.firebase),
    AngularFireMessagingModule,
  ],
  providers: [
    StatusBar,
    SplashScreen,
    { provide: RouteReuseStrategy, useClass: IonicRouteStrategy },
  ],
  bootstrap: [AppComponent],
})
export class AppModule {}
Now everything is configured and we can finally implement web push notifications!
Listening for Push Notifications
There are two scenarios: Your app/website/PWA is in the foreground, or it is closed/ in the background. For the first case, we can subscribe to a messages object of AngularFire and always catch incoming push messages.
The other case is actually not that easy, since it’s treated by the Firebase service worker we added to our project.
Also, we need a token of the user so we can target those notifications, which we do by calling requestToken which will also at the same time ask for user permission to push notifications. You could also do this in two separate calls actually!
You should also include functionality to delete the token once the user doesn’t want any notifications more, so go ahead and open the services/messaging.service.ts now and insert:
import { Injectable } from '@angular/core';
import { AngularFireMessaging } from '@angular/fire/messaging';
import { tap } from 'rxjs/operators'

@Injectable({
  providedIn: 'root'
})
export class MessagingService {
  token = null;

  constructor(private afMessaging: AngularFireMessaging) {}

  requestPermission() {
    return this.afMessaging.requestToken.pipe(
      tap(token => {
        console.log('Store token to server: ', token);
      })
    );
  }

  getMessages() {
    return this.afMessaging.messages;
  }

  deleteToken() {
    if (this.token) {
      this.afMessaging.deleteToken(this.token);
      this.token = null;
    }
  }
}
In this tutorial we don’t handle storking the token, we will just use it in our tests from the logs.
In a real world application, you would store this token on the server and later retrieve the token for a user if you want to send a push.
Now we can put this service to use within our page, and we simply subscribe to the different functions and display some toasts and alerts about the data. We will see at the end of this tutorial why we can use certain information from the received push inside our listenForMessages and how they are structured, for now simply go ahead and change the home/home.page.ts to:
import { Component } from '@angular/core';
import { MessagingService } from '../services/messaging.service';
import { AlertController, ToastController } from '@ionic/angular';

@Component({
  selector: 'app-home',
  templateUrl: 'home.page.html',
  styleUrls: ['home.page.scss'],
})
export class HomePage {

  constructor(
    private messagingService: MessagingService,
    private alertCtrl: AlertController,
    private toastCtrl: ToastController
  ) {
    this.listenForMessages();
  }

  listenForMessages() {
    this.messagingService.getMessages().subscribe(async (msg: any) => {
      const alert = await this.alertCtrl.create({
        header: msg.notification.title,
        subHeader: msg.notification.body,
        message: msg.data.info,
        buttons: ['OK'],
      });

      await alert.present();
    });
  }

  requestPermission() {
    this.messagingService.requestPermission().subscribe(
      async token => {
        const toast = await this.toastCtrl.create({
          message: 'Got your token',
          duration: 2000
        });
        toast.present();
      },
      async (err) => {
        const alert = await this.alertCtrl.create({
          header: 'Error',
          message: err,
          buttons: ['OK'],
        });

        await alert.present();
      }
    );
  }

  async deleteToken() {
    this.messagingService.deleteToken();
    const toast = await this.toastCtrl.create({
      message: 'Token removed',
      duration: 2000
    });
    toast.present();
  }
}
The last part is a UI to trigger our dummy functions, so change the home/home.page.html to this:
<ion-header>
  <ion-toolbar color="primary">
    <ion-title>
      Ionic Web Push
    </ion-title>
  </ion-toolbar>
</ion-header>

<ion-content>
  <ion-button expand="full" (click)="requestPermission()">Request Permission</ion-button>
  <ion-button expand="full" (click)="deleteToken()">Delete Token</ion-button>
</ion-content>
You can now run the app on your browser and start the testing when you receive a token in the log.
Testing Push Notifications
With the token of a user we can generate a targeted push notification, and you can try it with the browser open or closed to see the different results.
There are also different ways to call the API of Firebase to create a push, one would be to use a tool like Postman or Insomnia.
Simply set the authorization header of the call to the server key that you can grab from the the Cloud Messaging tab of your Firebase project:
Authorization: key=<YOUR-FIREBASE-SERVER-KEY>Now you just need to fill the body of your POST call with some information, and you can use this for testing:
{
"notification": {
"title": "Practical Ionic",
"body": "Check out my book!",
"icon": "https://i2.wp.com/devdactic.com/wp-content/uploads/2020/07/practical-ionic-book.webp",
"click_action":"https://devdactic.com/practical-ionic/"
},
"data": {
"info": "This is my special information for the app!"
},
"to": "<USER-PUSH-TOKEN>"
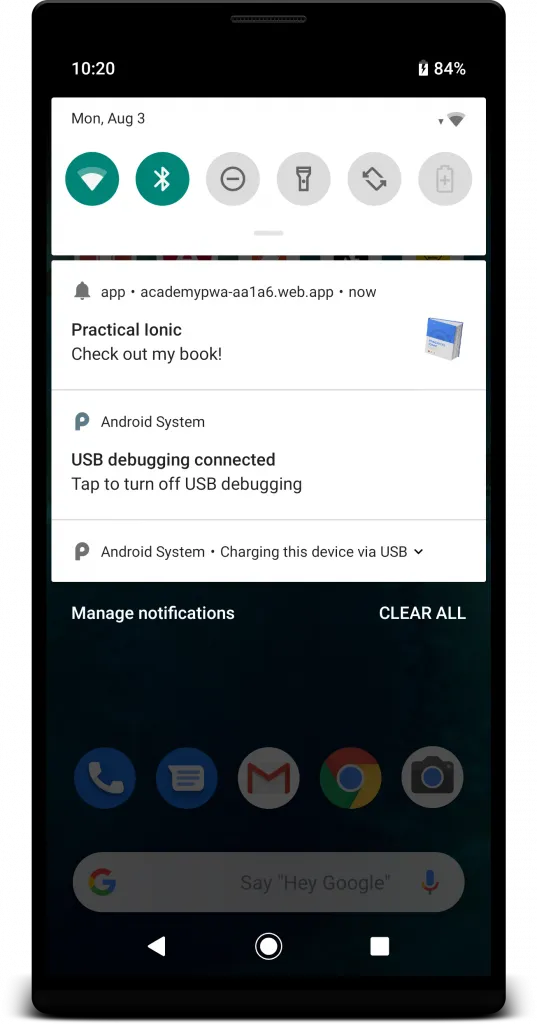
}Send the notification, and you should see the alert (if the app is open) or a system notification for a new message! If you are more of a CLI type, then simply go with the below curl statement:
curl -X POST   https://fcm.googleapis.com/fcm/send   -H 'Authorization: key=<YOUR-FIREBASE-SERVER-KEY>'   -H 'Content-Type: application/json'   -d '{
 "notification": {
"title": "Practical Ionic",
  "body": "Check out my book!",
  "icon": "https://i2.wp.com/devdactic.com/wp-content/uploads/2020/07/practical-ionic-book.webp",
  "click_action":"https://devdactic.com/practical-ionic/"
 },
 "to" : "<USER-PUSH-TOKEN>"
}'
The result should be basically the same, and even on a device (Android only) you see the notification like a real push!
To get this result, you should deploy your PWA somewhere.
Firebase PWA Deployment
The easiest way to test your PWA is by uploading it to Firebase hosting, which can be done in minutes given your already existing project.
Simply init the connection in your app now by running:
firebase initFor the questions, you need to answer like this:
- “Which Firebase CLI features do you want to set up for this folder?” -> “Hosting: Configure and deploy Firebase Hosting sites.”
- “Select a default Firebase project for this directory:” -> Select your Firebase project.
- “What do you want to use as your public directory?” -> “www”.
Now we just need to set the right caching headers for our PWA by changing the firebase.json to:
{
  "hosting": {
    "public": "www",
    "ignore": [
      "firebase.json",
      "**/.*",
      "**/node_modules/**"
    ],
    "rewrites": [
      {
        "source": "**",
        "destination": "/index.html"
      }
    ],
    "headers": [
      {
        "source": "/build/app/**",
        "headers": [
          {
            "key": "Cache-Control",
            "value": "public, max-age=31536000"
          }
        ]
      },
      {
        "source": "ngsw-worker.js",
        "headers": [
          {
            "key": "Cache-Control",
            "value": "no-cache"
          }
        ]
      }
    ]
  }
}
Your app is now configured, and whenever you want to build and deploy a new version to Firebase hosting, simply run:
ionic build --prod
firebase deploy
You should see the URL to your app on the command line, or you can also check the hosting tab of your Firebase project in the browser for more information!
Conclusion
Implementing web push notifications isn’t hard, but there are some limitations to this. You won’t have the functionality on iOS (as of now) and in general, these kind of notifications and popups for permission can be really annyoing.
So use this feature wisely and only when it’s really adding value for the users!
You can also find a video version of this tutorial below. https://youtu.be/4B5JK2BjsCk