Building an Ionic OCR App with Tesseract Last update: 2018-05-15
If you need some sort of text recognition inside images for your app you’ll come across the two most popular libraries called Ocrad and Tesseract. Both of them work pretty good out of the box so why not add the OCR functionality to your Ionic app?
Inside this tutorial we will use the Tesseract library with JavaScript to build a text recognition app with Ionic. Also, we’ll add the ngx-progressbar component to get a nice visual feedback of the loading state while our text recognition is working in the background!
Getting Started with OCR
We start with a blank new Ionic app and install the Tesseract JavaScript library, the progress bar and also the Ionic Native Camera plugin so we can capture images. We can also add the types for better code completion and finally of course the Cordova plugin for the camera as well, so get started with:
ionic start ocrexample blank
cd ocrexample
npm install tesseract.js @ionic-native/camera @ngx-progressbar/core
npm install @types/tesseract.js --save-dev
ionic cordova plugin add cordova-plugin-camera
Now we need to hook up everything inside our src/app/app.module.ts so we can later use the progress bar and camera therefore change it to:
import { BrowserModule } from '@angular/platform-browser';
import { ErrorHandler, NgModule } from '@angular/core';
import { IonicApp, IonicErrorHandler, IonicModule } from 'ionic-angular';
import { SplashScreen } from '@ionic-native/splash-screen';
import { StatusBar } from '@ionic-native/status-bar';

import { MyApp } from './app.component';
import { HomePage } from '../pages/home/home';
import { Camera } from '@ionic-native/camera';
import { NgProgressModule } from '@ngx-progressbar/core';

@NgModule({
  declarations: [
    MyApp,
    HomePage
  ],
  imports: [
    BrowserModule,
    IonicModule.forRoot(MyApp),
    NgProgressModule.forRoot()
  ],
  bootstrap: [IonicApp],
  entryComponents: [
    MyApp,
    HomePage
  ],
  providers: [
    StatusBar,
    SplashScreen,
    {provide: ErrorHandler, useClass: IonicErrorHandler},
    Camera
  ]
})
export class AppModule {}
Finally, on iOS your app will complain if you don’t specify why you want to use the camera or library. To automatically get the needed entries inside your plist, you can add these lines to your config.xml:
<edit-config file="*-Info.plist" mode="merge" target="NSCameraUsageDescription">
    <string>We need fresh images for OCR</string>
</edit-config>
<edit-config file="*-Info.plist" mode="merge" target="NSPhotoLibraryUsageDescription">
    <string>We can also scan your library images</string>
</edit-config>
That’s all for the setup, let’s get started with our actual app!
Adding the Ionic OCR Functionality
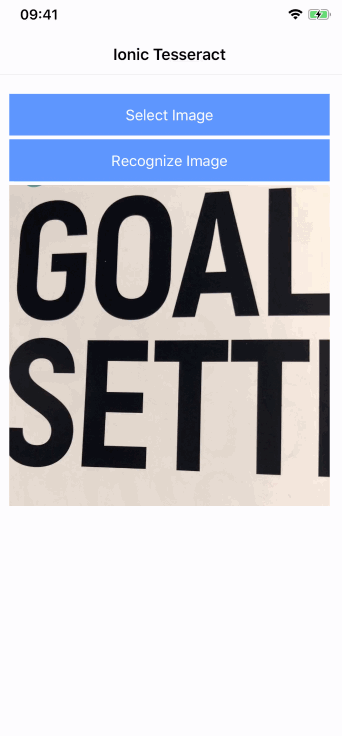
We start with the view of our OCR example, which contains basically 2 buttons to capture and decode the image plus an Ionic card to display what the library thinks is the text inside the image. Also, we add the progress bar at the top which will only show if we actually use it from our code later.
For now change your pages/home/home.html to;
<ion-header>
  <ion-navbar>
    <ion-title>
      Ionic Tesseract
    </ion-title>
  </ion-navbar>
</ion-header>

<ion-content padding>
  <ng-progress [min]="0" [max]="1"></ng-progress>

  <button ion-button full (click)="selectSource()">Select Image</button>
  <button ion-button full (click)="recognizeImage()" [disabled]="!selectedImage">Recognize Image</button>

  <img [src]="selectedImage" *ngIf="selectedImage">

  <ion-card *ngIf="imageText">
    <ion-card-header>
      Image Text
    </ion-card-header>
    <ion-card-content>
      {{ imageText }}
    </ion-card-content>
  </ion-card>
</ion-content>
The progress bar would normally be at the top of the page, however within Ionic it will be hidden behind the navigation bar. To fix this, simply shift the bar a bit down through the pages/home/home.scss like this:
page-home {
    .ng-progress-bar {
        margin-top: 88px;
    }
}
It’s a quick fix, perhaps you’ll also need a different distance on Android. We are also using the basic functionality of the bar, there are many more great options you can specific for this component as well! To use Tesseract we need an image, and to get an image we start by presenting an action sheet to either select one from the library or capture a new image. Once the user has selected/captured an image it will be set as base64 value to our selectedImage which is displayed within our view.
When we want to decode the image, we can use the recognize() function of Tesseract which will also emit all the progress events so we can update the bar to display the current status. If you run it the first time this might take a few moments as it’s loading some sources but the following times will be a lot faster.
Go ahead and change your pages/home/home.ts to;
import { Component } from '@angular/core';
import { NavController, ActionSheetController, LoadingController } from 'ionic-angular';
import { Camera, PictureSourceType } from '@ionic-native/camera';
import * as Tesseract from 'tesseract.js'
import { NgProgress } from '@ngx-progressbar/core';

@Component({
  selector: 'page-home',
  templateUrl: 'home.html'
})
export class HomePage {

  selectedImage: string;
  imageText: string;

  constructor(public navCtrl: NavController, private camera: Camera, private actionSheetCtrl: ActionSheetController, public progress: NgProgress) {
  }

  selectSource() {
    let actionSheet = this.actionSheetCtrl.create({
      buttons: [
        {
          text: 'Use Library',
          handler: () => {
            this.getPicture(this.camera.PictureSourceType.PHOTOLIBRARY);
          }
        }, {
          text: 'Capture Image',
          handler: () => {
            this.getPicture(this.camera.PictureSourceType.CAMERA);
          }
        }, {
          text: 'Cancel',
          role: 'cancel'
        }
      ]
    });
    actionSheet.present();
  }

  getPicture(sourceType: PictureSourceType) {
    this.camera.getPicture({
      quality: 100,
      destinationType: this.camera.DestinationType.DATA_URL,
      sourceType: sourceType,
      allowEdit: true,
      saveToPhotoAlbum: false,
      correctOrientation: true
    }).then((imageData) => {
      this.selectedImage = `data:image/jpeg;base64,${imageData}`;
    });
  }

  recognizeImage() {
    Tesseract.recognize(this.selectedImage)
    .progress(message => {
      if (message.status === 'recognizing text')
      this.progress.set(message.progress);
    })
    .catch(err => console.error(err))
    .then(result => {
      this.imageText = result.text;
    })
    .finally(resultOrError => {
      this.progress.complete();
    });
  }

}
Now test out your app on a device to capture and image and scan all the texts!
Conclusion
It’s pretty easy to add some OCR functionality to your Ionic app using the Tesseract library. If you want to use a different way, you can also give the Tesseract Cordova plugin a try (haven’t tried it yet).
Also, there’s more you can do with the library like figuring out which language your text is in or specifying a language for the recognition to improve the result.
If you’ve built and app with this functionality, definitely share your app below!
You can also find a video version of this tutorial below.