Ionic Image Upload and Management with Node.js - Part 1: Server Last update: 2017-10-03

In times of Instagram and the constant need to share our food and cat images, the image upload function inside an Ionic app is one of the most requested tutorials. A while ago you saw how to implement image upload with PHP backend and today it’s time to take this to the next level by building an image upload and management app with Ionic and Node.js backend!
Inside this first part we will develop the backend side for our app which will then give us a nice API we can use from our Ionic app inside the second part.
Part 2: Ionic Image Upload and Management with Node.js - Ionic App
As said the first step now is to create our backend. We will implement routes for the image upload, manage the images on the server side with a MongoDB and by keeping the information we can also get a list of currently uploaded images, get one image directly streamed from the server or finally delete an image.
So our app is really flexible and this won’t be one of the most easiest tutorials if you haven’t worked with Node.js before, but I bet it’s worth the time to expand your horizon!
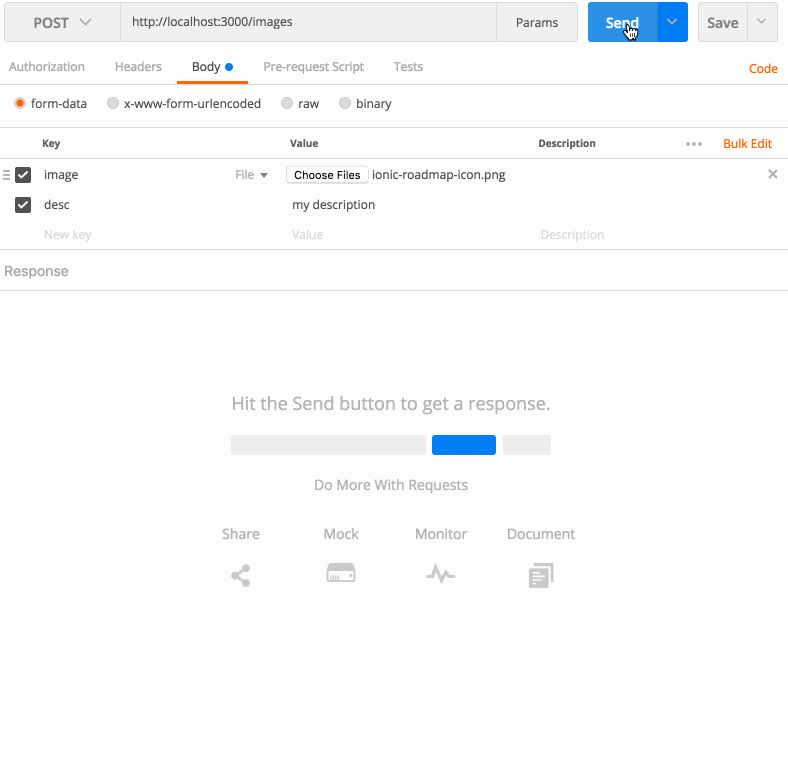
The final result of this post is an API which can be tested with Postman like you can see below.
Start Our Ionic Image Upload App
We start by creating a new folder and adding a new package.json which holds a reference to all the NPM packages that we need. Also, withing this post I’ll even use TypeScript on the backend side which is why we have a prestart script which compiles our TS files into a dist folder as plain Javascript files.
Open your package.json copy the following inside:
{
  "name": "image-upload",
  "version": "1.0.0",
  "description": "A simple NodeJS server for image upload",
  "scripts": {
    "prestart": "tsc",
    "start": "node dist/server.js"
  },
  "author": "Simon Grimm",
  "license": "MIT",
  "dependencies": {
    "cors": "^2.8.4",
    "del": "^3.0.0",
    "express": "^4.15.4",
    "fs": "0.0.1-security",
    "mongoose": "^4.11.9",
    "multer": "^1.3.0",
    "path": "^0.12.7"
  },
  "devDependencies": {
    "@types/express": "^4.0.37",
    "@types/multer": "^1.3.3",
    "typescript": "^2.4.2"
  }
}
As we want to use Typescript we should also add a tsconfig.json with some general information about our project and what we want to tell the TS compiler:
{
    "compilerOptions": {
        "module": "commonjs",
        "moduleResolution": "node",
        "target": "es6",
        "sourceMap": true,
        "outDir": "dist"
    }
}
Once we have these 2 files, we can go ahead and run npm install to install all the needed dependencies for our project. Also, make sure to create a new folder inside the project called ”uploads” because the way we use the upload feature we need the folder to be created before we start!
Now finally you need to make sure you have a local/remote MongoDB instance running. You can follow the MongoDB installation guide here, it shouldn’t take you long and afterwards you can simply start it directly from your command line.
Make sure your database is up and running while following the rest of the tutorial!
Starting the Image Upload Server
We have installed the dependencies and setup the needed config for Typescript, so let’s actually write some code. We start with the entry point to our server which will first of all configure the Multer plugin we use for uploading files.
We tell the plugin to use the diskStorage and pass in 2 callback functions for the destination path and also for the filename of the files as we want to create unique (more or less) filenames and therefore create the name from a special name of the file and the current date.
Afterwards we initialise our express app and tell it to create some API routes from the routes file which we will create later.
Finally we create a connection to our MongoDB, in this case expecting it to be available at localhost which is the case if you have installed it locally. Otherwise simply put in your IP!
Now go ahead and create a new server.ts and insert:
import * as express from 'express';
import * as multer from 'multer'
import * as cors from 'cors'
import * as mongoose from 'mongoose'

// Generell properties
export let UPLOAD_PATH = 'uploads'
export let PORT = 3000;

// Multer Settings for file upload
var storage = multer.diskStorage({
    destination: function (req, file, cb) {
        cb(null, UPLOAD_PATH)
    },
    filename: function (req, file, cb) {
        cb(null, file.fieldname + '-' + Date.now())
    }
})
export let upload = multer({ storage: storage })

// Initialise App
export const app = express();
app.use(cors());

// Load our routes
var routes = require('./routes');

// Setup Database
let uri = 'mongodb://localhost/imageupload';
mongoose.connect(uri, (err) => {
    if (err) {
        console.log(err);
    } else {
        console.log('Connected to MongoDb');
    }
});

// App startup
app.listen(PORT, function () {
    console.log('listening on port: ' + PORT);
});
If you have developed with Node.js before you might have noticed the import syntax at the top is different then the require() syntax we had before. This comes with the usage of TS, but the rest of the code could also be used with normal JS inside a Node.js server if you already have a project.
MongoDB Model and Schema
To make sure we always know which images are available we store a reference to each uploaded image inside our database. To easily work with a MongoDB we can use the awesome ODM Mongoose.
With Mongoose, we need to define a schema for all of our database entries which we can later use to easily create and store new objects in our database. The syntax of the code below is a bit different then without TS but if you are on an older version and have problems just leave a comment and we’ll find a solution.
With TS we need to create an additional interface for our database model and finally connect everything and export the type.
Now go ahead and create a new image.ts and insert:
import * as mongoose from 'mongoose'

// Interface for TS
export interface IImageModel extends mongoose.Document {
    filename: string;
    originalName: string;
    desc: string;
    created: Date;
  };

  // Actual DB model
export var imageSchema = new mongoose.Schema({
    filename: String,
    originalName: String,
    desc: String,
    created: { type: Date, default: Date.now }
});

export const Image = mongoose.model<IImageModel>('Image', imageSchema);
As you can see our image will consist of a filename which represents the name on the disk, the original name, a description if we like to and finally the creation date. This model will help us in the next step to create solid objects which will then help us to read them out later again.
Image Upload and Routes
Finally we come to the actualAPI routes which will be used inside our Ionic app later. There are a few routes we need to implement now:
- POST /images: Upload new image to the server
- GET /images: Get a list of all available images on the server
- GET /images/:id: Get one image streamed back from the server by its ID
- DELETE /images/id: Delete one image from the disk and database by its ID
Basic routes, and not super tricky given the work we have already done!
Uploading an image is actually super simple on the server side as we use the Multer plugin which will act as a middleware and automatically look inside the request for a file with the key image and then upload it to the server using our previously defined callbacks for path and name.
Normally this is enough, but as we want to keep track we also create a new Image model which we fill with the data of the request and finally call save() upon which stores the new object inside our MongoDB. Afterwards inside the completion block we then return the new created object back just as a sign that everything worked fine.
That’s already everything for the upload, but our other routes are also quite simple so let’s go over them:
To get all images we call find() on our database model without parameters which will return all the entries inside that database. We could return this, but I wanted to already give back the correct path to the images so our app has no additional work todo. That’s why we iterate through all the entries and for each set the URL as a new property on that object.
When the app want’s to load an image it will use this previously created URL, which is the third of our routes. Here the server needs to find the entry of the given image id by using findById() so we can then call createReadStream() on the correct path of our image. If we set the correct Content-type here the result of the call we be simply the image just like opening any image on the web!
Finally a delete route if we (or a user) uploaded a not so cool image. Like before we need to lookoup the image entry but at the same time we want to remove the entry so we use findByIdAndRemove() and afterwards use the del plugin to easily and save remove the file from our disk.
Now create a new routes.ts and insert:
import { UPLOAD_PATH, app, upload } from './server';
import { Image } from './image';
import * as path from 'path'
import * as fs from 'fs'
import * as del from 'del';

// Upload a new image with description
app.post('/images', upload.single('image'), (req, res, next) => {
    // Create a new image model and fill the properties
    let newImage = new Image();
    newImage.filename = req.file.filename;
    newImage.originalName = req.file.originalname;
    newImage.desc = req.body.desc
    newImage.save(err => {
        if (err) {
            return res.sendStatus(400);
        }
        res.status(201).send({ newImage });
    });
});

// Get all uploaded images
app.get('/images', (req, res, next) => {
    // use lean() to get a plain JS object
    // remove the version key from the response
    Image.find({}, '-__v').lean().exec((err, images) => {
        if (err) {
            res.sendStatus(400);
        }

        // Manually set the correct URL to each image
        for (let i = 0; i < images.length; i++) {
            var img = images[i];
            img.url = req.protocol + '://' + req.get('host') + '/images/' + img._id;
        }
        res.json(images);
    })
});

// Get one image by its ID
app.get('/images/:id', (req, res, next) => {
    let imgId = req.params.id;

    Image.findById(imgId, (err, image) => {
        if (err) {
            res.sendStatus(400);
        }
        // stream the image back by loading the file
        res.setHeader('Content-Type', 'image/jpeg');
        fs.createReadStream(path.join(UPLOAD_PATH, image.filename)).pipe(res);
    })
});

// Delete one image by its ID
app.delete('/images/:id', (req, res, next) => {
    let imgId = req.params.id;

    Image.findByIdAndRemove(imgId, (err, image) => {
        if (err && image) {
            res.sendStatus(400);
        }

        del([path.join(UPLOAD_PATH, image.filename)]).then(deleted => {
            res.sendStatus(200);
        })
    })
});
Congratulations, you have now successfully implemented your own Node.js server with image upload and management functionality!
You can now test your features with Postman or already try to start with the app if the second part of the series is not yet released.
Conclusion
Actually it’s not really hard to implement a Node.js server like this with some basic functionalities. If you can bring together a few functions like this while also having the ability to create your frontend, you will always have a good time as you can solve almost any problem alone!
Looking backward, the use of Typescript inside this article was not really needed and made a few things (inside the Mongoose model) more complex then needed. In future articles I might go back or try to make a bit more out of TypeScript, but now you saw that it’s not hard to get started with TypeScript on the server side.
I’ll see you inside the next part of this series, and make sure to leave a comment and share this article if you enjoyed it!
You can also find a video version of this article below.