Building an Ionic Image Gallery With Zoom Last update: 2017-04-11
The image gallery is a classic pattern used in many applications which need to display any kind of grid with pictures or photos to the user. If you have specific requirements, there might not be an out of the box solution that works fine for you, that’s why we will create our own Ionic image gallery.
We will display images in a gallery like infinite loop where we can always see the end of the previous image and the start of the following. This question came up inside the Ionic Academy and the solution we found should do the trick. Additional we make use of the Ionic-img-viewer component which helps us to display a selected picture in fullscreen with zooming options.
I tried to implement zooming on my own, but at the time writing this article (v3.0.1) the ion-scroll property for zooming does not really work. Hopefully in the future we will be able to use that zoom to build our own zooming view!
Prerequisite
Learning Ionic can become overwhelming, I know that feeling. Is learning from tutorials and videos sometimes not enough for you? Then I got something for you.
If you want to learn Ionic with step-by-step video courses, hands-on training projects and a helpful community who has your back, then take a look at the Ionic Academy.
Setting up our Ionic Image Gallery App
For the start we need only a blank Ionic app and install already the npm package for our image preview, so go ahead and run:
ionic start --v2 ImageGallery blank
cd ImageGallery
npm install --save ionic-img-viewer
Before we do the rest of our work, we need to connect everything inside our src/app/app.module.ts to load the module we have just installed:
import { BrowserModule } from '@angular/platform-browser';
import { ErrorHandler, NgModule } from '@angular/core';
import { IonicApp, IonicErrorHandler, IonicModule } from 'ionic-angular';
import { SplashScreen } from '@ionic-native/splash-screen';
import { StatusBar } from '@ionic-native/status-bar';

import { MyApp } from './app.component';
import { HomePage } from '../pages/home/home';

import { IonicImageViewerModule } from 'ionic-img-viewer';

@NgModule({
  declarations: [
    MyApp,
    HomePage
  ],
  imports: [
    BrowserModule,
    IonicModule.forRoot(MyApp),
    IonicImageViewerModule
  ],
  bootstrap: [IonicApp],
  entryComponents: [
    MyApp,
    HomePage
  ],
  providers: [
    StatusBar,
    SplashScreen,
    {provide: ErrorHandler, useClass: IonicErrorHandler}
  ]
})
export class AppModule {}
Very basic, nothing really special at this time!
Building our Image Gallery
If you want to display some images, make sure to add some to your project. In my case I copied 4 images to the src/assets/img folder, named “1.jpg” and so on.
To load these images we create a very simple array inside our page, so go ahead and add it to the src/pages/home/home.ts:
import { Component } from '@angular/core';
import { NavController } from 'ionic-angular';

@Component({
  selector: 'page-home',
  templateUrl: 'home.html'
})
export class HomePage {
  images = ['1.jpg', '2.jpg', '3.jpg', '4.jpg'];

  constructor(public navCtrl: NavController) {

  }
}
Next the actual view for the image gallery. We can make use of the ion-slides component, which is normally displaying full pages of content where you can swipe through.
However, with some properties and CSS we can finally achieve the desired look for our gallery!
Also, this component is based on the official Swiper component, where you can find many examples for animation of this component, including different effects and how the properties change the behaviour.
Almost all of these work with the Ionic component as well, so if you want some cool effects for example try adding effect="coverflow" for a nice coverflow effect with your Ionic slides!
Back to our view, we loop through our images, create the slides and display the according image in each of them. There we also add the imageViewer property which will take care of the click event on an image and display the special image viewer!
Now go ahead and insert to your src/pagges/home/home.html:
<ion-header>
  <ion-navbar>
    <ion-title>Image Gallery</ion-title>
  </ion-navbar>
</ion-header>

<ion-content>
  <ion-slides class="image-slider" loop="true" slidesPerView="2">
    <ion-slide *ngFor="let img of images">
      <img src="assets/img/{{img}}" class="thumb-img" imageViewer/>
    </ion-slide>
  </ion-slides>
</ion-content>
As said before this is not yet the desired outcome, therefore we need to apply a tiny CSS tweak and make it look a bit better as well. Put the code below into the src/pages/home/home.scss:
page-home {
ion-slide.swiper-slide {
left: 25%;
}
.slide-zoom {
background: #e6e6e6;
}
.thumb-img {
padding: 10px;
}
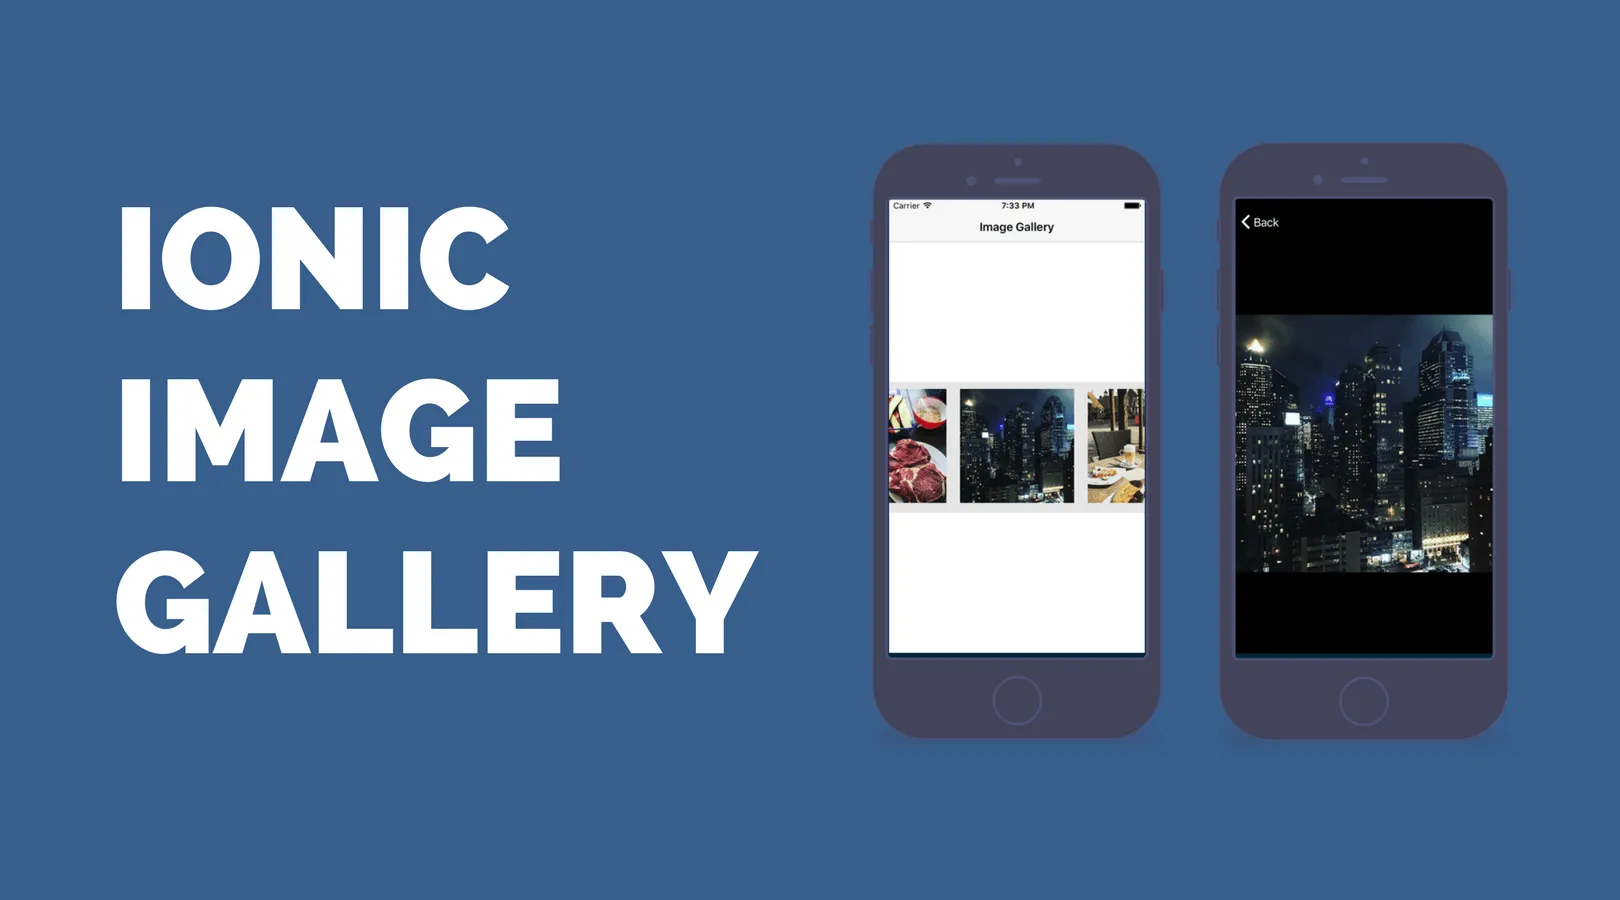
}Now your image slider should do exactly as we want, and the result will look like the images below. First, the gallery inside your view: 
By using 2 slides per view but adding the distance to the left and setting the size of each slide to only 50% we were able to craft this tricky view.
If you now select one image, the image viewer component comes up where you can zoom in and swipe down to leave the view (or use the button at the top): 
Conclusion
It actually don’t takes a lot of code to build a gallery, but if you want it in a special way you might have to tinker around with some CSS that works for you. Also, using an external module for the zooming view is not really perfect (although many thanks to Riron for creating it!), but hopefully this will be fixed in an upcoming Ionic release.
For now enjoy your Ionic image gallery with zooming functions!
You can watch the video version of this article below.
Happy Coding, Simon