Building an Ionic Firebase Chat with Authentication Last update: 2020-10-20

If you want to get started with Ionic and Firebase, building a simple Ionic Firebase chat is the first thing you can do that’s easy to achieve and yet powerful at the same time!
In this tutorial we will create an Ionic Firebase chat with authentication, security for the pages of our app and of course the realtime chat functionality using the Firestore database.
Are you using Firebase freuently? Check out my Kickoff Ionic bootstrap tool to setup your Ionic apps with Firebase even faster!
If you want to create an even more powerful chat with Firebase including push notifications, file upload and cloud functions, check out one of the courses inside the Ionic Academy.
Firebase Project Setup
The first step is Firebase, and you need to create a new project (or use any existing). Inside Firebase, make sure you have enabled the Firestore database by clicking “Get Started” in the right tab.
Since we will implement this basic app without authentication and accounts, make sure you select “Start in test mode” so no auth is applied to the database for now (not recommended for production of course!).
Once you have created the project you need to copy the web configuration which looks like this:
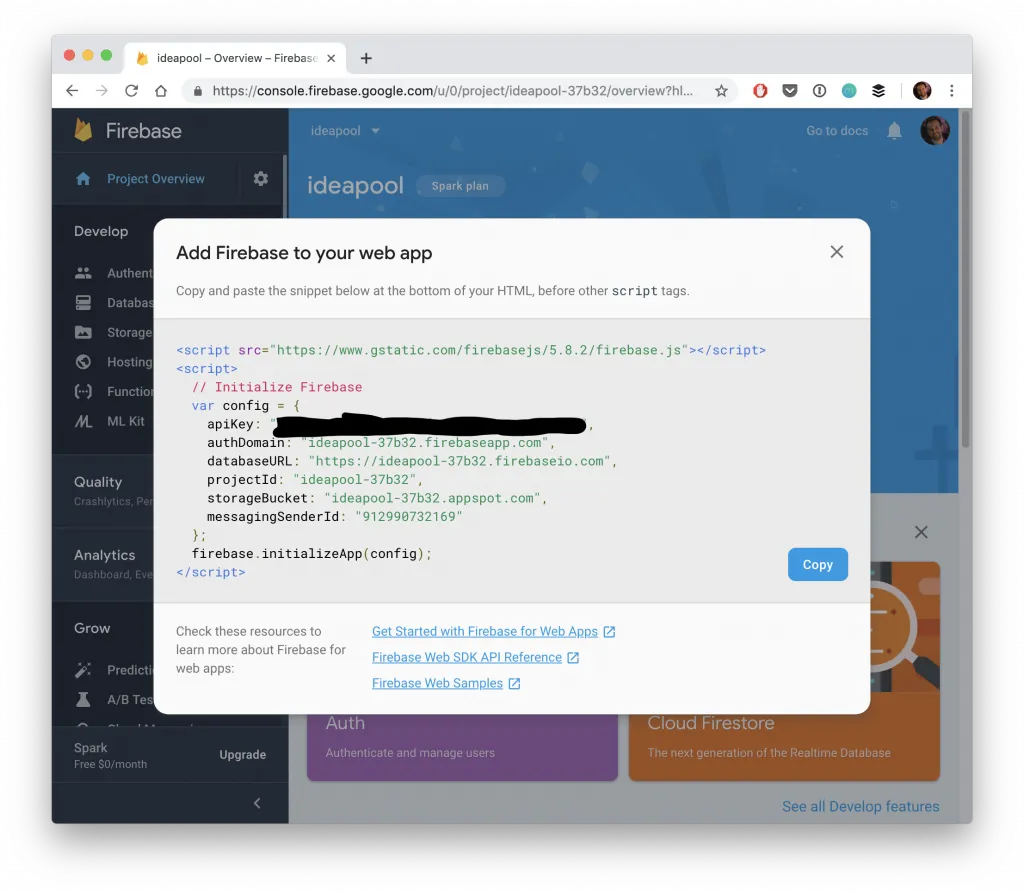
Leave this open until our app is ready so you can copy it over!
Additionally you need to enable email/password authentication inside the Authentication menu tab of your Firebase project so we can later register new users.
If you want to use Firebase storage to upload files you can also check out the How to Upload Files from Ionic to Firebase Storage tutorial.
Start the Ionic Firebase Chat App
Now we can start a new Ionic app and add the AngularFire package using a schematic. This will ask for the project to connect with the app, so select the project from the previous step when asked.
ionic start devdacticFire blank --type=angular --capacitor
cd ./devdacticFire
ng add @angular/fire

ionic g page pages/login
ionic g page pages/chat
ionic g service services/chat
Additionally we created two pages and a service for our main chat functionality.
Now we need the configuration from Firebase, and we can add it right inside our environments/environment.ts like this:
export const environment = {
  production: false,
  firebaseConfig: {
    apiKey: "",
    authDomain: "",
    databaseURL: "",
    projectId: "",
    storageBucket: "",
    messagingSenderId: "",
    appId: ""
  }
};
With the configuration in place we can initialise Firebase by adding the according modules to our app/app.module.ts and passing in the environment from before:
import { NgModule } from '@angular/core';
import { BrowserModule } from '@angular/platform-browser';
import { RouteReuseStrategy } from '@angular/router';

import { IonicModule, IonicRouteStrategy } from '@ionic/angular';
import { SplashScreen } from '@ionic-native/splash-screen/ngx';
import { StatusBar } from '@ionic-native/status-bar/ngx';

import { AppComponent } from './app.component';
import { AppRoutingModule } from './app-routing.module';

import { AngularFireModule } from '@angular/fire';
import { AngularFireAuthModule } from '@angular/fire/auth';
import { AngularFirestoreModule } from '@angular/fire/firestore';
import { environment } from '../environments/environment';

@NgModule({
  declarations: [AppComponent],
  entryComponents: [],
  imports: [BrowserModule, IonicModule.forRoot(), AppRoutingModule,
    AngularFireModule.initializeApp(environment.firebaseConfig),
    AngularFireAuthModule,
    AngularFirestoreModule,],
  providers: [
    StatusBar,
    SplashScreen,
    { provide: RouteReuseStrategy, useClass: IonicRouteStrategy }
  ],
  bootstrap: [AppComponent]
})
export class AppModule {}
The last step of our setup process is the routing. We will have a login page and a chat page, which means the first of them should be available to everyone, but the “inside” chat page is only available to authenticated users.
To do so we can use guards directly from AngularFire to perform one of these tasks:
- Redirect logged in users directly to the inside area instead of presenting the login again
- Redirect unauthorised users to the login if they try to access the chat page directly
By now we don’t need to create our own custom guards and can simply use the according functions from the AngularFire package like this inside the app/app-routing.module.ts:
import { NgModule } from '@angular/core';
import { PreloadAllModules, RouterModule, Routes } from '@angular/router';
import { canActivate, redirectUnauthorizedTo, redirectLoggedInTo } from '@angular/fire/auth-guard';

// Send unauthorized users to login
const redirectUnauthorizedToLogin = () =>
  redirectUnauthorizedTo(['/']);

// Automatically log in users
const redirectLoggedInToChat = () => redirectLoggedInTo(['/chat']);

const routes: Routes = [
  {
    path: '',
    loadChildren: () => import('./pages/login/login.module').then( m => m.LoginPageModule),
    ...canActivate(redirectLoggedInToChat),
  },
  {
    path: 'chat',
    ...canActivate(redirectUnauthorizedToLogin),
    loadChildren: () => import('./pages/chat/chat.module').then( m => m.ChatPageModule)
  }
];

@NgModule({
  imports: [
    RouterModule.forRoot(routes, { preloadingStrategy: PreloadAllModules })
  ],
  exports: [RouterModule]
})
export class AppRoutingModule { }
Now our pages are secure, we start on the login and we can begin with the logic for the authentication.
Creating a Service for the Ionic Firebase Chat
As usual we begin with the logic so we can later easily build the page based on this functionality. In our case we first need the sign up functionality, which is pretty easy given the AngularFire package.
While the createUserWithEmailAndPassword already creates a user account inside Firebase, you usually want to store some additional user information inside the database as this basic user object can’t have specific data like a full name or properties you might capture at sign up.
The easiest way is to grab the unique user id (uid) after the register function and store some more data inside a collection of the database. If you wanted to make this even more secure you could also use a cloud function to automatically perform the step, but the process show here works likewise fine.
The signIn and signOut are equally easy and just proxy the according call to our AF package.
Now get started and change the app/services/chat.service.ts to:
import { Injectable } from '@angular/core';
import { AngularFireAuth } from '@angular/fire/auth';
import { AngularFirestore } from '@angular/fire/firestore';
import * as firebase from 'firebase/app';
import { switchMap, map } from 'rxjs/operators';
import { Observable } from 'rxjs';

export interface User {
  uid: string;
  email: string;
}

export interface Message {
  createdAt: firebase.firestore.FieldValue;
  id: string;
  from: string;
  msg: string;
  fromName: string;
  myMsg: boolean;
}

@Injectable({
  providedIn: 'root'
})
export class ChatService {
  currentUser: User = null;

  constructor(private afAuth: AngularFireAuth, private afs: AngularFirestore) {
    this.afAuth.onAuthStateChanged((user) => {
      this.currentUser = user;
    });
  }

  async signup({ email, password }): Promise<any> {
    const credential = await this.afAuth.createUserWithEmailAndPassword(
      email,
      password
    );

    const uid = credential.user.uid;

    return this.afs.doc(
      `users/${uid}`
    ).set({
      uid,
      email: credential.user.email,
    })
  }

  signIn({ email, password }) {
    return this.afAuth.signInWithEmailAndPassword(email, password);
  }

  signOut(): Promise<void> {
    return this.afAuth.signOut();
  }

  // TODO Chat functionality
}
We also catch any change of the authenticated user inside onAuthStateChanged, so whenever someone sign in or out we can set our current user and have access to that information from then on. Our interfaces add just some more typings for our own comfort but are otherwise optional.
After the sign up we can now also prepare the Ionic Firebase chat functionality. For this we need a few additional functions:
addChatMessage: Simply adds a new message into a messages collection with additonal timestamp and the UID of the user who sent the messagegetChatMessages: Get an observable of messages that is updated whenever a new message is added. We need some additional logic in here that we’ll explore latergetUsers: Helper function to get all users so we can resolve names of usersgetUserForMsg: Helper function to find the real name (email) of a user based on a UID and the array of users
From the outside we will only call the first two functions, the rest is just some internal help.
We need to use the switchMap operator inside the pipe block when we retrieve messages so we can switch to a new Observable, because we first grab all users and later retrieve all messages, so we can iterate the messages and resolve their from names and add a property whether we have sent the message.
Now continue the app/services/chat.service.ts and also add:
// Chat functionality

addChatMessage(msg) {
  return this.afs.collection('messages').add({
    msg: msg,
    from: this.currentUser.uid,
    createdAt: firebase.firestore.FieldValue.serverTimestamp()
  });
}

getChatMessages() {
  let users = [];
  return this.getUsers().pipe(
    switchMap(res => {
      users = res;
      return this.afs.collection('messages', ref => ref.orderBy('createdAt')).valueChanges({ idField: 'id' }) as Observable<Message[]>;
    }),
    map(messages => {
      // Get the real name for each user
      for (let m of messages) {
        m.fromName = this.getUserForMsg(m.from, users);
        m.myMsg = this.currentUser.uid === m.from;
      }
      return messages
    })
  )
}

private getUsers() {
  return this.afs.collection('users').valueChanges({ idField: 'uid' }) as Observable<User[]>;
}

private getUserForMsg(msgFromId, users: User[]): string {
  for (let usr of users) {
    if (usr.uid == msgFromId) {
      return usr.email;
    }
  }
  return 'Deleted';
}
Another idea would be to directly store the relevant user name or information with each message so we don’t need to resolve the name. This means you would later have to change all these occurrences in messages if a user changes names, but that would be possible with cloud functions and the preferred way inside a real chat.
Also, in a real world chat you might have groups with a defined set of users, so you would only retrieve the uid/name combination for all the people inside a chat and therefore limit the calls to Firebase and store the resolved information locally instead.
Anyway, we got all functionality for our Ionic Firebase chat in place so let’s continue with the UI!
Create a Login and Signup Page for Firebase Authentication
Back to the beginning, we need to create users and sign them in. We should use a reactive form, and therefore we need to add the module to ourapp/pages/login/login.module.ts now:
import { NgModule } from '@angular/core';
import { CommonModule } from '@angular/common';
import { FormsModule, ReactiveFormsModule } from '@angular/forms';

import { IonicModule } from '@ionic/angular';

import { LoginPageRoutingModule } from './login-routing.module';

import { LoginPage } from './login.page';

@NgModule({
  imports: [
    CommonModule,
    FormsModule,
    IonicModule,
    LoginPageRoutingModule,
    ReactiveFormsModule
  ],
  declarations: [LoginPage]
})
export class LoginPageModule {}
The form will be quite easy and is used for both sign up and sign in on our page to make life a bit easier for now.
Both functions are basically just a call to our service, but when you make everything work together with a little loading indicator and error handling, the functions get a bit longer. But at the core, it’s really just handling the different success/error cases.
When the function finishes successful, we can use the Angular router to move to the inside area - and we replace the current URL so the user can’t simply go back to login, which should be prevented.
Go ahead and change the src/app/pages/login/login.page.ts to:
import { Component, OnInit } from '@angular/core';
import { FormGroup, FormBuilder, Validators } from '@angular/forms';
import { Router } from '@angular/router';
import { AlertController, LoadingController } from '@ionic/angular';
import { ChatService } from '../../services/chat.service';

@Component({
  selector: 'app-login',
  templateUrl: './login.page.html',
  styleUrls: ['./login.page.scss'],
})
export class LoginPage implements OnInit {
  credentialForm: FormGroup;

  constructor(
    private fb: FormBuilder,
    private router: Router,
    private alertController: AlertController,
    private loadingController: LoadingController,
    private chatService: ChatService
  ) {}

  ngOnInit() {
    this.credentialForm = this.fb.group({
      email: ['', [Validators.required, Validators.email]],
      password: ['', [Validators.required, Validators.minLength(6)]]
    });
  }

  async signUp() {
    const loading = await this.loadingController.create();
    await loading.present();
    this.chatService
      .signup(this.credentialForm.value)
      .then(
        (user) => {
          loading.dismiss();
          this.router.navigateByUrl('/chat', { replaceUrl: true });
        },
        async (err) => {
          loading.dismiss();
          const alert = await this.alertController.create({
            header: 'Sign up failed',
            message: err.message,
            buttons: ['OK'],
          });

          await alert.present();
        }
      );
  }

  async signIn() {
    const loading = await this.loadingController.create();
    await loading.present();

    this.chatService
      .signIn(this.credentialForm.value)
      .then(
        (res) => {
          loading.dismiss();
          this.router.navigateByUrl('/chat', { replaceUrl: true });
        },
        async (err) => {
          loading.dismiss();
          const alert = await this.alertController.create({
            header: ':(',
            message: err.message,
            buttons: ['OK'],
          });

          await alert.present();
        }
      );
  }

  // Easy access for form fields
  get email() {
    return this.credentialForm.get('email');
  }

  get password() {
    return this.credentialForm.get('password');
  }
}
At the end we also got two simply getter functions, which help us to easily access the form controls from the template like we did as well inside our Ionic 5 App navigation with login tutorial.
That means, we can not only connect our input fields to the reactive form, but also check if the control has any errors and display a specific error message for each of the fields!
Additionally we should check if the field is dirty or touched, because that means the user has somehow interacted with the input and we don’t want to show the error before by default!
Now go ahead and open the src/app/pages/login/login.page.html and change it to:
<ion-header>
  <ion-toolbar color="primary">
    <ion-title>Devdactic Chat</ion-title>
  </ion-toolbar>
</ion-header>

<ion-content class="ion-padding">

  <form [formGroup]="credentialForm">
    <ion-item>
      <ion-input
        placeholder="Email address"
        formControlName="email"
        autofocus="true"
        clearInput="true"
      ></ion-input>
    </ion-item>
    <div *ngIf="(email.dirty || email.touched) && email.errors" class="errors">
      <span *ngIf="email.errors?.required">Email is required</span>
      <span *ngIf="email.errors?.email">Email is invalid</span>
    </div>

    <ion-item>
      <ion-input
      placeholder="Password"
      type="password"
      formControlName="password"
      clearInput="true"
    ></ion-input>
    </ion-item>
    <div *ngIf="(password.dirty || password.touched) && password.errors" class="errors">
      <span *ngIf="password.errors?.required">Password is required</span>
      <span *ngIf="password.errors?.minlength">Password needs to be 6 characters</span>
    </div>
  </form>

    <ion-button (click)="signUp()" expand="full">Sing up</ion-button>
    <ion-button (click)="signIn()" expand="full" color="secondary">Sing in</ion-button>

</ion-content>
So we have connected the input elements to the formGroup and added our buttons below the form. We can even add some additional styling to make the errors stand out like this inside the src/app/pages/login/login.page.scss:
.errors {
    font-size: small;
    color: #fff;
    background: var(--ion-color-danger);
    padding-left: 15px;
    padding-top: 5px;
    padding-bottom: 5px;
}
Now the login of our Ionic Firebase chat works and we can sign up and see new entries inside the Firebase project console on the web. We should also see new entries inside Firestore for a new users, and we are routed forward to the chat page, which is now the next task for us.
Creating the Ionic Chat View
In fact the chat is quite easy, since we only need to retrieve the Observable from our service and then add an according view based on the information inside the message.
As you can see, we do all the transformation and data enrichment inside the service so we can keep the page as easy as possible and free from logic!
The only specialty we got is that after sending a message, we want to scroll the ion-content to the bottom to see the latest message (we could also do this whenever we get a new message by using a pipe block here!). And we can do this by accessing the component as a ViewChild!
Therefore open the src/app/pages/chat/chat.page.ts and simply change it to:
import { Component, OnInit, ViewChild } from '@angular/core';
import { IonContent } from '@ionic/angular';
import { Observable } from 'rxjs';
import { ChatService } from '../../services/chat.service';
import { Router } from '@angular/router';

@Component({
  selector: 'app-chat',
  templateUrl: './chat.page.html',
  styleUrls: ['./chat.page.scss'],
})
export class ChatPage implements OnInit {
  @ViewChild(IonContent) content: IonContent;

  messages: Observable<any[]>;
  newMsg = '';

  constructor(private chatService: ChatService, private router: Router) { }

  ngOnInit() {
    this.messages = this.chatService.getChatMessages();
  }

  sendMessage() {
    this.chatService.addChatMessage(this.newMsg).then(() => {
      this.newMsg = '';
      this.content.scrollToBottom();
    });
  }

  signOut() {
    this.chatService.signOut().then(() => {
      this.router.navigateByUrl('/', { replaceUrl: true });
    });
  }

}
The most important part here is now styling the chat based on whether the user itself did send the message. Luckily we already added this information as the myMsg boolean to each message inside the chat service!
That means we can create a grid layout and simply set a little offset for messages based on this boolean. Also, we can use conditional styling using ngClass to add different colors to the messages.
Finally, we need to create the Firebase timestamp into milliseconds so we can then apply the Angular datepipe for a better display of the time sent.
Now wrap up the view by changing the src/app/pages/chat/chat.page.html to:
<ion-header>
  <ion-toolbar color="primary">
    <ion-title>Open Chat</ion-title>
    <ion-buttons slot="end">
      <ion-button fill="clear" (click)="signOut()">
        <ion-icon name="log-out" slot="icon-only"></ion-icon>
      </ion-button>
    </ion-buttons>
  </ion-toolbar>
</ion-header>

<ion-content class="ion-padding">

  <ion-grid>
    <ion-row *ngFor="let message of messages | async">
      <ion-col size="9" class="message"
        [offset]="message.myMsg ? 3 : 0"
        [ngClass]="{ 'my-message': message.myMsg, 'other-message': !message.myMsg }">
        <b>{{ message.fromName }}</b><br>
        <span>{{ message.msg }}
        </span>
        <div class="time ion-text-right"><br>{{ message.createdAt?.toMillis() | date:'short' }}</div>
      </ion-col>
    </ion-row>
  </ion-grid>

</ion-content>

<ion-footer>
  <ion-toolbar color="light">
    <ion-row class="ion-align-items-center">
      <ion-col size="10">
        <ion-textarea autoGrow="true" class="message-input" rows="1" maxLength="500" [(ngModel)]="newMsg" >
        </ion-textarea>
      </ion-col>
      <ion-col size="2">
        <ion-button expand="block" fill="clear" color="primary" [disabled]="newMsg === ''"
          class="msg-btn" (click)="sendMessage()">
          <ion-icon name="send" slot="icon-only"></ion-icon>
        </ion-button>
      </ion-col>
    </ion-row>
  </ion-toolbar>
</ion-footer>
The input for new messages is inside the footer so it automatically scrolls up when we enter some text. By using the autoGrow property the field will automatically get bigger when the user types in the message.
If you run the app now it still doesn’t look to good, but that can be changed with a bit more CSS to style our chat bubbles inside the src/app/pages/chat/chat.page.scss:
.message-input {
    width: 100%;
    border: 1px solid var(--ion-color-medium);
    border-radius: 6px;
    background: #fff;
    resize: none;
    margin-top: 0px;
    --padding-start: 8px;
}

.message {
    padding: 10px !important;
    border-radius: 10px !important;
    margin-bottom: 4px !important;
    white-space: pre-wrap;
}

.my-message {
    background: var(--ion-color-tertiary);
    color: #fff;
}

.other-message {
    background: var(--ion-color-secondary);
    color: #fff;
}

.time {
    color: #dfdfdf;
    float: right;
    font-size: small;
}
Now run the app again and enjoy your Ionic Firebase chat!
Conclusion
If you understand the basics of Firebase like how authentication works, how you can secure your app with guards from AngularFire and how to use the Firestore database you can build powerful apps like this Ionic Firebase chat quite fast!
This is just a basic example, so perhaps now go ahead and try to add some group functionality to replicate the usual WhatsApp beahviour.
You can also find a video version of this tutorial below.