Build Your First Ionic App with Firebase using AngularFire 7 Last update: 2021-11-02
Using Firebase as the backend for your Ionic apps is a great choice if you want to build a robust system with live data fast, and by using AngularFire you can use a simple wrapper around the official Firebase JS SDK.
In this tutorial we will use the currently latest version 7 of AngularFire which uses the Firebase JS SDK version 9.
We will build a simple note taking app and include all essential Firebase CRUD functions!
User authentication, file upload, security rules and more topics are covered in the courses of the Ionic Academy!
Creating the Firebase Project
Before we dive into the Ionic app, we need to make sure we actually have a Firebase app configured. If you already got something in place you can of course skip this step.
Otherwise, make sure you are signed up (it’s free) and then hit Add project inside the Firebase console. Give your new app a name, select a region and then create your project!
Once you have created the project you need to find the web configuration which looks like this:
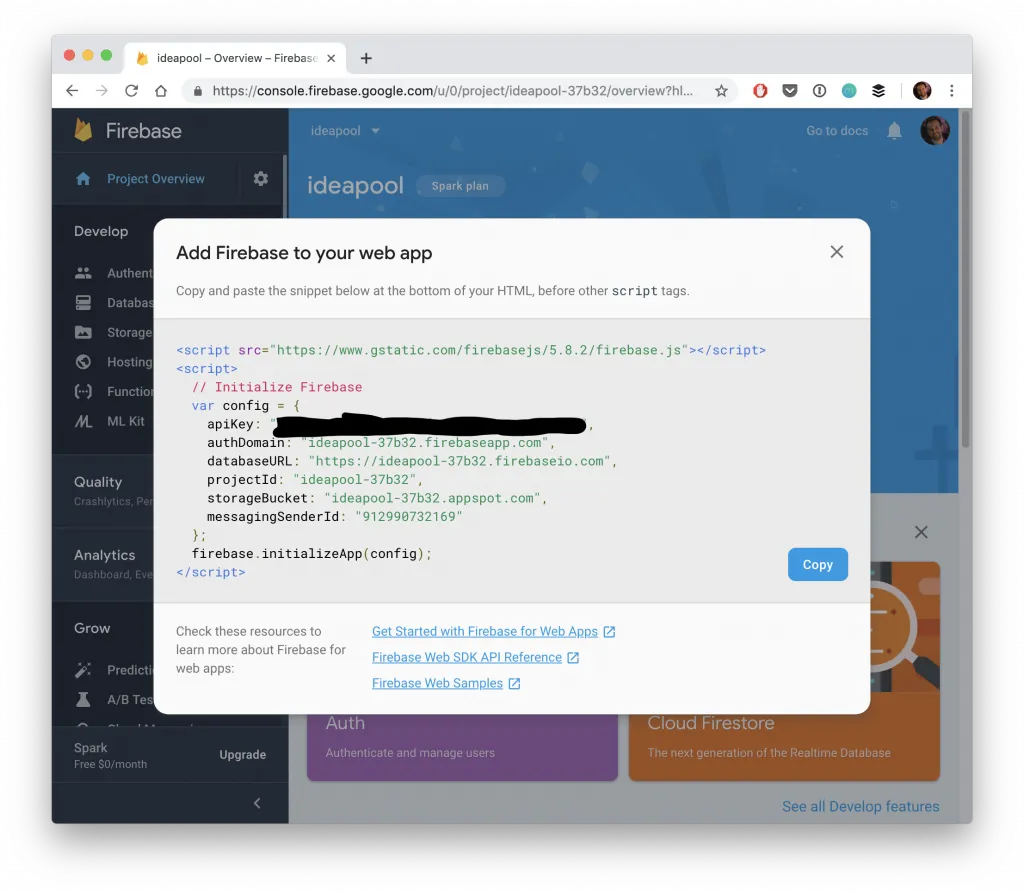
If it’s a new project, click on the web icon below “Get started by adding Firebase to your app” to start a new web app and give it a name, you will see the configuration in the next step now.
Leave this config block open (or copy it already) until our app is ready so we can insert it in our environment!
Additionally we have to enable the database, so select Firestore Database from the menu and click Create database.
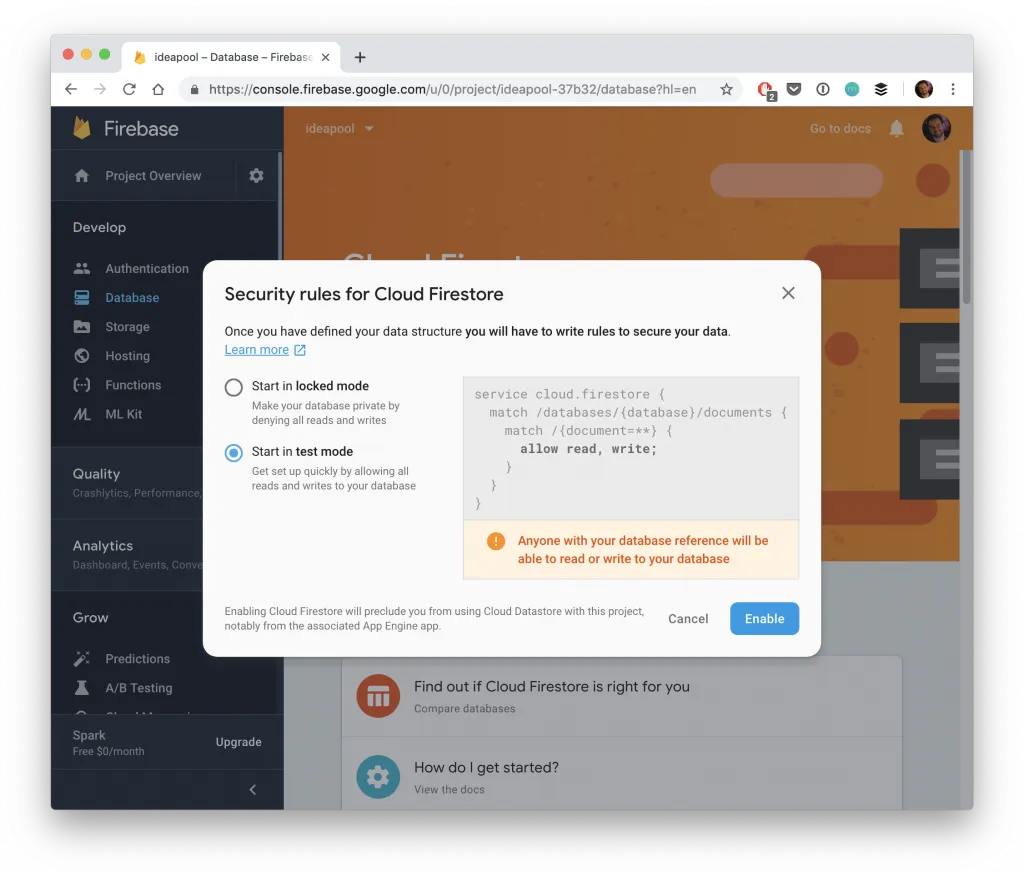
Here we can set the default security rules for our database and because this is a simple tutorial we’ll roll with the test mode which allows everyone access.
Starting our Ionic App & Firebase Integration
Now we are ready to setup the Ionic app, so generate a new app with an additional page and service for our logic and then use the AngularFire schematic to add all required packages and changes to the project:
ionic start devdacticFire blank --type=angular --capacitor
cd ./devdacticFire

# Generate a page and service
ionic g page modal
ionic g service services/data

# Install Firebase and AngularFire
ng add @angular/fire
Now we need the configuration from Firebase that you hopefully kept open in your browser, and we can add it right inside our environments/environment.ts like this:
export const environment = {
  production: false,
  firebase: {
    apiKey: "",
    authDomain: "",
    projectId: "",
    storageBucket: "",
    messagingSenderId: "",
    appId: ""
  }
};
Finally we set up the connection to Firebase by passing in our configuration. This looks different from previous versions as we are now using factory functions to setup all services that we need, like in our example the getFirestore().
Go ahead and change the src/app/app.module.ts to:
import { NgModule } from '@angular/core';
import { BrowserModule } from '@angular/platform-browser';
import { RouteReuseStrategy } from '@angular/router';

import { IonicModule, IonicRouteStrategy } from '@ionic/angular';

import { AppComponent } from './app.component';
import { AppRoutingModule } from './app-routing.module';

import { environment } from '../environments/environment';
import { provideFirebaseApp, initializeApp } from '@angular/fire/app';
import { getFirestore, provideFirestore } from '@angular/fire/firestore';

@NgModule({
  declarations: [AppComponent],
  entryComponents: [],
  imports: [BrowserModule, IonicModule.forRoot(), AppRoutingModule,
    provideFirebaseApp(() => initializeApp(environment.firebase)),
    provideFirestore(() => getFirestore())
  ],
  providers: [{ provide: RouteReuseStrategy, useClass: IonicRouteStrategy }],
  bootstrap: [AppComponent],
})
export class AppModule { }
Injecting more services like authentication or file storage basically follow the same setup!
Working with Firestore Docs & Collections
As a first step we will create a service that interacts with Firebase and loads our data. It’s always a good idea to outsource your logic into a service!
To work with Firestore in the latest version we need to inject the Firestore instance into every call, so we import it within our constructor and later use it in our CRUD functions. On top of that we simply create a reference to the path in our Firestore database to either a collection or document.
Let’s go through each of them:
getNotes: Access the notes collection and query the data usingcollectionData()getNoteById: Access one document in the notes collection and return the data withdocData()addNote: With a reference to the notes collection we useaddDoc()to simply push a new document to a collection where a unique ID is generated for itdeleteNote: Delete a document at a specific path usingdeleteDoc()updateNote: Create a reference to one document and update it throughupdateDoc()
For our first functions we also pass in an options object that contains idField, which helps to easily include the ID of a document in the response!
Now let’s go ahead and change the src/app/services/data.service.ts to:
import { Injectable } from '@angular/core';
import { Firestore, collection, collectionData, doc, docData, addDoc, deleteDoc, updateDoc } from '@angular/fire/firestore';
import { Observable } from 'rxjs';

export interface Note {
  id?: string;
  title: string;
  text: string;
}

@Injectable({
  providedIn: 'root'
})
export class DataService {

  constructor(private firestore: Firestore) { }

  getNotes(): Observable<note[]> {
    const notesRef = collection(this.firestore, 'notes');
    return collectionData(notesRef, { idField: 'id'}) as Observable<note[]>;
  }

  getNoteById(id): Observable<note> {
    const noteDocRef = doc(this.firestore, `notes/${id}`);
    return docData(noteDocRef, { idField: 'id' }) as Observable<note>;
  }

  addNote(note: Note) {
    const notesRef = collection(this.firestore, 'notes');
    return addDoc(notesRef, note);
  }

  deleteNote(note: Note) {
    const noteDocRef = doc(this.firestore, `notes/${note.id}`);
    return deleteDoc(noteDocRef);
  }

  updateNote(note: Note) {
    const noteDocRef = doc(this.firestore, `notes/${note.id}`);
    return updateDoc(noteDocRef, { title: note.title, text: note.text });
  }
}
</note></note></note[]></note[]>
With all of that in place we are ready to build some functionality on top of our service.
Load and add to Firestore Collections
First of all we want to display a list with the collection data, so let’s create a quick template first. We add a click event to every item, and additionally use a FAB button to create new notes for our collection.
Get started by changing the src/app/home/home.page.html to:
<ion-header>
  <ion-toolbar color="primary">
    <ion-title>
      Devdactic Notes
    </ion-title>
  </ion-toolbar>
</ion-header>

<ion-content>

  <ion-list>
    <ion-item *ngFor="let note of notes" (click)="openNote(note)">
      <ion-label>
        {{ note.title }}
      </ion-label>
    </ion-item>
  </ion-list>

  <ion-fab vertical="bottom" horizontal="end" slot="fixed">
    <ion-fab-button (click)="addNote()">
      <ion-icon name="add"></ion-icon>
    </ion-fab-button>
  </ion-fab>

</ion-content>
Since we have created the logic to load the data before, we now simply load the data from our service and assign it to our local notes array.
To add a new note we can use the Ionic alert controller and two simple inputs to capture a title and text for a new note.
With that information we can call addNote() from our service to create a new note in our Firestore collection.
We don’t need any additional logic to reload the collection data - since we are subscribed to an Observable that returns our collection data we will automatically receive the new data!
To show the details for a note (as a little exercise) we create a new modal using the Ionic 6 sheet version with breakpoints which looks pretty cool. We pass in the ID of the note we want to open, so we can later load its data through our service.
For now open the src/app/home/home.page.ts and change it to:
import { ChangeDetectorRef, Component } from '@angular/core';
import { AlertController, ModalController } from '@ionic/angular';
import { DataService, Note } from '../services/data.service';
import { ModalPage } from '../modal/modal.page';

@Component({
  selector: 'app-home',
  templateUrl: 'home.page.html',
  styleUrls: ['home.page.scss']
})
export class HomePage {
  notes: Note[] = [];

  constructor(private dataService: DataService,  private cd: ChangeDetectorRef, private alertCtrl: AlertController, private modalCtrl: ModalController) {
    this.dataService.getNotes().subscribe(res => {
      this.notes = res;
      this.cd.detectChanges();
    });
  }

  async addNote() {
    const alert = await this.alertCtrl.create({
      header: 'Add Note',
      inputs: [
        {
          name: 'title',
          placeholder: 'My cool note',
          type: 'text'
        },
        {
          name: 'text',
          placeholder: 'Learn Ionic',
          type: 'textarea'
        }
      ],
      buttons: [
        {
          text: 'Cancel',
          role: 'cancel'
        }, {
          text: 'Add',
          handler: res => {
            this.dataService.addNote({ text: res.text, title: res.title });
          }
        }
      ]
    });

    await alert.present();
  }

  async openNote(note: Note) {
    const modal = await this.modalCtrl.create({
      component: ModalPage,
      componentProps: { id: note.id },
      breakpoints: [0, 0.5, 0.8],
      initialBreakpoint: 0.8
    });

    await modal.present();
  }
}
Note: Initially I had to use the Angular ChangeDetectorRef and manually trigger a change detection to update the view, in later tests it worked without. See what works for you, most likely you don’t need that part.
Now we just need to implement the modal with some additional functionality.
Update and Delete Firestore Documents
The last step is loading the detail data of a document, which you can do by using the ID that we define as @Input() and getting the document data from our service.
The other functions to delete and update a document work the same, simply by calling our service functionalities.
Therefore quickly open the src/app/modal/modal.page.ts and change it to:
import { Component, Input, OnInit } from '@angular/core';
import { Note, DataService } from '../services/data.service';
import { ModalController, ToastController } from '@ionic/angular';

@Component({
  selector: 'app-modal',
  templateUrl: './modal.page.html',
  styleUrls: ['./modal.page.scss'],
})
export class ModalPage implements OnInit {
  @Input() id: string;
  note: Note = null;

  constructor(private dataService: DataService, private modalCtrl: ModalController, private toastCtrl: ToastController) { }

  ngOnInit() {
    this.dataService.getNoteById(this.id).subscribe(res => {
      this.note = res;
    });
  }

  async deleteNote() {
    await this.dataService.deleteNote(this.note)
    this.modalCtrl.dismiss();
  }

  async updateNote() {
    await this.dataService.updateNote(this.note);
    const toast = await this.toastCtrl.create({
      message: 'Note updated!.',
      duration: 2000
    });
    toast.present();

  }
}
The cool thing is that our document is also updated in realtime, just like the list based on the collection on our previous page.
So since we can now connect our ngModel input fields with our note, you could directly update the data inside Firestore and see the change in your Ionic app.
For the other direction, we still need to press the update button first so let’s wrap up the tutorial by adding the last items to show the input fields and two buttons to trigger all actions inside the src/app/modal/modal.page.html:
<ion-header>
  <ion-toolbar color="secondary">
    <ion-title>Details</ion-title>
  </ion-toolbar>
</ion-header>

<ion-content>
  <div *ngIf="note">
    <ion-item>
      <ion-label position="stacked">Title</ion-label>
      <ion-input [(ngModel)]="note.title"></ion-input>
    </ion-item>

    <ion-item>
      <ion-label position="stacked">Note</ion-label>
      <ion-textarea [(ngModel)]="note.text" rows="8"></ion-textarea>
    </ion-item>
  </div>

  <ion-button expand="block" color="success" (click)="updateNote()">
    <ion-icon name="save" slot="start"></ion-icon>
    Update
  </ion-button>
  <ion-button expand="block" color="danger" (click)="deleteNote()">
    <ion-icon name="trash" slot="start"></ion-icon>
    Delete
  </ion-button>

</ion-content>
And with that you have successfully finished the basic Firebase integration on which you could now add all further functionalities like user authentication or file upload.
Conclusion
Firebase remains one of the most popular choices for a cloud backend besides the upcoming star Supabase, which is an open source Firebase alternative.
I’ve personally used both and enjoy the different philosophies of SQL and NoSQL, but you can certainly build powerful apps with both cloud backend solutions!
You can also find a video version of this tutorial below.