How to Build a Simple Ionic E-Commerce App with Firebase Last update: 2021-02-23
If you want to build an Ionic E-Commerce app, Firebase is a great backend alternative to existing shop systems. This is a quick yet still robust solution for a full blown shopping app!
In this tutorial we will setup a Firebase project with dummy shopping data inside Firestore. To keep it simple, we are not adding authentication although this would be quite easy afterwards following other material on Firebase authentication.
Once we got some dummy data we will build an Ionic app that loads data from Firebase and also uses Firestore to keep track of the cart and stock amount of products until we perform a dummy check out and clear all items.
We won’t integrate payments in this basic tutorial, but we have different courses inside the Ionic Academy in which we use Braintree for Paypal and also Stripe with Firebase!
Firebase Project Setup
Before we dive into the Ionic E-Commerce app, the first step is Firebase, and you need to create a new project (or use any existing). Inside Firebase, make sure you have enabled the Firestore database by clicking “Get Started” in the right tab.
Once you have created the project you need to find the web configuration which looks like this:
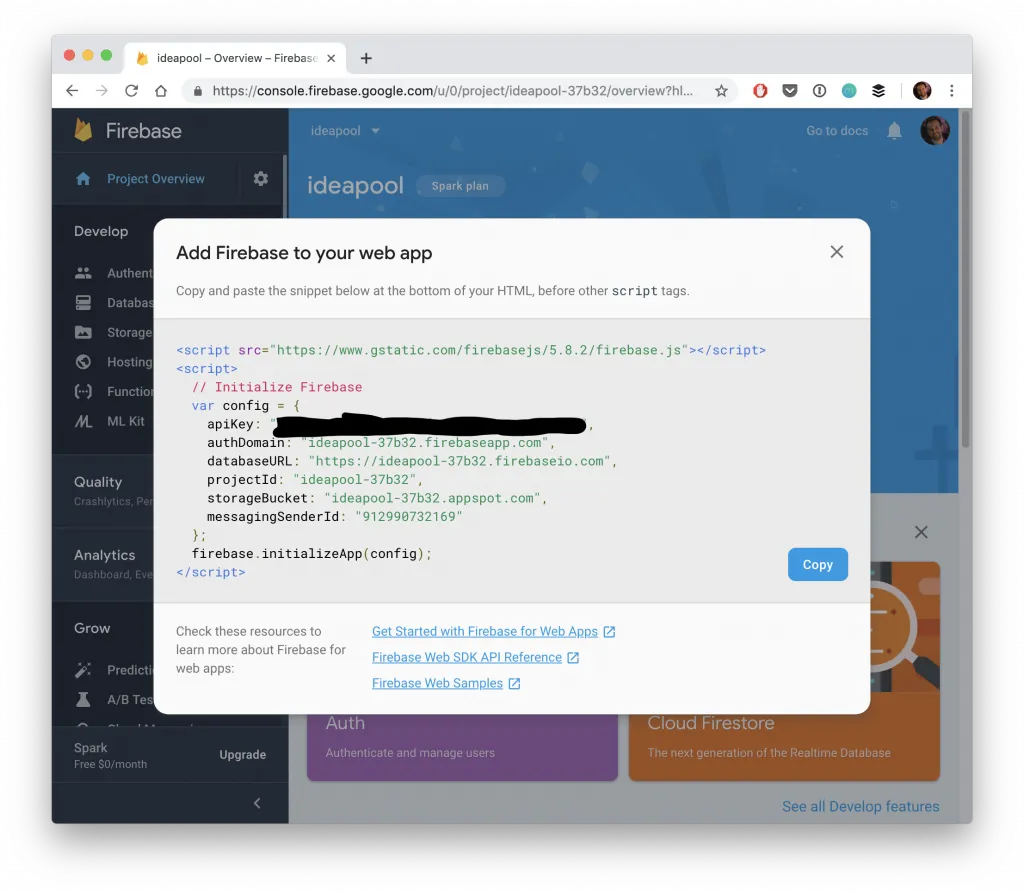
If it’s a new project, click on the web icon to start a new web app and give it a name, you will see the configuration in the next step now.
Leave this config block open until our app is ready so we can copy it over!
Upload Dummy Data to Firestore with Node
Most likely you have some existing product data or don’t want to create all listings by hand. For this, I found a [great video containing an upload script](
some element to make it work with the latest version of Firebase.If you want to build your own Firestore upload tool, simply create a folder and init a new Node project, plus install two dependencies:
mkidr firestore-upload
cd ./firestore-upload

npm init --yes
npm i firebase firebase-admin
Inside that folder you can now create a uploader.js file which basically creates the connection to your Firebase project using a service key.
To generate this key, navigate inside your Firebase project to Users and permissions and select the Service accounts tab. From here, scroll down and hit Generate new private key which you can copy to your just created project and rename it to service_key.json.
Now back to the uploader.js, which only scans a files folder for documents and uploads them directly to Firebase. Go ahead and fill that file with the following code:
var admin = require("firebase-admin");

var serviceAccount = require("./service_key.json");

admin.initializeApp({
  credential: admin.credential.cert(serviceAccount),
});

const firestore = admin.firestore();
const path = require("path");
const fs = require("fs");
const directoryPath = path.join(__dirname, "files");

fs.readdir(directoryPath, function(err, files) {
  if (err) {
    return console.log("Unable to scan directory: " + err);
  }

  files.forEach(function(file) {
    var lastDotIndex = file.lastIndexOf(".");

    var menu = require("./files/" + file);

    menu.forEach(function(obj) {
      firestore
        .collection(file.substring(0, lastDotIndex))
        .add(obj)
        .then(function(docRef) {
          console.log("Document written");
        })
        .catch(function(error) {
          console.error("Error adding document: ", error);
        });
    });
  });
});
The collection name will be used from the file, and the rest of the information is taken from the JSON data. I slightly changed the script to simply add() all items to the collection which generates a random ID for each document - in the initial version you could also specify a fixed ID instead.
To make life easier, I took an export of the the products data from the cool Fakestore API and changed a few parts of it for our example.
If you want to follow along, create a file at files/products.json now and insert the following data:
[{
    "title": "Fjallraven - Foldsack No. 1 Backpack, Fits 15 Laptops",
    "price": 109.95,
    "description": "Your perfect pack for everyday use and walks in the forest. Stash your laptop (up to 15 inches) in the padded sleeve, your everyday",
    "category": "men clothing",
    "image": "https://fakestoreapi.com/img/81fPKd-2AYL._AC_SL1500_.jpg",
    "stock": 100
}, {
    "title": "Mens Casual Premium Slim Fit T-Shirts ",
    "price": 22.3,
    "description": "Slim-fitting style, contrast raglan long sleeve, three-button henley placket, light weight & soft fabric for breathable and comfortable wearing. And Solid stitched shirts with round neck made for durability and a great fit for casual fashion wear and diehard baseball fans. The Henley style round neckline includes a three-button placket.",
    "category": "men clothing",
    "image": "https://fakestoreapi.com/img/71-3HjGNDUL._AC_SY879._SX._UX._SY._UY_.jpg",
    "stock": 100
}, {
    "title": "Mens Cotton Jacket",
    "price": 55.99,
    "description": "great outerwear jackets for Spring/Autumn/Winter, suitable for many occasions, such as working, hiking, camping, mountain/rock climbing, cycling, traveling or other outdoors. Good gift choice for you or your family member. A warm hearted love to Father, husband or son in this thanksgiving or Christmas Day.",
    "category": "men clothing",
    "image": "https://fakestoreapi.com/img/71li-ujtlUL._AC_UX679_.jpg",
    "stock": 100
}, {
    "title": "Mens Casual Slim Fit",
    "price": 15.99,
    "description": "The color could be slightly different between on the screen and in practice. / Please note that body builds vary by person, therefore, detailed size information should be reviewed below on the product description.",
    "category": "men clothing",
    "image": "https://fakestoreapi.com/img/71YXzeOuslL._AC_UY879_.jpg",
    "stock": 100
}, {
    "title": "John Hardy Women's Legends Naga Gold & Silver Dragon Station Chain Bracelet",
    "price": 695,
    "description": "From our Legends Collection, the Naga was inspired by the mythical water dragon that protects the ocean's pearl. Wear facing inward to be bestowed with love and abundance, or outward for protection.",
    "category": "jewelery",
    "image": "https://fakestoreapi.com/img/71pWzhdJNwL._AC_UL640_QL65_ML3_.jpg",
    "stock": 100
}, {
    "title": "Solid Gold Petite Micropave ",
    "price": 168,
    "description": "Satisfaction Guaranteed. Return or exchange any order within 30 days.Designed and sold by Hafeez Center in the United States. Satisfaction Guaranteed. Return or exchange any order within 30 days.",
    "category": "jewelery",
    "image": "https://fakestoreapi.com/img/61sbMiUnoGL._AC_UL640_QL65_ML3_.jpg",
    "stock": 100
}, {
    "title": "White Gold Plated Princess",
    "price": 9.99,
    "description": "Classic Created Wedding Engagement Solitaire Diamond Promise Ring for Her. Gifts to spoil your love more for Engagement, Wedding, Anniversary, Valentine's Day...",
    "category": "jewelery",
    "image": "https://fakestoreapi.com/img/71YAIFU48IL._AC_UL640_QL65_ML3_.jpg",
    "stock": 100
}, {
    "title": "Pierced Owl Rose Gold Plated Stainless Steel Double",
    "price": 10.99,
    "description": "Rose Gold Plated Double Flared Tunnel Plug Earrings. Made of 316L Stainless Steel",
    "category": "jewelery",
    "image": "https://fakestoreapi.com/img/51UDEzMJVpL._AC_UL640_QL65_ML3_.jpg",
    "stock": 100
}, {
    "title": "WD 2TB Elements Portable External Hard Drive - USB 3.0 ",
    "price": 64,
    "description": "USB 3.0 and USB 2.0 Compatibility Fast data transfers Improve PC Performance High Capacity; Compatibility Formatted NTFS for Windows 10, Windows 8.1, Windows 7; Reformatting may be required for other operating systems; Compatibility may vary depending on user’s hardware configuration and operating system",
    "category": "electronics",
    "image": "https://fakestoreapi.com/img/61IBBVJvSDL._AC_SY879_.jpg",
    "stock": 100
}, {
    "title": "SanDisk SSD PLUS 1TB Internal SSD - SATA III 6 Gb/s",
    "price": 109,
    "description": "Easy upgrade for faster boot up, shutdown, application load and response (As compared to 5400 RPM SATA 2.5” hard drive; Based on published specifications and internal benchmarking tests using PCMark vantage scores) Boosts burst write performance, making it ideal for typical PC workloads The perfect balance of performance and reliability Read/write speeds of up to 535MB/s/450MB/s (Based on internal testing; Performance may vary depending upon drive capacity, host device, OS and application.)",
    "category": "electronics",
    "image": "https://fakestoreapi.com/img/61U7T1koQqL._AC_SX679_.jpg",
    "stock": 100
}, {
    "title": "Silicon Power 256GB SSD 3D NAND A55 SLC Cache Performance Boost SATA III 2.5",
    "price": 109,
    "description": "3D NAND flash are applied to deliver high transfer speeds Remarkable transfer speeds that enable faster bootup and improved overall system performance. The advanced SLC Cache Technology allows performance boost and longer lifespan 7mm slim design suitable for Ultrabooks and Ultra-slim notebooks. Supports TRIM command, Garbage Collection technology, RAID, and ECC (Error Checking & Correction) to provide the optimized performance and enhanced reliability.",
    "category": "electronics",
    "image": "https://fakestoreapi.com/img/71kWymZ+c+L._AC_SX679_.jpg",
    "stock": 100
}, {
    "title": "WD 4TB Gaming Drive Works with Playstation 4 Portable External Hard Drive",
    "price": 114,
    "description": "Expand your PS4 gaming experience, Play anywhere Fast and easy, setup Sleek design with high capacity, 3-year manufacturer's limited warranty",
    "category": "electronics",
    "image": "https://fakestoreapi.com/img/61mtL65D4cL._AC_SX679_.jpg",
    "stock": 100
}, {
    "title": "Acer SB220Q bi 21.5 inches Full HD (1920 x 1080) IPS Ultra-Thin",
    "price": 599,
    "description": "21. 5 inches Full HD (1920 x 1080) widescreen IPS display And Radeon free Sync technology. No compatibility for VESA Mount Refresh Rate: 75Hz - Using HDMI port Zero-frame design | ultra-thin | 4ms response time | IPS panel Aspect ratio - 16: 9. Color Supported - 16. 7 million colors. Brightness - 250 nit Tilt angle -5 degree to 15 degree. Horizontal viewing angle-178 degree. Vertical viewing angle-178 degree 75 hertz",
    "category": "electronics",
    "image": "https://fakestoreapi.com/img/81QpkIctqPL._AC_SX679_.jpg",
    "stock": 100
}, {
    "title": "Samsung 49-Inch CHG90 144Hz Curved Gaming Monitor (LC49HG90DMNXZA) – Super Ultrawide Screen QLED ",
    "price": 999.99,
    "description": "49 INCH SUPER ULTRAWIDE 32:9 CURVED GAMING MONITOR with dual 27 inch screen side by side QUANTUM DOT (QLED) TECHNOLOGY, HDR support and factory calibration provides stunningly realistic and accurate color and contrast 144HZ HIGH REFRESH RATE and 1ms ultra fast response time work to eliminate motion blur, ghosting, and reduce input lag",
    "category": "electronics",
    "image": "https://fakestoreapi.com/img/81Zt42ioCgL._AC_SX679_.jpg",
    "stock": 100
}, {
    "title": "BIYLACLESEN Women's 3-in-1 Snowboard Jacket Winter Coats",
    "price": 56.99,
    "description": "Note:The Jackets is US standard size, Please choose size as your usual wear Material: 100% Polyester; Detachable Liner Fabric: Warm Fleece. Detachable Functional Liner: Skin Friendly, Lightweigt and Warm.Stand Collar Liner jacket, keep you warm in cold weather. Zippered Pockets: 2 Zippered Hand Pockets, 2 Zippered Pockets on Chest (enough to keep cards or keys)and 1 Hidden Pocket Inside.Zippered Hand Pockets and Hidden Pocket keep your things secure. Humanized Design: Adjustable and Detachable Hood and Adjustable cuff to prevent the wind and water,for a comfortable fit. 3 in 1 Detachable Design provide more convenience, you can separate the coat and inner as needed, or wear it together. It is suitable for different season and help you adapt to different climates",
    "category": "women clothing",
    "image": "https://fakestoreapi.com/img/51Y5NI-I5jL._AC_UX679_.jpg",
    "stock": 100
}, {
    "title": "Lock and Love Women's Removable Hooded Faux Leather Moto Biker Jacket",
    "price": 29.95,
    "description": "100% POLYURETHANE(shell) 100% POLYESTER(lining) 75% POLYESTER 25% COTTON (SWEATER), Faux leather material for style and comfort / 2 pockets of front, 2-For-One Hooded denim style faux leather jacket, Button detail on waist / Detail stitching at sides, HAND WASH ONLY / DO NOT BLEACH / LINE DRY / DO NOT IRON",
    "category": "women clothing",
    "image": "https://fakestoreapi.com/img/81XH0e8fefL._AC_UY879_.jpg",
    "stock": 100
}, {
    "title": "Rain Jacket Women Windbreaker Striped Climbing Raincoats",
    "price": 39.99,
    "description": "Lightweight perfet for trip or casual wear---Long sleeve with hooded, adjustable drawstring waist design. Button and zipper front closure raincoat, fully stripes Lined and The Raincoat has 2 side pockets are a good size to hold all kinds of things, it covers the hips, and the hood is generous but doesn't overdo it.Attached Cotton Lined Hood with Adjustable Drawstrings give it a real styled look.",
    "category": "women clothing",
    "image": "https://fakestoreapi.com/img/71HblAHs5xL._AC_UY879_-2.jpg",
    "stock": 100
}, {
    "title": "MBJ Women's Solid Short Sleeve Boat Neck V ",
    "price": 9.85,
    "description": "95% RAYON 5% SPANDEX, Made in USA or Imported, Do Not Bleach, Lightweight fabric with great stretch for comfort, Ribbed on sleeves and neckline / Double stitching on bottom hem",
    "category": "women clothing",
    "image": "https://fakestoreapi.com/img/71z3kpMAYsL._AC_UY879_.jpg",
    "stock": 100
}, {
    "title": "Opna Women's Short Sleeve Moisture",
    "price": 7.95,
    "description": "100% Polyester, Machine wash, 100% cationic polyester interlock, Machine Wash & Pre Shrunk for a Great Fit, Lightweight, roomy and highly breathable with moisture wicking fabric which helps to keep moisture away, Soft Lightweight Fabric with comfortable V-neck collar and a slimmer fit, delivers a sleek, more feminine silhouette and Added Comfort",
    "category": "women clothing",
    "image": "https://fakestoreapi.com/img/51eg55uWmdL._AC_UX679_.jpg",
    "stock": 100
}, {
    "title": "DANVOUY Womens T Shirt Casual Cotton Short",
    "price": 12.99,
    "description": "95%Cotton,5%Spandex, Features: Casual, Short Sleeve, Letter Print,V-Neck,Fashion Tees, The fabric is soft and has some stretch., Occasion: Casual/Office/Beach/School/Home/Street. Season: Spring,Summer,Autumn,Winter.",
    "category": "women clothing",
    "image": "https://fakestoreapi.com/img/61pHAEJ4NML._AC_UX679_.jpg",
    "stock": 100
}]
Now all you got to do is run the uploader script from the command line and your Firestore data will contain all the great testing data:
node uploader.jsIf you followed along, your Firestore data should now look like this: 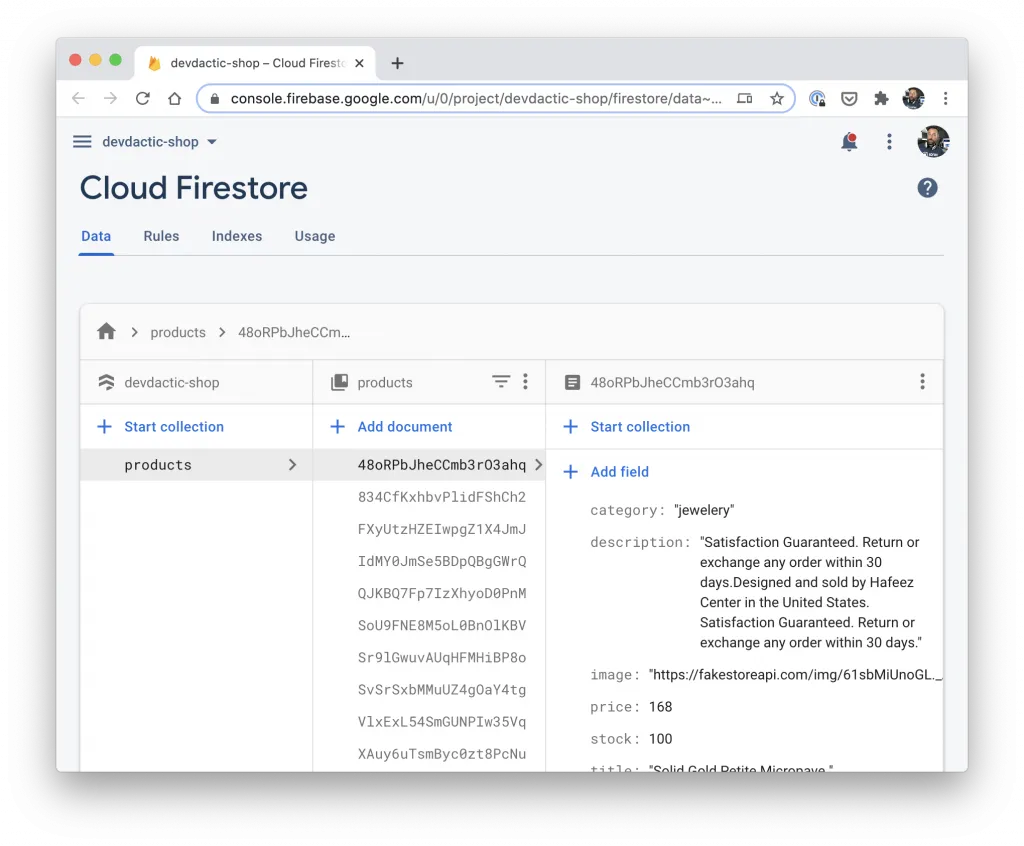
If you want to manually manage the products you could also create another app to manage the product listings, something we did inside the Marketplace course inside the Ionic Academy!
Setting up the Ionic E-Commerce App
Now we are ready to dive into the Ionic E-Commerce app and start with a blank new app and add the AngularFire schematic which will install all the necessary packages.
Additionally we generate a page and service for the rest of our functionality, so get started now with:
ionic start devdacticShop blank --type=angular --capacitor
cd ./devdacticShop

ng add @angular/fire

ionic g service services/product
ionic g page cartModal
Now we need the configuration from Firebase that you hopefully kept open in your browser, and we can add it right inside our environments/environment.ts like this:
export const environment = {
  production: false,
  firebase: {
    apiKey: "",
    authDomain: "",
    databaseURL: "",
    projectId: "",
    storageBucket: "",
    messagingSenderId: "",
    appId: ""
  }
};
With the configuration in place we can initialise the connection from our Ionic app to Firebase by adding the according modules to our app/app.module.ts and passing in the environment from before:
import { NgModule } from '@angular/core';
import { BrowserModule } from '@angular/platform-browser';
import { RouteReuseStrategy } from '@angular/router';

import { IonicModule, IonicRouteStrategy } from '@ionic/angular';
import { SplashScreen } from '@ionic-native/splash-screen/ngx';
import { StatusBar } from '@ionic-native/status-bar/ngx';

import { AppComponent } from './app.component';
import { AppRoutingModule } from './app-routing.module';

import { AngularFireModule } from '@angular/fire';
import { AngularFirestoreModule } from '@angular/fire/firestore';
import { environment } from '../environments/environment';

@NgModule({
  declarations: [AppComponent],
  entryComponents: [],
  imports: [BrowserModule, IonicModule.forRoot(), AppRoutingModule,
    AngularFireModule.initializeApp(environment.firebase),
    AngularFirestoreModule
  ],
  providers: [
    StatusBar,
    SplashScreen,
    { provide: RouteReuseStrategy, useClass: IonicRouteStrategy }
  ],
  bootstrap: [AppComponent]
})
export class AppModule {}
That’s all for the setup and we can now connect to Firebase from our Ionic app!
Creating the Product and Cart Logic
First of all we will implement the backbone of our app, the service that manages the products and cart and connection to Firebase.
Since we are not using authentication at this point (although this would be easy to use with this logic as well!) we need a way to persist the cart of a user, and we can do it like this:
- If a user opens the app, we check the Capacitor storage for a value stored under our
CART_STORAGE_KEY - If there is no stored value, we start a new cart by creating a document inside the Firestore collection. We will then use the ID of this new document and store it locally, so we can later retrieve the cart of a user again!
- If the app starts and we find this ID already, we access the cart document from Firestore and load all the stored values/amounts!
With this approach we update our local cart data and also keep track of all the items inside a Firebase document.
Again: With authentication, you could simply use the unique user id to have a connection between user and cart instead of using the random id generated by Firebase right now.
We can also already create the getProducts() function which returns our product data including the actual ID of the document, and keep track of our cart by using a BehaviorSubject that always holds the ids of items added and the amount.
Get started with our service by changing the services/product.service.ts to:
import { Injectable } from '@angular/core';
import { AngularFirestore, AngularFirestoreCollection } from '@angular/fire/firestore';
import { Plugins } from '@capacitor/core';
import firebase from 'firebase/app';
import { BehaviorSubject } from 'rxjs';

const { Storage } = Plugins;

const CART_STORAGE_KEY = 'MY_CART';

const INCREMENT = firebase.firestore.FieldValue.increment(1);
const DECREMENT = firebase.firestore.FieldValue.increment(-1);

@Injectable({
  providedIn: 'root'
})
export class ProductService {
  cart = new BehaviorSubject({});
  cartKey = null;
  productsCollection: AngularFirestoreCollection;

  constructor(private afs: AngularFirestore) {
    this.loadCart();
    this.productsCollection = this.afs.collection('products');
  }

  getProducts() {
    return this.productsCollection.valueChanges({ idField: 'id' });
  }

  async loadCart() {
    const result = await Storage.get({ key: CART_STORAGE_KEY });
    if (result.value) {
      this.cartKey = result.value;

      this.afs.collection('carts').doc(this.cartKey).valueChanges().subscribe((result: any) => {
        // Filter out our timestamp
        delete result['lastUpdate'];

        this.cart.next(result || {});
      });

    } else {
      // Start a new cart
      const fbDocument = await this.afs.collection('carts').add({
        lastUpdate: firebase.firestore.FieldValue.serverTimestamp()
      });
      this.cartKey = fbDocument.id;
      // Store the document ID locally
      await Storage.set({ key: CART_STORAGE_KEY, value: this.cartKey });

      // Subscribe to changes
      this.afs.collection('carts').doc(this.cartKey).valueChanges().subscribe((result: any) => {
        delete result['lastUpdate'];
        console.log('cart changed: ', result);
        this.cart.next(result || {});
      });
    }
  }
}
You might have noticed the INCREMENT and DECREMENT at the top already - these are super helpful functions from Firebase to easily change a value. In our case, we use it to increase/decrease the amount of an item inside our shopping cart and also inside the actual products collection, since we need to change the stock of a product at the same time! We can now also use a computed property by using brackets around the id, which uses the value of the ID as the property name!
That means, once we add items to the cart, the document inside Firebase looks something like this:
{
  123asd1iasd: 2,
  dasd8349: 3,
  kas2918: 1,
  lastUpdate: ...
}
So we use the ID as a key in the object, and the value is the amount in our cart.
Go ahead and add the following to the same services/product.service.ts now:
addToCart(id) {
  // Update the FB cart
  this.afs.collection('carts').doc(this.cartKey).update({
    [id]: INCREMENT,
    lastUpdate: firebase.firestore.FieldValue.serverTimestamp()
  });

  // Update the stock value of the product
  this.productsCollection.doc(id).update({
    stock: DECREMENT
  });
}

removeFromCart(id) {
  // Update the FB cart
  this.afs.collection('carts').doc(this.cartKey).update({
    [id]: DECREMENT,
    lastUpdate: firebase.firestore.FieldValue.serverTimestamp()
  });

  // Update the stock value of the product
  this.productsCollection.doc(id).update({
    stock: INCREMENT
  });
}

async checkoutCart() {
  // Create an order
  await this.afs.collection('orders').add(this.cart.value);

  // Clear old cart
  this.afs.collection('carts').doc(this.cartKey).set({
    lastUpdate: firebase.firestore.FieldValue.serverTimestamp()
  });
}
At last we also have a simple checkout function which writes the current cart to another orders collection and clears our cart by using the set() function which will replace the whole document to the new value (before we only used update()!).
Building the Shopping List
Before we now dive into the product list, let’s quickly already import the module of the cart page that we generated in the beginning since we will later open the modal from this page.
Open the src/app/home/home.module.ts and import it like this:
import { NgModule } from '@angular/core';
import { CommonModule } from '@angular/common';
import { IonicModule } from '@ionic/angular';
import { FormsModule } from '@angular/forms';
import { HomePage } from './home.page';

import { HomePageRoutingModule } from './home-routing.module';
import { CartModalPageModule } from '../cart-modal/cart-modal.module';

@NgModule({
  imports: [
    CommonModule,
    FormsModule,
    IonicModule,
    HomePageRoutingModule,
    CartModalPageModule
  ],
  declarations: [HomePage]
})
export class HomePageModule {}
Now we can retrieve the products from our service and assign it to an Observable to which we will subscribe from our view in the next step so we don’t need to manage it inside our class at this point.
We will also subscribe to any changes of the cart so we can set the value in our class to the new value of the cart, which will help to display the amount of an item inside our view,
As a little bonus, I also added an Ionic animation which we simply create once upfront and then call play() whenever we add or remove items from our cart.
Finally those functions simply call the according service functionality - everything is handled in there, and also the cart updated will be received automatically so we don’t need to worry about the state of our data!
Go ahead and change the src/app/home/home.page.ts to:
import { AfterViewInit, Component, ElementRef, OnInit, ViewChild } from '@angular/core';
import { Animation, AnimationController, ModalController } from '@ionic/angular';
import { Observable } from 'rxjs';
import { CartModalPage } from '../cart-modal/cart-modal.page';
import { ProductService } from '../services/product.service';

@Component({
  selector: 'app-home',
  templateUrl: 'home.page.html',
  styleUrls: ['home.page.scss'],
})
export class HomePage implements OnInit, AfterViewInit {
  products: Observable<any[]>;
  @ViewChild('myfab', { read: ElementRef }) carBtn: ElementRef;
  cart = {};
  cartAnimation: Animation;

  constructor(private productService: ProductService, private animationCtrl: AnimationController, private modalCtrl: ModalController) {}

  ngOnInit() {
    this.products = this.productService.getProducts();

    // Listen to Cart changes
    this.productService.cart.subscribe(value => {
      this.cart = value;
    });
  }

  ngAfterViewInit() {
    // Setup an animation that we can reuse
    this.cartAnimation = this.animationCtrl.create('cart-animation');
    this.cartAnimation
    .addElement(this.carBtn.nativeElement)
    .keyframes([
      { offset: 0, transform: 'scale(1)' },
      { offset: 0.5, transform: 'scale(1.2)' },
      { offset: 0.8, transform: 'scale(0.9)' },
      { offset: 1, transform: 'scale(1)' }
    ])
    .duration(300)
    .easing('ease-out');
  }

  addToCart(event, product) {
    event.stopPropagation();
    this.productService.addToCart(product.id);
    this.cartAnimation.play();
  }

  removeFromCart(event, product) {
    event.stopPropagation();
    this.productService.removeFromCart(product.id);
    this.cartAnimation.play();
  }

  async openCart() {
    const modal = await this.modalCtrl.create({
      component: CartModalPage
    });
    await modal.present();
  }
}
In our functions we also have stopPropagation() because they are triggered from buttons inside an ion-item which has a click handler itself to expand a read more section.
By passing the event to those functions and stopping it right there, we make sure that the parent click event isn’t also executed. Nice and easy hack that comes in helpful every now and then!
Inside the template we can now subscribe to the products Observable using the async pipe to handle all the subscription automatically. Additionally we display a bit of the information from a product like the image, stock and the expandable section with a super simple click logic.
At the bottom we keep our fab button with the #myfab template reference - remember how we used that for our Ionic animation before?
Inside the product we can now access the cart object and check if the ID of a product is included and display the value (or 0 as fallback) and also use this logic to disable a remove button. Nobody wants -1 items in their cart!
Now open the src/app/home/home.page.html and change it to:
<ion-header>
  <ion-toolbar color="primary">
    <ion-title>
      Devdactic Shop
    </ion-title>
  </ion-toolbar>
</ion-header>

<ion-content>

  <ion-list>
    <ion-item *ngFor="let p of products | async" (click)="p.expanded = !p.expanded">
      <ion-thumbnail slot="start">
        <ion-img [src]="p.image"></ion-img>
      </ion-thumbnail>
      <ion-label class="ion-text-wrap">
        {{ p.title }}<br>
        <b>{{ p.price | currency:'USD' }}</b>
        <p>{{ p.stock }} left</p>
        <div [hidden]="!p.expanded">
          {{ p.description }}
        </div>
      </ion-label>
      <ion-row slot="end" class="ion-no-padding ion-align-items-center">
        <ion-col size="5">
          <ion-button (click)="addToCart($event, p)" fill="clear">
            <ion-icon name="add" slot="icon-only"></ion-icon>
          </ion-button>
        </ion-col>

        <ion-col size="2">
          {{ cart[p.id] || 0 }}
        </ion-col>

        <ion-col size="5">
          <ion-button (click)="removeFromCart($event, p)" fill="clear" [disabled]="!cart[p.id] || cart[p.id] == 0">
            <ion-icon name="remove" slot="icon-only"></ion-icon>
          </ion-button>
        </ion-col>
      </ion-row>

    </ion-item>
  </ion-list>

  <ion-fab vertical="bottom" horizontal="end" slot="fixed">
    <ion-fab-button (click)="openCart()" color="secondary" #myfab>
      <ion-icon name="cart"></ion-icon>
    </ion-fab-button>
  </ion-fab>

</ion-content>
Now we already got a nice list of product items in place and can wrap up everything with a quick checkout view.
Adding the Checkout Page
This page is quick to add, but we need our brain one more time to implement a logic which:
- Loads all product information
- Checks if a product of our cart exists in that data
- Combines the product data and the value for each product we have in our cart
In reality you could also do it the other way and load the Firebase data for each item inside your cart. Really depends on how many products you actually got and which operation would take longer.
To create a nice array with all of that information for the checkout page we load the products once using the take(1) operator.
We then filter() out all products that don’t exist inside our cart, and finally we map each product to a new value that now combines information using the ... spread operator so we got the actual product and the count in one object!
Additionally we can add the code for the checkout which uses the function of our service and closes the modal with a little alert for testing.
Now open the src/app/cart-modal/cart-modal.page.ts and change it to:
import { Component, OnInit } from '@angular/core';
import { AlertController, ModalController } from '@ionic/angular';
import { ProductService } from '../services/product.service';
import { take } from 'rxjs/operators';

@Component({
  selector: 'app-cart-modal',
  templateUrl: './cart-modal.page.html',
  styleUrls: ['./cart-modal.page.scss'],
})
export class CartModalPage implements OnInit {
  products = [];

  constructor(private productService: ProductService, private modalCtrl: ModalController, private alertCtrl: AlertController) { }

  ngOnInit() {
    const cartItems = this.productService.cart.value;

    this.productService.getProducts().pipe(take(1)).subscribe(allProducts => {
      this.products = allProducts.filter(p => cartItems[p.id]).map(product => {
        return { ...product, count: cartItems[product.id] };
      });
    });
  }

  async checkout() {
    const alert = await this.alertCtrl.create({
      header: 'Success',
      message: 'Thanks for your order',
      buttons: ['Continue shopping']
    });

    await alert.present();

    this.productService.checkoutCart();
    this.modalCtrl.dismiss();
  }

  close() {
    this.modalCtrl.dismiss();
  }
}
The last step is to create another simple view to list all of the items with their count inside the cart and add a checkout button inside our src/app/cart-modal/cart-modal.page.html:
<ion-header>
  <ion-toolbar color="primary">
    <ion-buttons slot="start">
      <ion-button (click)="close()">
        <ion-icon slot="icon-only" name="close"></ion-icon>
      </ion-button>
    </ion-buttons>
    <ion-title>Cart</ion-title>
  </ion-toolbar>
</ion-header>

<ion-content>
<ion-list>
  <ion-item *ngFor="let p of products">
    <p slot="start">
      {{ p.count }}x
    </p>
    <ion-label>
      {{ p.title }}
    </ion-label>

    <ion-avatar slot="end">
      <ion-img [src]="p.image"></ion-img>
    </ion-avatar>
  </ion-item>
</ion-list>
</ion-content>

<ion-footer>
  <ion-toolbar color="success">
    <ion-button expand="full" (click)="checkout()" fill="clear" color="light">
      Checkout
    </ion-button>
  </ion-toolbar>
</ion-footer>
We will not dive into the creation of a checkout form and payment logic but you can find courses on those topics inside the Ionic Academy!
Automatically clear Cart after X Minutes?
Right now we reduce the stock for products whenever we add them to the cart, but what happens if a user doesn’t finish the checkout?
To fix that problem, I recommend you create a CRON job with Firebase cloud functions and simply iterate the cart collection inside that function.
Because we keep a server timestamp of the last update in each cart document you can easily check when a cart was last changed.
If it’s too long ago, simply use the keys inside the cart to once again increment the stock of each product and then clear the cart in the background with this logic!
Conclusion
It’s possible to build an Ionic E-Commerce shop based on Firebase with a lot of the Firebase benefits! You can manually upload all your products with a script (or build your own admin area), and you can keep the cart of a user inside the Firestore database as well with a nice sync to your actual Ionic app.
If you want to see more about this topic, leave a comment below!
You can also find a video version of this tutorial below.