Creating an Ionic Table With ngx-datatable Last update: 2018-07-10

If you are working with a lot of data you might have encountered the problem of presenting this data in an Excel like way as table inside your Ionic app. Although the Ionic table is not always the most recommended for mobile apps, especially in times of PWAs having the ability to create a table within your Ionic app is a great alternative.
Inside this tutorial we will use the ngx-datatable package which was made for Angular apps, so we can perfectly use this inside our Ionic app as well!

But as you can see from the gif above, using this pattern on small devices is problematic but let’s talk about the good things for now and see how to add it to our app.
Adding ngx-datatable to your Ionic Project
Like always we start with a blank Ionic app and install the datatable packe to our app, so go ahead and run:
ionic start dataTable blank
cd dataTable
npm i @swimlane/ngx-datatable
ionic g page table
We’ve also created a new page which comes with a module file, because the initial page doesn’t. Therefore, go ahead and remove all references to the HomePage from your module file and then set a new entry point for our app inside the app/app.component.ts:
import { Component } from '@angular/core';
import { Platform } from 'ionic-angular';
import { StatusBar } from '@ionic-native/status-bar';
import { SplashScreen } from '@ionic-native/splash-screen';

@Component({
	templateUrl: 'app.html'
})
export class MyApp {
	rootPage: any = 'TablePage';

	constructor(platform: Platform, statusBar: StatusBar, splashScreen: SplashScreen) {
		platform.ready().then(() => {
			statusBar.styleDefault();
			splashScreen.hide();
		});
	}
}
The ngx-datatable comes with some predefined styling we can use, but first we need to make sure the styling and an additional font is copied over to our build folder. Therefore, add a new block to your package.json:
"config": { "ionic_sass": "./config/sass.config.js", "ionic_copy": "./config/copy.config.js" }We’ve changed the copy times already in many other articles, and the only change we really need is to copy over the fonts in an additional task. Create the folder and new file at config/copy.config.js and insert everything from the regular Ionic copy script plus a block which copies over the fonts:
module.exports = {
    copyAssets: {
        src: ['{{SRC}}/assets/**/*'],
        dest: '{{WWW}}/assets'
    },
    copyIndexContent: {
        src: ['{{SRC}}/index.html', '{{SRC}}/manifest.json', '{{SRC}}/service-worker.js'],
        dest: '{{WWW}}'
    },
    copyFonts: {
        src: ['{{ROOT}}/node_modules/ionicons/dist/fonts/**/*', '{{ROOT}}/node_modules/ionic-angular/fonts/**/*'],
        dest: '{{WWW}}/assets/fonts'
    },
    copyPolyfills: {
        src: ['{{ROOT}}/node_modules/ionic-angular/polyfills/polyfills.js'],
        dest: '{{BUILD}}'
    },
    copyNgxFont: {
        src: ['{{ROOT}}/node_modules/@swimlane/ngx-datatable/release/assets/fonts/data-table.ttf',
        '{{ROOT}}/node_modules/@swimlane/ngx-datatable/release/assets/fonts/data-table.woff'],
        dest: '{{BUILD}}/fonts'
    }
}
For the second special file, create another new file at config/sass.config.js. For this file, copy the contents of the original file (which is pretty long) from /node_modules/@ionic/app-scripts/config/sass.config.js.
Then, search for the includePaths block and add one line to it at the end like this:
includePaths: [
  'node_modules/ionic-angular/themes',
  'node_modules/ionicons/dist/scss',
  'node_modules/ionic-angular/fonts',
  'node_modules/@swimlane/ngx-datatable/release'
],
Now both the font and styling of the package is copied to our build folder and we can use it easily! To make the styling available to our app we also need to import both available styles, so change your app/app.scss to:
@import 'themes/bootstrap';
@import 'themes/dark';
@import 'assets/icons';
That’s all for the integration, now to the actual usage!
Presenting a Basic Ionic Table
We start with a super basic example where we’ll display some information in the most easy way possible.
To use this package inside your pages you first need to add it to the imports of the module, in our case we need to change the pages/table/table.module.ts to this:
import { NgModule } from '@angular/core';
import { IonicPageModule } from 'ionic-angular';
import { TablePage } from './table';
import { NgxDatatableModule } from '@swimlane/ngx-datatable';

@NgModule({
  declarations: [
    TablePage,
  ],
  imports: [
    IonicPageModule.forChild(TablePage),
    NgxDatatableModule
  ],
})
export class TablePageModule {}
Next we need some data which I’ve copied from one of their examples.
Additionally I’ve already incorporated a little switch so you can change the theme of your datatable from bootstrap to dark so you can see both of them in action!
There’s not much to it right now, so change your pages/table/table.ts to:
import { Component } from '@angular/core';
import { IonicPage, NavController, NavParams } from 'ionic-angular';

@IonicPage()
@Component({
  selector: 'page-table',
  templateUrl: 'table.html',
})
export class TablePage {
  // https://github.com/swimlane/ngx-datatable/blob/master/assets/data/company.json
  rows = [
    {
      "name": "Ethel Price",
      "gender": "female",
      "age": 22
    },
    {
      "name": "Claudine Neal",
      "gender": "female",
      "age": 55
    },
    {
      "name": "Beryl Rice",
      "gender": "female",
      "age": 67
    },
    {
      "name": "Simon Grimm",
      "gender": "male",
      "age": 28
    }
  ];

  tablestyle = 'bootstrap';

  constructor(public navCtrl: NavController, public navParams: NavParams) { }

  switchStyle() {
    if (this.tablestyle == 'dark') {
      this.tablestyle = 'bootstrap';
    } else {
      this.tablestyle = 'dark';
    }
  }

}
We wanted to build the most basic version of a table first, so here it is! We only add one extra button to change our table style, and inside the view we craft the table.
This table needs rows which are the datasource and even the additional attributes I’ve adde might be obsolete but are needed to present the table in an appealing way on a mobile device.
Inside the table you then define columns for your values, in our case three of them which will look up the value of their name. The name doesn’t have to be the key inside the array, but more on this later.
The table will now iterate over your data and create the according rows and columns, so for now change the pages/table/table.html to:
<ion-header>
  <ion-navbar color="dark">
    <ion-title>ngx-Table</ion-title>
    <ion-buttons end>
      <button ion-button icon-only (click)="switchStyle()">
        <ion-icon name="bulb"></ion-icon>
      </button>
    </ion-buttons>
  </ion-navbar>
</ion-header>
<ion-content>

  <ngx-datatable class="fullscreen" [ngClass]="tablestyle" [rows]="rows" [columnMode]="'force'" [sortType]="'multi'" [reorderable]="false">
    <ngx-datatable-column name="Name"></ngx-datatable-column>
    <ngx-datatable-column name="Gender"></ngx-datatable-column>
    <ngx-datatable-column name="Age"></ngx-datatable-column>
  </ngx-datatable>
</ion-content>
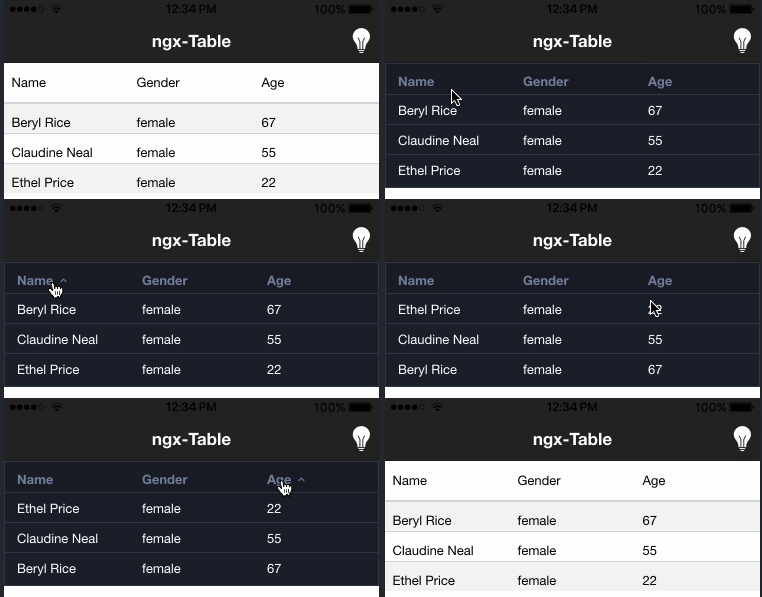
The result of this simple is what you can see below.

Kinda nice for just a few lines of HTML that create everything from a given datasource, right?
Advanced Ionic Datatable
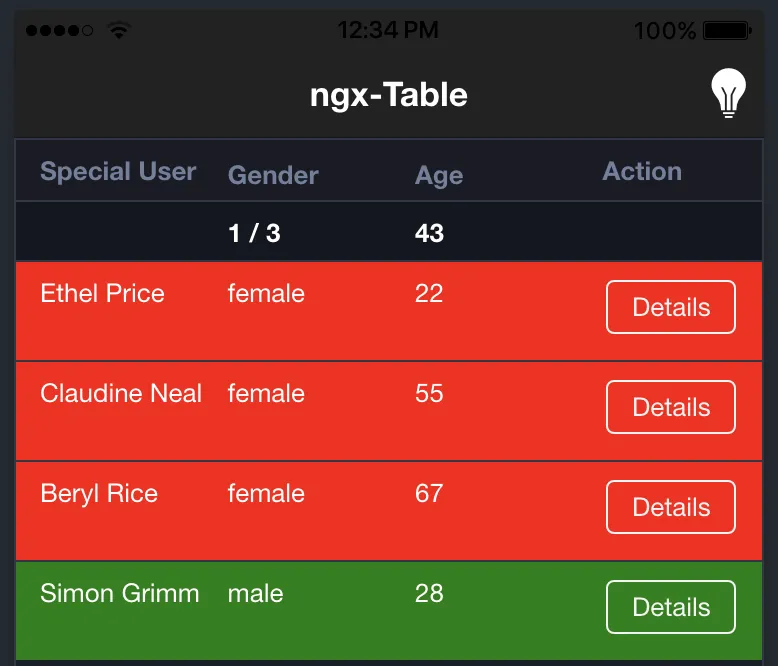
Let’s build a more sophisticated example with some reordering mechanism, additional row buttons and special styling.
For this, we start by adding a few functions to our class. To determine a special class that get’s added to a row we define the getRowClass() function that checks if the dataset of the row is a male or female person. In both cases we return the name of a CSS class that we will define later.
When we open a row, we simply present an alert with basic information gathered from the row to show how everyhting works.
Finally we also have some summary functions that can be used to display a summary row inside your table. Most of the time the default summary for your column won’t work so with these functions you can write your own logic for creating the sum or average or whatever you want to display!
In our case we present the sum of male/female persons as well as the average age of our persons.
Go ahead and add the new functions to your pages/table/table.ts like this:
import { Component } from '@angular/core';
import { IonicPage, NavController, NavParams, AlertController } from 'ionic-angular';

@IonicPage()
@Component({
  selector: 'page-table',
  templateUrl: 'table.html',
})
export class TablePage {
  // https://github.com/swimlane/ngx-datatable/blob/master/assets/data/company.json
  rows = [
    {
      "name": "Ethel Price",
      "gender": "female",
      "age": 22
    },
    {
      "name": "Claudine Neal",
      "gender": "female",
      "age": 55
    },
    {
      "name": "Beryl Rice",
      "gender": "female",
      "age": 67
    },
    {
      "name": "Simon Grimm",
      "gender": "male",
      "age": 28
    }
  ];

  tablestyle = 'bootstrap';

  constructor(public navCtrl: NavController, public navParams: NavParams, private alertCtrl: AlertController) { }

  switchStyle() {
    if (this.tablestyle == 'dark') {
      this.tablestyle = 'bootstrap';
    } else {
      this.tablestyle = 'dark';
    }
  }

  getRowClass(row) {
    return row.gender == 'male' ? 'male-row' : 'female-row';
  }

  open(row) {
    let alert = this.alertCtrl.create({
      title: 'Row',
      message: `${row.name} is ${row.age} years old!`,
      buttons: ['OK']
    });
    alert.present();
  }

  //
  // Summary Functions
  //
  genderSummary(values) {
    let male = values.filter(val => val == 'male').length;
    let female = values.filter(val => val == 'female').length;

    return `${male} / ${female}`;
  }

  ageSummary(values) {
    return values.reduce((a, b) => a+b, 0) / values.length;
  }

}
Now we also need to add some changes to the view in order to make use of the new functionality we’ve implemented. First of all we add the CSS that is needed to customize rows based on the gender, so change your pages/table/table.scss to:
page-table {
    .male-row {
        background-color: green !important;
    }
    .female-row {
        background-color: red !important;
    }
}
The last missing piece now is the view which needs to be changed for our custom columns. We’ve previously seen basic columns, but we can also have more control about the header, the used value for the column or which summary function should be used.
There are quite a few options you can set for both the table and columns, so for all the information check out the official documentation which also contains examples for almost everything the package offers!
Let’s change the code and talk about a few elements afterwards, so open your pages/table/table.html and change it to:
<ion-header>
  <ion-navbar color="dark">
    <ion-title>ngx-Table</ion-title>
    <ion-buttons end>
      <button ion-button icon-only (click)="switchStyle()">
        <ion-icon name="bulb"></ion-icon>
      </button>
    </ion-buttons>
  </ion-navbar>
</ion-header>
<ion-content>

  <ngx-datatable class="fullscreen" [ngClass]="tablestyle" [rows]="rows" [columnMode]="'force'" [sortType]="'multi'" [reorderable]="false"
    [rowHeight]="50" [rowClass]="getRowClass" [summaryRow]="true" [summaryPosition]="'top'">

    <ngx-datatable-column prop="name" [resizeable]="false">
      <ng-template let-column="column" ngx-datatable-header-template let-sort="sortFn">
        <span (click)="sort()">Special User</span>
      </ng-template>
      <ng-template let-value="value" ngx-datatable-cell-template>
        {{ value }}
      </ng-template>
    </ngx-datatable-column>

    <ngx-datatable-column name="Gender" [summaryFunc]="genderSummary.bind(this)"></ngx-datatable-column>

    <ngx-datatable-column name="Age" [summaryFunc]="ageSummary.bind(this)"></ngx-datatable-column>

    <ngx-datatable-column name="id" [resizeable]="false">
      <ng-template ngx-datatable-header-template>
        Action
      </ng-template>
      <ng-template let-row="row" ngx-datatable-cell-template>
        <button ion-button small outline color="light" (click)="open(row)">Details</button>
      </ng-template>
    </ngx-datatable-column>

  </ngx-datatable>
</ion-content>
Here is a bit more information about what we’ve used and what it does:
- let-sort=“sortFn”: Use the default alpha numeric ordering mechanism for this column
- prop: Use the specified key inside the datasource to lookup the value for the column
- summaryFunc: Use a special summary function for the whole column
- .bind(this): Not needed here but makes
thisavailable inside the function called! - let-value=“value”: Makes the value of the column available as
value - let-row=“row”: Make the whole
rowobject available inside the column
As said before, there’s really a lot you can customize and some elements won’t work that well together. In my testing, the now applied summary function actually breaks the reordering mechanism, but I’m sure there is some fix for that issue as well.
Conclusion
Overall you should be careful when you use a table inside a mobile app, but if you decide you need one the ngx-datatable is an awesome package that offers a lot of options to customize how your data is presented!
You can also find a video version of this article below.
