How to Build an Ionic Calendar App Last update: 2017-06-13

Out of the box there is no Ionic Calendar component to display a classic calendar inside your app, but what if you want to give people the chance to add events and display everything inside a good-looking view?
Like always we can rely on a helpful third-party package called Ionic calendar. In this tutorial we will build our own Ionic calendar app to add events into an almost Apple like looking calendar view! Of course we could also access the device calendar to add events, but that’s not helping us regarding showing some sort of table to the user.
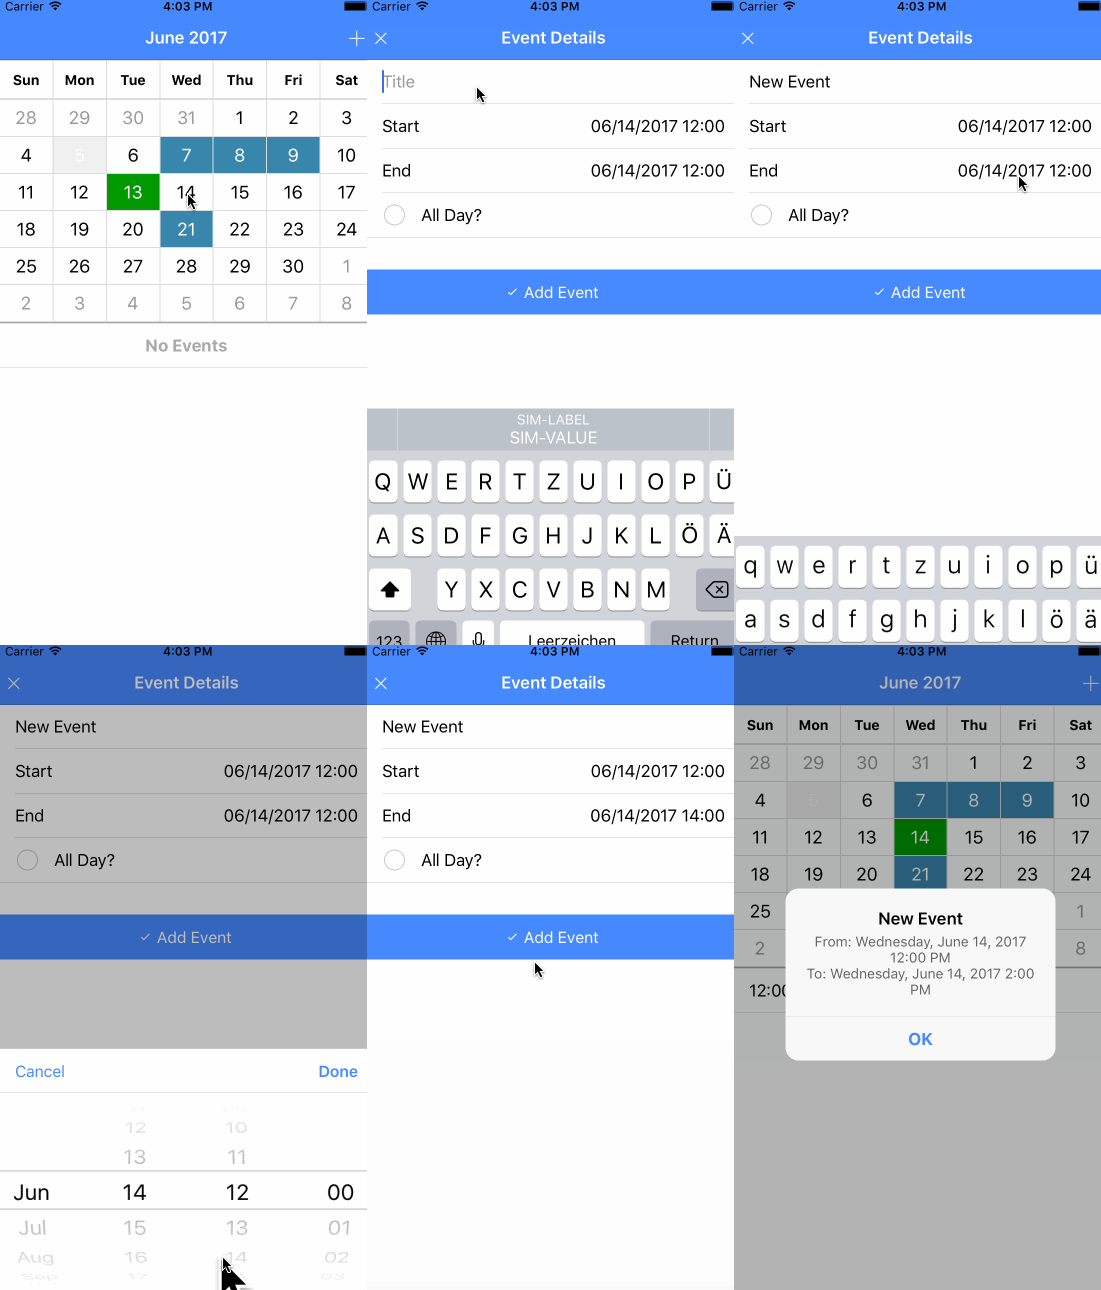
Once done our app will look like in the image below, where we can insert new events into our own custom calendar view.

Setting up the Ionic Calendar App
As always we start with a blank new Ionic app. We create another page where we will add details for a new event, and we install the ionic-calendar package plus 2 more packages. The first is needed as a dependency of the calendar, the second is Moment.js which helps us to transform some of our dates more easily than we could do with pure Javascript.
Go ahead now and start your app like this:
ionic start devdacticCalendar blank
cd devdacticCalendar
ionic g page eventModal
npm install ionic2-calendar --save
npm install moment --save
npm install intl@1.2.5 --save
To make use of the calendar we also need to import it, so open your src/app/app.module.ts and insert:
import { BrowserModule } from '@angular/platform-browser';
import { ErrorHandler, NgModule } from '@angular/core';
import { IonicApp, IonicErrorHandler, IonicModule } from 'ionic-angular';
import { SplashScreen } from '@ionic-native/splash-screen';
import { StatusBar } from '@ionic-native/status-bar';

import { MyApp } from './app.component';
import { HomePage } from '../pages/home/home';

import { NgCalendarModule  } from 'ionic2-calendar';

@NgModule({
  declarations: [
    MyApp,
    HomePage
  ],
  imports: [
    NgCalendarModule,
    BrowserModule,
    IonicModule.forRoot(MyApp)
  ],
  bootstrap: [IonicApp],
  entryComponents: [
    MyApp,
    HomePage
  ],
  providers: [
    StatusBar,
    SplashScreen,
    {provide: ErrorHandler, useClass: IonicErrorHandler}
  ]
})
export class AppModule {}
Building the Ionic Calendar View
The view of our main calendar is actually super easily, because all the heavy work is done by our package. Inside the nav bar we add a button to call our addEvent() function, and inside the content we only add the calendar.
We take a look at all the options in a second, for now simply add this to your src/pages/home/home.html:
<ion-header>
  <ion-navbar color="primary">
    <ion-title>
      {{ viewTitle }}
    </ion-title>
    <ion-buttons end>
      <button ion-button icon-only (click)="addEvent()">
        <ion-icon name="add"></ion-icon>
      </button>
    </ion-buttons>
  </ion-navbar>
</ion-header>

<ion-content>
<calendar [eventSource]="eventSource"
        [calendarMode]="calendar.mode"
        [currentDate]="calendar.currentDate"
        (onEventSelected)="onEventSelected($event)"
        (onTitleChanged)="onViewTitleChanged($event)"
        (onTimeSelected)="onTimeSelected($event)"
        step="30"
        class="calendar">
      </calendar>
</ion-content>
We haven’t actually used everything of that plugin, but what we used so far is:
- eventSource: The data we feed to the calendar view
- currentDate: Needed to mark “today”
- onEventSelected: Handle a tap on a single event
- onTitleChanged: Happens when we swipe to a new month
- onTimeSelected: Happens when we select a day or time
- step: Used for accuracy of a day or week view
You can check out all options here again.
Now that we got the view let’s connect it with our controller. As we see we need to create some functions, and most of them are pretty basic.
When we want to add an event, we will show a new page to set up the information. Once the modal view is dismissed we create the event and push it to our eventSource. To update the information inside the view we also need to use setTimeout so the data will be reloaded inside the view.
If we click on a single event we will simply alert out some information. This is a point where you could also drill deeper into a day view or show more information for a single event.
Make sure your controller contains all the needed information and functions for the calendar, so go ahead and change your src/pages/home/home.ts to:
import { Component } from '@angular/core';
import { NavController, ModalController, AlertController } from 'ionic-angular';
import * as moment from 'moment';

@Component({
  selector: 'page-home',
  templateUrl: 'home.html'
})
export class HomePage {
  eventSource = [];
  viewTitle: string;
  selectedDay = new Date();

  calendar = {
    mode: 'month',
    currentDate: new Date()
  };

  constructor(public navCtrl: NavController, private modalCtrl: ModalController, private alertCtrl: AlertController) { }

  addEvent() {
    let modal = this.modalCtrl.create('EventModalPage', {selectedDay: this.selectedDay});
    modal.present();
    modal.onDidDismiss(data => {
      if (data) {
        let eventData = data;

        eventData.startTime = new Date(data.startTime);
        eventData.endTime = new Date(data.endTime);

        let events = this.eventSource;
        events.push(eventData);
        this.eventSource = [];
        setTimeout(() => {
          this.eventSource = events;
        });
      }
    });
  }

  onViewTitleChanged(title) {
    this.viewTitle = title;
  }

  onEventSelected(event) {
    let start = moment(event.startTime).format('LLLL');
    let end = moment(event.endTime).format('LLLL');

    let alert = this.alertCtrl.create({
      title: '' + event.title,
      subTitle: 'From: ' + start + '<br>To: ' + end,
      buttons: ['OK']
    })
    alert.present();
  }

  onTimeSelected(ev) {
    this.selectedDay = ev.selectedTime;
  }
}
We are now ready to run our Ionic Calendar app, but we can’t add any events so let’s wrap this up with the last missing piece.
Adding User Events
We already implemented the function to display our second view, so this view will allow the user to insert some details for a new event. Of course we could also store some own information here and improve the date display, but for now this is enough.
Open your src/pages/event-modal/event-modal.html and change it to:
<ion-header>
  <ion-navbar color="primary">
    <ion-buttons start>
      <button ion-button icon-only (click)="cancel()">
        <ion-icon name="close"></ion-icon>
      </button>
    </ion-buttons>
    <ion-title>Event Details</ion-title>
  </ion-navbar>
</ion-header>

<ion-content>
  <ion-list>
    <ion-item>
      <ion-input type="text" placeholder="Title" [(ngModel)]="event.title"></ion-input>
    </ion-item>

    <ion-item>
      <ion-label>Start</ion-label>
      <ion-datetime displayFormat="MM/DD/YYYY HH:mm" pickerFormat="MMM D:HH:mm" [(ngModel)]="event.startTime" [min]="minDate"></ion-datetime>
    </ion-item>

    <ion-item>
      <ion-label>End</ion-label>
      <ion-datetime displayFormat="MM/DD/YYYY HH:mm" pickerFormat="MMM D:HH:mm" [(ngModel)]="event.endTime" [min]="minDate"></ion-datetime>
    </ion-item>

    <ion-item>
      <ion-label>All Day?</ion-label>
      <ion-checkbox [(ngModel)]="event.allDay"></ion-checkbox>
    </ion-item>
  </ion-list>

  <button ion-button full icon-left (click)="save()">
    <ion-icon name="checkmark"></ion-icon> Add Event
  </button>
</ion-content>
We just add a bunch of standard Ionic inputs and controls to build out the event object of that class.
Speaking of the class, here we only have a few interesting points. For one, we pass in the currently selected date from our calendar view. By doing this we can automatically set the start date to that previously selected date like any good calendar!
When we want to save or add the event, we will simply dismiss the page and pass the current event as an object. We already added the logic to catch this data and create a new event from it, so now we only have to add this to our src/pages/event-modal/event-modal.ts:
import { Component } from '@angular/core';
import { IonicPage, NavController, NavParams, ViewController } from 'ionic-angular';
import * as moment from 'moment';

@IonicPage()
@Component({
  selector: 'page-event-modal',
  templateUrl: 'event-modal.html',
})
export class EventModalPage {

  event = { startTime: new Date().toISOString(), endTime: new Date().toISOString(), allDay: false };
  minDate = new Date().toISOString();

  constructor(public navCtrl: NavController, private navParams: NavParams, public viewCtrl: ViewController) {
    let preselectedDate = moment(this.navParams.get('selectedDay')).format();
    this.event.startTime = preselectedDate;
    this.event.endTime = preselectedDate;
  }

  cancel() {
    this.viewCtrl.dismiss();
  }

  save() {
    this.viewCtrl.dismiss(this.event);
  }

}
We are done and you should be able to see your calendar and add your own events now!
Conclusion
With the help of this plugin it’s actually not really hard to implement a calendar with Ionic. You can of course change the CSS so it fit’s your app, and you could add more logic to store and retrieve events from your own backend.
This tutorial should give you a good starting point if you want to implement your own calendar!
You can find a video version of this article below.
Happy Coding, Simon https://youtu.be/GOPEV3sE36o
