Building an Ionic 4 Pokédex with Search, Infinite Scroll & Skeleton Views Last update: 2019-08-06

While we focus on different detailed aspects of Ionic in most tutorials, today I wanted to offer a more holistic approach that everyone can follow to integrate some of the most common features into an Ionic 4 app.
Therefore we will today dive into the great PokeAPI, a free API that we can use to build a cool Pokédex application!
This means we will integrate HTTP requests, infinite loading for Ionic lists, working with RxJS, creating a search bar and adding navigation.
Sounds fun? Let’s do this!
Setting up Our Pokdex
We get started with a blank Ionic app template and only generate one additional page (for the details of a Pokémon) and also a service that will hold most of our logic, so go ahead and run:
ionic start devdacticPokedex blank
cd devdacticPokedex
ionic g page details
ionic g service services/pokemon
In order to make any HTTP requests to a server we have to import the HttpClientModule to our main module, so open your app/app.module.ts and change it to:
import { NgModule } from '@angular/core';
import { BrowserModule } from '@angular/platform-browser';
import { RouteReuseStrategy } from '@angular/router';

import { IonicModule, IonicRouteStrategy } from '@ionic/angular';
import { SplashScreen } from '@ionic-native/splash-screen/ngx';
import { StatusBar } from '@ionic-native/status-bar/ngx';

import { AppComponent } from './app.component';
import { AppRoutingModule } from './app-routing.module';

import { HttpClientModule } from '@angular/common/http';

@NgModule({
  declarations: [AppComponent],
  entryComponents: [],
  imports: [BrowserModule, IonicModule.forRoot(), AppRoutingModule, HttpClientModule],
  providers: [
    StatusBar,
    SplashScreen,
    { provide: RouteReuseStrategy, useClass: IonicRouteStrategy }
  ],
  bootstrap: [AppComponent]
})
export class AppModule {}
Now we can also setup the routing logic in advance. Our app has 2 screens, the initial list of Pokémon and a detail view. The CLI has already created a new route for the page we created, but we want to be able to pass an ID to that page so we can simply change our routing to this inside the app/app-routing.module.ts:
import { NgModule } from '@angular/core';
import { PreloadAllModules, RouterModule, Routes } from '@angular/router';

const routes: Routes = [
  { path: '', redirectTo: 'home', pathMatch: 'full' },
  { path: 'home', loadChildren: './home/home.module#HomePageModule' },
  { path: 'home/:index', loadChildren: './details/details.module#DetailsPageModule' },
];

@NgModule({
  imports: [
    RouterModule.forRoot(routes, { preloadingStrategy: PreloadAllModules })
  ],
  exports: [RouterModule]
})
export class AppRoutingModule { }
Now we are able to access the first page at /home and navigate to any details page by calling /home/1 for example to open the details for Pokémon 1.
We’ll later see how to actually retrieve the information from the URL using the Angular router.
If you want to see more possible ways to send data to a details page check out this quick win on routing inside the Ionic Academy!
Finally, if you want to achieve the full Pokédex flair you need a nice red touch. For this, we can easily change the predefined colors inside the theme/variables.scss and change the primary entries to:
  --ion-color-primary: #DC0A2C;
  --ion-color-primary-rgb: 220,10,44;
  --ion-color-primary-contrast: #ffffff;
  --ion-color-primary-contrast-rgb: 255,255,255;
  --ion-color-primary-shade: #c20927;
  --ion-color-primary-tint: #e02341;
Now we are ready for the more complicated things!
Having Fun with RxJS
Making basic HTTP requests isn’t really a problem. It’s one line of code to make a GET request and see the data.
But in this case with the given API we encounter a few problems:
- The basic list of Pokémon does not contain information about their image
- We should not load all data, so we have to work with an offset
- Because of the offset we need a better way to find out the real index of the Pokémon
- Some attributes are not formatted as an Array which makes working with the data harder
You could tackle all these issues at the end of the chain in your controller or views, but that’s not how you should approach it.
The best way to overcome these problems is to directly work with the data returned by the HTTP requests inside our service. Here we can simply map() the result to something else and chain different operations inside the pipe() block of the Observable!
This means, in our case we can for example use the index of the Pokémon to construct the URL to the image and store it under a new key “image” (which does not yet exist on the object). You can llokup the URL for the images pretty easy, just change the number at the end for example: https://raw.githubusercontent.com/PokeAPI/sprites/master/sprites/pokemon/25.webp
Also, in all of the calls we directly calculate the real index of the Pokémon based on the given offset and index in the result array (which only contains 25 objects per call as specified by our limit query param!).
Let’s go ahead by implementing your services/pokemon.service.ts like this:
import { Injectable } from '@angular/core';
import { HttpClient } from '@angular/common/http';
import { map } from 'rxjs/operators';

@Injectable({
  providedIn: 'root'
})
export class PokemonService {
  baseUrl = 'https://pokeapi.co/api/v2';
  imageUrl = 'https://raw.githubusercontent.com/PokeAPI/sprites/master/sprites/pokemon/';

  constructor(private http: HttpClient) {}

  getPokemon(offset = 0) {
    return this.http
      .get(`${this.baseUrl}/pokemon?offset=${offset}&limit=25`)
      .pipe(
        map(result => {
          return result['results'];
        }),
        map(pokemon => {
          return pokemon.map((poke, index) => {
            poke.image = this.getPokeImage(offset + index + 1);
            poke.pokeIndex = offset + index + 1;
            return poke;
          });
        })
      );
  }

  findPokemon(search) {
    return this.http.get(`${this.baseUrl}/pokemon/${search}`).pipe(
      map(pokemon => {
        pokemon['image'] = this.getPokeImage(pokemon['id']);
        pokemon['pokeIndex'] = pokemon['id'];
        return pokemon;
      })
    );
  }

  getPokeImage(index) {
    return `${this.imageUrl}${index}.webp`;
  }

  getPokeDetails(index) {
    return this.http.get(`${this.baseUrl}/pokemon/${index}`).pipe(
      map(poke => {
        let sprites = Object.keys(poke['sprites']);
        poke['images'] = sprites
          .map(spriteKey => poke['sprites'][spriteKey])
          .filter(img => img);
        return poke;
      })
    );
  }
}
All of this mapping will transform the data of the request and once we receive the data in our controller there is really not much to do and we can easily use the properties we added ”on the fly“.
Oh and if you wonder why we change the sprites: The sprites in the regular response is not an array. This makes iterating the entries in the view more complicated, so we can easily transform it to an array and at the same time filter() out all the null values!
Building Our Pokédex with Search and Infinite Scroll
I would say from now on things get a lot easier. We can now happily call our service functions and trust that we will receive all the data needed for our views!
So on our first page we load a list of Pokémon, and we keep track of the offset so the calls to the API will look like:
- https://pokeapi.co/api/v2/pokemon?offset=0&limit=25
- https://pokeapi.co/api/v2/pokemon?offset=25&limit=25
- https://pokeapi.co/api/v2/pokemon?offset=50&limit=25
- …
In order to make our view display the items we need to set the whole array, so we can use the spread operator … to fill a new array with the items of two arrays! If you would just concat the data the view wouldn’t reload immediately.
Also, if the function was called using the infinite scroll component (you will see this in the view in a second) we need to take care of finishing the loading animation by calling complete() on the refresher object.
Finally, we also need to handle any search input, so whenever someone changes the data in the search of the view we will make another call to our service to search for a given name or ID. Don’t worry right now - there is a built in debounce time in the Ionic search bar so the function won’t be called after every character if you type quickly!
For now let’s change the home/home.page.ts to:
import { PokemonService } from './../services/pokemon.service';
import { Component, OnInit, ViewChild } from '@angular/core';
import { IonInfiniteScroll } from '@ionic/angular';
@Component({
selector: 'app-home',
templateUrl: 'home.page.html',
styleUrls: ['home.page.scss'],
})
export class HomePage implements OnInit {
offset = 0;
pokemon = [];
@ViewChild(IonInfiniteScroll) infinite: IonInfiniteScroll;
constructor(private pokeService: PokemonService) { }
ngOnInit() {
this.loadPokemon();
}
loadPokemon(loadMore = false, event?) {
if (loadMore) {
this.offset += 25;
}
this.pokeService.getPokemon(this.offset).subscribe(res => {
this.pokemon = [...this.pokemon, ...res];
if (event) {
event.target.complete();
}
// Optional
if (this.offset == 125) {
this.infinite.disabled = true;
}
});
}
onSearchChange(e) {
let value = e.detail.value;
if (value == '') {
this.offset = 0;
this.loadPokemon();
return;
}
this.pokeService.findPokemon(value).subscribe(res => {
this.pokemon = [res];
}, err => {
this.pokemon = [];
});
}
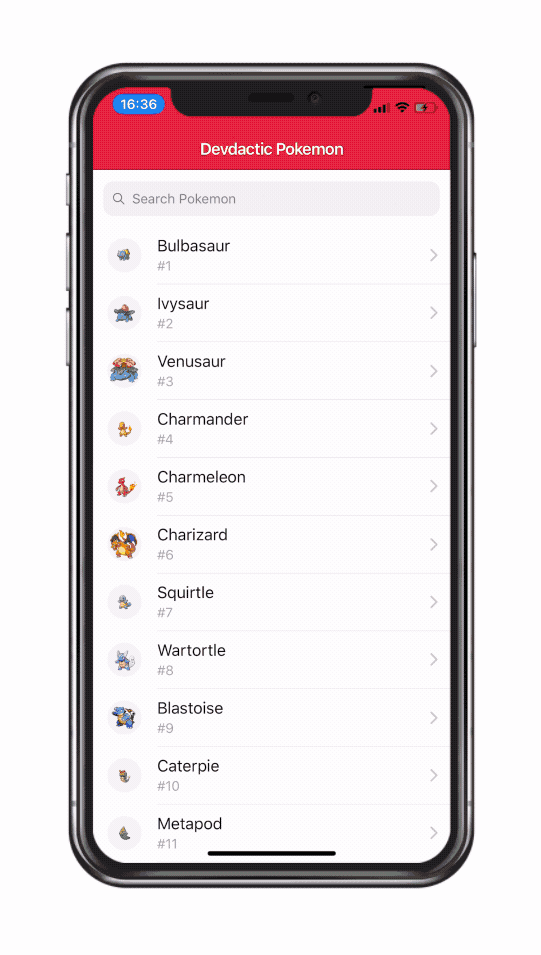
}Now we need the view based on the list of Pokémon we got plus the Ionic search bar and the Ionic infinite scroll component. Both of these component offer a lot of settings but for now we’ll stick to the basics in here.
In the next snippet I also added the Ionic skeleton text whenever the array is empty. This is a great component to indicate progress in your app and make loading times look way faster. You can notice the general behaviour of these skeleton views in basically all Popular apps!
In our list we need to take care of the routing now as well, so every item will have a router link - remember how we set it up in the beginning?
And because we created our custom field pokeIndex we can now make use of it, just like the image link that we can easily set as the source of our thumbnail!
Finally the infinite scroll component can be integrated pretty easily at the top or the end of a list. All we need is to call the function of our class to handle the loading logic, and this will automatically trigger once we get close to the end of the list.
Now go ahead and change your home/home.page.html to:
<ion-header>
  <ion-toolbar color="primary">
    <ion-title>
      Devdactic Pokemon
    </ion-title>
  </ion-toolbar>
</ion-header>

<ion-content>
  <ion-searchbar placeholder="Search Pokemon" (ionChange)="onSearchChange($event)"></ion-searchbar>
  <ion-list *ngIf="pokemon.length == 0">
    <ion-item *ngFor="let i of [1,2,3,4,5]">
      <ion-avatar slot="start">
        <ion-skeleton-text animated></ion-skeleton-text>
      </ion-avatar>
      <ion-label class="ion-text-capitalize">
        <h2>
          <ion-skeleton-text animated style="width: 50%"></ion-skeleton-text>
        </h2>
        <p>
          <ion-skeleton-text animated style="width: 20%"></ion-skeleton-text>
        </p>
      </ion-label>
    </ion-item>
  </ion-list>

  <ion-list>
    <ion-item *ngFor="let poke of pokemon;" [routerLink]="poke.pokeIndex">
      <ion-avatar slot="start">
        <img [src]="poke.image" style="background: #F2F2F2;">
      </ion-avatar>
      <ion-label class="ion-text-capitalize">
        <h2>{{ poke.name }}</h2>
        <p>#{{ poke.pokeIndex }}</p>
      </ion-label>
    </ion-item>
  </ion-list>

  <ion-infinite-scroll (ionInfinite)="loadPokemon(true, $event)">
    <ion-infinite-scroll-content loadingSpinner="bubbles" loadingText="Loading more Pokemon...">
    </ion-infinite-scroll-content>
  </ion-infinite-scroll>

</ion-content>
You should be able to see a nice list of Pokémon now, but the details page is still to do.
Pokedetails with JSON Data
This is a very classic pattern: You pass an ID to a details page to show information about a house, an item from a shop or whatever it might be.
In most cases your API should allow to receive the data like this, if you directly need to pass a whole object to the next page already check out the Quick Win on Angular routing again.
With the Angular router we can now easily retrieve the ID we used in the URL through the ActivatedRoute and then use this information to make a call through our service. See how wonderful all our preparation comes together!
There’s really not much else to the details page, so open the details/details.page.ts and change it to:
import { PokemonService } from './../services/pokemon.service';
import { Component, OnInit } from '@angular/core';
import { ActivatedRoute } from '@angular/router';

@Component({
  selector: 'app-details',
  templateUrl: './details.page.html',
  styleUrls: ['./details.page.scss'],
})
export class DetailsPage implements OnInit {
  details: any;

  slideOpts = {
    autoplay: {
      delay: 1000,
      disableOnInteraction: false
    }
  };

  constructor(private pokeService: PokemonService, private route: ActivatedRoute) { }

  ngOnInit() {
    let index = this.route.snapshot.paramMap.get('index');
    this.pokeService.getPokeDetails(index).subscribe(details => {
      this.details = details;
    });
  }
}
Now we just need to display the details information, and for this I recommend you simply log the value of your object and see which properties you would like to display.
In the following view we also use the Elvis Operator or safe navigation operator ? to access properties without crashing if the object does not yet exist (like in the title). Remember, we load the data from the API which is asynchronous, so when the view is loaded the data is not instant available!
If you don’t want to use the operator all across your page you can also simply wrap your element inside a div with an *ngIf check to make sure you got the data!
What follows then is just looking at JSON data, understanding the types and the path you need to follow to different objects and keys. This is actually where a lot of people go wrong, but you really only need to follow the path and understand if you have an array you can iterate or just plain keys!
So here is an example how your details/details.page.html could look like:
<ion-header>
  <ion-toolbar color="primary">
    <ion-buttons slot="start">
      <ion-back-button defaultHref="home"></ion-back-button>
    </ion-buttons>
    <ion-title class="ion-text-capitalize">{{ details?.name }}</ion-title>
  </ion-toolbar>
</ion-header>

<ion-content>

  <div *ngIf="details">
    <ion-slides pager="true" [options]="slideOpts">
      <ion-slide *ngFor="let sprite of details.images">
        <img [src]="sprite" style="height: 250px;">
      </ion-slide>
    </ion-slides>

    <ion-card>
      <ion-card-header>
        <ion-card-title class="ion-text-capitalize">#{{ details.id }} {{ details.name }}
          <ion-chip color="primary" *ngFor="let t of details.types">
            <ion-label>{{ t.type.name }}</ion-label>
          </ion-chip>
        </ion-card-title>
        <ion-card-subtitle class="ion-text-capitalize">{{ details.weight }} lbs</ion-card-subtitle>
      </ion-card-header>

      <ion-card-content>
        <ion-list lines="full">
          <ion-item>
            <ion-label text-wrap><b>Abilities:</b> <span *ngFor="let a of details.abilities; let isLast = last"
                class="ion-text-capitalize">
                {{ a.ability.name }}{{ !isLast ? ',' : '' }}
              </span></ion-label>
          </ion-item>
          <ion-item *ngFor="let s of details.stats" class="ion-text-capitalize">
            <ion-label slot="start"><b>{{ s.stat.name }}:</b></ion-label>
            <ion-label slot="end">
              {{ s.base_stat }}
            </ion-label>
          </ion-item>
        </ion-list>
      </ion-card-content>
    </ion-card>
  </div>

</ion-content>
Feel free to experiment with the different fields and look up what the JSON has to offer.
Oh and before we end this: We’ve also added the Ionic slides component in here which is based on sprites array - the one we composed in our service on the fly!
This gives a nice gallery of images, and you can also pass an options object to the slides (which we created in the details class) where you can specify a lot of settings like in this case autoplay all the Pokémon sprites!
Conclusion
Good planning and preparation pays off. We’ve built a simple Pokédex together and because we did all the hard work in our service, we could focus on creating the views and didn’t have to worry how to transform the data at that end to fit our needs!
This is an approach you should follow when building Ionic (or any) apps, and also make sure you feel comfortable with the JSON data of API responses.
You can also find a video version of this tutorial with more explanation below.