The Ionic 4 Media Files Guide (Images, Movies & Audio) Last update: 2019-11-12

Working with files in Ionic has traditionally been one of the biggest challenge, since iOS and Android both handle them quite different.
Today we will try to conquer the field of media files which means images, movies and audio files. And we will capture them with our Ionic 4 app, store them inside the apps data directory and play it!
This was the second place in your content vote with so many votes that I just had to create the tutorial on it as well.
For iOS all of this works pretty smooth, for Android we have to add some workarounds here and there to make everything work.
Setting up Our Media Plugins
This tutorial makes heavy use of Cordova plugins as we gonna do a lot of different things with different media types. If you just need a specific feature pick the according package and Cordova plugin and only follow up with the code for it!
Also, of course make sure to test your app on a real device or emulator and not the browser - no chance with all of our plugins.
Now go ahead, get a coffee and let the installation for all the plugins run through:
ionic start devdacticMedia blank
cd ./devdacticMedia

npm i @ionic-native/media-capture
npm i @ionic-native/file
npm i @ionic-native/media
npm i @ionic-native/streaming-media
npm i @ionic-native/photo-viewer
npm i @ionic-native/image-picker

ionic cordova plugin add cordova-plugin-media-capture
ionic cordova plugin add cordova-plugin-file
ionic cordova plugin add cordova-plugin-media
ionic cordova plugin add cordova-plugin-streaming-media
ionic cordova plugin add com-sarriaroman-photoviewer
ionic cordova plugin add cordova-plugin-telerik-imagepicker

// For the imagepicker on Android we need a fix
cordova plugin add cordova-android-support-gradle-release
// https://github.com/wymsee/cordova-imagePicker/issues/212#issuecomment-438895540
Let’s see what each of these plugins does:
- Media Capture: The plugin we use to capture videos, images and audio. Audio might be a problem on Android for some devices, so make sure you have a recorder app installed as well.
- File: After capturing media you should move it to your apps folder, and with the File plugin we can do all of those operations
- Media: To play Audio in an easy way, but there are also other alternatives to manage audio even better with additional controls
- Streaming Media: Play a video in a nice player, but of course HTML5 video tags would work as well
- Photo Viewer: We don’t want another component to show an image lightbox, so we can also use this plugin
- Image Picker: As requested by the community, select multiple images from the library with this one
Now that we got all of this installed, you also need to add them to your app/app.module.ts so go ahead and change it to:
import { NgModule } from '@angular/core';
import { BrowserModule } from '@angular/platform-browser';
import { RouteReuseStrategy } from '@angular/router';

import { IonicModule, IonicRouteStrategy } from '@ionic/angular';
import { SplashScreen } from '@ionic-native/splash-screen/ngx';
import { StatusBar } from '@ionic-native/status-bar/ngx';

import { AppComponent } from './app.component';
import { AppRoutingModule } from './app-routing.module';
import { ImagePicker } from '@ionic-native/image-picker/ngx';
import { File } from '@ionic-native/File/ngx';
import { MediaCapture } from '@ionic-native/media-capture/ngx';
import { Media } from '@ionic-native/media/ngx';
import { StreamingMedia } from '@ionic-native/streaming-media/ngx';
import { PhotoViewer } from '@ionic-native/photo-viewer/ngx';

@NgModule({
  declarations: [AppComponent],
  entryComponents: [],
  imports: [BrowserModule, IonicModule.forRoot(), AppRoutingModule],
  providers: [
    StatusBar,
    SplashScreen,
    { provide: RouteReuseStrategy, useClass: IonicRouteStrategy },
    ImagePicker,
    MediaCapture,
    File,
    Media,
    StreamingMedia,
    PhotoViewer
  ],
  bootstrap: [AppComponent]
})
export class AppModule {}
Now the app is ready, but on iOS your app will likely crash because a lot of permissions are missing! To automatically include them with your build, you can add these entries in the iOS section of your config.xml:
<edit-config file="*-Info.plist" mode="merge" target="NSCameraUsageDescription">
    <string>need camera access to take pictures</string>
</edit-config>
<edit-config file="*-Info.plist" mode="merge" target="NSPhotoLibraryUsageDescription">
    <string>need photo library access to get pictures from there</string>
</edit-config>
<edit-config file="*-Info.plist" mode="merge" target="NSPhotoLibraryAddUsageDescription">
    <string>need to store photos to your library</string>
</edit-config>
<edit-config file="*-Info.plist" mode="merge" target="NSMicrophoneUsageDescription">
    <string>need to record your voice</string>
</edit-config>
Make sure to use a meaningful description and not just the ones above when releasing your app later on!
Loading our Media Files on Start
Basically all of our action will take place in one file, and therefore we will simply split the code a bit as one big snippet would get out of hand here.
For the beginning, let’s add all the imports and inject all the packages to our initial page.
Also, we take a bit different approach then we did in our complete guide to Ionic 4 images: This time we will not store a reference to the file, but simply list the content of a folder in our app!
Therefore, we have to check if the folder exists or otherwise create it, and then we can read the content into our files array.
So here’s the first part of our app/home/home.page.ts:
import { Component, OnInit } from '@angular/core';
import { ImagePicker } from '@ionic-native/image-picker/ngx';
import { ActionSheetController, Platform } from '@ionic/angular';
import {
  MediaCapture,
  MediaFile,
  CaptureError
} from '@ionic-native/media-capture/ngx';
import { File, FileEntry } from '@ionic-native/File/ngx';
import { Media, MediaObject } from '@ionic-native/media/ngx';
import { StreamingMedia } from '@ionic-native/streaming-media/ngx';
import { PhotoViewer } from '@ionic-native/photo-viewer/ngx';

const MEDIA_FOLDER_NAME = 'my_media';

@Component({
  selector: 'app-home',
  templateUrl: 'home.page.html',
  styleUrls: ['home.page.scss']
})
export class HomePage implements OnInit {
  files = [];

  constructor(
    private imagePicker: ImagePicker,
    private mediaCapture: MediaCapture,
    private file: File,
    private media: Media,
    private streamingMedia: StreamingMedia,
    private photoViewer: PhotoViewer,
    private actionSheetController: ActionSheetController,
    private plt: Platform
  ) {}

  ngOnInit() {
    this.plt.ready().then(() => {
      let path = this.file.dataDirectory;
      this.file.checkDir(path, MEDIA_FOLDER_NAME).then(
        () => {
          this.loadFiles();
        },
        err => {
          this.file.createDir(path, MEDIA_FOLDER_NAME, false);
        }
      );
    });
  }

  loadFiles() {
    this.file.listDir(this.file.dataDirectory, MEDIA_FOLDER_NAME).then(
      res => {
        this.files = res;
      },
      err => console.log('error loading files: ', err)
    );
  }
}
As you can see most imports are still unused - we will use them now one by one.
Displaying Our Files
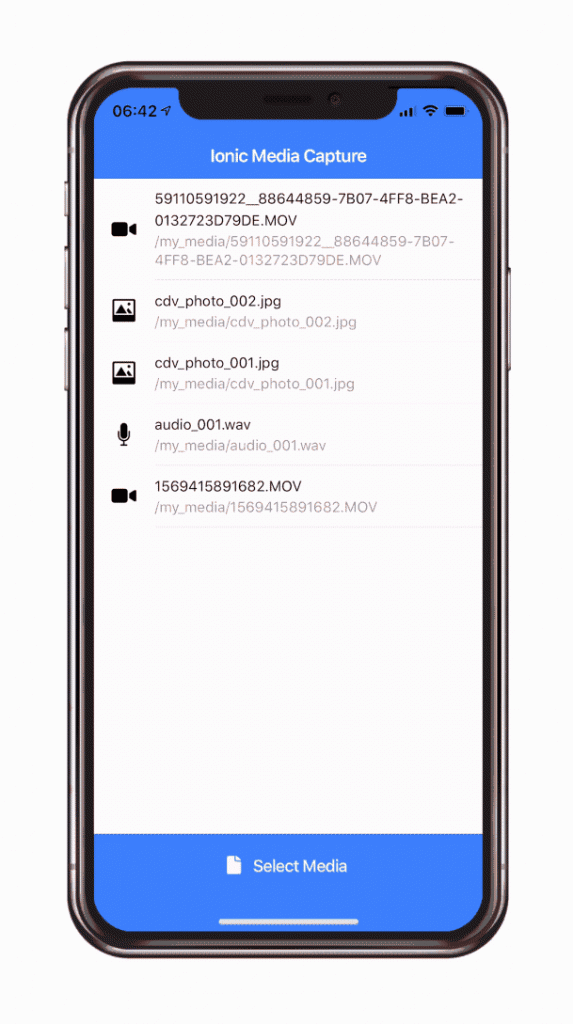
Before we dive into the more complex file stuff let’s quickly set up the view so we can actually see the result of our hard work.
From the previous step we have an array of files (specific: FileEntries) and we simply display them in our list with an according icon based on the file type.
Additionally we show the path but that’s just for us and the debugging, nothing important. Finally we add a button to the footer from which we will open a selection for the operation we want to perform.
So go ahead and change your app/home/home.page.html to:
<ion-header>
  <ion-toolbar color="primary">
    <ion-title>
      Ionic Media Capture
    </ion-title>
  </ion-toolbar>
</ion-header>

<ion-content>
  <ion-list>
    <ion-item-sliding *ngFor="let f of files">
      <ion-item (click)="openFile(f)">
        <ion-icon name="image" slot="start" *ngIf="f.name.endsWith('jpg')"></ion-icon>
        <ion-icon name="videocam" slot="start" *ngIf="f.name.endsWith('MOV') || f.name.endsWith('mp4')"></ion-icon>
        <ion-icon name="mic" slot="start" *ngIf="f.name.endsWith('wav')"></ion-icon>

        <ion-label class="ion-text-wrap">
          {{ f.name }}
          <p>{{ f.fullPath }}</p>
        </ion-label>
      </ion-item>

      <ion-item-options side="start">
        <ion-item-option (click)="deleteFile(f)" color="danger">
          <ion-icon name="trash" slot="icon-only"></ion-icon>
        </ion-item-option>
      </ion-item-options>

    </ion-item-sliding>
  </ion-list>
</ion-content>

<ion-footer>
  <ion-toolbar color="primary">
    <ion-button fill="clear" expand="full" color="light" (click)="selectMedia()">
      <ion-icon slot="start" name="document"></ion-icon>
      Select Media
    </ion-button>
  </ion-toolbar>
</ion-footer>
There are also some functions connected to clicking on an item and removing it, but we’ll implement that later.
Capturing Images, Movies and Audio
Now it’s time to start with the first real part which is capturing files. We can present an action sheet and perform the according action after the user has picked an option.
All of the functions new make use of the Cordova plugins we installed in the beginning, and all of them will return a URL to the file on the device.
The media capture plugin always returns an array of result so we can always simply use the data[0].fullPath, and for the multiple selected images we can go through the array of results and perform our action for each of them.
Not really too hard stuff so open the app/home/home.page.ts again and append inside your class:
async selectMedia() {
    const actionSheet = await this.actionSheetController.create({
      header: 'What would you like to add?',
      buttons: [
        {
          text: 'Capture Image',
          handler: () => {
            this.captureImage();
          }
        },
        {
          text: 'Record Video',
          handler: () => {
            this.recordVideo();
          }
        },
        {
          text: 'Record Audio',
          handler: () => {
            this.recordAudio();
          }
        },
        {
          text: 'Load multiple',
          handler: () => {
            this.pickImages();
          }
        },
        {
          text: 'Cancel',
          role: 'cancel'
        }
      ]
    });
    await actionSheet.present();
  }

  pickImages() {
    this.imagePicker.getPictures({}).then(
      results => {
        for (var i = 0; i < results.length; i++) {
          this.copyFileToLocalDir(results[i]);
        }
      }
    );

    // If you get problems on Android, try to ask for Permission first
    // this.imagePicker.requestReadPermission().then(result => {
    //   console.log('requestReadPermission: ', result);
    //   this.selectMultiple();
    // });
  }

  captureImage() {
    this.mediaCapture.captureImage().then(
      (data: MediaFile[]) => {
        if (data.length > 0) {
          this.copyFileToLocalDir(data[0].fullPath);
        }
      },
      (err: CaptureError) => console.error(err)
    );
  }

  recordAudio() {
    this.mediaCapture.captureAudio().then(
      (data: MediaFile[]) => {
        if (data.length > 0) {
          this.copyFileToLocalDir(data[0].fullPath);
        }
      },
      (err: CaptureError) => console.error(err)
    );
  }

  recordVideo() {
    this.mediaCapture.captureVideo().then(
      (data: MediaFile[]) => {
        if (data.length > 0) {
          this.copyFileToLocalDir(data[0].fullPath);
        }
      },
      (err: CaptureError) => console.error(err)
    );
  }
All of the functions call our copyFileToLocalDir() with the path to the file, which we now have to implement.
Working with File Paths
The copy function will copy a file from any place into the ”my_media” folder inside our apps data directory (check our constant MEDIA_FOLDER_NAME we declared at the top). This is a safe place to keep files, you shouldn’t rely on any files outside your app in a temp directory!
To move the file we need the path, the file name, a new path and new name. To construct all of this we split some values from the path and create a new “random” name by using the current date.
Also, if we enter the copy function with a URL like “/var/…/..” we should append it with “file://” to make the copy function work!
If you receive an error code check its meaning, most likely your initial path to the file is somehow wrong.
In general the copy function works really great, and you can see some more file action also in our File Explorer with Ionic 4 tutorial.
For now go ahead with these additions for our app/home/home.page.ts:
copyFileToLocalDir(fullPath) {
    let myPath = fullPath;
    // Make sure we copy from the right location
    if (fullPath.indexOf('file://') < 0) {
      myPath = 'file://' + fullPath;
    }

    const ext = myPath.split('.').pop();
    const d = Date.now();
    const newName = `${d}.${ext}`;

    const name = myPath.substr(myPath.lastIndexOf('/') + 1);
    const copyFrom = myPath.substr(0, myPath.lastIndexOf('/') + 1);
    const copyTo = this.file.dataDirectory + MEDIA_FOLDER_NAME;

    this.file.copyFile(copyFrom, name, copyTo, newName).then(
      success => {
        this.loadFiles();
      },
      error => {
        console.log('error: ', error);
      }
    );
  }

  openFile(f: FileEntry) {
    if (f.name.indexOf('.wav') > -1) {
      // We need to remove file:/// from the path for the audio plugin to work
      const path =  f.nativeURL.replace(/^file:///, '');
      const audioFile: MediaObject = this.media.create(path);
      audioFile.play();
    } else if (f.name.indexOf('.MOV') > -1 || f.name.indexOf('.mp4') > -1) {
      // E.g: Use the Streaming Media plugin to play a video
      this.streamingMedia.playVideo(f.nativeURL);
    } else if (f.name.indexOf('.jpg') > -1) {
      // E.g: Use the Photoviewer to present an Image
      this.photoViewer.show(f.nativeURL, 'MY awesome image');
    }
  }

  deleteFile(f: FileEntry) {
    const path = f.nativeURL.substr(0, f.nativeURL.lastIndexOf('/') + 1);
    this.file.removeFile(path, f.name).then(() => {
      this.loadFiles();
    }, err => console.log('error remove: ', err));
  }
As you can see we now also got the openFile() and deleteFile() in here. Deletion is simple, just pass in the path and the file name and the file will be removed!
For opening a file you should check what type of file you have to handle. Also, this is a problematic area as iOS and Android handle these things quite different so some plugins work great on the one platform but not really on the other.
Also, some plugins don’t want to have the “file://” in the path and some need it, so this can really cause a lot of confusion when debugging it.
Implement the functionality you need one by one, check remote debugging for native error codes from all the plugins and add optional some error blocks to log out the errors that we haven’t caught in our code yet!
Conclusion
While it’s likely not going to be that smooth in your app, I hope this Ionic media files guide gave you a good starting point to capture different types of media, manage files in your application and also present them to the user.
When your app crashes or doesn’t perform the operation like you expect, try to find the log of the Cordova plugin - there is always a reason why it’s not working, and in general you can make all of these medai operations work in your Ionic app!
Hopefully this gives you confidence for your next project.
You can also find a video version of this tutorial below.