How to Build An Ionic 4 App with Firebase and AngularFire 5 Last update: 2019-02-19

Your favorite tech combinations is back!
Firebase continues to be the leading hosting platform in Ionics 2018 Developer Survey and it’s no wonder - getting started is super easy and you get the benefits of a real backend in only minutes!
In this tutorial we will walk through the steps of creating an Ionic App using the AngularFire package to connect our App to Firebase.
That means, we’ll use the new routing concepts, environment variables, services and the connection to the Firestore database which is by now actually out of beta!
Creating the Firebase App
Before we dive into Ionic we need to make sure we actually have a Firebase app configured. If you already got something in place you can of course skip this step.
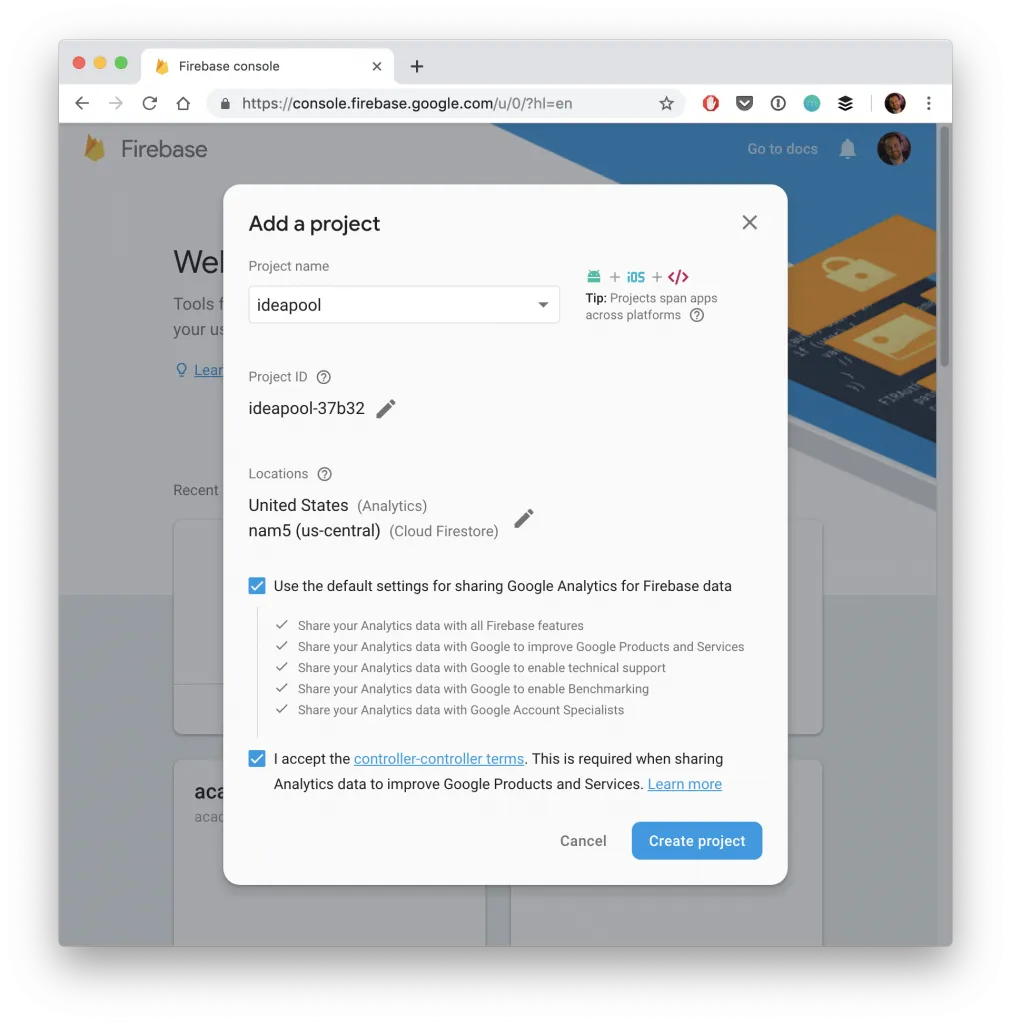
Otherwise, make sure you are signed up (it’s free) and then hit Add project inside the Firebase console. Give your new app a name, optional select a region and then create your project once you checked the boxes like below.
After a short time you will be brought to the dashboard of your app and the only thing we need from here is the information for our Ionic app. We’ll copy this soon, but for now we also need to navigate to Database which will automatically open a security information (you might have to click get started first).
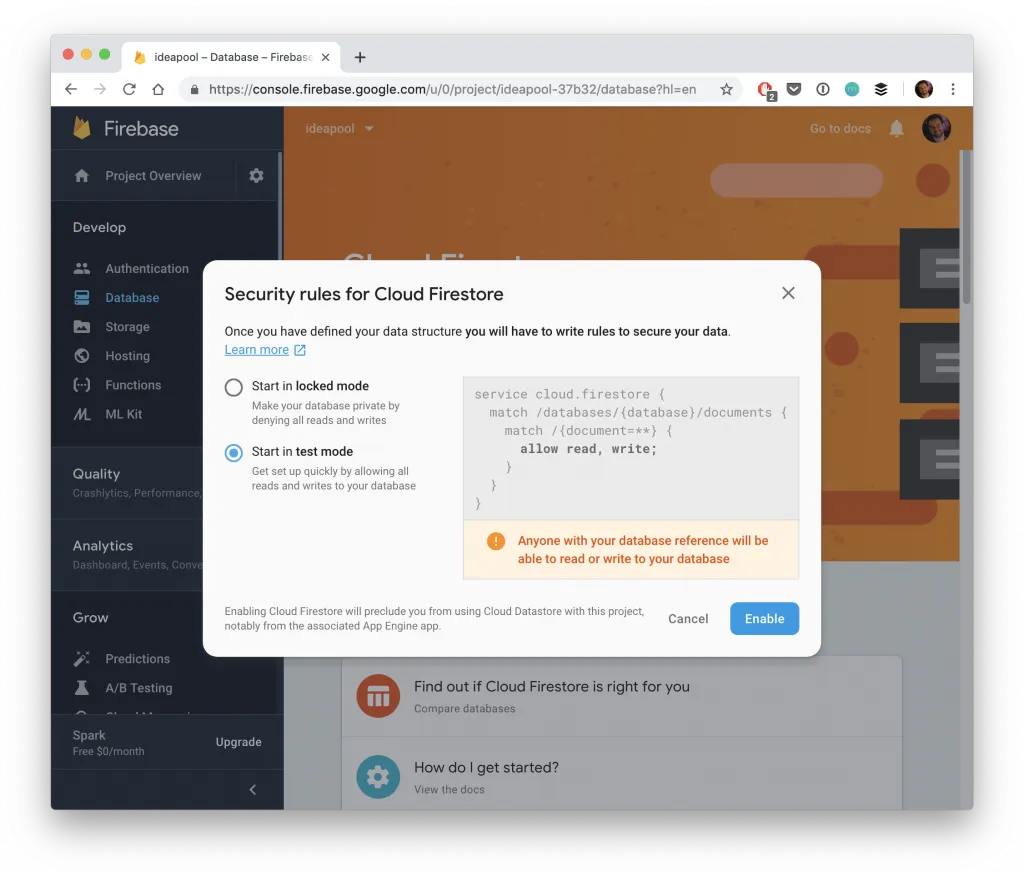
Here we can set the default security rules for our database and because this is a simple tutorial we’ll roll with the test mode which allows everyone access.
User authentication, security rules and more topics are covered in the courses of the Ionic Academy!
Starting our Ionic App & Firebase Integration
Now we get into the Ionic side of things. We create a new blank Ionic 4 app and install the Firebase and AngularFire package from NPM. Additionally we need 2 more pages to navigate around and also a service so we can separate our Firebase calls from our pages, so go ahead and run:
ionic start devdacticFire blank --type=angular
cd devdacticFire

npm install firebase @angular/fire

ionic g page pages/ideaList
ionic g page pages/ideaDetails
ionic g service services/idea
Once the app is ready we need the information from Firebase to connect our Ionic app to it. Therefore, navigate to your dashboard and click on the code icon for web above Add an app to get started which will bring up a screen like below.
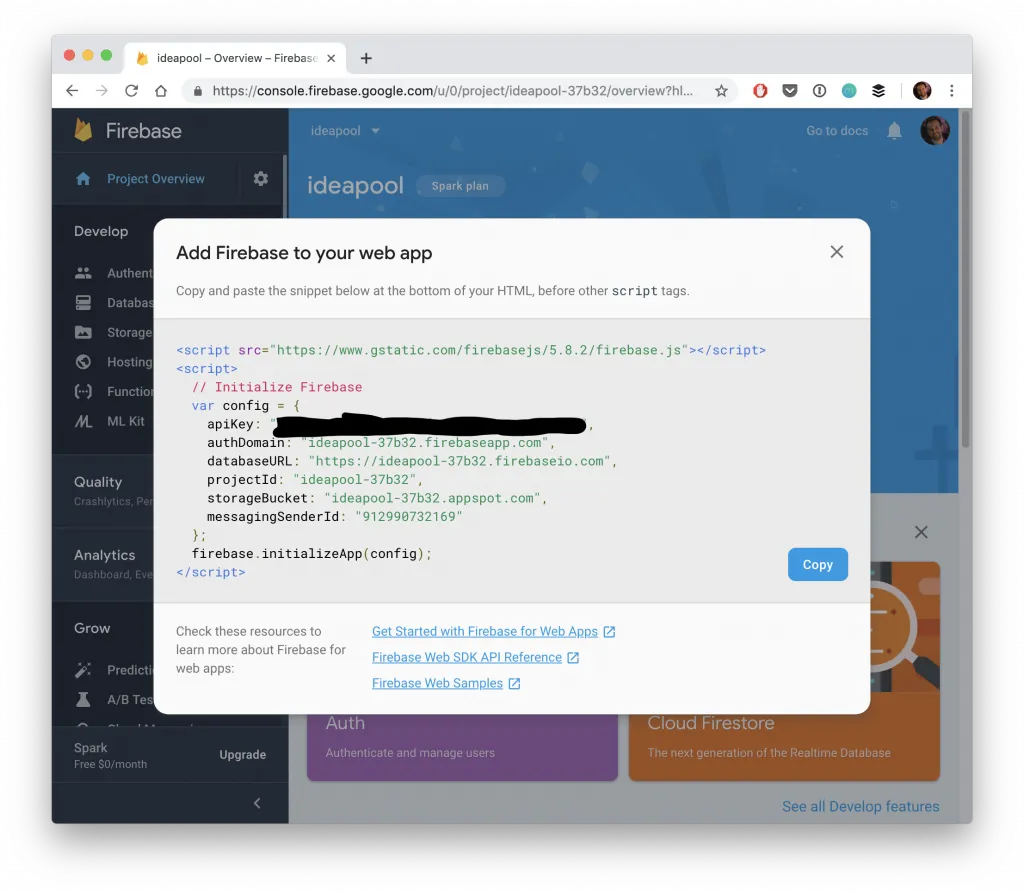
You can now simply the information from the config object and paste it below into your src/environments/environment.ts under a new firebase key like this:
export const environment = {
  production: false,
  firebase: {
    apiKey: "",
    authDomain: "",
    databaseURL: "",
    projectId: "",
    storageBucket: "",
    messagingSenderId: ""
  }
};
The cool thing about the environment is that we could have different information in this and the .prod file which would be used if build our app later with that command line flag!
In all of our files the import will stay the same - it’s just a different file that will be used in the end.
Just by pasting the information into the environment we are not yet done. Now it’s time to let AngularFire know about this information and we do so inside our app/app.module.ts
import { NgModule } from '@angular/core';
import { BrowserModule } from '@angular/platform-browser';
import { RouteReuseStrategy } from '@angular/router';

import { IonicModule, IonicRouteStrategy } from '@ionic/angular';
import { SplashScreen } from '@ionic-native/splash-screen/ngx';
import { StatusBar } from '@ionic-native/status-bar/ngx';

import { AppComponent } from './app.component';
import { AppRoutingModule } from './app-routing.module';

import { AngularFireModule } from '@angular/fire';
import { environment } from '../environments/environment';
import { AngularFirestoreModule, FirestoreSettingsToken } from '@angular/fire/firestore';

@NgModule({
  declarations: [AppComponent],
  entryComponents: [],
  imports: [BrowserModule, IonicModule.forRoot(), AppRoutingModule,
    AngularFireModule.initializeApp(environment.firebase),
    AngularFirestoreModule],
  providers: [
    StatusBar,
    SplashScreen,
    { provide: RouteReuseStrategy, useClass: IonicRouteStrategy },
    { provide: FirestoreSettingsToken, useValue: {} }
  ],
  bootstrap: [AppComponent]
})
export class AppModule { }
Because of a recent update to the Firebase SDK we can also add the provide block at the end to prevent an error message in our log. You can find more information on this issue here, maybe it’s also solved at a later point!
The last thing we need now is to setup our routing information.
Our app should have a list of ideas (yeah, just wanted something else than a todo list..) and also a details page for an idea, a very classic pattern you’ll most likely have in all your apps.
Therefore change the routing information inside your app/app-routing.module.ts where the pages and modules have been automatically added to:
import { NgModule } from '@angular/core';
import { Routes, RouterModule } from '@angular/router';

const routes: Routes = [
  { path: '', loadChildren: './pages/idea-list/idea-list.module#IdeaListPageModule' },
  { path: 'idea', loadChildren: './pages/idea-details/idea-details.module#IdeaDetailsPageModule' },
  { path: 'idea/:id', loadChildren: './pages/idea-details/idea-details.module#IdeaDetailsPageModule' },
];

@NgModule({
  imports: [RouterModule.forRoot(routes)],
  exports: [RouterModule]
})
export class AppRoutingModule { }
Now your app will work already and you shouldn’t see any error logs - let’s continue with the Firebase interaction.
Creating a Firebase Data Service
We can use the AngularFire service from all of our pages - but I think it makes sense to still keep the interaction with Firebase in a specific service which will simply return the data to our pages later.
Therefore we’ve created a service upfront. In this service we will store a reference to the ideas collection which is basically a link to one collection in our Firestore database.
Through this connection we receive all information about current documents but also add, remove and update documents.
We also got this strange map() block in the snapshotChanges function. This means, whenever the data changes this block will triggered and we transform the data a bit - because we need both the real data of the document but also the ID so we can apply changes to documents later, otherwise this key would not exist in the response object.
All further functionality is the simple usage of AngularFire on our collection reference. Only for getting one idea by id we add some more rxjs code. It’s mostly the same case like before - the document itself doesn’t contain its ID, therefore we map the data so it now also has it.
That’s just to make our life easier at a later point but nothing mandatory to have! Ok enough talking, here’s the code for your services/idea.service.ts
import { Injectable } from '@angular/core';
import { AngularFirestore, AngularFirestoreCollection, AngularFirestoreDocument, DocumentReference } from '@angular/fire/firestore';
import { map, take } from 'rxjs/operators';
import { Observable } from 'rxjs';

export interface Idea {
  id?: string,
  name: string,
  notes: string
}

@Injectable({
  providedIn: 'root'
})
export class IdeaService {
  private ideas: Observable<Idea[]>;
  private ideaCollection: AngularFirestoreCollection<Idea>;

  constructor(private afs: AngularFirestore) {
    this.ideaCollection = this.afs.collection<Idea>('ideas');
    this.ideas = this.ideaCollection.snapshotChanges().pipe(
      map(actions => {
        return actions.map(a => {
          const data = a.payload.doc.data();
          const id = a.payload.doc.id;
          return { id, ...data };
        });
      })
    );
  }

  getIdeas(): Observable<Idea[]> {
    return this.ideas;
  }

  getIdea(id: string): Observable<Idea> {
    return this.ideaCollection.doc<Idea>(id).valueChanges().pipe(
      take(1),
      map(idea => {
        idea.id = id;
        return idea
      })
    );
  }

  addIdea(idea: Idea): Promise<DocumentReference> {
    return this.ideaCollection.add(idea);
  }

  updateIdea(idea: Idea): Promise<void> {
    return this.ideaCollection.doc(idea.id).update({ name: idea.name, notes: idea.notes });
  }

  deleteIdea(id: string): Promise<void> {
    return this.ideaCollection.doc(id).delete();
  }
}
We also used the according Typing information for all functions using our very own idea interface that we defined at the top - cool typing in all pages incoming!
Displaying a Firestore Collection List
The first page of our app is the list that will display all documents of the collection. Because we created everything important upfront the actual page doesn’t have a lot of logic, but see self and add this to your pages/idea-list/idea-list.page.ts
import { Component, OnInit } from '@angular/core';
import { IdeaService, Idea } from 'src/app/services/idea.service';
import { Observable } from 'rxjs';

@Component({
  selector: 'app-idea-list',
  templateUrl: './idea-list.page.html',
  styleUrls: ['./idea-list.page.scss'],
})
export class IdeaListPage implements OnInit {

  private ideas: Observable<Idea[]>;

  constructor(private ideaService: IdeaService) { }

  ngOnInit() {
    this.ideas = this.ideaService.getIdeas();
  }
}
I didn’t lie, did I?
We now have an Observable to which we haven’t subscribed yet so right now you wouldn’t get any data from Firebase at all. We let our view take care of handling the subscription by using the async pipe which is most of the time the cleanest way of handling subscriptions in your view!
In order to create a new idea we also add a little FAB button and also construct the correct routerLink on our items by combining the path with the id of the idea object of each iteration. Now change your pages/idea-list/idea-list.page.html to this:
<ion-header>
  <ion-toolbar color="primary">
    <ion-title>My Ideas</ion-title>
  </ion-toolbar>
</ion-header>

<ion-content>
  <ion-fab vertical="bottom" horizontal="end" slot="fixed">
    <ion-fab-button routerLink="/idea">
      <ion-icon name="add"></ion-icon>
    </ion-fab-button>
  </ion-fab>

  <ion-list>
    <ion-item button [routerLink]="['/idea', idea.id]" *ngFor="let idea of (ideas | async)">
      {{ idea.name }}
    </ion-item>
  </ion-list>
</ion-content>
As you can see the route to our details page is basically the same - it works because we specified that both of these routes resolve to the same page and module in the beginning!
Working with a Firestore Document
This means our detail page either receives an id or not - that’s the way to tell if we are about to create a new document or are simply updating an existing one. To access this information of the URL we can use the activatedRoute of the Angular router. So if we got an idea we need to load the details for the document which we through our service!
Also, all other functions are simply based on the service function we’ve created upfront. The only thing we need to take care of is how we react (pun intended) to those functions.
Sometimes we might want to display a little toast as information for the user, and sometimes we also want to directly go back once the operation has finished which we can do through the router as well.
Although the code is long there’s not really a lot of magic to it so go ahead and change your pages/idea-details/idea-details.page.ts:
import { Component, OnInit } from '@angular/core';
import { ActivatedRoute, Router } from '@angular/router';
import { IdeaService, Idea } from 'src/app/services/idea.service';
import { ToastController } from '@ionic/angular';

@Component({
  selector: 'app-idea-details',
  templateUrl: './idea-details.page.html',
  styleUrls: ['./idea-details.page.scss'],
})
export class IdeaDetailsPage implements OnInit {

  idea: Idea = {
    name: '',
    notes: ''
  };

  constructor(private activatedRoute: ActivatedRoute, private ideaService: IdeaService,
    private toastCtrl: ToastController, private router: Router) { }

  ngOnInit() { }

  ionViewWillEnter() {
    let id = this.activatedRoute.snapshot.paramMap.get('id');
    if (id) {
      this.ideaService.getIdea(id).subscribe(idea => {
        this.idea = idea;
      });
    }
  }

  addIdea() {
    this.ideaService.addIdea(this.idea).then(() => {
      this.router.navigateByUrl('/');
      this.showToast('Idea added');
    }, err => {
      this.showToast('There was a problem adding your idea :(');
    });
  }

  deleteIdea() {
    this.ideaService.deleteIdea(this.idea.id).then(() => {
      this.router.navigateByUrl('/');
      this.showToast('Idea deleted');
    }, err => {
      this.showToast('There was a problem deleting your idea :(');
    });
  }

  updateIdea() {
    this.ideaService.updateIdea(this.idea).then(() => {
      this.showToast('Idea updated');
    }, err => {
      this.showToast('There was a problem updating your idea :(');
    });
  }

  showToast(msg) {
    this.toastCtrl.create({
      message: msg,
      duration: 2000
    }).then(toast => toast.present());
  }
}
One Note: In a first attempt I had the logic for loading the data for one idea inside the ngOnInit which caused the app to freeze after some fast navigation back and forth, that’s why I moved the block to one of the Ionic lifecycle events. This issue might need deeper investigation.
For now though we wrap up our app by completing the details view of our idea page that needs input fields for the name and notes of an idea. The only cool thing here is the footer which we use to display the buttons we need - either with operations to update or delete the idea or to save it. We could add even more logic as it might flash up right now as we set the initial value of idea as if we would always edit the idea.
Maybe getting the id inside onInit and calling the subscribe in viewEnter might work to prevent this!
Anyhow, for now finish your view by changing the pages/idea-details/idea-details.page.html to:
<ion-header>
  <ion-toolbar color="primary">
    <ion-buttons slot="start">
      <ion-back-button defaultHref="/"></ion-back-button>
    </ion-buttons>
    <ion-title>Idea Details</ion-title>
  </ion-toolbar>
</ion-header>

<ion-content padding>

  <ion-item>
    <ion-label position="stacked">Name</ion-label>
    <ion-input [(ngModel)]="idea.name"></ion-input>
  </ion-item>

  <ion-item>
    <ion-label position="stacked">Notes</ion-label>
    <ion-textarea [(ngModel)]="idea.notes" rows="8"></ion-textarea>
  </ion-item>
</ion-content>

<ion-footer *ngIf="!idea.id">
  <ion-toolbar color="success">
    <ion-button expand="full" fill="clear" color="light" (click)="addIdea()">
      <ion-icon name="checkmark" slot="start"></ion-icon>
      Add Idea
    </ion-button>
  </ion-toolbar>
</ion-footer>

<ion-footer *ngIf="idea.id">
  <ion-row no-padding text-center>
    <ion-col size="6">
      <ion-button expand="block" fill="outline" color="danger" (click)="deleteIdea()">
        <ion-icon name="trash" slot="start"></ion-icon>
        Delete
      </ion-button>
    </ion-col>
    <ion-col size="6">
      <ion-button expand="block" fill="solid" color="success" (click)="updateIdea()">
        <ion-icon name="save" slot="start"></ion-icon>
        Update
      </ion-button>
    </ion-col>
  </ion-row>
</ion-footer>
You can now run your app (browser or device; doesn’t matter) and play around with your connection to Firebase.
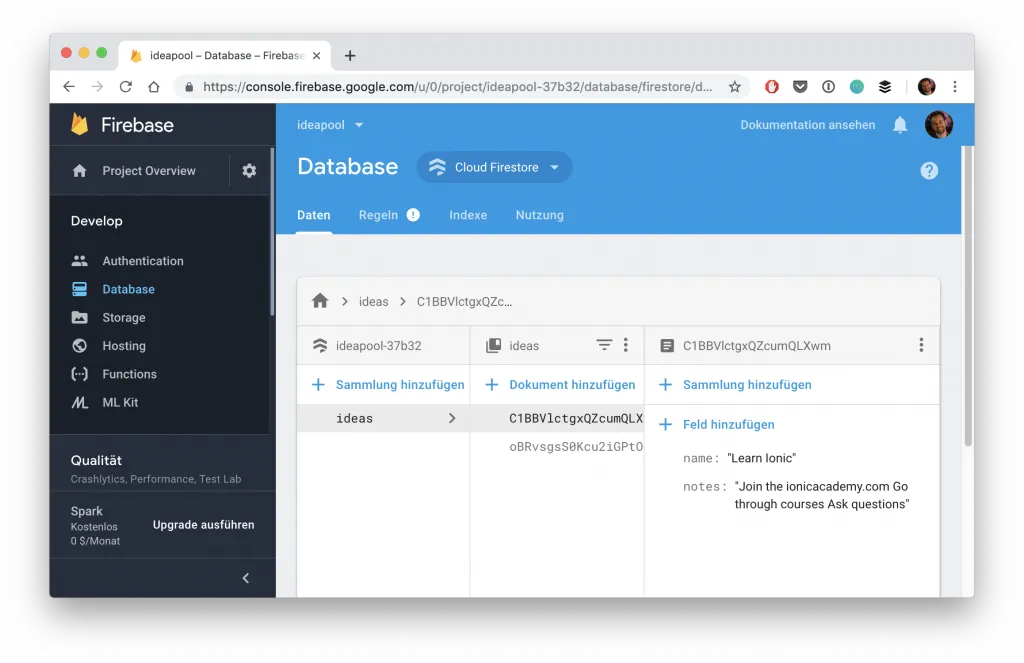
The coolest thing is still to observe how your database is updated in realtime so open it in another tab like the one below and see how your cool elements roll in or get removed!
Conclusion
Firebase is one of the best choices as a backend for Ionic developers because what you’ve seen above - the integration works in minutes and you got a fully functional realtime database.
Take some more time and you have an authentication system, file storage and even more!
If you want to learn more about Ionic & Firebase you can become a member of the Ionic Academy today and learn everything Ionic!
You can also find a video version of this tutorial below.