How to Create a Simple Ionic 4 Firebase App with AngularFire Last update: 2018-09-18

The Ionic 4 Firebase combination remains one of the most used in terms of a cloud backend, and today we will use the latest version of Ionic with the AngularFire RC11 to build a simple todo application!
Although the todo list example is a bit boring, this guide is especially interesting if you are just starting with Ionic 4 because it also contains some basic routing information but also the usage of the (new) Firestore database of Firebase.
Once you are finished with this tutorial you will have your basic Ionic Firebase app to create, read, update and delete data inside your Firebase database!
Setup the Ionic 4 Firebase App
For now we start with a blank Ionic 4 app and at the time writing this I’m using the beta so we have to append the type of our project to get the version 4 app. Also, we install the needed packages for Firebase and add another page and service, so go ahead and run:
ionic start devdacticFire blank --type=angular
cd devdacticFire
npm install firebase angularfire2
ionic g page pages/todoDetails
ionic g service services/todo
Now you need to make sure you have created a Firebase app so either use an existing project or create a new one inside the console.
To add the connection to your app, go to the dashboard of your Firebase app and hit ”Add Firebase to your web app” which will bring up your configuration object. With Ionic 4 we can now simply add this to our app/environments/environment.ts like this:
export const environment = {
  production: false,
  firebase: {
    apiKey: '<your-key>',
    authDomain: '<your-project-authdomain>',
    databaseURL: '<your-database-URL>',
    projectId: '<your-project-id>',
    storageBucket: '<your-storage-bucket>',
    messagingSenderId: '<your-messaging-sender-id>'
  }
};
Finally we need to load the environment configuration and also setup our module to use the AngularFire package, so go ahead and change your app/app.module.ts to:
import { NgModule } from '@angular/core';
import { BrowserModule } from '@angular/platform-browser';
import { RouterModule, RouteReuseStrategy, Routes } from '@angular/router';

import { IonicModule, IonicRouteStrategy } from '@ionic/angular';
import { SplashScreen } from '@ionic-native/splash-screen/ngx';
import { StatusBar } from '@ionic-native/status-bar/ngx';

import { AppComponent } from './app.component';
import { AppRoutingModule } from './app-routing.module';

import { AngularFireModule } from 'angularfire2';
import { environment } from '../environments/environment';
import { AngularFirestoreModule } from 'angularfire2/firestore';

@NgModule({
  declarations: [AppComponent],
  entryComponents: [],
  imports: [
    BrowserModule, IonicModule.forRoot(), AppRoutingModule,
    AngularFireModule.initializeApp(environment.firebase),
    AngularFirestoreModule,
  ],
  providers: [
    StatusBar,
    SplashScreen,
    { provide: RouteReuseStrategy, useClass: IonicRouteStrategy }
  ],
  bootstrap: [AppComponent]
})
export class AppModule {}
As we are using the routing system of Angular inside our app now we need to create the routing configuration to navigate around. We will start on the home page and add 2 routes to the same details page, but we can either navigate their without a parameter or with an additional id.
To do so, change your app/app-routing.module.ts to include all the routes:
import { NgModule } from '@angular/core';
import { Routes, RouterModule } from '@angular/router';

const routes: Routes = [
  { path: '', redirectTo: 'home', pathMatch: 'full' },
  { path: 'home', loadChildren: './home/home.module#HomePageModule' },
  { path: 'details/:id', loadChildren: './pages/todo-details/todo-details.module#TodoDetailsPageModule' },
  { path: 'details', loadChildren: './pages/todo-details/todo-details.module#TodoDetailsPageModule' },
];

@NgModule({
  imports: [RouterModule.forRoot(routes)],
  exports: [RouterModule]
})
export class AppRoutingModule { }
To finish the setup head back to your Firebase app and from the menu navigate to Database. In here you can now select the Database you wish to use (if it’s a new project) and we will use the new Firestore database which is basically a NoSQL database.
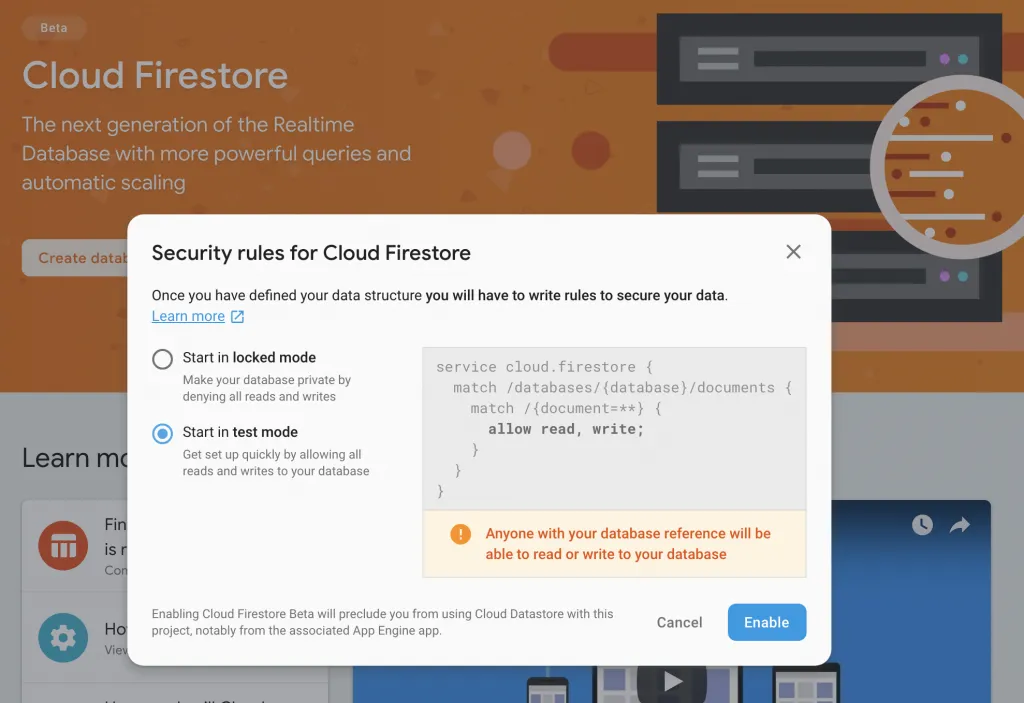
Also make sure to select the test mode rules for testing so we can easily read and write all objects. Of course you should have reasonable rules in place for a productive app!
Creating the Firebase Service
Now that our app is connected to Firebase we should create a service to interact with our database.
This service will take care of our create, read update and delete functions (CRUD). All of the interaction will happen on our todosCollection which will load the data from the ‘todos’ path inside our database.
But to display the data in realtime and have all the information present when we need it we need to call the snapshotChanges() function. Also, we need to map those elements because normally they wouldn’t contain the ID of the document, and this ID is what you need most of them to update or delete documents.
The other functions are then only calling the operations on our collection or a single doc() inside the database, so nothing spectacular.
Therefore go ahead and change your app/services/todo.service.ts to:
import { Injectable } from '@angular/core';
import { AngularFirestore, AngularFirestoreCollection } from 'angularfire2/firestore';
import { Observable } from 'rxjs';
import { map } from 'rxjs/operators';

export interface Todo {
  id?: string;
  task: string;
  priority: number;
  createdAt: number;
}

@Injectable({
  providedIn: 'root'
})
export class TodoService {
  private todosCollection: AngularFirestoreCollection<Todo>;

  private todos: Observable<Todo[]>;

  constructor(db: AngularFirestore) {
    this.todosCollection = db.collection<Todo>('todos');

    this.todos = this.todosCollection.snapshotChanges().pipe(
      map(actions => {
        return actions.map(a => {
          const data = a.payload.doc.data();
          const id = a.payload.doc.id;
          return { id, ...data };
        });
      })
    );
  }

  getTodos() {
    return this.todos;
  }

  getTodo(id) {
    return this.todosCollection.doc<Todo>(id).valueChanges();
  }

  updateTodo(todo: Todo, id: string) {
    return this.todosCollection.doc(id).update(todo);
  }

  addTodo(todo: Todo) {
    return this.todosCollection.add(todo);
  }

  removeTodo(id) {
    return this.todosCollection.doc(id).delete();
  }
}
If you have a service like this in place it’s later really easy to use all the functions while the connection to the database is in one single class!
Loading the Firebase Collection
Now we just need to create our views and classes to use all the great functions of our service. The first is our home page where we display a list of todos.
The class actually only needs to load the data from the service, and initially I used the Observable directly but the result was that data was duplicate or strange loading results happened. Therefore, we can also subscribe to the Observable and update our local todos array which works fine.
For now, change your app/home/home.page.ts to:
import { Component, OnInit } from '@angular/core';
import { Todo, TodoService } from '../services/todo.service';

@Component({
  selector: 'app-home',
  templateUrl: 'home.page.html',
  styleUrls: ['home.page.scss'],
})
export class HomePage implements OnInit {

  todos: Todo[];

  constructor(private todoService: TodoService) { }

  ngOnInit() {
    this.todoService.getTodos().subscribe(res => {
      this.todos = res;
    });
  }

  remove(item) {
    this.todoService.removeTodo(item.id);
  }
}
Now we got all the data and just need to iterate the todos inside our view. Therefore we create an ngFor and sliding items so we can both click them to update the details or also mark them as finished.
Here we use the routerLink to construct the URL of the next page, and if you go back to the routing you see that we can open the details with an id parameter, so that route will be called!
I’ve also added the ion-skeleton-text element which is a cool way of indicating that content is loading like you might have seen on Facebook or YouTube!
Finally at the bottom right of the page we add a ion-fab which is floating above the content. Again, this button is not calling a function to push a new page but simply navigates to the details path of our app so we don’t need any additional logic!
Quite nice this routing new, hu?
Now you can go ahead and replace the code inside your app/home/home.page.html with:
<ion-header>
  <ion-toolbar color="primary">
    <ion-title>
      Ionic FireTodos
    </ion-title>
  </ion-toolbar>
</ion-header>

<ion-content>

  <ion-list>

    <ng-container *ngIf="!todos || todos.length == 0">
      <div *ngFor="let n of [0,1,2]" padding>
        <ion-skeleton-text></ion-skeleton-text>
        <p>
          <ion-skeleton-text class="fake-skeleton"></ion-skeleton-text>
        </p>
      </div>
    </ng-container>

    <ion-item-sliding *ngFor="let item of todos">
      <ion-item lines="inset" button [routerLink]="['/details', item.id]">
        <ion-label>
          {{ item.task }}
          <p>{{ item.createdAt | date:'short' }}</p>
        </ion-label>
        <ion-note slot="end" color="primary">{{ item.priority }}</ion-note>
      </ion-item>

      <ion-item-options side="end">
        <ion-item-option (click)="remove(item)" color="secondary">
          Check
          <ion-icon name="checkmark" slot="end"></ion-icon>
        </ion-item-option>
      </ion-item-options>
    </ion-item-sliding>

  </ion-list>

  <ion-fab vertical="bottom" horizontal="end" slot="fixed">
    <ion-fab-button routerLink="/details" routerDirection="forward">
      <ion-icon name="add"></ion-icon>
    </ion-fab-button>
  </ion-fab>

</ion-content>
If you want the skeleton to look a bit more fancy you can give it different widths for example by adding this to your app/home/home.page.scss:
.fake-skeleton {
    width: 60%;
}
Now the home view of our Ionic Firebase Todolist is working but we need the second view so we can actually create todos!
Creating & Updating Firestore Documents
Our details view takes care of creating new todos and also updating existing todos. This means, we need to find out if we navigated to the page with the id of a document or without any information.
To do so, we use the Angular Router and the ActivatedRoute, especially the snapshot data of the current route. If we then got the id from the params, we call our loadTodo() function which will load only one specific document of our collection (through our TodoService).
You might have noticed that we also use our Todo interface along the code examples which adds nice typings to our objects!
Once we want to save our todo we need to check if we are updating an existing todo or add a todo - but in both cases we can use the appropriate function of our service. We also show a loading while performing our operations and because we use async/await for the promises, we need to mark the functions as async as well.
Now go ahead and change your app/pages/todo-details/todo-details.page.ts to:
import { Todo, TodoService } from './../../services/todo.service';
import { Component, OnInit } from '@angular/core';
import { ActivatedRoute } from '@angular/router';
import { NavController, LoadingController } from '@ionic/angular';

@Component({
  selector: 'app-todo-details',
  templateUrl: './todo-details.page.html',
  styleUrls: ['./todo-details.page.scss'],
})
export class TodoDetailsPage implements OnInit {

  todo: Todo = {
    task: 'test',
    createdAt: new Date().getTime(),
    priority: 2
  };

  todoId = null;

  constructor(private route: ActivatedRoute, private nav: NavController, private todoService: TodoService, private loadingController: LoadingController) { }

  ngOnInit() {
    this.todoId = this.route.snapshot.params['id'];
    if (this.todoId)  {
      this.loadTodo();
    }
  }

  async loadTodo() {
    const loading = await this.loadingController.create({
      message: 'Loading Todo..'
    });
    await loading.present();

    this.todoService.getTodo(this.todoId).subscribe(res => {
      loading.dismiss();
      this.todo = res;
    });
  }

  async saveTodo() {

    const loading = await this.loadingController.create({
      message: 'Saving Todo..'
    });
    await loading.present();

    if (this.todoId) {
      this.todoService.updateTodo(this.todo, this.todoId).then(() => {
        loading.dismiss();
        this.nav.goBack('home');
      });
    } else {
      this.todoService.addTodo(this.todo).then(() => {
        loading.dismiss();
        this.nav.goBack('home');
      });
    }
  }

}
Finally the last missing piece which might actually be the most boring of all snippets. We just need to input elements and connect them using ngModel. The result looks like this inside your app/pages/todo-details/todo-details.page.html
<ion-header>
  <ion-toolbar color="primary">
    <ion-buttons slot="start">
      <ion-back-button defaultHref="/home"></ion-back-button>
    </ion-buttons>
    <ion-title>Details</ion-title>
  </ion-toolbar>
</ion-header>

<ion-content padding>
  <ion-list lines="full">
    <ion-item>
      <ion-input required type="text" placeholder="Task" [(ngModel)]="todo.task"></ion-input>
    </ion-item>
    <ion-item>
      <ion-input required type="number" placeholder="Priority" [(ngModel)]="todo.priority"></ion-input>
    </ion-item>
  </ion-list>
  <ion-button expand="full" (click)="saveTodo()">Save</ion-button>
</ion-content>
Nothing special, but now your Ionic Firebase app is finished and you have all the basic operations in place to work with the Firestore database!
Conclusion
The Ionic 4 routing might be new but the connection to Firebase with AngularFire works just as good as always. Especially the environment that’s now available makes it easy to add different configurations in case you have multiple systems/projects for test/staging/prod.
You can also find a video version of this tutorial below.