Building an Eisenhower App with Ionic 4 Drag and Drop Last update: 2018-12-11

There are many ways to add some drag and drop functions to your Ionic app, but using the Dragula package has been my favorite so far and something you enjoyed with Ionic 3 previously as well.
Today we will take things a step further and build an app that incorporates the Eisenhower time management method with a nice UI, drag & drop and of course Ionic 4!
We will use the ng2-Dragula wrapper for Angular which we’ve used back then as well, but it’s updated to version 2 by now and some parts have slightly changed.
Starting our Drag and Drop App
To get started with our app we create a blank new project and simply install the ng2-dragula package:
ionic start devdacticDrag blank --type=angular
cd devdacticDrag
npm install ng2-dragula
To make use of the package we have to add it to our app module just like many other packages, so go ahead and change your app/app.module.ts to:
import { NgModule } from '@angular/core';
import { BrowserModule } from '@angular/platform-browser';
import { RouteReuseStrategy } from '@angular/router';

import { IonicModule, IonicRouteStrategy } from '@ionic/angular';
import { SplashScreen } from '@ionic-native/splash-screen/ngx';
import { StatusBar } from '@ionic-native/status-bar/ngx';

import { AppComponent } from './app.component';
import { AppRoutingModule } from './app-routing.module';

import { DragulaModule } from 'ng2-dragula';

@NgModule({
  declarations: [AppComponent],
  entryComponents: [],
  imports: [BrowserModule, IonicModule.forRoot(), AppRoutingModule,
    DragulaModule.forRoot()],
  providers: [
    StatusBar,
    SplashScreen,
    { provide: RouteReuseStrategy, useClass: IonicRouteStrategy }
  ],
  bootstrap: [AppComponent]
})
export class AppModule {}
At the time writing this there’s a tiny problem with the package and we need to add a workaround to our src/polyfills.ts to make it work, so simply add this to the bottom of your file:
(window as any).global = window;Finally we need some CSS so the drag animation looks nicely. We could load it directly from the package, however they recommend a slightly different code so add this to your src/global.scss now:
/* in-flight clone */
.gu-mirror {
  position: fixed !important;
  margin: 0 !important;
  z-index: 9999 !important;
  opacity: 0.8;
  -ms-filter: "progid:DXImageTransform.Microsoft.Alpha(Opacity=80)";
  filter: alpha(opacity=80);
  pointer-events: none;
}

/* high-performance display:none; helper */
.gu-hide {
  left: -9999px !important;
}

/* added to mirrorContainer (default = body) while dragging */
.gu-unselectable {
  -webkit-user-select: none !important;
  -moz-user-select: none !important;
  -ms-user-select: none !important;
  user-select: none !important;
}

/* added to the source element while its mirror is dragged */
.gu-transit {
  opacity: 0.2;
  -ms-filter: "progid:DXImageTransform.Microsoft.Alpha(Opacity=20)";
  filter: alpha(opacity=20);
}
That’s it for the basic setup of the Dragula package!
Adding the Drag & Drop Logic
If you want to use the functionality in one of your pages you’ll have to to import it inside the module file of your lazy loaded pages. In our case we can change our app/home/home.module.ts to this:
import { NgModule } from '@angular/core';
import { CommonModule } from '@angular/common';
import { IonicModule } from '@ionic/angular';
import { FormsModule } from '@angular/forms';
import { RouterModule } from '@angular/router';

import { HomePage } from './home.page';
import { DragulaModule } from 'ng2-dragula';

@NgModule({
  imports: [
    CommonModule,
    FormsModule,
    IonicModule,
    RouterModule.forChild([
      {
        path: '',
        component: HomePage
      }
    ]),
    DragulaModule
  ],
  declarations: [HomePage]
})
export class HomePageModule {}
Now it’s time to actually work with the package.
With Dragula you can move objects around between groups if they share the same Dragula name. In our case we will have four different arrays (for the quadrants of our app) that hold the information, and we want to drag and drop items between them. Therefore, all of them will be in the same Dragula group called ”bag“.
Within our constructor we can now use the Dragula service to subscribe to various events. Let’s talk about the ones we use:
- drag(): An item is currently being dragged. In that case we will change the background color
- removeModel(): An item was dropped, but not inside another group but outside any group. At that point the item will be removed and we’ll show a little toast
- dropModel(): An item was dropped into a new group. We’ll again change the color to reflect that something happened
- createGroup(): This one defines some options for our group, in our case that all items dropped outside the group should be spilled which means removed
All of these Observables can return a lot of values, and you can pick the ones you need. In our case we mostly need the actual item which holds the information of the object inside our data array, but you can get information about almost anything at that point! Simply check out the signature of those functions.
We are also changing the color in two different ways; While dragging we directly set the color attribute of the HTML item, later we use the color property. Just wanted to show both options in here as they do pretty much the same.
Finally we also have a function to add a new todo to a specific quadrant. We need some logic here to check which color should be added but basically it just adds the information to the appropriate array.
Now go ahead and change your app/home/home.page.ts to:
import { Component } from '@angular/core';
import { DragulaService } from 'ng2-dragula';
import { ToastController } from '@ionic/angular';

@Component({
  selector: 'app-home',
  templateUrl: 'home.page.html',
  styleUrls: ['home.page.scss'],
})
export class HomePage {
  q1 = [
    { value: 'Buy Milk', color: 'primary' },
    { value: 'Write new Post', color: 'primary' }
  ];
  q2 = [
    { value: 'Schedule newsletter', color: 'secondary' },
    { value: 'Find new Ionic Academy topics', color: 'secondary' }
  ];
  q3 = [
    { value: 'Improve page performance', color: 'tertiary' },
    { value: 'Clean the house', color: 'tertiary' }
  ];
  q4 = [
    { value: 'Unimportant things', color: 'warning' },
    { value: 'Watch Netflix', color: 'warning' }
  ];

  todo = { value: '', color: '' };
  selectedQuadrant = 'q1';

  constructor(private dragulaService: DragulaService, private toastController: ToastController) {
    this.dragulaService.drag('bag')
    .subscribe(({ name, el, source }) => {
      el.setAttribute('color', 'danger');
    });

    this.dragulaService.removeModel('bag')
    .subscribe(({ item }) => {
      this.toastController.create({
        message: 'Removed: ' + item.value,
        duration: 2000
      }).then(toast => toast.present());
    });

    this.dragulaService.dropModel('bag')
      .subscribe(({ item }) => {
        item['color'] = 'success';
      });

    this.dragulaService.createGroup('bag', {
      removeOnSpill: true
    });
  }

  addTodo() {
    switch (this.selectedQuadrant) {
      case 'q1':
        this.todo.color = 'primary';
        break;
      case 'q2':
        this.todo.color = 'secondary';
        break;
      case 'q3':
        this.todo.color = 'tertiary';
        break;
      case 'q4':
        this.todo.color = 'warning';
        break;
    }
    this[this.selectedQuadrant].push(this.todo);
    this.todo = { value: '', color: '' };
  }

}
We also added a few initial items to our array so the app is not so empty while testing.
Creating the Eisenhower Matrix View
Right now we have added all the logic and learned to use the Dragula service, now it’s time to connect everything with our view.
First of all we need the information for a new todo which is the area at the top of our view. It’s not really anything new, but you might have noticed the forceOverscroll on our ion-content. This helps to prevent some crazy scrolling on a device while dragging elements between the lists!
At the bottom we have the four quadrants, and we could have another array to iterate so it would be only one code block but I thought it would be a bit more clearly how the package works if we write things out.
So within each column we have a little header for that area followed by a list of the todo items of that quadrant.
The most important part is to specify dragula="bag" on all of the groups between which you want to drag and drop items! Also, you need to pass in the [(dragulaModel)] which is the connection to the array with information for each quadrant.
If you set up these things correctly you have established a connection between the different lists and also a 2 way data binding between the Dragula list and the actual array containing the information.
With all of that said, open your app/home/home.page.html and replace it with:
<ion-header>
  <ion-toolbar>
    <ion-title>
      Devdactic Eisenhower
    </ion-title>
  </ion-toolbar>
</ion-header>

<ion-content forceOverscroll="false">
  <ion-grid>

    <ion-row align-items-center>
      <ion-col size="12">
        <ion-item>
          <ion-label position="fixed">New Todo:</ion-label>
          <ion-input [(ngModel)]="todo.value"></ion-input>
        </ion-item>

      </ion-col>

      <ion-col size="12">
        <ion-item>
          <ion-label>Quadrant:</ion-label>
          <ion-select [(ngModel)]="selectedQuadrant">
            <ion-select-option value="q1">Do</ion-select-option>
            <ion-select-option value="q2">Schedule</ion-select-option>
            <ion-select-option value="q3">Delegate</ion-select-option>
            <ion-select-option value="q4">Dont do</ion-select-option>
          </ion-select>
        </ion-item>
      </ion-col>

    </ion-row>

    <ion-button expand="block" fill="outline" (click)="addTodo()">
      <ion-icon name="add" slot="start"></ion-icon>
      Add Todo
    </ion-button>

    <ion-row no-padding class="matrix">
      <ion-col size="6" class="q1">
        <div class="q-header">Do</div>
        <ion-list dragula="bag" [(dragulaModel)]="q1" lines="none">
          <ion-item *ngFor="let item of q1" [color]="item.color" expand="block" text-wrap>
            {{ item.value }}
          </ion-item>
        </ion-list>
      </ion-col>

      <ion-col size="6" class="q2">
        <div class="q-header">Schedule</div>
        <ion-list dragula="bag" [(dragulaModel)]="q2" lines="none">
          <ion-item *ngFor="let item of q2" [color]="item.color" expand="block" text-wrap>
            {{ item.value }}
          </ion-item>
        </ion-list>
      </ion-col>

      <ion-col size="6" class="q3">
        <div class="q-header">Delegate</div>
        <ion-list dragula="bag" [(dragulaModel)]="q3" lines="none">
          <ion-item *ngFor="let item of q3" [color]="item.color" expand="block" text-wrap>
            {{ item.value }}
          </ion-item>
        </ion-list>
      </ion-col>

      <ion-col size="6" class="q4">
        <div class="q-header">Don't do</div>
        <ion-list dragula="bag" [(dragulaModel)]="q4" lines="none">
          <ion-item *ngFor="let item of q4" [color]="item.color" expand="block" text-wrap>
            {{ item.value }}
          </ion-item>
        </ion-list>
      </ion-col>
    </ion-row>
  </ion-grid>

  <ion-row class="delete-area" align-items-center justify-content-center>
    <ion-icon name="trash" color="medium"></ion-icon>
  </ion-row>

</ion-content>
Whether you are directly following this tutorial or use your own view, adding some styling is important because Dragula might not work as expected otherwise. First, we had to add this overall CSS so we see anything happen, now it’s important to give your lists height:100%; in order to make them work when the array is empty!
Besides that I played around with some other styling properties but feel free to experiment a bit more on a real device! Here’s my styling that you can add to your app/home/home.page.scss:
.q1, .q2, .q3, .q4 {
border: 4px solid #fff;
}
.matrix {
margin-top: 30px;
ion-col {
--ion-grid-column-padding: 0px;
min-height: 150px;
}
.list {
padding: 0px;
height: 100%;
}
ion-item {
margin-bottom: 2px;
}
}
.q-header {
background-color: var(--ion-color-light);
height: 20px;
text-align: center;
}
.delete-area {
border: 2px dashed var(--ion-color-medium);
margin: 10px;
height: 100px;
ion-icon {
font-size: 64px;
}
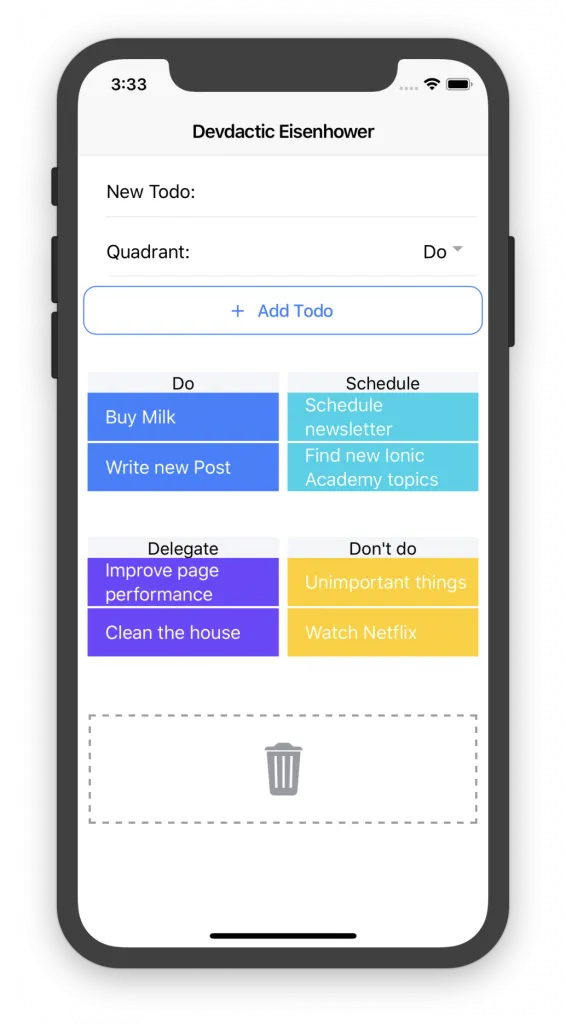
}The result should look pretty much like the image below. You can drag the items between the different lists, you can add new items and also drop them outside to remove them. The delete area is basically just a UI indication to drop it, actually you can drop them anywhere outside the lists to remove them!
Conclusion
Drag and drop is a pretty cool functionality if you can integrate it in a useful way inside your Ionic app. Dragula is not the only package that helps us to implement such a feature, but it’s one of the easiest and fastest ways to add it.
You can also find a video version of this tutorial below.