Getting Started with Grafbase using Ionic React Last update: 2023-01-24
Have you ever used a GraphQL API? With Grafbase, the task of defining and creating your own GraphQL backend becomes a breeze and you will build and deploy your backend in minutes!
In todays tutorial you will learn to create a GraphQL API with Grafbase and how we can easily connect it to a React application with Ionic UI components.
Curious to see the result? Check out a hosted preview!
This tutorial is sponsored by Grafbase!
After going through the tutorial you will be able to:
- Create and deploy a GraphQL backend to Grafbase
- Use Apollo with React to connect to a GraphQL API
- Write GraphQL queries and mutations to fetch data
- Add user authentication to your backend
On top of that you will build a basic Ionic React application, which you can use as a starting point for your next project together with Appwrite.
You can also find the full code of the Grafbase Ionic React app on Github.
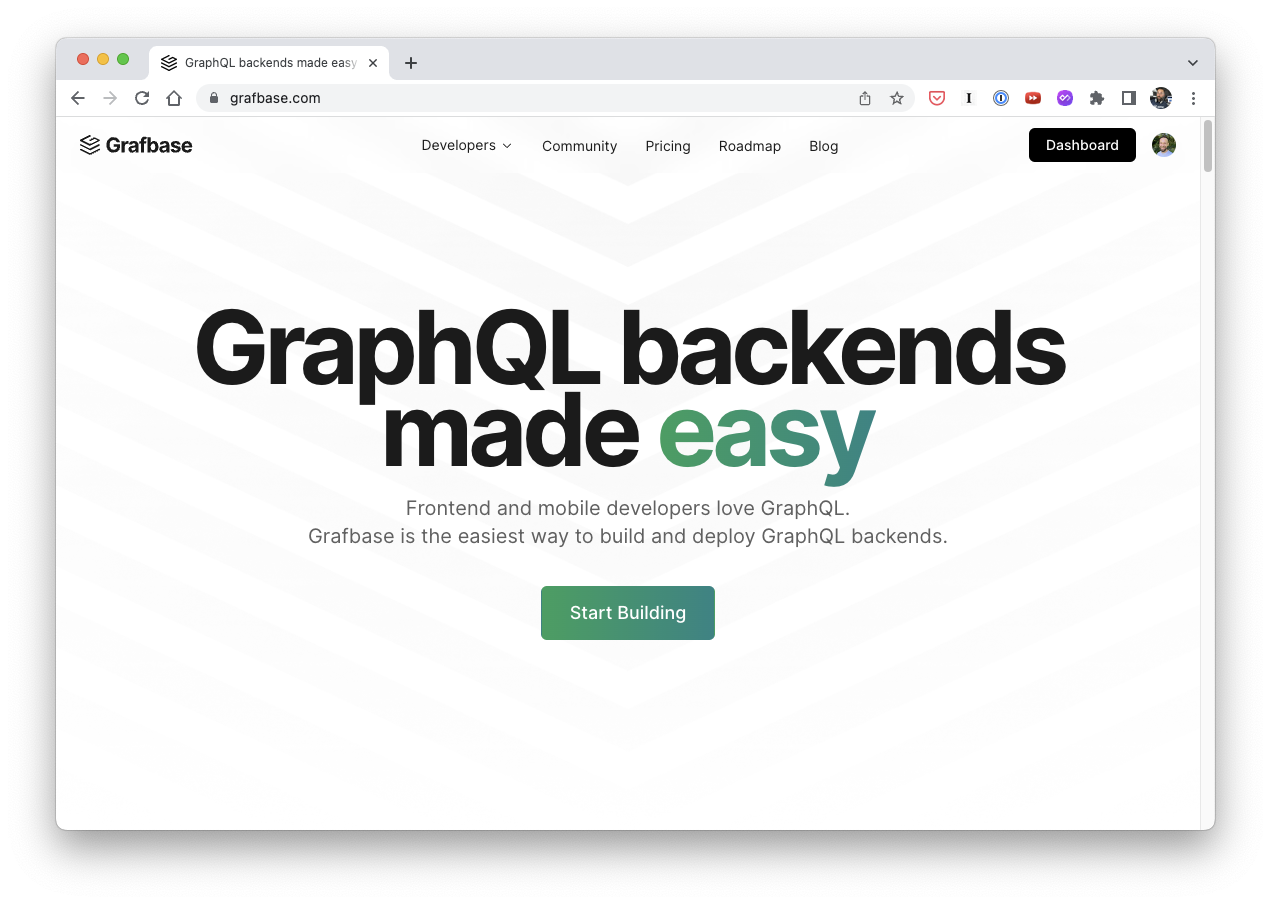
What is Grafbase?
Grafbase is building the best developer platform to build and deploy serverless GraphQL backends - and they got $7.3m in funding in 2022!
For Grafbase you only need to write a simply schema file, and Grafbase will generate a GraphQL schema and deploy the API for you in minutes!

That means you only need to define the models for your GraphQL API, and Grafbase generates the standard queries and mutations based on the data types you use.
Grafbase uses a DynamoDB under the hood to store your data, but in fact we can run our whole Grafbase locally with the simple Grafbase CLI!
This makes it super easy to get started and test out the first functionalities, as Grafbase also includes a GraphQL playground to test our queries.
Because you can get started for free with the Hobby plan and have two projects included, it’s a great choice for your next personal project or simple backend!
Creating the Grafbase & Ionic Project
Let’s finally see it in action, and we start with the creation of an Ionic project and then generate a Grafbase project inside so we have all code in one repository!
ionic start myTodos blank --type=react
cd ./myTodos

npm install @apollo/client graphql
This creates a blank new Ionic React project, and we already installed the Apollo package which we will later use for queries.
Within our Ionic app let’s start a new Grafbase project through the CLI:
npx grafbase initThis commands creates a new folder grafbase with a schema.graphql which holds some initial types:
type TodoList @model {
	id: ID!
	title: String!
	todos: [Todo]
}

type Todo @model {
	id: ID!
	title: String!
	complete: Boolean!
}
Believe it or not, that’s enough to define a basic GraphQL API with Grafbase!
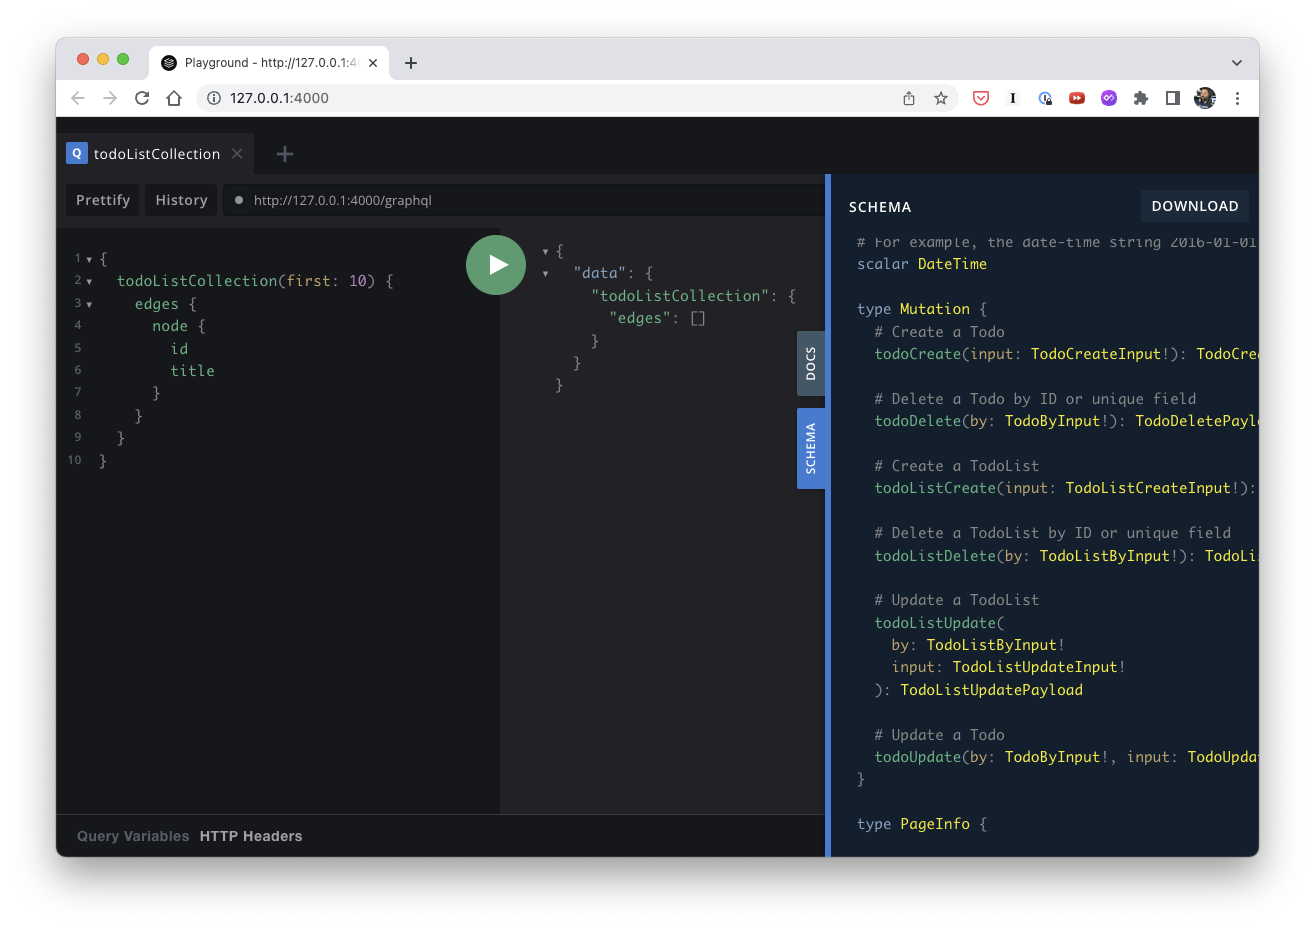
We can test this out by starting the local GraphQL server so run:
npx grafbase devYou can now open http://127.0.0.1:4000/ and should see the playground in which you can test queries and mutations and have access to the schema that was generated by Grafbase.
Grafbase also supports multiple field types which are called scalars, and additional schema directives for more control over your data models.
You can find all the supported scalars here, which include the standards like Email, DateTime or Timestamp.
With directives you can easily add data validation to your schema like @unique or @length
Defining the GraphQL Schema for our Grafbase Project
Since version 0.14.1 and above the id: ID! field is now optional, and additional the creation and update date are system fields which are included by default in your models.
For our app we will now change the schema a tiny bit an remove the unnecessary fields, so change your grafbase/schema.graphql to this:
type TodoList @model {
	title: String @length(min: 4, max: 50)
	todos: [Todo]
}

type Todo @model {
	title: String @length(min: 4, max: 255)
	notes: String
	complete: Boolean!
}
That means users are able to create a todo list and add notes, which are in a one-to-many relationship inside the todo list.
If you still have the local playground running, the schema will automatically update and you could test that everything works by running a query to create a new todo list like this:
mutation {
  todoListCreate(input: {title: "My tasks"} )
  {
    todoList{id}
  }
}
As a result you should get back the new added playlist including its ID!
That means, our GraphQL API is ready (at least locally) and we can connect our React app to it.
Connecting your React App to Grafbase with Apollo
We have set up an Ionic project with React support in the beginning, but of course you could use any other framework you prefer.
Grafbase comes with some great templates for all popular frameworks!
To begin with we need to set up the connection to our API by creating a new HttpLink and then initializing the ApolloClient with that value, so bring up the src/index.tsx and change the relevant parts to:
import { ApolloClient, InMemoryCache, ApolloProvider, HttpLink } from '@apollo/client';

const GRAFBASE_API_URL = 'http://127.0.0.1:4000/graphql';

const link = new HttpLink({
	uri: GRAFBASE_API_URL
});

const client = new ApolloClient({
	link,
	cache: new InMemoryCache()
});

const container = document.getElementById('root');
const root = createRoot(container!);
root.render(
	<React.StrictMode>
		<ApolloProvider client={client}>
			<App />
		</ApolloProvider>
	</React.StrictMode>
);
We will come back to the settings later once we add live queries.
As always you can now run your Ionic app with the Ionic CLI:
ionic serveIf you don’t notice anything special about the logs that’s a good sign, and we can continue and work with our GraphQL API!
Building our Todo App with GraphQL Queries and Mutations
First of all we should define some interface and a query to retrieve our todo lists, and another mutation to create a new list.
For this bring up the src/pages/Home.tsx and change the top of the file to:
import { gql } from '@apollo/client';
import { IonContent, IonHeader, IonPage, IonTitle, IonToolbar } from '@ionic/react';

export interface TodoList {
	id: string;
	title: string;
	todos: { edges: { node: Todo }[] };
}

export interface Todo {
	id: string;
	title: string;
	notes: string;
	complete: boolean;
}

export const TODOLIST_QUERY = gql`
	query LoadLists {
		todoListCollection(first: 10) {
			edges {
				node {
					id
					title
					todos(first: 100) {
						edges {
							node {
								id
							}
						}
					}
				}
			}
		}
	}
`;

const CREATE_LIST_MUTATION = gql`
	mutation CreateList($title: String!) {
		todoListCreate(input: { title: $title, todos: [] }) {
			todoList {
				id
				title
				todos(first: 100) {
					edges {
						node {
							id
						}
					}
				}
			}
		}
	}
`;
Now we can integrate the previously defined queries by adding the useQuery hook from the Apollo package which runs when our component is mounted.
Additionally we can add a function that calls the mutation because the useMutation hook won’t be called until we actually execute it.
We do this in combination with an Ionic alert input to capture a new name for that list, and by specifying refetchQueries we can automatically reload the list data (more on live queries later!).
Update the component to this now:
const Home: React.FC = () => {
	// Query our collection on load
	const { data, loading, error } = useQuery<{
		todoListCollection: { edges: { node: TodoList }[] };
	}>(TODOLIST_QUERY);
	const [createList] = useMutation(CREATE_LIST_MUTATION);
	const [presentAlert] = useIonAlert();
	const [showLoading, hideLoading] = useIonLoading();

	const addList = () => {
		presentAlert({
			header: 'Please enter a name for your new list',
			buttons: ['Create List'],
			inputs: [
				{
					name: 'name',
					placeholder: 'Tasklist',
					min: 2
				}
			],
			onDidDismiss: async (ev: CustomEvent) => {
				await showLoading();

				// Run the mutation and refetch data
				await createList({
					variables: { title: ev.detail.data.values.name },
					refetchQueries: [TODOLIST_QUERY]
				});

				hideLoading();
			}
		});
	};

	return (
		<IonPage>
			<IonHeader>
				<IonToolbar>
					<IonTitle>Blank</IonTitle>
				</IonToolbar>
			</IonHeader>
			<IonContent fullscreen>
				<IonHeader collapse="condense">
					<IonToolbar>
						<IonTitle size="large">Blank</IonTitle>
					</IonToolbar>
				</IonHeader>
				<ExploreContainer />
			</IonContent>
		</IonPage>
	);
};
We are already loading the data now, but it’s not yet showing on our screen.
The final change is to include the result of our query inside the component with some Ionic components, so update the return statement to this:
return (
<IonPage>
<IonHeader>
<IonToolbar color="primary">
<IonTitle>My Todos</IonTitle>
</IonToolbar>
</IonHeader>
<IonContent className="ion-padding">
{data && !loading && !error && (
<>
{data?.todoListCollection?.edges?.map(({ node }) => (
<IonCard button routerLink={`/home/${node?.id}`} key={node?.id}>
<IonCardHeader>
<IonCardTitle>{node?.title}</IonCardTitle>
</IonCardHeader>
<IonCardContent>Tasks: {node?.todos?.edges.length ?? 0}</IonCardContent>
</IonCard>
))}
</>
)}
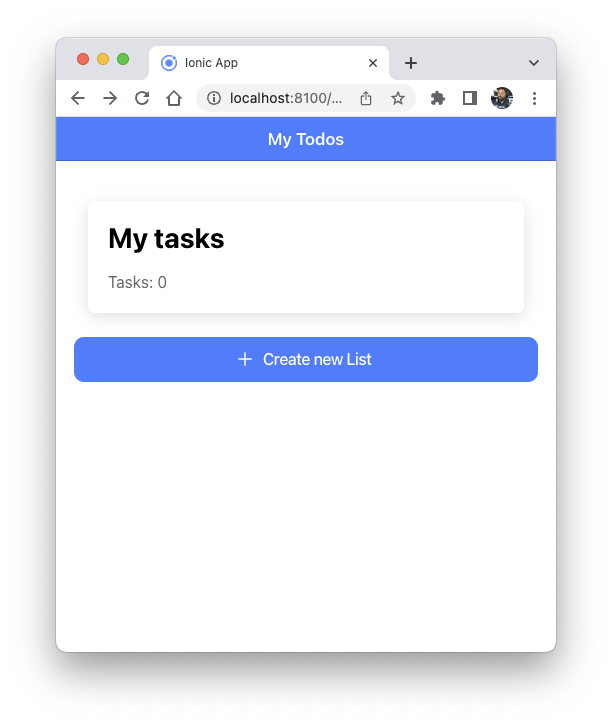
<IonButton expand="block" onClick={() => addList()}>
<IonIcon icon={add} slot="start"></IonIcon>
Create new List
</IonButton>
</IonContent>
</IonPage>
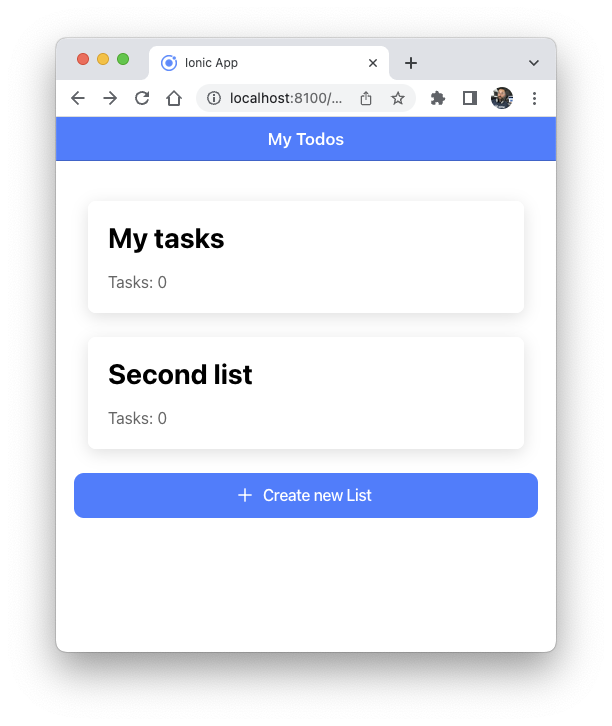
);If you run the query to generate a dummy todo list in the playground, or any other queries, you should now see a list in your Ionic app preview!
Additionally you should be able to add more todo lists, and because we refetch the query after running the mutation we always get the latest data.
Using Live Queries with Grafbase
Speaking of refetching, we actually don’t have to do it like this.
Grafbase recently introduced live queries so we can use server-sent events and simply update our local data to stay in sync!
To get this feature, we first of all need to install another package for our React app:
npm i @grafbase/apollo-linkWe don’t have to touch our Grafbase schema, but we need to change the way how we connect to our GraphQL backend with Apollo.
With a simple split logic Apollo can automatically detect live queries or regular queries and we don’t have to mess up our code!
For this, bring up the src/index.tsx again and change the logic to create our ApolloClient:
import { ApolloClient, InMemoryCache, ApolloProvider, HttpLink, split } from '@apollo/client';
import { getOperationAST } from 'graphql';
import { isLiveQuery, SSELink } from '@grafbase/apollo-link';

const GRAFBASE_API_URL = 'http://127.0.0.1:4000/graphql';

export const createApolloLink = () => {
	const sseLink = new SSELink({
		uri: GRAFBASE_API_URL
	});

	const httpLink = new HttpLink({
		uri: GRAFBASE_API_URL
	});

	return split(
		({ query, operationName, variables }) =>
			isLiveQuery(getOperationAST(query, operationName), variables),
		sseLink,
		httpLink
	);
};

const link = createApolloLink();

const client = new ApolloClient({
	link,
	cache: new InMemoryCache()
});
In order to mark a query for live updates, we simply need to add @live to our query, so within the src/pages/Home.tsx we could change our list query to this:
// Retrieve collection with Live Queries
export const TODOLIST_QUERY = gql`
	query LoadLists @live {
		todoListCollection(first: 10) {
			edges {
				node {
					id
					title
					todos(first: 100) {
						edges {
							node {
								id
							}
						}
					}
				}
			}
		}
	}
`;
Additionally you can now get rid of refetchQueries as our data will update whenever it changes - just give it a try and add more lists!
Working with Ionic React and Grafbase
As a next step we can now add some more queries and logic to our app, but feel free to jump over this part if you’ve already seen enough and want to move further with Grafbase authentication and deployment.
Right now clicking on a todo list card will give you an error because we haven’t defined any other routes, so let’s start by creating a new page at src/pages/Todolist.tsx.
This page needs a query as well and additional mutations to change the data in our backend, so open the new file and insert:
import {
	IonBackButton,
	IonButton,
	IonButtons,
	IonContent,
	IonHeader,
	IonIcon,
	IonInput,
	IonItem,
	IonItemOption,
	IonItemOptions,
	IonItemSliding,
	IonLabel,
	IonList,
	IonPage,
	IonTitle,
	IonToolbar,
	useIonLoading,
	useIonRouter
} from '@ionic/react';
import React, { useRef, useState } from 'react';
import { RouteComponentProps } from 'react-router';
import { useQuery, gql, useMutation } from '@apollo/client';
import { checkmarkDoneOutline, trashBinOutline } from 'ionicons/icons';
import { Todo, TODOLIST_QUERY } from './Home';

interface TodolistPageProps
	extends RouteComponentProps<{
		id: string;
	}> {}

const TODOLIST_DETAILS_QUERY = gql`
	query GetTodolistDetails($id: ID!) {
		todoList(by: { id: $id }) {
			title
			id
			todos(first: 100) {
				edges {
					node {
						id
						title
						notes
						complete
					}
				}
			}
		}
	}
`;

const CREATE_TODO_MUTATION = gql`
	mutation CreateTodo($title: String!) {
		todoCreate(input: { title: $title, complete: false, notes: "" }) {
			todo {
				id
			}
		}
	}
`;

const UPDATE_TODOLIST_MUTATION = gql`
	mutation UpdateTodolist($listID: ID!, $todoID: ID!) {
		todoListUpdate(by: { id: $listID }, input: { todos: [{ link: $todoID }] }) {
			todoList {
				title
				todos(first: 100) {
					edges {
						node {
							id
						}
					}
				}
			}
		}
	}
`;

const DELETE_TODO_MUTATION = gql`
	mutation DeleteTodo($id: ID!) {
		todoDelete(by: { id: $id }) {
			deletedId
		}
	}
`;

const UPDATE_TODO_MUTATION = gql`
	mutation UpdateTodo($id: ID!, $complete: Boolean) {
		todoUpdate(by: { id: $id }, input: { complete: $complete }) {
			todo {
				title
				complete
				id
			}
		}
	}
`;

const DELETE_TODOLIST_MUTATION = gql`
	mutation DeleteTodolist($id: ID!) {
		todoListDelete(by: { id: $id }) {
			deletedId
		}
	}
`;
These are all the mutations to create a new todo, link the todo to the todo list and update/delete a todo or a whole list later.
We can make use of useQuery and useMutation again to handle all those queries, and we can wrap them in some functions so go ahead and add:
const Todolist: React.FC<TodolistPageProps> = ({ match }) => {
const { data, loading, error } = useQuery<{
todoList: { id: String; title: String; todos: { edges: { node: Todo }[] } };
}>(TODOLIST_DETAILS_QUERY, {
variables: { id: match.params.id }
});
const [updateTodolist] = useMutation(UPDATE_TODOLIST_MUTATION);
const [deleteTodolist] = useMutation(DELETE_TODOLIST_MUTATION);
const [createTodo] = useMutation(CREATE_TODO_MUTATION);
const [deleteTodo] = useMutation(DELETE_TODO_MUTATION);
const [updateTodo] = useMutation(UPDATE_TODO_MUTATION);
const [title, setTitle] = useState('');
const listRef = useRef<HTMLIonListElement>(null);
const inputRef = useRef<HTMLIonInputElement>(null);
const ionRouter = useIonRouter();
const [showLoading, hideLoading] = useIonLoading();
const addTodo = async () => {
showLoading();
// Create a todo
const createTodoResult = await createTodo({
variables: { title }
});
// Access the result ID
const todoId = createTodoResult.data.todoCreate.todo.id;
// Update the todolikst to include the todo
await updateTodolist({
variables: { listID: match.params.id, todoID: todoId },
refetchQueries: [TODOLIST_DETAILS_QUERY]
});
inputRef.current!.value = '';
hideLoading();
};
const deleteTodoById = (id: string) => {
deleteTodo({
variables: { id: id },
refetchQueries: [TODOLIST_DETAILS_QUERY]
});
};
const updateTodoById = async (id: string) => {
await updateTodo({
variables: { id: id, complete: true },
refetchQueries: [TODOLIST_DETAILS_QUERY]
});
listRef.current?.closeSlidingItems();
};
const deleteList = () => {
deleteTodolist({
variables: { id: match.params.id },
refetchQueries: [TODOLIST_QUERY]
});
ionRouter.goBack();
};
return <div>TODO</div>;
};
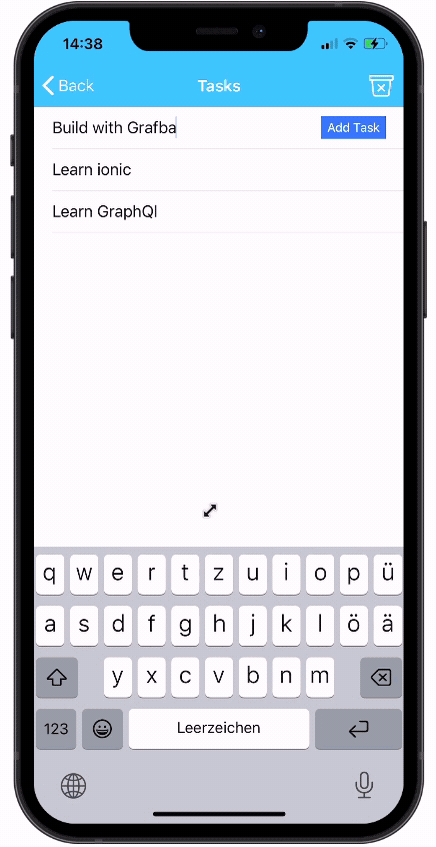
export default Todolist;Finally we need some components to display the collection data as well as inputs and buttons, so proceed with the following view function:
return (
	<IonPage>
		<IonHeader>
			<IonToolbar color="secondary">
				<IonButtons slot="start">
					<IonBackButton defaultHref="/home" />
				</IonButtons>
				<IonTitle>{data?.todoList.title}</IonTitle>
				<IonButtons slot="end">
					<IonButton onClick={() => deleteList()}>
						<IonIcon icon={trashBinOutline} slot="icon-only" />
					</IonButton>
				</IonButtons>
			</IonToolbar>
		</IonHeader>
		<IonContent>
			<IonItem>
				<IonInput
					ref={inputRef}
					placeholder="Use Grafbase"
					onIonChange={(e: any) => setTitle(e.target.value)}
				></IonInput>
				<IonButton expand="full" slot="end" onClick={() => addTodo()}>
					Add Task
				</IonButton>
			</IonItem>
			{data && !loading && !error && (
				<IonList ref={listRef}>
					{data?.todoList?.todos?.edges.map(({ node }) => (
						<IonItemSliding key={node.id}>
							<IonItem>
								<span
									style={{
										textDecoration: node.complete ? 'line-through' : '',
										opacity: node.complete ? 0.4 : 1
									}}
								>
									{node.title}
								</span>
							</IonItem>

							<IonItemOptions side="start">
								{!node.complete && (
									<IonItemOption color="success" onClick={() => updateTodoById(node.id)}>
										<IonIcon icon={checkmarkDoneOutline} slot="icon-only"></IonIcon>
									</IonItemOption>
								)}
							</IonItemOptions>

							<IonItemOptions side="end">
								<IonItemOption color="danger" onClick={() => deleteTodoById(node.id)}>
									<IonIcon icon={trashBinOutline} slot="icon-only"></IonIcon>
								</IonItemOption>
							</IonItemOptions>
						</IonItemSliding>
					))}
				</IonList>
			)}
			{data && data?.todoList?.todos?.edges.length === 0 && (
				<div className="ion-padding" style={{ textAlign: 'center', fontSize: 'large' }}>
					<IonLabel color="medium">Add your first item now!</IonLabel>
				</div>
			)}
		</IonContent>
	</IonPage>
);
We still can’t see our list as we need one last step, which is adding the routing information.
For this simply bring up the src/App.tsx and change the relevant parts to hold a second route to our new Todolist component:
import Todolist from './pages/Todolist';

setupIonicReact();

const App: React.FC = () => (
	<IonApp>
		<IonReactRouter>
			<IonRouterOutlet>
				<Route exact path="/home">
					<Home />
				</Route>
				<Route exact path="/home/:id" component={Todolist} />
				<Route exact path="/">
					<Redirect to="/home" />
				</Route>
			</IonRouterOutlet>
		</IonReactRouter>
	</IonApp>
);
Now you can test your app more by diving into lists, adding and update tasks with the sliding items and even see the changes of tasks on the overview page of your todo lists.

Additionally you can of course see all the changes when making the same queries within your Grafbase playground!
Also try and make an invalid request, like a todo with just 2 characters. You will see an error in the log thanks to the @length definition in our schema!
Adding User Authentication with Grafbase
Because most APIs won’t be just public, there’s an easy way to add authentication to your Grafbase project.
For this, we can define a specific auth provider in our schema, and the most common would be JWT.
To test this, bring up the grafbase/schema.graphql and prepend our definition with:
schema
	@auth(
		providers: [{ type: jwt, issuer: "{{ env.ISSUER_URL }}", secret: "{{ env.JWT_SECRET }}" }]
		rules: [{ allow: private }]
	) {
	query: Query
}

type TodoList @model {
	title: String @length(min: 4, max: 50)
	todos: [Todo]
}

type Todo @model {
	title: String @length(min: 4, max: 255)
	notes: String
	complete: Boolean!
}
You can define more granular auth rules for your models, but we will simply make everything private and require a JWT from now on.
You might have noticed some placeholder in that schema as well - Grafbase supports a local environment file or environment variables inside your hosted Grafbase project!
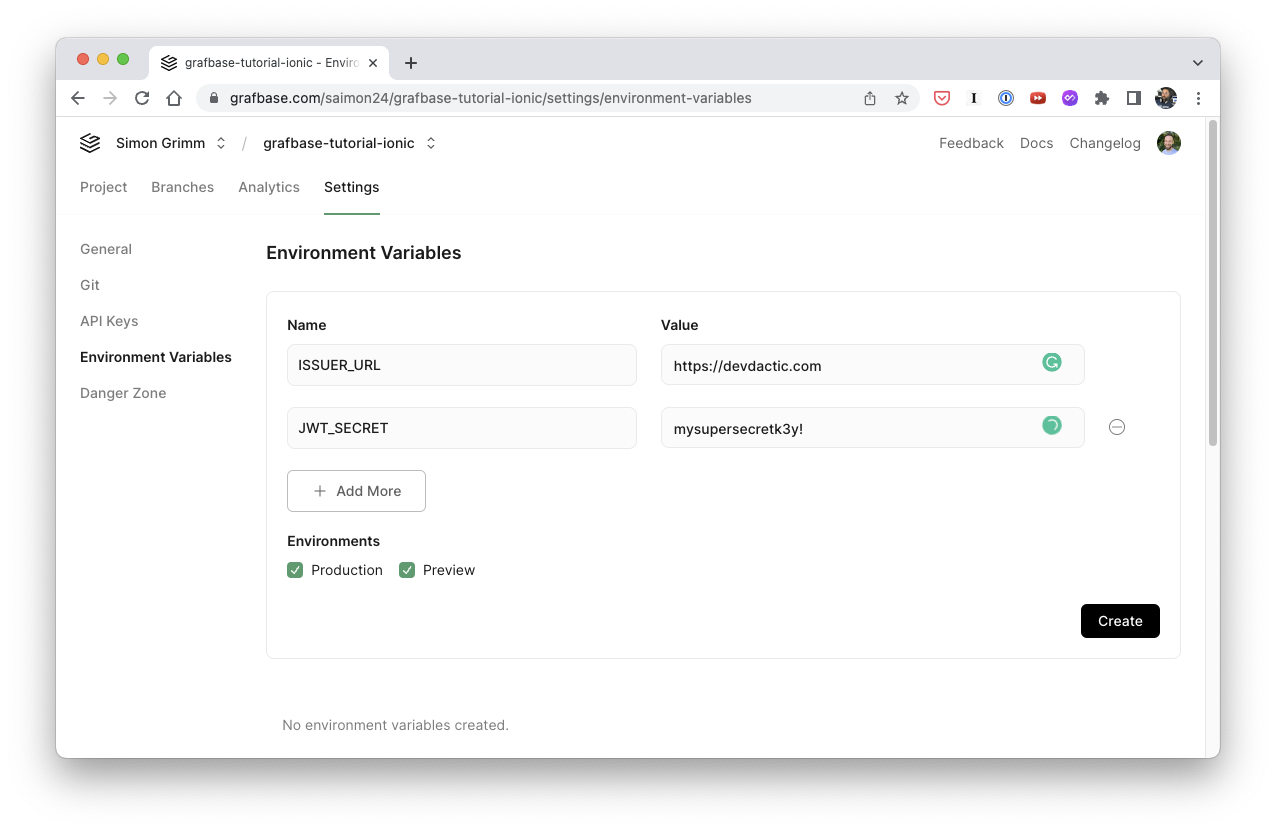
To test this locally you can add a grafbase/.env file and insert:
ISSUER_URL=https://devdactic.com
JWT_SECRET=mysupersecretk3y!
Because we are testing Grafbase only local the auth is disabled and our React app works just as before.
To try this with a real deployed Grafbase API, let’s move on!
Deploying your Grafbase App
To connect our local schema with Grafbase and deploy it we need to create a Github repository and then connect it to Grafbase.
First of all we can add all of our files to the automatically initialized Git repository in our Ionic app:
git add .
git commit -am 'Initial commit.'
Now we could use the Github CLI to create a new project (use a different name for your repo) and then push our code by running:
gh repo create grafbase-tutorial-ionic --private --source=. --remote=upstream
git push -u upstream main
Now you need to open your Grafbase dashboard (sign in if you haven’t before) and click on Create Project to start the import process.
Connect your Grafbase account to Github and give it access to your repository, then select Import and finally Deploy on the overview page of your deployment.
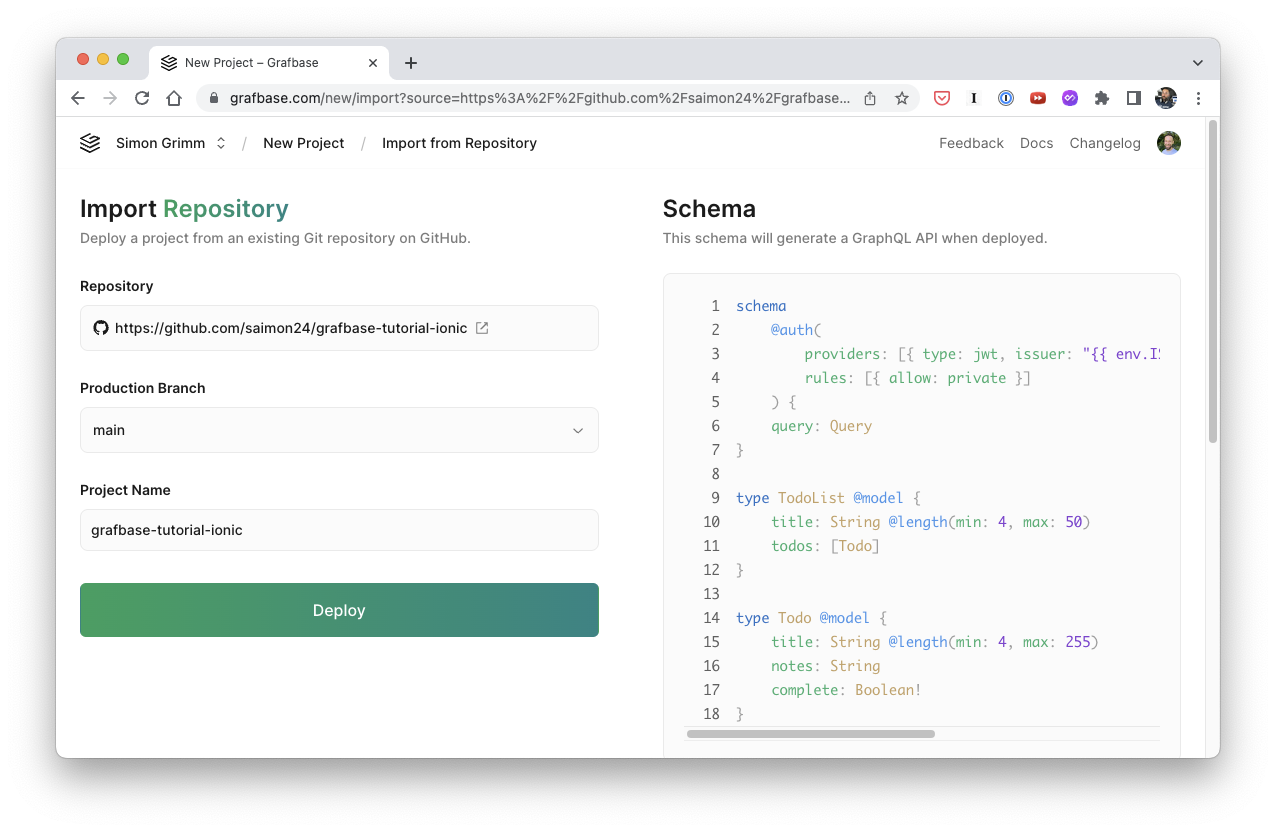
This will create a new hosted GraphQL API based on your schema, and whenever you make changes to that schema, all you need to do is push your code to rebuild your app!
On top of that Grafbase also supports branches of your repository, so you can add features in a branch and deploy that as a separate API to Grafbase easily.
Did you get an error?
You most likely did as we included environment variables but didn’t define them in Grafbase yet!
Therefore move into the Settings of your Grafbase project where you can define Environment Variables, and we will simply add the same values like before.
Now you can try and use the hosted URL of your Grafbase in your local app and you’ll notice that we can’t add data anymore.
Auth finally hit us, so let’s update our code with some dummy JWT to get access to our deployed Grafbase API again.
Using a JWT with Grafbase
Normally your app would make a call to the backend to obtain a JWT, and based on the issuer and secret that we added to Grafbase the GraphQL API is able to see if a user is allowed to request data.
To make life easier, you can use the following code to quickly generate a valid JWT in your app by using the jose npm package:
import { SignJWT } from 'jose';
// Example of generating a JWT:
const secret = new Uint8Array('mysupersecretk3y!'.split('').map((c) => c.charCodeAt(0)));

const getToken = () => {
	return new SignJWT({ sub: 'user_1234', groups: [] })
		.setProtectedHeader({ alg: 'HS256', typ: 'JWT' })
		.setIssuer('https://devdactic.com')
		.setIssuedAt()
		.setExpirationTime('2h')
		.sign(secret);
};

getToken().then((token) => {
	console.log(token);
});
This will print a token to your log, and you can now change our Apollo connection code to include that token again:
const JWT_TOKEN =
	'Bearer eyJhbGciOiJIUzI1NiIsInR5cCI6IkpXVCJ9.eyJzdWIiOiJ1c2VyXzEyMzQiLCJncm91cHMiOltdLCJpc3MiOiJodHRwczovL2RldmRhY3RpYy5jb20iLCJpYXQiOjE2NzMzNTM3NTEsImV4cCI6MTY3MzM2MDk1MX0.zcuf31xJ6TxwrCW7cQlHsORe6XL4Jj1ZJUQuHT0e_m8';
export const createApolloLink = () => {
	const sseLink = new SSELink({
		uri: GRAFBASE_API_URL,
		headers: {
			authorization: JWT_TOKEN
		}
	});

	const httpLink = new HttpLink({
		uri: GRAFBASE_API_URL,
		headers: {
			authorization: JWT_TOKEN
		}
	});

	return split(
		({ query, operationName, variables }) =>
			isLiveQuery(getOperationAST(query, operationName), variables),
		sseLink,
		httpLink
	);
};
To make live easier you could also set the x-api-key header and use a token from the settings page of your Grafbase project, but those information should usually be kept secret and not used in any frontend project as it grants full access to the API!
If you followed all steps and your API is not running, give it some time - if you navigate to the Playground of your Grafbase project and only see loading skeletons you know that your Grafbase API is not yet fully deployed.
Just come back a few minutes later and you can test your app including (and without) the JWT to test your easily added authentication.
Conclusion
Grafbase is a great way to create a GraphQL API for your app in minutes with its simple schema-first approach.
THe integration with Apollo in frameworks like React works seamless, and you can quickly enjoy the benefits of using GraphQL, especially with the local preview of your Grafbase API!
Additionally it comes with a bunch of features like different scalars, directives and even authentication right out of the box, so most general cases for an API can be handled.
It’s still very early days for Grafbase and it is not yet “done”, but many more improvements are planned on the roadmap already!
Get started for free and scale up your projects when you need to later!
What are your thoughts on Grafbase?