Ionic Google Login with Firebase Last update: 2017-06-27

Google Sign-In has become one of the most used authentication methods out there, and this is in part because of how easy it is to the users to sign-in across multiple devices without managing passwords. This article explains the simple steps to implement Ionic Google Login for your apps.
This is a guest post from Jorge Vergara. You can check out more about Jorge on his blog Javebratt!
In today’s guide, we’re going to set up Google Sign-In with the native picker, meaning that we won’t show our users a browser to log into their Google accounts, instead, they’ll be shown the native Google account selector so they can pick which account to use for your app.
By the way, at the end of this post, I’m going to link a Starter Template that already has Google & Facebook authentication ready to go, all you’d need to do is add your credentials and run `npm install`.
This app is going to be built using Firebase Authentication for the back-end, and we’re going to break down the process into three steps:
Step #1: Get your credentials from Google.
We need to set-up Google Credentials manager to get API keys so we can communicate with our Firebase app, that way Firebase can handle all the authentication flow.
Step #2: Install the Google native plugin.
We need to install a Cordova plugin to call the native account chooser, in this step we’ll also install the Ionic Native package for Google+, that way we can handle it in a more “Ionic” way.
Step #3: Log In using Google and Firebase.
In this final stage we’ll work on coding our sign-in process, so users can get to our app and use their Google account to sign-in.
To follow along with this tutorial, I’m going to assume you already know how to create a brand new Ionic app and initialize it with Firebase. If you don’t know yet, you can read this post first.
Step #1: Get your credentials from Google.
The first thing we need to do is to set up everything we’re going to need from Google to get our app working. We need to get:
- A `REVERSED_CLIENT_ID` from the Google developers console.
- Enable Google sign-in inside the Firebase console.
- Take note of the credential so we can install the plugin.
To start generating our credentials, we need to create both iOS and Android apps in the Google Developers Console, let’s start with the iOS app, for that, go to this link.
Log in with the Google account you use for Firebase (if it asks you to log in), and follow the instructions to create the iOS app.
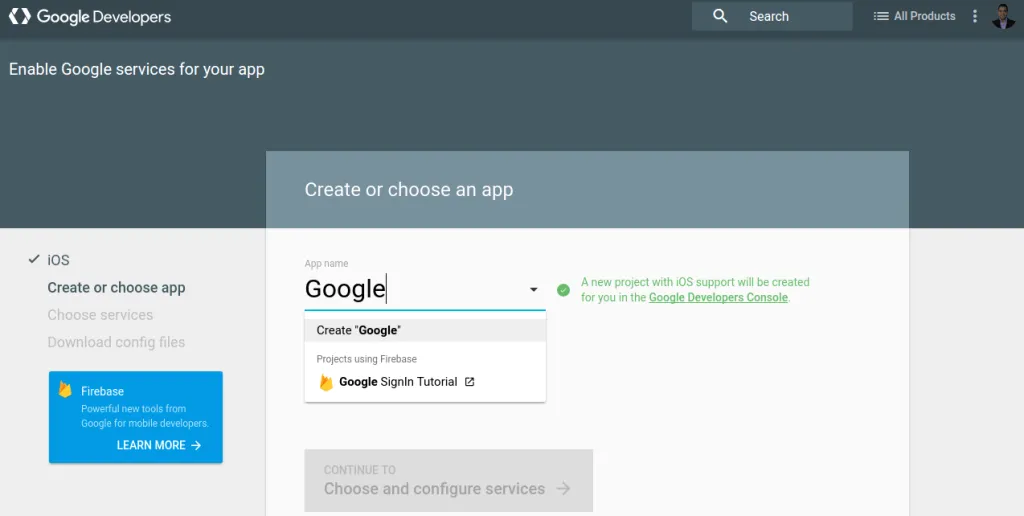
The first thing it’s going to ask you is the app name, as soon as you start typing it’s going to search for your Firebase apps, pick the one you linked to this project.
Then, it’s going to ask you for an iOS Bundle ID, to get this, go into your app’s `config.xml` file and copy the package id of the app.
It’s the one that looks like `io.ionic.starter` or something similar (by the way, please, change this to be something custom for your project).
After you add the iOS Bundle ID, click on the button that says Continue to choose and configure services.
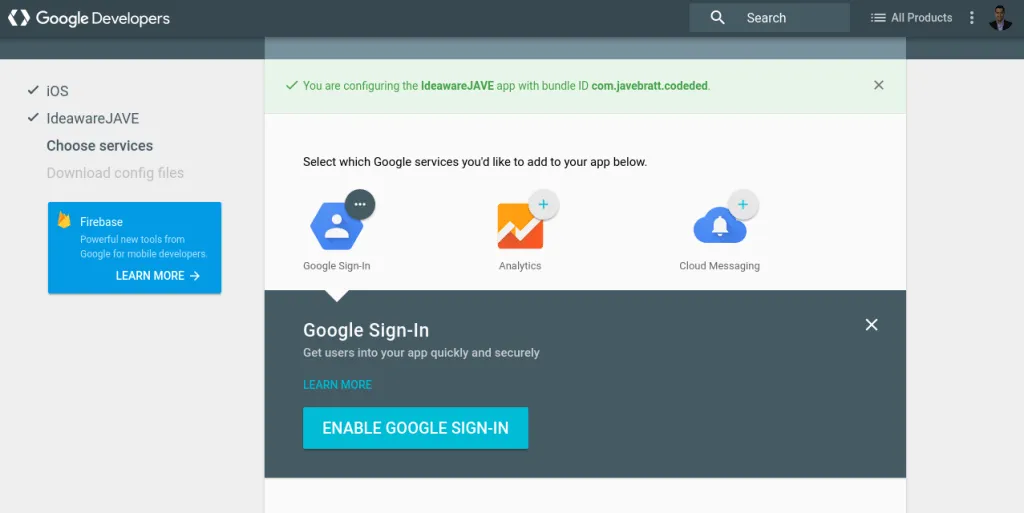
Once you move to the next view, it’s going to let you enable services to use for your app. It has Google Sign-In, Analytics, and Cloud Messaging, we’re going to choose Google Sign-In and click on the button that says ENABLE GOOGLE SIGN-IN.
Once enabled it will let you download the `GoogleService-Info.plist` configuration file, you’ll store this file in your project’s root, right next to the `package.json` file.
Now it’s time to follow the same process with Android, and it’s mostly the same, you’ll go to this link, and start creating your Android app.
The one difference is that you need to add an `Android Signing Certificate SHA-1` to be able to enable Google Sign-In for Android.
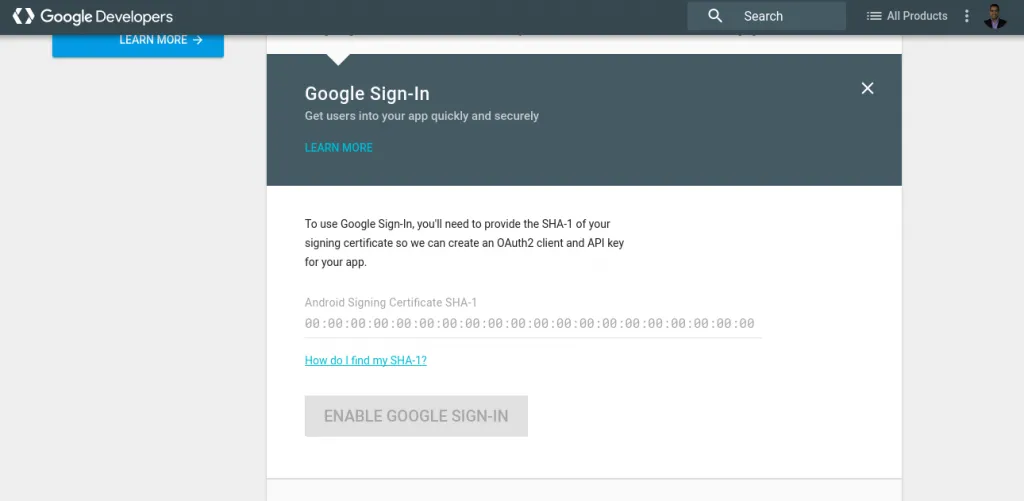
Getting the SHA-1 sign-in certificate isn’t difficult, but it does require a bit of command line work.
There are two certificates you’ll need, one for production and one for development, in this tutorial we’ll get the development certificate sign-in, and in the end, I’ll show you where to get the production one.
To get the development certificate, we’re going to open our terminal and type:
$ keytool -exportcert -list -v -alias androiddebugkey -keystore ~/.android/debug.keystoreWhere `~/.android/debug.keystore` is where 99,99% of the time you’ll find it, if not, check your Android SDK install to see where it is.
It’s going to ask you for a Keystore password. The default one is android** (hopefully you haven’t changed _it :P_)
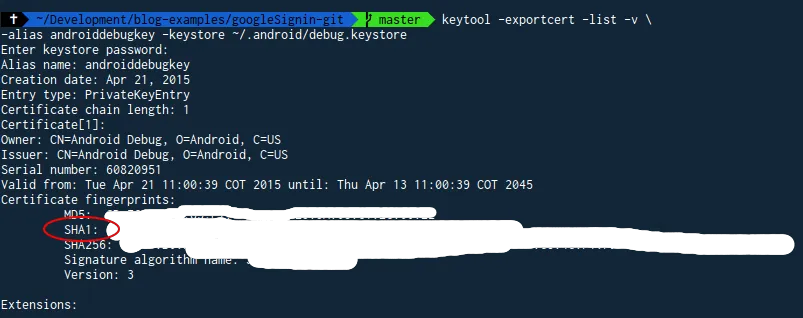
The output from that command is going to give you 3 or 4 certificate fingerprints, copy the SHA1 and paste it in the form where you’re creating the Android app in the developers’ console.
Then click ENABLE GOOGLE SIGN-IN, and it will let you download your Android configuration file, go ahead and move it to the project’s root folder.
And now we’re ready to install the Cordova plugins to get our application working.
Step #2: Install the Google native plugin.
Now that we finished with all the setup, we’re going to open the `GoogleService-Info.plist` file. Inside that file, locate this bit of code:
<key>REVERSED_CLIENT_ID</key>
<string>com.googleusercontent.apps.LONG_STRING_HERE</string>
That right there is your `REVERSECLIENT_ID`, take note of it, we’ll use it to install the Cordova plugin (_NOTE: This is only required for iOS.)
Now open your terminal and install both the plugin and the Ionic native wrapper (do not forget to replace ’_myrecerseclientid’ with the reversed client id you got from the configuration file_).
$ cordova plugin add cordova-plugin-googleplus --save --variable  REVERSED_CLIENT_ID=myreversedclientid

$ npm install --save @ionic-native/google-plus
After the CLI finishes installing, go ahead and type
$ cordova prepareAnd then, make sure to add the GooglePlus package as a provider in the `app.module.ts` file:
import { SplashScreen } from '@ionic-native/splash-screen';
import { StatusBar } from '@ionic-native/status-bar';
import { GooglePlus } from '@ionic-native/google-plus';

@NgModule({
  ...,
  providers: [
    {provide: ErrorHandler, useClass: IonicErrorHandler},
    SplashScreen,
    StatusBar,
    GooglePlus
  ]
})
export class AppModule {}
Now grab a drink, and get ready for the next step where we’ll create the authentication flow.
Step #3: Create the Sign-In Process
Go ahead and open your `home.html` page (or the page you want to use for sign-in, home is just an example) and change the HTML to look like this:
<ion-header>
  <ion-navbar>
    <ion-title>
      Ionic Blank
    </ion-title>
  </ion-navbar>
</ion-header>

<ion-content padding>

  <button ion-button block color="danger" (click)="loginUser()" *ngIf="!userProfile">
    <ion-icon name="logo-googleplus"></ion-icon>
    Login with Google
  </button>

  <ion-item *ngIf="userProfile">
    <ion-avatar item-left>
      <img [src]="userProfile.photoURL">
    </ion-avatar>
    <h2>{{ userProfile.displayName }}</h2>
    <h3>{{ userProfile.email }}</h3>
  </ion-item>
</ion-content>
We’re using
<button ion-button block color="danger" (click)="loginUser()" *ngIf="!userProfile">
  <ion-icon name="logo-googleplus"></ion-icon>
  Login with Google
</button>
To show the login button when there’s no user, and we’re using:
<ion-item *ngIf="userProfile">
  <ion-avatar item-left>
    <img [src]="userProfile.photoURL">
  </ion-avatar>
  <h2>{{ userProfile.displayName }}</h2>
  <h3>{{ userProfile.email }}</h3>
</ion-item>
To display some info if the user is already logged-in.
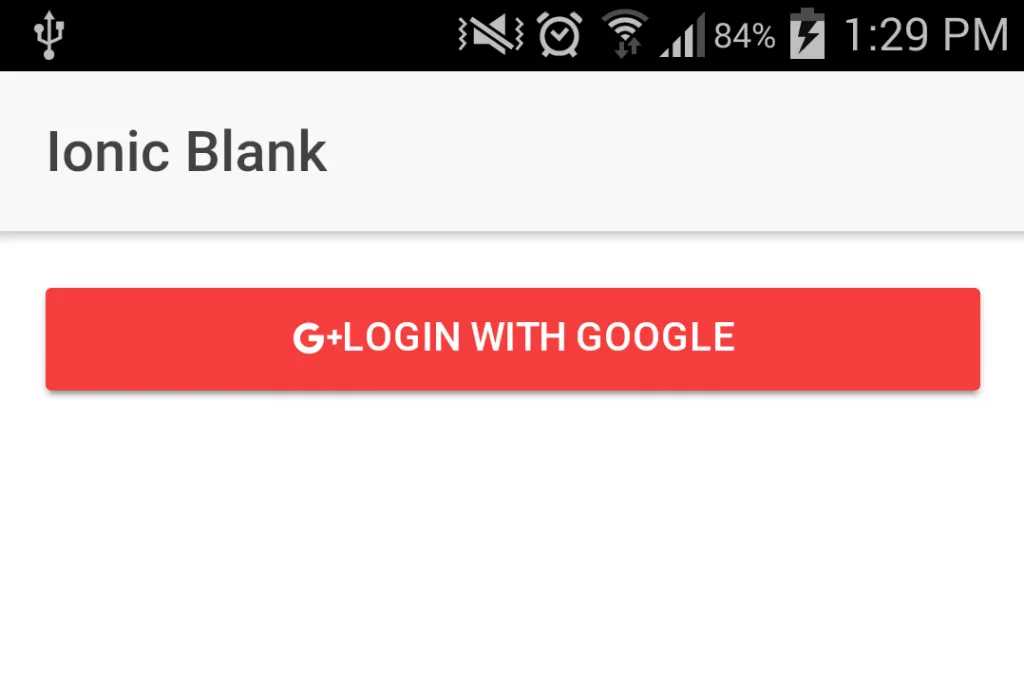
And now let’s move to the `home.ts` file to connect everything and get our app working, the first thing we’ll do is to import Firebase and Google plus
import { GooglePlus } from '@ionic-native/google-plus';
import firebase from 'firebase';
Then, we’re going to declare the `userProfile` variable we’re using in the HTML, and also inject Google Plus into the constructor
userProfile: any = null;
constructor(public navCtrl: NavController, private googlePlus: GooglePlus) {}
Once that’s done, we’re going to create an authentication observable that listens to any auth changes in real-time and respond to them
constructor(public navCtrl: NavController, private googlePlus: GooglePlus) {
  firebase.auth().onAuthStateChanged( user => {
    if (user){
      this.userProfile = user;
    } else {
        this.userProfile = null;
    }
  });
}
`onAuthStateChanged()` is listening to Firebase authentication, and every time there’s change it will trigger, if there’s a logged-in user it will assign that user to the `userProfile` variable, and if there isn’t any user it will mark the `userProfile` as `null`.
Now go ahead and create the login function:
loginUser(): void {
  this.googlePlus.login({
    'webClientId': '<Your web client ID>',
    'offline': true
  }).then( res => console.log(res))
    .catch(err => console.error(err));
}
Here’s what’s going on:
- We’re calling `googlePlus.login()` to have the cordova plugin call the native account chooser.
- We’re passing `‘offline’: true` and our `webClientId` to have the app return an `idToken` we can later send to Firebase.
- Our `webClientId` is the same as our `REVERSE_CLIENT_ID` but backward, meaning it would look like `LONG_STRING_HERE.apps.googleusercontent.com`.
Right there we managed to authorize our application with Google Sign-In (or we have a big red error message and don’t know what to do).
Now we’re going to send the `idToken` to Firebase so we can create a user account using Google Sign-In
loginUser(): void {
  this.googlePlus.login({
    'webClientId': '<Your web client ID>',
    'offline': true
  }).then( res => {
          const googleCredential = firebase.auth.GoogleAuthProvider
              .credential(res.idToken);

          firebase.auth().signInWithCredential(googleCredential)
        .then( response => {
            console.log("Firebase success: " + JSON.stringify(response));)
        });
  }, err => {
      console.error("Error: ", err)
  });
}
Let’s break it down to understand it better
const googleCredential = firebase.auth.GoogleAuthProvider.credential(res.idToken);This is creating a credential object for the Google Provider with the `idToken` we got from the function.
And:
firebase.auth().signInWithCredential(googleCredential)
  .then( response => {
    console.log("Firebase success: " + JSON.stringify(response));)
});
This is taking the credential object and signing in our user with Firebase `signInWithCredential()`.
Once the user is successfully signed in, the `onAuthStateChanged()` will trigger and it will assign everything to the `userProfile` object.
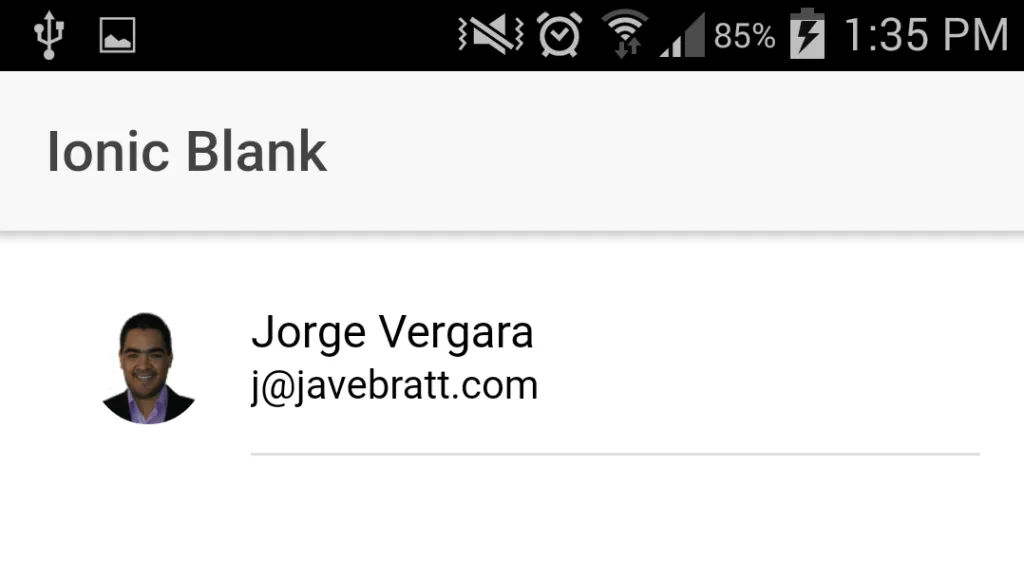
Now, remember that if you want to use this process in production, you’ll need to go back to the SHA-1 generation step and instead of using the debug key you’ll need to use the production Keystore you created to upload your apps to Google Play.
$ keytool -exportcert -list -v -alias androiddebugkey -keystore <path to keystore here>Next Steps
First of all thank you for giving me your time and attention, if you’re experiencing any issues don’t hesitate to send me a message.
Second, I created a starter template ready to use for both Google and Facebook Sign-In, all you need to do is add your credentials and run `npm install`.
My starters usually go for \$10 bucks, but since you took the time to read this whole post I want you to have it for free, just use the code devdactic at checkout.
