How to Create an Email List with Firebase, Sendfox and Ionic Last update: 2020-03-10
If you want to integrate an email list for your app or website, you have countless options - but today I’ll show you a really simple way to make everything work with Firebase cloud functions!
Integrating an email provider can be challenging, especially if they only offer pre-made widgets. With Sendfox, we have access to an API, but we shouldn’t use it directly from our frontend app since that would expose our private keys. 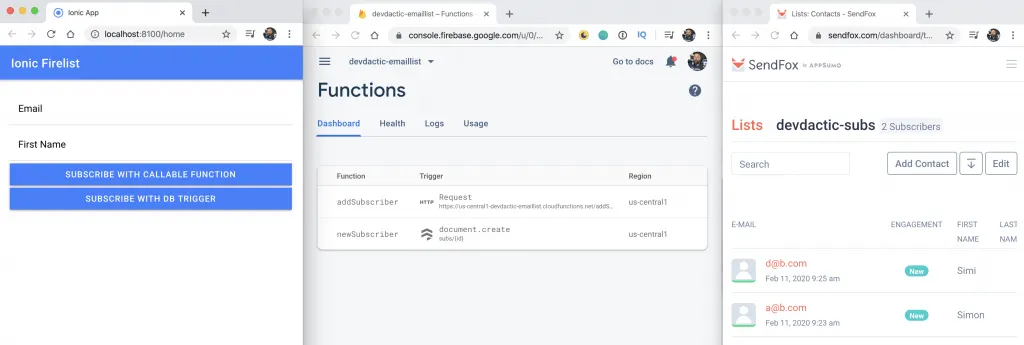
Instead, we use Firebase cloud functions and database trigger to automatically add new subscribers in a safe way!
Email List Setup
First of all you need a Sendfox account, which is free in the beginning.
After creating your account, you need to create a list to which we can later add new subscribers.
You can then find the list ID in the URL of your browser, which we will need at a later point as well.
Finally we also need an API key, so go ahead and create one in your settings and save the value for now somewhere. 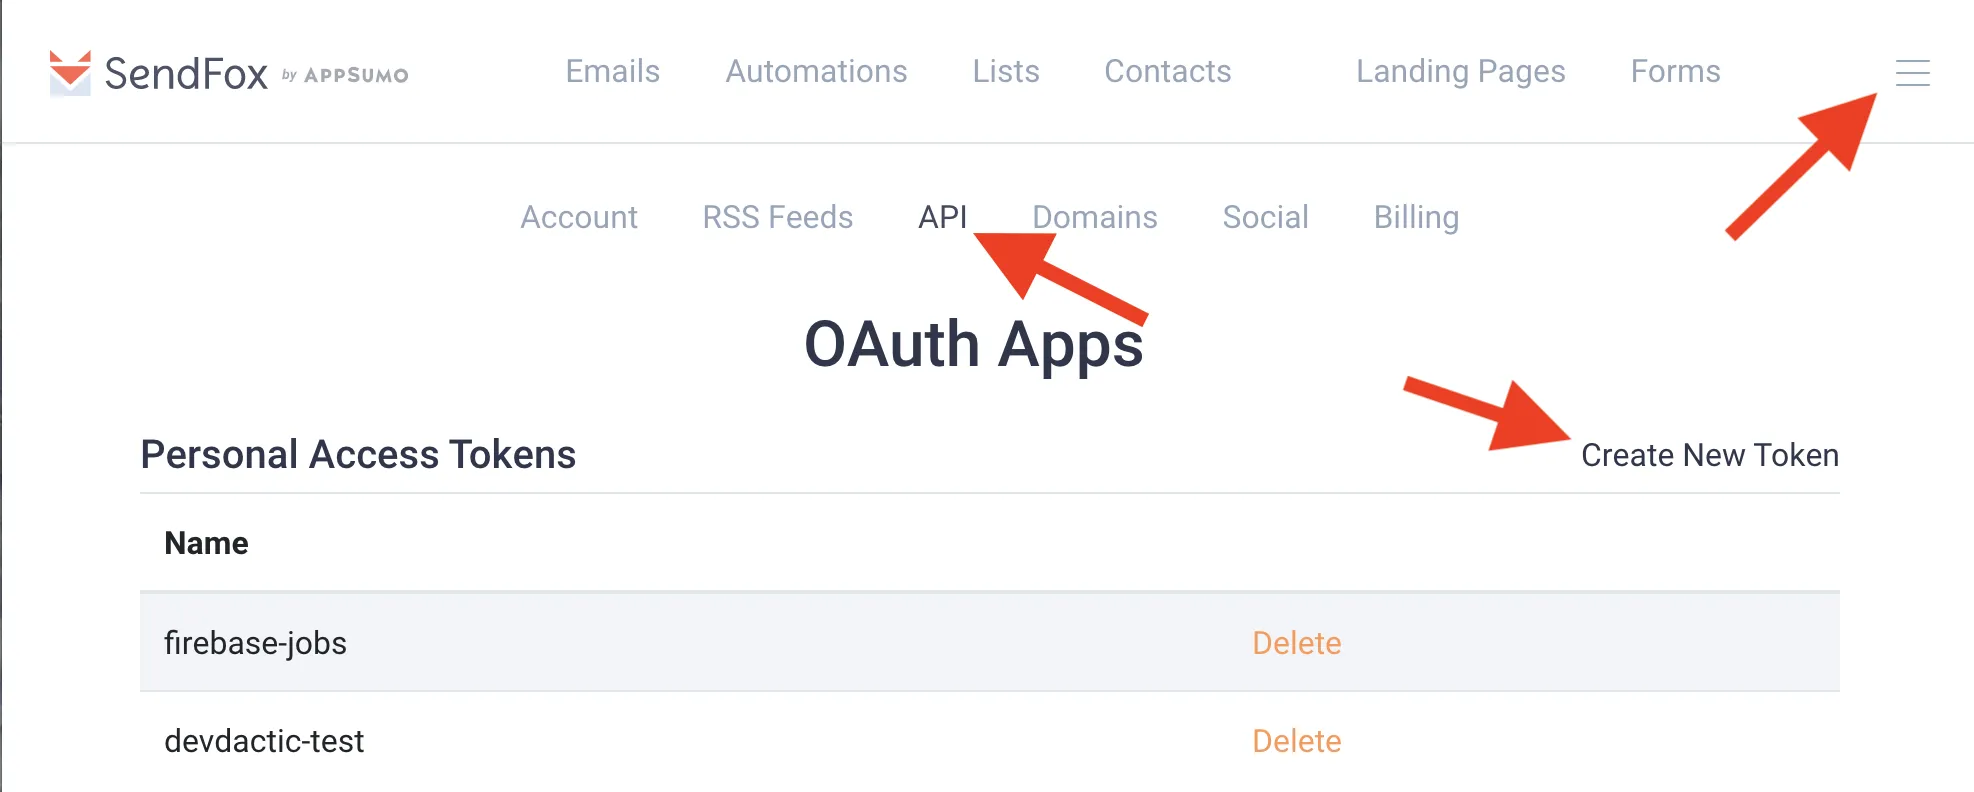
The key is shown only once, so note it now before dismissing the view.
Firebase Settings
Next step is Firebase, and you need to create a new project (or use any existing). Inside Firebase, make sure you have enabled the Firestore database by clicking “Get Started” in the right tab.
In order to connect our Ionic app to Firebase we also need the configuration object. You can create it by going to settings -> general -> add app inside Firebase, which will show an object the we need in the next step.
Ionic App Setup
Now let’s move to our app. We can create a blank new Ionic app and install the packages for Angular Fire in order to easily access both the database and the cloud functions.
Go ahead by running:
ionic start devdacticFirelist blank --type=angular
cd ./devdacticFirelist
npm i firebase @angular/fire
Now it’s time to copy over your configuration object from Firebase, which you can paste into the environments/environment.ts under a new Firebase key like this:
export const environment = {
  production: false,
  firebase: {
    apiKey: "",
    authDomain: "",
    databaseURL: "",
    projectId: "",
    storageBucket: "",
    messagingSenderId: "",
    appId: ""
  }
};
To connect everything, we need to initialize AngularFire with this object. Also, we need to import all the modules that we need within our app later, so change the app.module.ts to:
import { NgModule } from '@angular/core';
import { BrowserModule } from '@angular/platform-browser';
import { RouteReuseStrategy } from '@angular/router';

import { IonicModule, IonicRouteStrategy } from '@ionic/angular';
import { SplashScreen } from '@ionic-native/splash-screen/ngx';
import { StatusBar } from '@ionic-native/status-bar/ngx';

import { AppComponent } from './app.component';
import { AppRoutingModule } from './app-routing.module';

import { AngularFireModule } from '@angular/fire';
import { environment } from '../environments/environment';
import { AngularFirestoreModule } from '@angular/fire/firestore';
import { AngularFireFunctionsModule, FUNCTIONS_REGION } from '@angular/fire/functions';

@NgModule({
  declarations: [AppComponent],
  entryComponents: [],
  imports: [
    BrowserModule,
    IonicModule.forRoot(),
    AppRoutingModule,
    AngularFireModule.initializeApp(environment.firebase),
    AngularFirestoreModule,
    AngularFireFunctionsModule
  ],
  providers: [
    StatusBar,
    SplashScreen,
    { provide: RouteReuseStrategy, useClass: IonicRouteStrategy },
    { provide: FUNCTIONS_REGION, useValue: 'us-central1' }
  ],
  bootstrap: [AppComponent]
})
export class AppModule {}
We also need to set a specific region for our functions - you will see in which region your functions run later when you deploy them. If you see a different value then, make sure to change it in here as well!
Ionic Firebase Integration
In terms of our app we will keep it simple for this example, especially the part of the view. We only need the mandatory input fields and buttons to trigger our actions, so go ahead and change the home/home.page.html to:
<ion-header>
  <ion-toolbar color="primary">
    <ion-title>
      Ionic Firelist
    </ion-title>
  </ion-toolbar>
</ion-header>

<ion-content>
  <div class="ion-padding">
    <ion-item>
      <ion-label position="floating">Email</ion-label>
      <ion-input [(ngModel)]="userdata.email"></ion-input>
    </ion-item>
    <ion-item>
      <ion-label position="floating">First Name</ion-label>
      <ion-input [(ngModel)]="userdata.first_name"></ion-input>
    </ion-item>

    <ion-button expand="full" (click)="subscribeDirectly()">
      Subscribe with Callable function</ion-button>

    <ion-button expand="full" (click)="subscribeTriggered()">
      Subscribe with DB trigger</ion-button>
  </div>
</ion-content>
As you can see from our view, we will use two different ways to add a subscriber. Not really mandatory, but a good example to show:
- How to use a Firestore cloud trigger
- How to use a callable cloud function
The first option is done by simply writing to the database. Our Ionic app doesn’t really know what’s happening afterwards, but we will add a cloud function later that will be called whenever we write to a specific location inside our Firestore!
The second way is directly calling a cloud function. We can call a function by its name and pass data to the call - just like we are used to with any regular Http call.
It’s important to understand that we need to call the callable() function in order to actually get an Observable to which we can subscribe, it’s not immediately created in the first line of the subscribeDirectly.
Go ahead by changing your home/home.page.ts to:
import { Component } from '@angular/core';
import { AngularFireFunctions } from '@angular/fire/functions';
import { AngularFirestore } from '@angular/fire/firestore';
import { ToastController } from '@ionic/angular';

@Component({
  selector: 'app-home',
  templateUrl: 'home.page.html',
  styleUrls: ['home.page.scss']
})
export class HomePage {
  userdata = {
    email: '',
    first_name: ''
  };

  constructor(
    private functions: AngularFireFunctions,
    private db: AngularFirestore,
    private toastCtrl: ToastController
  ) {}

  subscribeTriggered() {
    this.db
      .collection('subs')
      .add({ email: this.userdata.email, first_name: this.userdata.first_name })
      .then(
        res => {
          this.showToast('You are now subscribed!');
        },
        err => {
          console.log('ERROR: ', err);
        }
      );
  }

  subscribeDirectly() {
    const callable = this.functions.httpsCallable('addSubscriber');
    const obs = callable({ email: this.userdata.email, first_name: this.userdata.first_name });
    obs.subscribe(res => {
      this.showToast(res.msg);
    });
  }

  async showToast(msg) {
    const toast = await this.toastCtrl.create({
      message: msg,
      duration: 2000
    });
    toast.present();
  }
}
In both cases we will show a toast after the operation, but in the case of the callable function we will use the message we hopefully get back from the call instead of a string directly.
Firebase Cloud Functions
Now it’s time to establish our cloud functions, since the Ionic app won’t work correctly until we have set them up.
Make sure you have the firebase-tools installed globally in order to run the other commands!
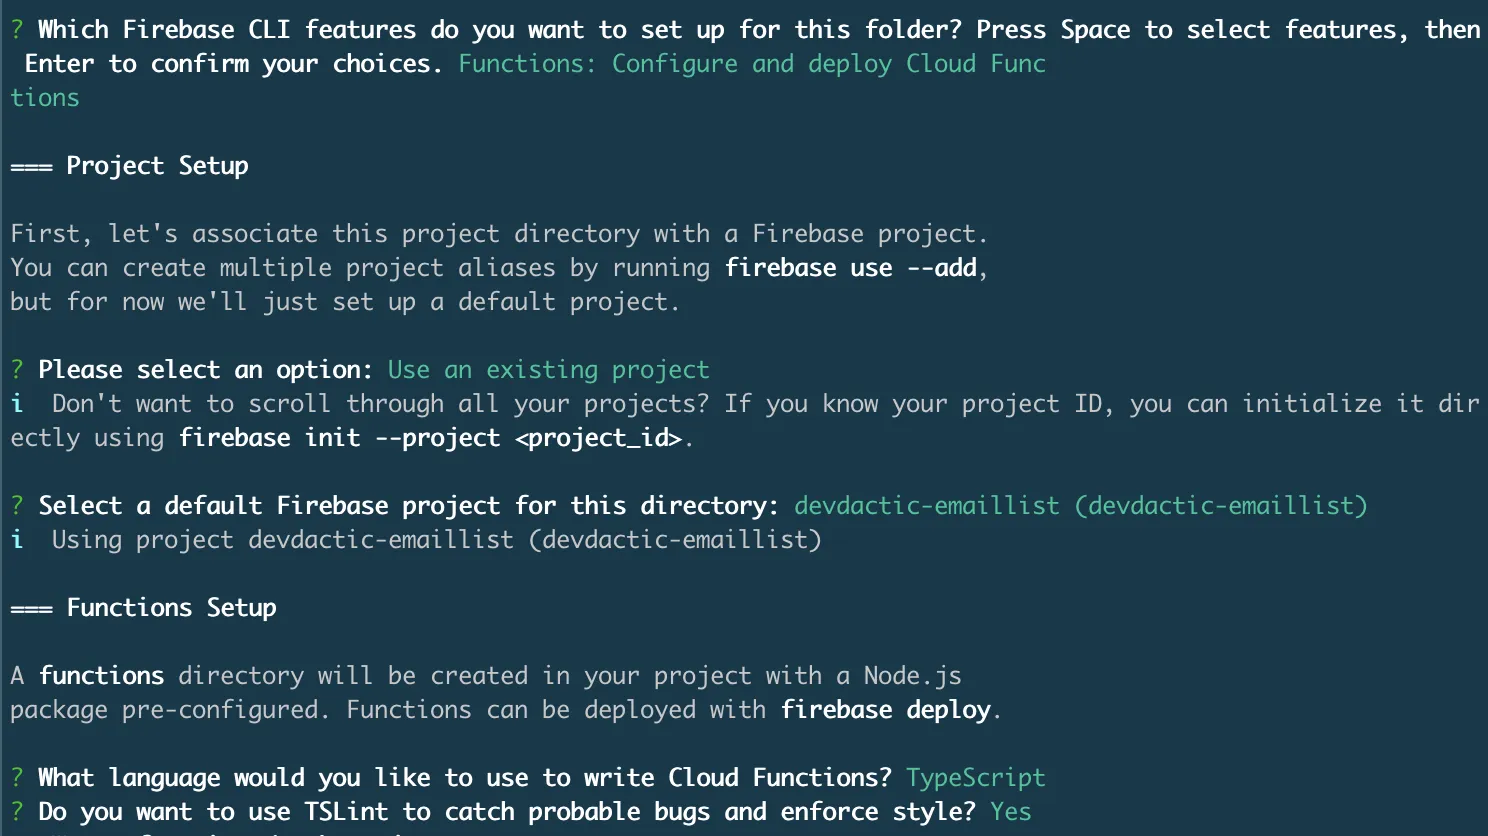
To get started, initialize a Firebase project directly at the root of your Ionic project. Inside the dialog, select only Functions (as we don’t need anything else in this example) and continue the answers like shown in the image below.
npm i -g firebase-tools
firebase init
cd ./functions
npm i axios
We also install the axios package, which is a standard helper for performing HTTP requests.
After everything is finished, you will find a new functions folder in your project. This is the place where you develop your cloud functions for Firebase!
As mentioned before, we will implement two different ways to add a subscriber.
Our addSubscriber is a callable function, which will have a regular endpoint inside Firebase after deployment. We already called this function from Ionic directly by its name!
All data that we passed to the function is directly available, and we pass it to our addToSendfox to perform the subscription API call.
The second function newSubscriber will be triggered whenever we write data to the subs collection within Firestore (more specific: create a new document).
Inside the function we also got access to the document, which again holds all relevant information for our subscription call.
Go ahead and replace everything inside the functions/index.ts with:
import * as functions from 'firebase-functions';
const axios = require('axios').default;
const sendfoxKey = 'Bearer ' + functions.config().sendfox.key;

// Callable cloud function
export const addSubscriber = functions.https.onCall(async (data, context) => {
  addToSendfox(data);
  return { msg: 'You are now subscribed through a callable function!' };
});

// User a trigger on our database
exports.newSubscriber = functions.firestore.document('/subs/{id}').onCreate((snap, context) => {
  let user: any = snap.data();

  addToSendfox(user);
  return true;
});

function addToSendfox(user: any) {
  // Use your Sendfox List ID
  user.lists = [18645];

  const options = {
    url: 'https://api.sendfox.com/contacts',
    method: 'post',
    headers: {
      'Content-Type': 'application/json',
      Authorization: sendfoxKey
    },
    data: user
  };

  axios(options)
    .then((response: any) => {
      console.log('response: ',response);
    })
    .catch((error: any) => {
      console.log('error: ', error);
    });
}
Our helper function will perform the actual HTTP request using axios. In here we just need to construct the call to make it a regular post, with the headers we need and the body which needs to contain an array of list IDs to which we subscribed the email (remember the list ID from Sendfox you created in the beginning!).
Before we deploy our functions, we need to set they API key for Sendfox. By writing it to the Firebase environment it is stored in a safe place and not exposed to anyone else.
You can set the configuration by using functions:config:set and write whatever value you want to it.
Afterwards we are done and can continue to deploy the project, but since we only got functions we only want to deploy them:
firebase functions:config:set sendfox.key="YOURAPIKEY"
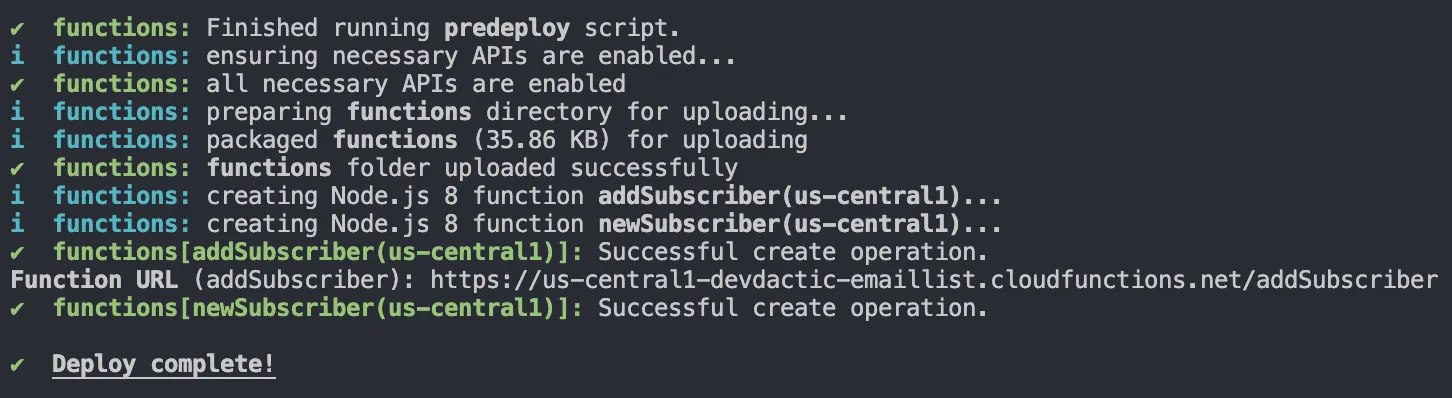
firebase deploy --only functionsAfter running the deployment you can also see the regions for your cloud functions. If the value here is different from what you initially entered inside your app.module.ts, go ahead and replace it with the actual value you see!
Most likely your functions won’t work correctly and if you inspect the logs within the Firebase functions tab you will see a message like this:
Billing account not configured. External network is not accessible and quotas are severely limited. Configure billing account to remove these restrictions
To make an external API call from your cloud functions you need to upgrade your Firebase to a paid project. You can select it on the left hand side and pick the Blaze plan, but for some testing calls in the beginning you won’t be charged I guess (Idon’t know the exact number of calls allowed).
Now the error should be gone and you can enjoy the whole process from Ionic to Firebase and Sendfox!
Conclusion
Creating an email list for your next project might look like a challenging task, but given the capabilities of email services and Firebase cloud functions make the task a simple combination of our available tools!
Of course the process of using Firebase callable functions could be used for a variety of other cases in which you want to make secured API calls to a third-party service that shouldn’t be done from your frontend project.
You can also find a video version of this tutorial below.