How to Publish a Custom Ionic Module With NPM Last update: 2018-03-20
Have you ever thought about creating your own custom Ionic Module? Wouldn’t it be nice to publish a part of your work and distribute it through NPM? Truth is, it’s actually more easy than you might think!
Recently I found a great Ionic component on Github but you had to download and integrate it which was not working directly. I thought this would be the perfect spot to create a custom Ionic Module and see how far I can get (spoiler: it is published).
Also, this approach makes great use of the Ionic Module Template which apparently is not working to 100% therefore we’ll go through the needed steps for your own custom module now!
Configure your Custom Ionic Module Package
You can start this tutorial with a blank folder, no Ionic app is needed!
First of all we need some information about our package, the structure, scripts used and where files will be. All of this needs to be available inside the final package as well and therefore we need to put the information inside the package.json like this:
{
  "name": "ionic-academy-package",
  "version": "0.0.1",
  "description": "A Simple Ionic Academy Module",
  "main": "./dist/index.js",
  "typings": "./dist/index.d.ts",
  "files": ["dist"],
  "scripts": {
    "ngc": "ngc",
    "build": "rm -rf dist && npm run ngc",
    "publishPackage": "npm run build && npm publish"
  },
  "repository": {
    "type": "git",
    "url": "git+https://github.com/saimon24/ionic-academy-module.git"
  },
  "keywords": [],
  "author": "Simon Grimm",
  "license": "MIT",
  "homepage": "https://ionicacademy.com",
  "devDependencies": {
    "@angular/common": "5.0.3",
    "@angular/compiler": "5.0.3",
    "@angular/compiler-cli": "5.0.3",
    "@angular/core": "5.0.3",
    "@angular/forms": "^5.2.7",
    "@angular/platform-browser": "5.0.3",
    "@angular/platform-browser-dynamic": "5.0.3",
    "@types/node": "^9.4.6",
    "ionic-angular": "3.9.2",
    "rxjs": "5.5.2",
    "typescript": "2.4.2",
    "zone.js": "0.8.18"
  }
}
For now just create the file and perhaps change the names and URL if you already want to work on your own custom component.
Next step is to give our TypeScript compiler a bit of advise about our project, so create a new file tsconfig.json and insert:
{
  "compilerOptions": {
    "module": "es2015",
    "target": "es5",
    "moduleResolution": "node",
    "sourceMap": true,
    "inlineSources": true,
    "declaration": true,
    "noImplicitAny": false,
    "experimentalDecorators": true,
    "lib": ["dom", "es2015"],
    "outDir": "dist"
  },
  "exclude": [
    "node_modules",
    "dist",
    "scripts"
  ],
  "angularCompilerOptions": {
    "skipTemplateCodegen": true
  }
}
This is just general information about how our project TypeScript files should be transpiled, and you normally find this file automatic inside your Ionic apps folder.
Create your Custom Ionic Module
The previous 2 files are enough for the base, now we focus on creating the actual custom module. Go ahead and create a folder src/ where the logic/view of our custom module will live.
Inside that folder create 2 more folders called components/ and providers/. You know these folders from a standard Ionic app and they will have the same role inside our module as well.
Let’s start with a super simple provider that our module can finally export. For this tutorial we’ll just add one function that returns a reason why you should join the Ionic Academy.
Now create a new file at src/providers/academy-provider.ts and insert:
import { Injectable } from '@angular/core';

@Injectable()
export class AcademyProvider {
  reasonToJoin() {
    return 'The Ionic Academy helps you to learn everything Ionic!';
  }
}
Just like we did for the provider we can now also create a component. Apparently at the moment we need to build the HTML and CSS inline and can’t use a template file like we are used to.
But the rest of the logic follows the same principles, so create a new file a t src/components/academy-component.ts and insert:
import { Component } from '@angular/core';
import { NavController } from 'ionic-angular';

const HTML_TEMPLATE = `
<ion-header>
  <ion-navbar color="primary">
    <ion-title>
      Ionic Academy
    </ion-title>
  </ion-navbar>
</ion-header>

<ion-content padding>

<div class="special-text">Welcome to the special Ionic Academy Module!</div>
  <button ion-button full icon-left (click)="leavePage()">
    <ion-icon name="close"></ion-icon>
  Close the Page</button>
</ion-content>
`;

const CSS_STYLE = `
.special-text {
    font-weight: 800;
    font-size: 15pt;
    text-align: center;
    color: #0000FF;
}
`;

@Component({
  selector: 'academy-component',
  template: HTML_TEMPLATE,
  styles: [CSS_STYLE]
})
export class AcademyComponent {
  constructor(private navCtrl: NavController) {}

  leavePage() {
      this.navCtrl.pop();
  }
}
Now that’s a bit more code, but we basically craft a simple UI inline, add some styling to it and implement one function that will make the page pop back to where we came from.
Inside the app later we can easily push this whole component, and when the user leaves the component we are back inside our app without any problems.
Export Your Custom Ionic Module
We have created the configuration and logic for our custom Ionic Module, now it’s time to export everything so we can use it later.
For this we first of all need a new file at src/index.ts which only exports our 2 files:
export * from './ionic-academy.module';
export * from './components/academy-component';
export * from './providers/academy-provider';
We have referenced the index file inside our package.json in the beginning as the entry point, so it needs all relevant information. Besides that, we also need to create the custom module which can then be imported later in your app. The module looks quite like the one you might know but has and additional export class which exports the whole module. Go ahead and create the new file at src/ionic-academy.module.ts and insert: src/ionic-academy.module.ts
import { NgModule, ModuleWithProviders } from '@angular/core';
import { AcademyComponent } from './components/academy-component';
import { AcademyProvider } from './providers/academy-provider';
import { IonicModule } from 'ionic-angular';

@NgModule({
    imports: [
        // Only if you use elements like ion-content, ion-xyz...
        IonicModule
    ],
    declarations: [
        // declare all components that your module uses
        AcademyComponent
    ],
    exports: [
        // export the component(s) that you want others to be able to use
        AcademyComponent
    ]
})
export class IonicAcademyModule {
    static forRoot(): ModuleWithProviders {
        return {
            ngModule: IonicAcademyModule,
            providers: [AcademyProvider]
        };
    }
}
If you get error messages while developing the module make sure to run npm install so the module actually finds the dependencies!
When you are finished, your project structure looks like this: 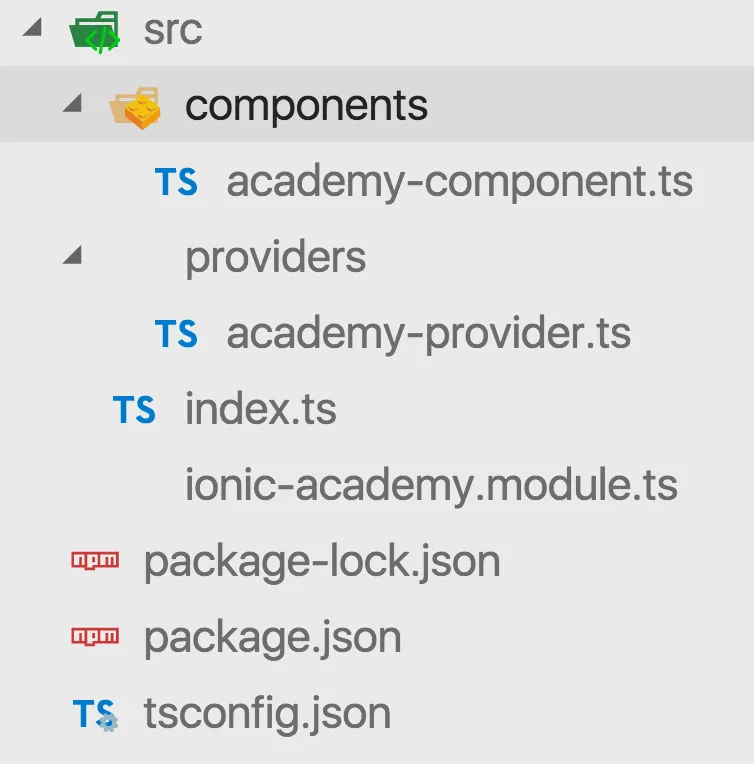
Of course you can replace everything inside with your own logic (which you should do), but let’s cover the last step to get this published. If you have no NPM account, you need to create one now which is completely free but needed to publish the module.
Actually our app is so well prepared at this point that you only have to run one script:
npm run publishPackage

# Which  runs: npm run build && npm publish
This will build our custom module and then run the publish command to make it available through NPM! If you run the command for the first time you might need to login or answer questions, but once done you should be able to find the final package inside the list of your own published packages inside your profile.
Using the Custom Ionic Module
Congratulations, if you’ve come this far your package should be published through NPM! It’s a bit easier to publish something there than inside iTunes connect, so don’t worry that it will take time, after upload it is ready immediately.
Normally you could also link an NPM package inside another project while developing it but that’s not working right now as stated on the page of the Ionic Module Template.
Anyway our package can be used, so if you have any Ionic app at hand give it a try and install:
npm i ionic-academy-packageThis will of course install the custom Ionic Module developed for this article, if yours is available install that! It’s just about understanding the mechanics. To use a custom module we now need to import all the information inside app/app.module.ts like this:
import { BrowserModule } from '@angular/platform-browser';
import { ErrorHandler, NgModule } from '@angular/core';
import { IonicApp, IonicErrorHandler, IonicModule } from 'ionic-angular';
import { SplashScreen } from '@ionic-native/splash-screen';
import { StatusBar } from '@ionic-native/status-bar';

import { MyApp } from './app.component';
import { HomePage } from '../pages/home/home';

import { IonicAcademyModule, AcademyProvider, AcademyComponent } from 'ionic-academy-package';

@NgModule({
  declarations: [
    MyApp,
    HomePage
  ],
  imports: [
    BrowserModule,
    IonicModule.forRoot(MyApp),
    IonicAcademyModule
  ],
  bootstrap: [IonicApp],
  entryComponents: [
    MyApp,
    HomePage,
    AcademyComponent
  ],
  providers: [
    StatusBar,
    SplashScreen,
    {provide: ErrorHandler, useClass: IonicErrorHandler},
    AcademyProvider
  ]
})
export class AppModule {}
We use everything we’ve created inside the module and after the import statement you should also get some code completion for the module! To finally use it, you can directly use the created provider and component inside a page like this:
import { Component } from '@angular/core';
import { NavController } from 'ionic-angular';
import { AcademyComponent, AcademyProvider } from 'ionic-academy-package';

@Component({
  selector: 'page-home',
  templateUrl: 'home.html'
})
export class HomePage {
  info = '';

  constructor(public navCtrl: NavController, private academyProvider: AcademyProvider) {
    this.info = this.academyProvider.reasonToJoin();
  }

  showAcademyComponent() {
    this.navCtrl.push(AcademyComponent);
  }
}
As you can see we make use of the provider function reasonToJoin() and also push the AcademyComponent directly on our view stack without any problems. If you’ve used this package, the result looks like the image below where we can see the information of the provider and the new component/page.

And that’s how you create a custom Ionic module - wasn’t actually that hard, right?
Further Additions
We’ve covered only the basics but this should help you get started with your own modules. There are also things I’ve not included here to keep it short which are still super important.
One of them is to create and upload your Github repository so people can also see what’s going on, they can open issues help you grow the module.
Also, when you create the Github repo you need to add a readme file with all the information about how to use your package for other users, and you can find an example of this inside the custom module I created (which basically wraps a component created by Carson Chen).
You can also find a video version of this article below.