How to add Capacitor Google Sign In to your Ionic App Last update: 2020-11-03

If you need a social sign in inside your Ionic app, adding Capacitor Google sign in is actually a breeze to implement after some initial configuration.
Google sign in is one of the most common social authentication providers besides the new Sign in with Apple that iOS apps need to support, and we can set it up directly with Capacitor with just a bit of set up.
The only thing you will need for this tutorial is a Firebase project, so create one now or use any of your existing projects!
Setting up the Capacitor Google Sign app
For the Capacitor Google Sign we need one additional plugin from the Capacitor community, so go ahead for now and set up a blank project and add the plugin like below:
ionic start devdacticLogin blank --type=angular --capacitor
cd ./devdacticLogin
npm i @codetrix-studio/capacitor-google-auth
Since we need to configure the native apps as well, you should set the right bundle ID for your app upfront. You can add it to the CLI command when generating a project or simply set it inside your capacitor.config.json right now:
{
  "appId": "com.devdactic.capalogin",
  "appName": "devdacticLogin",
  "bundledWebRuntime": false,
  "npmClient": "npm",
  "webDir": "www",
  "plugins": {
    "SplashScreen": {
      "launchShowDuration": 0
    }
  },
  "cordova": {}
}
Of course you should pick a bundle ID different from my example, it’s the one you later also use when publishing your iOS and Android app. Now you can add the native platforms after running one initial build:
ionic build
npx cap add ios
npx cap add android
Now the configuration begins…
Firebase Google Sign In Preparation
As said before, we now need our Firebase project. The first step is to open the Firebase project settings and click Add app and select Android.
Make sure you put in the correct bundle ID of your app - the one that’s already in your capacitor.config.json.
We also need SHA-1 signing certificate, something you usually use when you sign your APK for the Play Store in the end. But in order to hook our app up to Google services, we already need it now.
You can first of all get the fingerprint of your debug key, which is 99% of the time automatically created at ~/.android/debug.keystore on your computer.
Get the output for this key by running:
keytool -list -v -alias androiddebugkey -keystore ~/.android/debug.keystoreThe default password for this key should be android, for me actually hitting only enter worked as well.
If you encounter any problems on a Mac because Java is not installed, head over to the Oracle downloads page and install the current JDK!
From the output of your keytool command copy the value after SHA1 and paste it into the Firebase wizard to register our app.
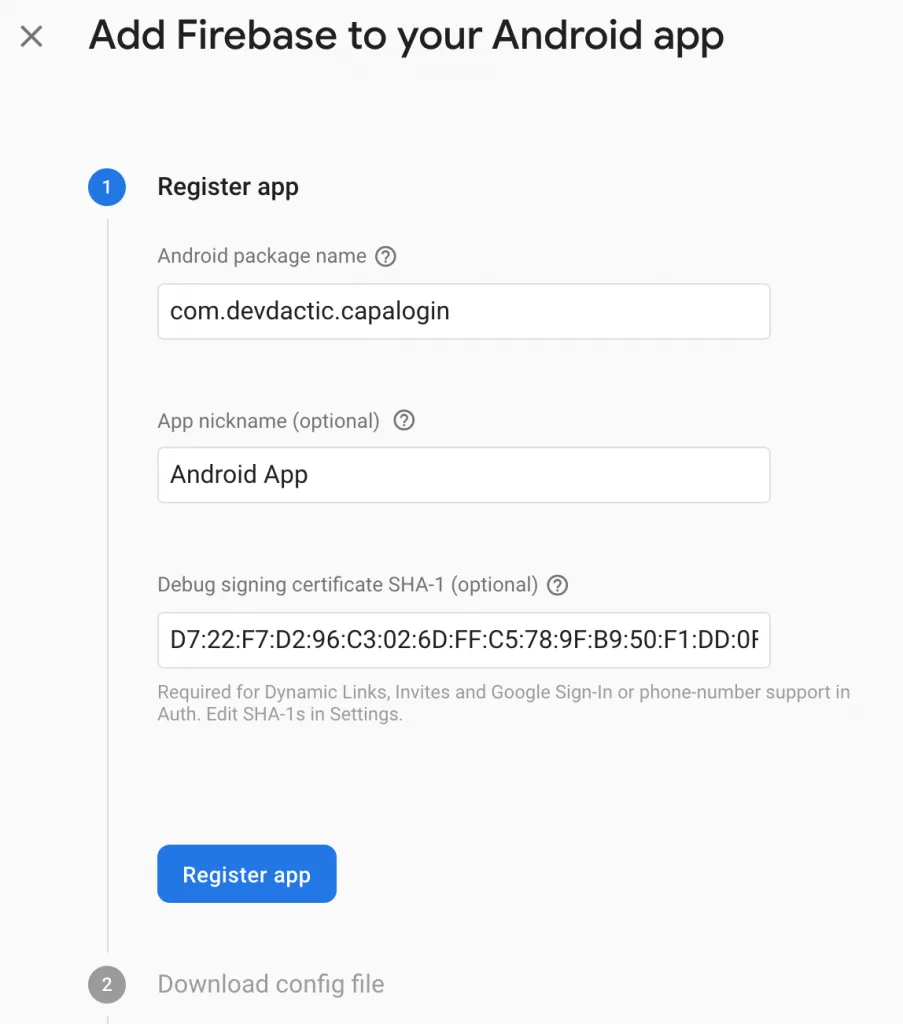
This is your debug SHA1, once you sign your final APK for go live you also need to add this fingerprint for the release key to your Android app inside Firebase, but there’s a simple “Add Fingerprint” button available.
You can now download the google-services.json file and move it to the android/app folder inside your Ionic project. To make the value available to our Android app we also need to make a change to the android/app/src/main/res/values/strings.xml and add an entry for the server_client_id:
<?xml version='1.0' encoding='utf-8'?>
<resources>
    <string name="app_name">devdacticLogin</string>
    <string name="title_activity_main">devdacticLogin</string>
    <string name="package_name">com.devdactic.capalogin</string>
    <string name="custom_url_scheme">com.devdactic.capalogin</string>
    <string name="server_client_id">REPLACEME.apps.googleusercontent.com</string>
</resources>
Now you just need to replace the dummy with your key - but where is your key?
The key is already part of your google-services.json, but there are some other keys as well and taking the wrong key will result in an error when you finally use the sign in!
The best way to find the correct key is to actually visit the Google APIs console, in which a project for your Firebase project was automatically created.
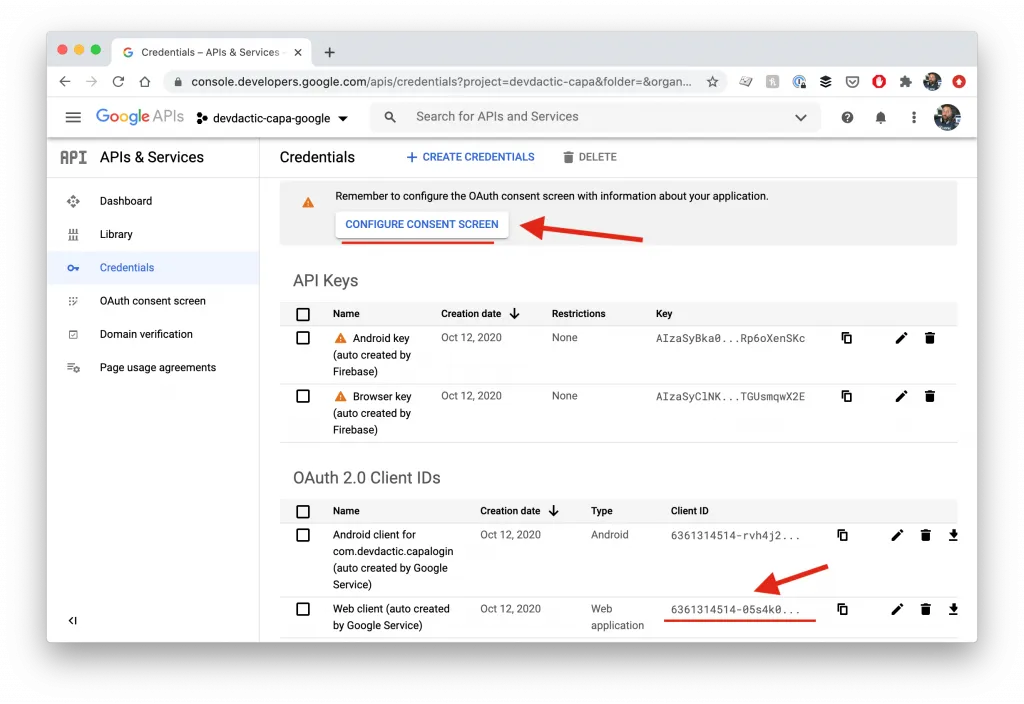
You now want to copy from the OAuth 2.0 Client IDs section, the row Web client and more specific the Client ID in that row (there’s a copy symbol after the ID, just use that).
This is your client ID from now on, so paste it into the Android strings file we opened a minute agoand set it as your server_client_id. We will also need it again soon.
Inside the Google APIs console you also see a warning for the OAuth consent screen, which you should fill out now as you will get into trouble later otherwise. It’s basically a configuration for the consent screen that your users will see when they use the Capacitor Google sign in.
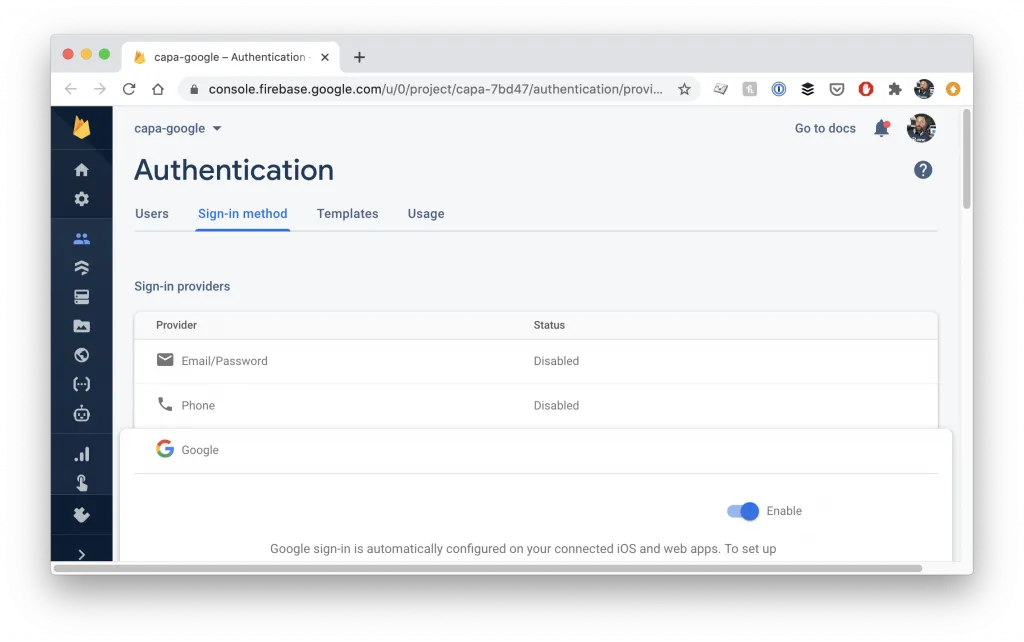
I actually always encountered issues with the OAuth consent screen not being set up, and my changes were not saved, and going through the wizard didn’t really help. What actually fixed the problem in the end:
Inside your Firebase project, go to the Authentication menu, select the Sign-in method tab and activate Google sign in - after hitting safe, this fixed all the OAuth consent screen issues!
Since the Google APIs view is already open, we can make another tiny change to our Web Client, so simply click on the row where you copied the key before and now open the details for it.
In the following screen we can add Authorized JavaScript origins, and if you take a look at the list you’ll see that the usual port 8100 where Ionic apps are served is missing. Go ahead and click the button to add a new URI with our port:

If you still get an error in your developer console later, make sure you empty the cache of your browser and refresh the page.
Capacitor Google Sign In Preparation - Android
Apparently we are not yet done, but we need to tell Android about the Capacitor plugin we installed. Therefore, we need to open the android/app/src/main/java/com/devdactic/capalogin/MainActivity.java which is the starting point of the native Android application and add two lines to import and use our plugin:
package com.devdactic.capalogin;

import android.os.Bundle;

import com.getcapacitor.BridgeActivity;
import com.getcapacitor.Plugin;

import java.util.ArrayList;
import com.codetrixstudio.capacitor.GoogleAuth.GoogleAuth;

public class MainActivity extends BridgeActivity {
  @Override
  public void onCreate(Bundle savedInstanceState) {
    super.onCreate(savedInstanceState);

    // Initializes the Bridge
    this.init(savedInstanceState, new ArrayList<Class<? extends Plugin>>() {{
      // Additional plugins you've installed go here
      add(GoogleAuth.class);
    }});
  }
}
Since we might have the client ID still in our clipboard, we can quickly add it to another file in order to also test our Google Sign In on the web.
Open the src/index.html and put the following line with your client ID into the head tag of your page:
<meta name="google-signin-client_id" content="REPLACEME.apps.googleusercontent.com">Besides that we also need the value in our capacitor.config.json to configure the plugin correctly, so open it and add the whole plugins block to your configuration file:
{
  "appId": "com.devdactic.capalogin",
  "appName": "devdacticLogin",
  "bundledWebRuntime": false,
  "npmClient": "npm",
  "webDir": "www",
  "plugins": {
    "SplashScreen": {
      "launchShowDuration": 0
    },
    "GoogleAuth": {
      "scopes": [
        "profile",
        "email"
      ],
      "serverClientId": "REPLACEME.apps.googleusercontent.com",
      "forceCodeForRefreshToken": true
    }
  },
  "cordova": {}
}
Of course use your real ID in there again, not my dummy.
Now we’ve taken the hard steps and just need to wrap it up for iOS as well.
Capacitor Google Sign In Preparation - iOS
Head over to the Firebase project settings and click Add app again, but this time we will add a native iOS app.
Again, make sure you put in the correct bundle ID of your app, the one from your capacitor.config.json.
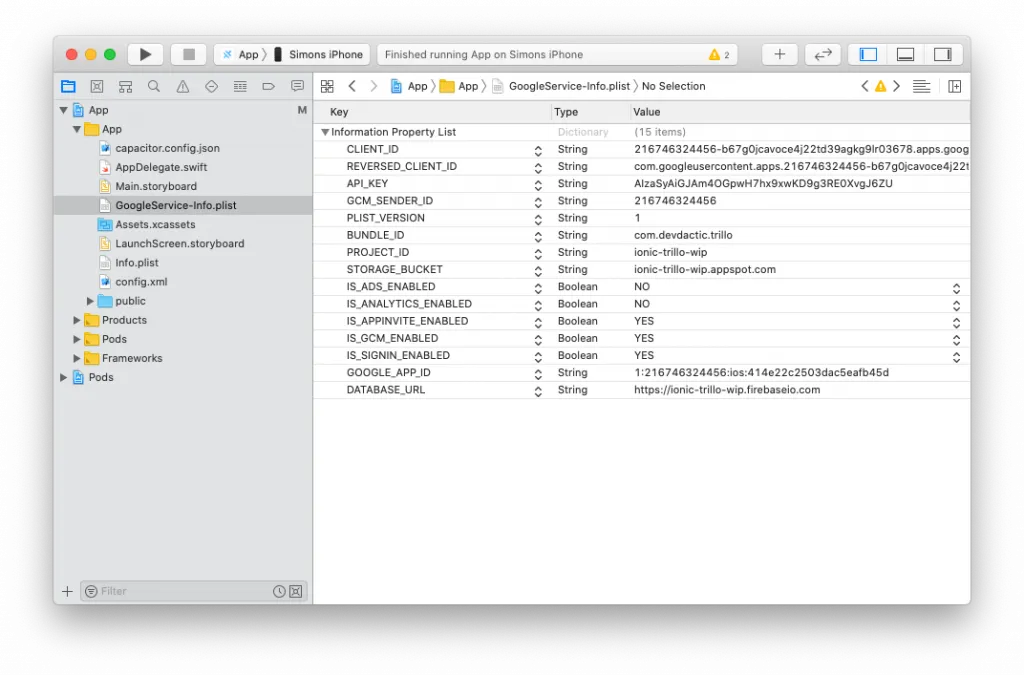
In the next step you can download a file named GoogleService-Info.plist, and we need to move that file into the right location in our project at ios/App/App (yes, twice App in the path) so it sits next to the info.plist in your iOS project.
It’s not enough to do this in your text editor, you really need to drag it into Xcode at the right path!
Before copy, also select Copy items if needed and then it should be right in your Xcode project.
Additionally we need to add an URL scheme to our iOS app, and the easiest way is actually inside Xcode again. Keep in mind that all these changes to the native platforms are persistent since we are using Capacitor!
Within Xcode, select your app in the navigation area to the left, go into the Info tab and scroll to the bottom. In here, we need to expand the URL Types area at the bottom and click the plus to create a new scheme.
This scheme will now be filled with the value of your REVERSED_CLIENT_ID, an ID you can find in the previously downloaded GoogleService-Info.plist (not the client ID from before!). Paste that value into the field like in the image below.
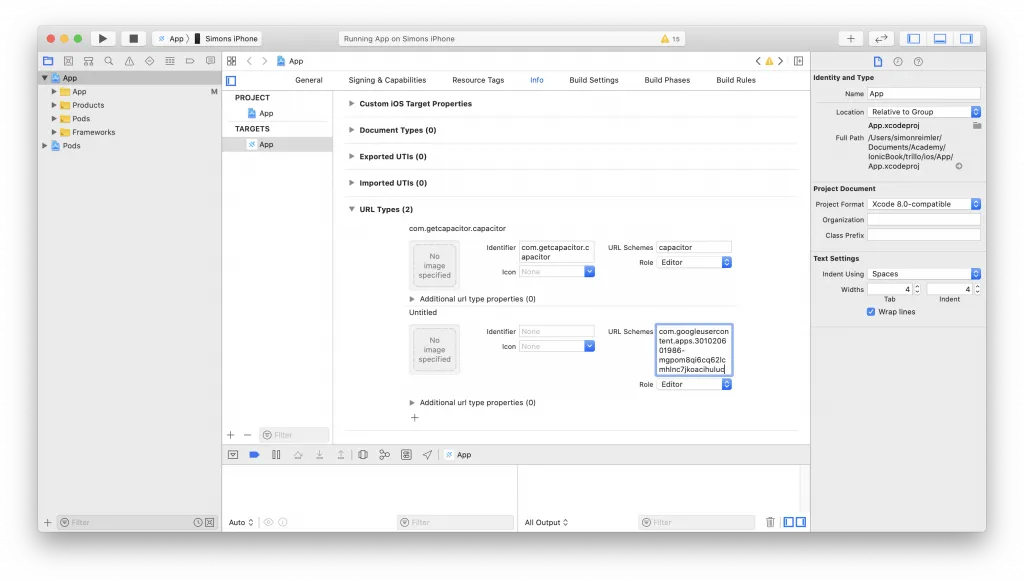
This steps makes sure the callback after the Google sign in opens our app correctly.
Capacitor Google Sign In Implementation
Now things become very easy, since the usage of the plugin is actually just one line of code. Go ahead and open the home/home.page.ts and change it to:
import { Component } from '@angular/core';
import '@codetrix-studio/capacitor-google-auth';
import { Plugins } from '@capacitor/core';

@Component({
  selector: 'app-home',
  templateUrl: 'home.page.html',
  styleUrls: [ 'home.page.scss' ],
})
export class HomePage {
  userInfo = null;

  constructor() { }

  async googleSignup() {
    const googleUser = await Plugins.GoogleAuth.signIn(null) as any;
    console.log('my user: ', googleUser);
    this.userInfo = googleUser;
  }
}
We are not really doing anything with the information after the sign in, but you can easily hook this up to the general Firebase authentication to create a new user. You can find more about this in my book Practical Ionic as well!
The last step for testing is to add a button, simply follow up with the home/home.page.html and change it to:
<ion-header>
  <ion-toolbar color="primary">
    <ion-title>
      Devdactic Sign-in
    </ion-title>
  </ion-toolbar>
</ion-header>

<ion-content>
  <ion-button (click)="googleSignup()">Sign in</ion-button>
  <ion-card>
    <ion-card-content>
      {{ userInfo | json}}
    </ion-card-content>
  </ion-card>
</ion-content>
Now you are ready to use the sign in inside your browser (clear cache if you experience problems) and on your native iOS and Android apps as well!
Conclusion
Implementing Capacitor Google Sign In is mostly a problem of the configuration, which easily results in failures during testing if not made correctly. But if you follow the exact steps outlined above, you now got a powerful social authentication available inside your app!
You can also find a video version of this tutorial below.