How to Build Your Own Ionic Library for NPM Last update: 2020-12-15
You find yourself creating custom components, pages and CRUD operations for your apps over and over? The solution might be to create your own Ionic library that you can install from NPM!
In this tutorial we will create an Angular library, use Ionic components and export our own functionality that allows us to even route to a whole page coming from the Ionic library!

At the same time we will include our Ionic library inside an Ionic testing app to see our changes in realtime, and finally publish the whole package to NPM so everyone can install it.
You can actually see my published devdactic-lib package right here!
Creating the Angular Library Project
The first step to your own custom Ionic library is to generate an Angular library. But this library needs to live inside a workspace, so we generate a new workspace without any application first and then generate the library and add two more components to it.
Go ahead and run:
# npm install -g @angular/cli
ng new devdacticWorkspace --create-application=false
cd ./devdacticWorkspace

ng generate library devdactic-lib --prefix=dev
ng g component customCard
ng g component customPage


ng build
cd dist/devdactic-lib
npm link
After adding the components we run a first build which is necessary at least once to build the /dist folder!
Once the build is done, we can run the link command inside the folder. This command creates a symlink between your local node modules folder and this dist folder, which means you can easily add this folder to an Ionic project afterwards for testing and development.
When you now take a first look at this workspace, you will find the actual code for your library inside projects/devdactic.lib:
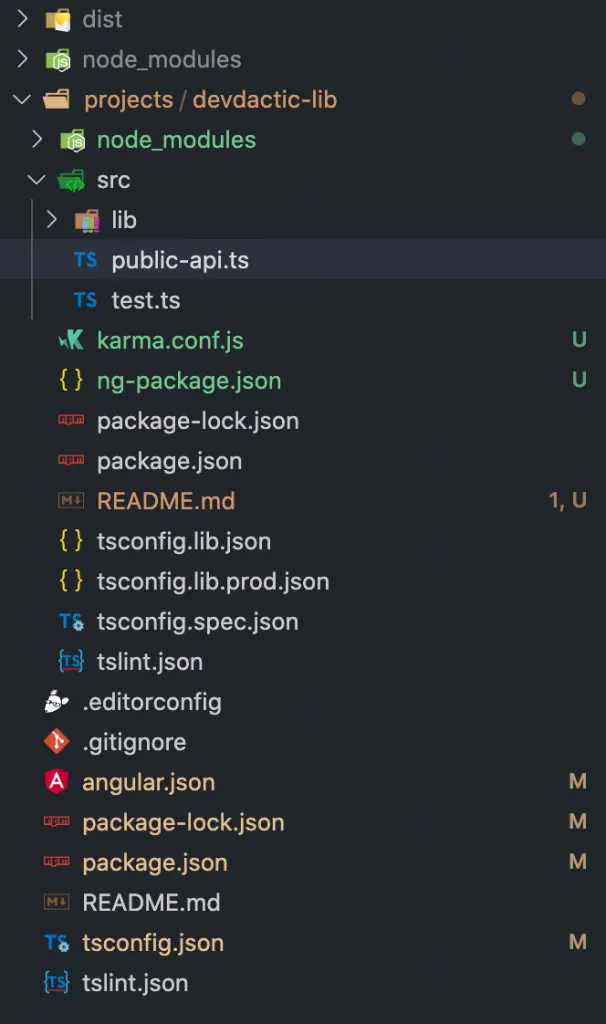
This folder is where you build the functionalities of your Ionic library, add components and services, and declare everything correctly so we can import the module easily in other applications.
For development, I now recommend you run the build command with the watch flag, which is basically live reload for your component whenever something changes!
ng build --watchDuring development I sometimes had to restart this command or the Ionic serve, since some changes were not picked up correctly.
Testing the Ionic Library
Before we dive any further into the library, let’s simultanously create our Ionic app that uses our library.
Create a blank new project and install the package like it was already on NPM - it will directly pick up your local symlink instead:
ionic start devdacticLibraryApp blank --type=angular --capacitor
cd ./devdacticLibraryApp
npm link devdactic-lib
You won’t see it inside your package.json file, but you should see a statement on the console which shows the path of your symlink.
There’s also a tiny issue with the Angular setup and symlinks, and in order to fix this you should now open your angular.json inside the Ionic project and add the preserveSymlinks entry at the shown path:
 "projects": {
    "app": {
      "architect": {
        "build": {
          "options": {
            "preserveSymlinks": true,
Now the compiler will be happy, and you can add the module as a little test to the src/app/home/home.module.ts like you are used to:
import { NgModule } from '@angular/core';
import { CommonModule } from '@angular/common';
import { IonicModule } from '@ionic/angular';
import { FormsModule } from '@angular/forms';
import { HomePage } from './home.page';

import { HomePageRoutingModule } from './home-routing.module';
import { DevdacticLibModule } from 'devdactic-lib';

@NgModule({
  imports: [
    CommonModule,
    FormsModule,
    IonicModule,
    HomePageRoutingModule,
    DevdacticLibModule
  ],
  declarations: [HomePage]
})
export class HomePageModule {}
Since the library only exports the default generated component by now, we can not yet use our own components. But for testing, we can use the automatically created one inside the src/app/home/home.page.html like this:
<ion-header>
<ion-toolbar color="primary">
<ion-title>
Devdactic Library
</ion-title>
</ion-toolbar>
</ion-header>
<ion-content>
<dev-devdactic-lib></dev-devdactic-lib>
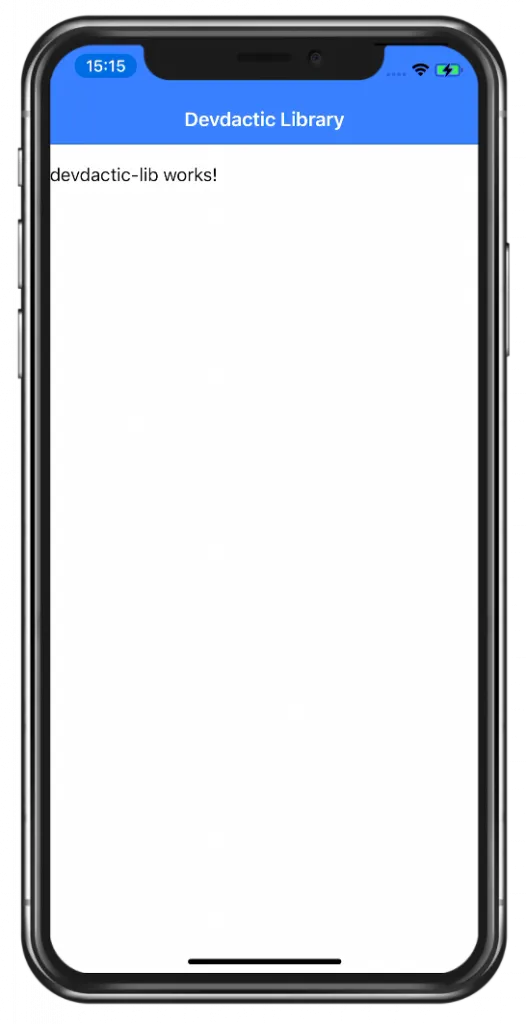
</ion-content>It’s time to bring up ionic serve or Capacitor livereload on a device and check out the result:
If you see something like this, it means your Ionic library integration into the app with symlink works! If not, try to check the logs from both the library and your app, restart the commands and see if you missed something from above.
When you can see that your app and library are connected, it’s time to move on.
Adding Ionic to your Library
By now the library is merely an Angular library and doesn’t know about Ionic components at all. In order to use stuff like ion-card or ion-list inside the lib, we need to install Ionic as a development dependency:
cd projects/devdactic-lib
npm i @ionic/angular --save-dev
You see that we navigate into the actual library folder first, because there’s also a package.json at the top of our workspace, but that’s the wrong place to install the depedency:
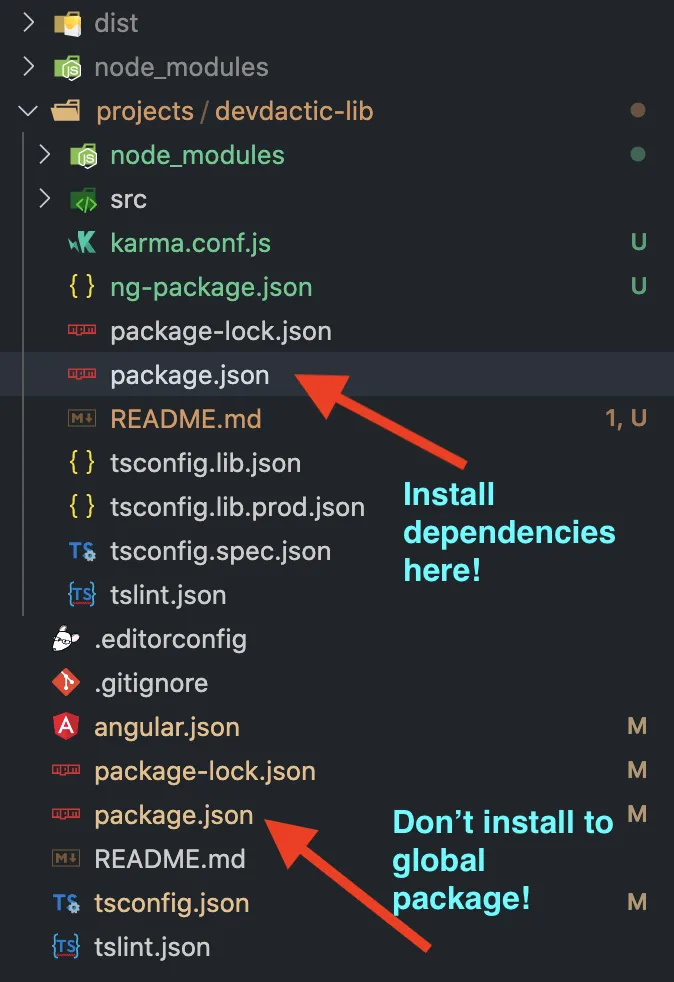 We want to have it right inside the library, not at the top!
Also, the command for installing the dependency is not enough since we also need to add it as a peerDependencies inside the projects/devdactic-lib/package.json:
{
  "name": "devdactic-lib",
  "version": "0.0.1",
  "peerDependencies": {
    "@angular/common": "^9.1.12",
    "@angular/core": "^9.1.12",
    "@ionic/angular": "^5.5.0"
  },
  "dependencies": {
    "tslib": "^1.10.0"
  },
  "devDependencies": {
    "@ionic/angular": "^5.5.0"
  }
}
Whenever someone uses our package, Angular will check if the peer dependencies are already installed in the parent project or otherwise install it, since the library now depends on it.
Now we are ready to add all the Ionic stuff into the library.
Preparing the Exports of your Library
You see that a lot of this isn’t working 100% with CLI commands yet, so you have to take some manual extra steps to make everything work.
Since apps from the outside using our package don’t know about the content automatically, we need to make sure that we are exporting everything correctly. Therefore, open the projects/devdactic-lib/src/public-api.ts and change it to:
/*
 * Public API Surface of devdactic-lib
 */

export * from './lib/devdactic-lib.service';
export * from './lib/devdactic-lib.component';
export * from './lib/devdactic-lib.module';
export * from './lib/custom-card/custom-card.component';
We have only added our custom card, since we will handle the other page component a bit differently in the end.
Now it’s time to add everything to the main module of the library, but we also add something else:
You might have seen this with other packages that you include with a forRoot() call in your module, and that’s the behaviour we want to implement as well. To do so, we need to add a function to the main module of our library that exports some information and becomes a LibConfig object which is a simple interface that we define in there as well.
You could also pass more or other information to your library of course, we will simply pass a URL to it for now.
We as create an InjectionToken with our interface as this is not defined at runtime, we just need it do be injected into our module. We will also inject this LibConfigService in the next step inside a service to retrieve the actual value that was passed to our library!
Now change the projects/devdactic-lib/src/lib/devdactic-lib.module.ts to:
import { DevdacticLibService } from './devdactic-lib.service';
import { NgModule, ModuleWithProviders, InjectionToken } from '@angular/core';
import { DevdacticLibComponent } from './devdactic-lib.component';
import { CustomCardComponent } from './custom-card/custom-card.component';
import { CommonModule } from '@angular/common';
import { IonicModule } from '@ionic/angular';
import { HttpClientModule } from '@angular/common/http';

export interface LibConfig {
  apiUrl: string;
}

export const LibConfigService = new InjectionToken<LibConfig>('LibConfig');

@NgModule({
  declarations: [DevdacticLibComponent, CustomCardComponent],
  imports: [
    CommonModule,
    HttpClientModule,
    IonicModule
  ],
  exports: [DevdacticLibComponent, CustomCardComponent]
})
export class DevdacticLibModule {
  static forRoot(config: LibConfig): ModuleWithProviders {
    return {
      ngModule: DevdacticLibModule,
      providers: [
        DevdacticLibService,
        {
          provide: LibConfigService,
          useValue: config
        }
      ]
    };
  }
}
This setup might look a bit strange or difficult first, but it’s mandatory in order to feed some settings/values to our library later.
Using Ionic Components inside the Library
Now that we got the setup done we can start and add Ionic components inside our library.
To get started, simply change the projects/devdactic-lib/src/lib/custom-card/custom-card.component.html to this:
<ion-card>
    <ion-card-header>
        <ion-card-title>{{ title }}</ion-card-title>
    </ion-card-header>
    <ion-card-content>
        {{ content }}
    </ion-card-content>
</ion-card>
A simple card, but we will use dynamic values and so we define inputs for them just like we would when creating a shared component inside an Ionic app.
Therefore, open the according projects/devdactic-lib/src/lib/custom-card/custom-card.component.ts and change it to:
import { Input } from '@angular/core';
import { Component, OnInit } from '@angular/core';

@Component({
  selector: 'dev-custom-card',
  templateUrl: './custom-card.component.html',
  styleUrls: ['./custom-card.component.css']
})
export class CustomCardComponent implements OnInit {
  @Input() title: string;
  @Input() content: string;

  constructor() { }

  ngOnInit(): void {
  }

}
That means, we can now use those inputs to bring values to the component, and since we already imported the module for our library inside our Ionic app before, we can now directly make use of our new component by adding the component inside the src/app/home/home.page.html of our testing app:
<dev-custom-card title="My Coold Library Card" content="There will be dragons"></dev-custom-card>Serve the application, and you should see the card (coming from the library) filled with our own values!
Using Services from our Ionic Library
This was just the start, now let’s continue with a service that we can directly import to our app. You could add all kind of useful stuff in here, in this example we will simply use the apiUrl of our LibConfig interface as the base URL to make an HTTP request.
In our previous example on building a Wordpress library we made calls to the WP API based on the base url, which was even more helpful.
This time we will inject the base URL ”https://randomuser.me/” in the next step, and since a call to that dummy api looks like ”https://randomuser.me/api” we add the “api” part in our service.
Go ahead and change the projects/devdactic-lib/src/lib/devdactic-lib.service.ts to:
import { HttpClient } from '@angular/common/http';
import { Inject, Injectable } from '@angular/core';
import { LibConfigService, LibConfig } from './devdactic-lib.module';
import { map } from 'rxjs/operators';

@Injectable({
  providedIn: 'root'
})
export class DevdacticLibService {
  baseUrl = this.config.apiUrl;

  constructor(@Inject(LibConfigService) private config: LibConfig, private http: HttpClient) {
    console.log('My config: ', config);
  }

  getData() {
    return this.http.get<any>(`${this.baseUrl}/api`).pipe(
      map((res: any) => res.results[0])
    )
  }
}
Now the service inside our library can make API calls based on a URL we pass to it, and we can pass it inside the forRoot() function right inside the src/app/app.module.ts of our Ionic testing app like this:
import { NgModule } from '@angular/core';
import { BrowserModule } from '@angular/platform-browser';
import { RouteReuseStrategy } from '@angular/router';

import { IonicModule, IonicRouteStrategy } from '@ionic/angular';
import { SplashScreen } from '@ionic-native/splash-screen/ngx';
import { StatusBar } from '@ionic-native/status-bar/ngx';

import { AppComponent } from './app.component';
import { AppRoutingModule } from './app-routing.module';
import { DevdacticLibModule } from 'devdactic-lib';

@NgModule({
  declarations: [AppComponent],
  entryComponents: [],
  imports: [BrowserModule, IonicModule.forRoot(), AppRoutingModule,
    DevdacticLibModule.forRoot({
      apiUrl: 'https://randomuser.me'
    })],
  providers: [
    StatusBar,
    SplashScreen,
    { provide: RouteReuseStrategy, useClass: IonicRouteStrategy }
  ],
  bootstrap: [AppComponent]
})
export class AppModule {}
Your library starts to look like a real powerful package now!
To see the result of this, we can now inject the service into our src/app/home/home.page.ts just like we do with any other service:
import { Component } from '@angular/core';
import { DevdacticLibService } from 'devdactic-lib';

@Component({
  selector: 'app-home',
  templateUrl: 'home.page.html',
  styleUrls: ['home.page.scss'],
})
export class HomePage {
  user = null;

  constructor(private devdacticLibService: DevdacticLibService) { }

  getData() {
    this.devdacticLibService.getData().subscribe(res => {
      this.user = res;
    });
  }

}
The only difference is that we are importing this service from our own Ionic library package instead now!
To finally show the value and call the function, quickly also change the src/app/home/home.page.html to:
<ion-header>
  <ion-toolbar color="primary">
    <ion-title>
      Devdactic Library
    </ion-title>
  </ion-toolbar>
</ion-header>

<ion-content>
  <dev-custom-card title="My Coold Library Card" content="There will be dragons"></dev-custom-card>
  <ion-button expand="full" (click)="getData()">Load Data</ion-button>

  <ion-card *ngIf="user">
    <img [src]="user.picture.large">
    <ion-card-content>
      {{ user.email }}
    </ion-card-content>
  </ion-card>
</ion-content>
Alright, component and services from the Ionic library are working, now to the last missing piece.
Using Pages and CSS Variables from our Ionic Library
This was a question under the last version of this tutorial: How to include a page from the library?
An Ionic page is just like an Angular component, but usually Ionic pages come with their own routing and module to allow lazy loading, and we can do the same with our library now!
Therefore we first of all need to create a new file named custom-page-routing.module.ts inside our library within the custom page folder. Then, we can change the newly created projects/devdactic-lib/src/lib/custom-page/custom-page-routing.module.ts to look like inside a real Ionic app:
import { CustomPageComponent } from './custom-page.component';
import { NgModule } from '@angular/core';
import { RouterModule, Routes } from '@angular/router';

const routes: Routes = [
  {
    path: '',
    component: CustomPageComponent,
  }
];

@NgModule({
  imports: [RouterModule.forChild(routes)],
  exports: [RouterModule]
})
export class CustomPageRoutingModule {}
Additionally the page needs a module, so we create a new module at projects/devdactic-lib/src/lib/custom-page/custom-page.module.ts and insert:
import { CustomPageComponent } from './custom-page.component';
import { CustomPageRoutingModule } from './custom-page-routing.module';
import { NgModule } from '@angular/core';
import { CommonModule } from '@angular/common';
import { IonicModule } from '@ionic/angular';
import { FormsModule } from '@angular/forms';

@NgModule({
  imports: [
    CommonModule,
    FormsModule,
    IonicModule,
    CustomPageRoutingModule
  ],
  declarations: [CustomPageComponent]
})
export class CustomPageModule {}
The component is now basically like any other Ionic page that you generate, but we now need to export it a bit different inside the library.
To do so, open the projects/devdactic-lib/src/public-api.ts again and export the module instead of just the component this time:
export * from './lib/devdactic-lib.service';
export * from './lib/devdactic-lib.component';
export * from './lib/devdactic-lib.module';
export * from './lib/custom-card/custom-card.component';
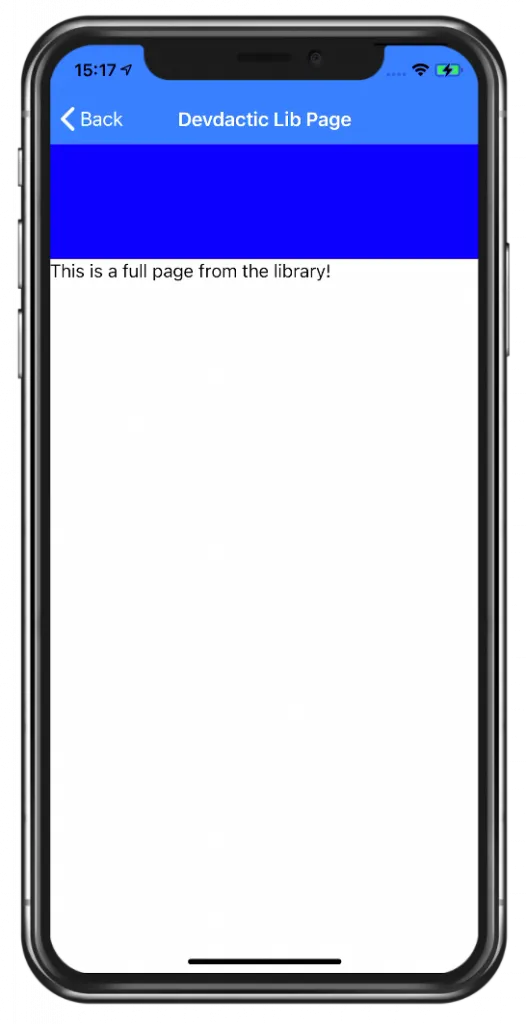
export * from './lib/custom-page/custom-page.module';Next step is to make the page look like an actual Ionic page, and to do so simply change the projects/devdactic-lib/src/lib/custom-page/custom-page.component.html to some Ionic markup of a page:
<ion-header>
    <ion-toolbar color="primary">
        <ion-buttons slot="start">
            <ion-back-button  defaultHref="/"></ion-back-button>
        </ion-buttons>
        <ion-title>
            Devdactic Lib Page
        </ion-title>
    </ion-toolbar>
</ion-header>

<ion-content>
    <div class="custom-box"></div>
    This is a full page from the library!
</ion-content>
Since I also wanted to show how to inject some styling into your library, add the following snippet to the projects/devdactic-lib/src/lib/custom-page/custom-page.component.css:
.custom-box {
    background: var(--custom-background, #ff00ff);
    width: 100%;
    height: 100px;
}
Just like Ionic components, we can also define our own CSS variables that we could set from the outside to style the component! if the --custom-background is not set, the fallback value will be used instead.
Now we are ready to use the page inside our testing app, and we need a way to navigate to it.
As said before, we can now use lazy loading and don’t need to import the component directly (which would also work).
That means, we can use the standard Angular import() syntax with the only difference that we are importing the module from our Ionic library. Go ahead and open the src/app/app-routing.module.ts and insert a new route like this:
import { NgModule } from '@angular/core';
import { PreloadAllModules, RouterModule, Routes } from '@angular/router';

const routes: Routes = [
  {
    path: 'home',
    loadChildren: () => import('./home/home.module').then( m => m.HomePageModule)
  },
  {
    path: 'custom',
    loadChildren: () => import('devdactic-lib').then( m => m.CustomPageModule)
  },
  {
    path: '',
    redirectTo: 'home',
    pathMatch: 'full'
  },
];

@NgModule({
  imports: [
    RouterModule.forRoot(routes, { preloadingStrategy: PreloadAllModules })
  ],
  exports: [RouterModule]
})
export class AppRoutingModule { }
Don’t worry if you see compiler warnings at this point, in the end all will be fine. VSC wasn’t picking up the changes for me as well, but it still worked as expected afterwards..
Now we just need to navigate to the new route, so simply add a button with the new route to the src/app/home/home.page.html:
<ion-button expand="full" routerLink="/custom">Open Library Page</ion-button>And don’t forget about the CSS!
We can style the block on that page right from our Ionic app by setting the CSS variable that we used in the library.
Since we don’t really have any connected styling file for the page, simply add it to the src/global.scss like this:
dev-custom-page {
    .custom-box {
        --custom-background: #1900ff;
    }
}
Now we can navigate to a whole page that’s defined inside our Ionic library and even pass custom styling to it if we want to!
Publishing your Ionic Library to NPM
If at some point you want to make the library public or just don’t want to use the local symlink anymore, you can easily distribute the library.
Simply run a build, navigate into the output folder and publish it to npm like this:
ng build --prod
cd dist/devdactic-lib
npm publish
I did so as well, and you can see the devdactic-lib inside the npm package registry. If you used the same name you can’t publish it of course, pick your own library name instead then!
Now installing your new Ionic library is as easy as running:
npm i devdactic-libThe usage inside your testing app doesn’t change since we used the symlink correctly and it now just switches over to the real files downloaded from npm.
Conclusion
Creating your own Ionic library is a powerful way to build a set of functionality for your company or client that you can reuse across your apps.
Define your own custom element or tweak Ionic components to your needs, or even create wrapper libraries for your APIs to reuse them in different projects.
You can also find a video version of this tutorial below.