How to Build Your Own Capacitor Plugin for Ionic Last update: 2020-08-11
When you work with a framework like Capacitor, you should know how it works internally, and how you can overcome challenges even if there’s not a plugin out there for your needs.
That’s why we are going to create our very own Capacitor plugin today that works on both iOS, Android and with a little fallback for the web as well. 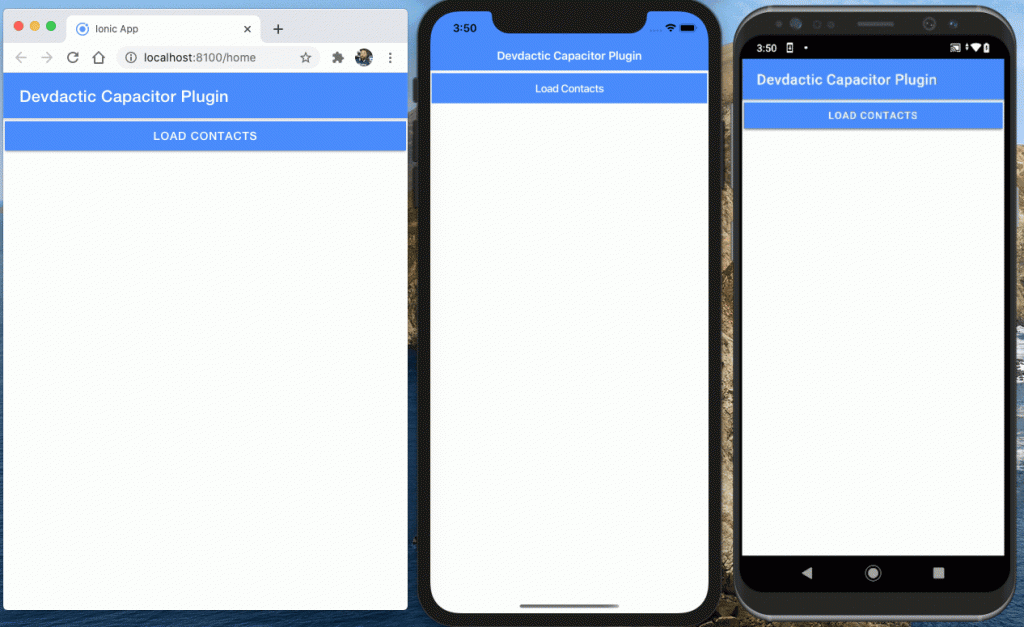
We are going to retrieve the native contacts of a phone (which of course doesn’t work very well on the browser) and write some Swift and Java code for the native platforms to handle everything efficient.
Creating the Capacitor Plugin
To get started with a new Capacitor plugin, you can simply call the generate command of the Capacitor CLI (install if you haven’t) which will ask for a bunch of details:
npm i -g @capacitor/cli
npx @capacitor/cli plugin:generate
cd contacts-plugin
npm run build
You can answer the questions as you want, but if you want to follow the names in this tutorial, here’s what I used. 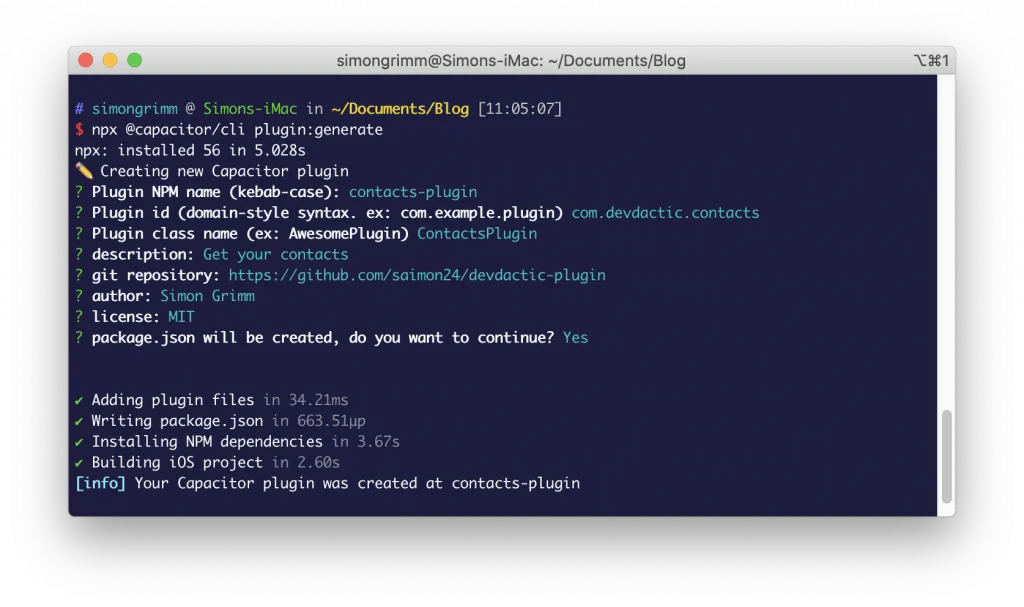
Afterwards you can dive into your new plugin and create a first build using the predefined NPM script. Let’s also check out what the plugin is actually made of:
- Android: The native implementation of the plugin for Android
- dist: The build output folder which is used on the web
- ios: The native implementation of the plugin for iOS
- src: The web implementation of your plugin and its interface
These are the most important folders of your plugin, so let’s start to tackle our plugin one by one.
Web Capacitor Plugin Code
First of all we need to define a new function on the interface of the plugin. There’s already one dummy function defined, and we will simply add another one inside the src/definition.ts:
declare module "@capacitor/core" {
  interface PluginRegistry {
    ContactsPlugin: ContactsPluginPlugin;
  }
}

export interface ContactsPluginPlugin {
  echo(options: { value: string }): Promise<{value: string}>;
  getContacts(filter: string): Promise<{results: any[]}>;
}
We wanna have a function to retrieve contacts, and we can pass any value to this function and access it within the plugin implementation later.
For the web, the implementation is actually just a dummy fallback since there are no native contacts. But if your plugin has the ability to work on the web, this would be the place to implement the Typescript logic of it.
Continue by adding your new function and a super simple implementation to the src/web.ts:
import { WebPlugin } from '@capacitor/core';
import { ContactsPluginPlugin } from './definitions';

export class ContactsPluginWeb extends WebPlugin implements ContactsPluginPlugin {
  constructor() {
    super({
      name: 'ContactsPlugin',
      platforms: ['web']
    });
  }

  async echo(options: { value: string }): Promise<{ value: string }> {
    console.log('ECHO', options);
    return options;
  }

  async getContacts(filter: string): Promise<{ results: any[] }> {
    console.log('filter: ', filter);
    return {
      results: [{
        firstName: 'Dummy',
        lastName: 'Entry',
        telephone: '123456'
      }]
    };
  }
}

const ContactsPlugin = new ContactsPluginWeb();

export { ContactsPlugin };

import { registerWebPlugin } from '@capacitor/core';
registerWebPlugin(ContactsPlugin);
In here we can see the already existing function, and within the constructor we see the supported platforms. This actually means that the web code is only used on the web - it doesn’t mean your plugin won’t work on other platforms!
Only if you want to use the web implementation of your plugin on the other native platforms, you would add them to the array in here.
At this point we could already integrate the plugin in our app, but let’s stick to this project before we dive into the usage in the end.
iOS Capacitor Plugin Code
To edit your iOS implementation, I highly recommend to use the native tooling, which means you should open the ios/Plugin.xcworkspace with Xcode.
This will give you the right syntax highlighting and the best available code completion to write your plugin.
Now I don’t really know Swift anymore after years, but with some general coding knowledge it’s quite easy to find tutorials on the native implementation of features, that you can easily adapt and integrate into the Capacitor shell and format that we need to follow!
First of all, we need to register our function within the ios/Plugin/Plugin.m, following the same structure like the existing dummy function:
#import <Foundation/Foundation.h>
#import <Capacitor/Capacitor.h>

// Define the plugin using the CAP_PLUGIN Macro, and
// each method the plugin supports using the CAP_PLUGIN_METHOD macro.
CAP_PLUGIN(ContactsPlugin, "ContactsPlugin",
           CAP_PLUGIN_METHOD(echo, CAPPluginReturnPromise);
           CAP_PLUGIN_METHOD(getContacts, CAPPluginReturnPromise);
)
Next step is to create the function we just registered and add the Swift code.
As said before, I made this solution work based on some Swift tutorials and looking up Stack overflow answers, so most likely it’s not the best way, but it works!
Within the Swift file of our plugin we already see the dummy function, which get’s one argument that contains all the information about the plugin call. From this object you could extract all the information you initially passed to the plugin.
In our case, we could extract the filter value and use it in the native code, but I’ll leave the filtering logic up to you as a little task (read: I was too lazy to add it in the end).
Afterwards follows the native code to retrieve the device contacts, add them to an array and finally use our call variable to report a success back to our calling code and pass the results along.
If we fail, we can also use call.reject which would then give us an error of our Promise inside Javascript.
Go ahead and change the ios/Plugin/Plugin.swift to this now:
import Foundation
import Capacitor
import Contacts

@objc(ContactsPlugin)
public class ContactsPlugin: CAPPlugin {

    @objc func echo(_ call: CAPPluginCall) {
        let value = call.getString("value") ?? ""
        call.success([
            "value": value
        ])
    }

    @objc func getContacts(_ call: CAPPluginCall) {
        let value = call.getString("filter") ?? ""
        // You could filter based on the value passed to the function!

        let contactStore = CNContactStore()
        var contacts = [Any]()
        let keys = [
                CNContactFormatter.descriptorForRequiredKeys(for: .fullName),
                        CNContactPhoneNumbersKey,
                        CNContactEmailAddressesKey
                ] as [Any]
        let request = CNContactFetchRequest(keysToFetch: keys as! [CNKeyDescriptor])

        contactStore.requestAccess(for: .contacts) { (granted, error) in
            if let error = error {
                print("failed to request access", error)
                call.reject("access denied")
                return
            }
            if granted {
               do {
                   try contactStore.enumerateContacts(with: request){
                           (contact, stop) in
                    contacts.append([
                        "firstName": contact.givenName,
                        "lastName": contact.familyName,
                        "telephone": contact.phoneNumbers.first?.value.stringValue ?? ""
                    ])
                   }
                   print(contacts)
                   call.success([
                       "results": contacts
                   ])
               } catch {
                   print("unable to fetch contacts")
                   call.reject("Unable to fetch contacts")
               }
            } else {
                print("access denied")
                call.reject("access denied")
            }
        }
    }
}
We also added a new import and again, I didn’t know a thing about this Swift implementation but still made it work, so you can do the same for any native function that you want to create a plugin for!
Android Capacitor Plugin Code
The Android code took me a bit longer since I didn’t (and still don’t) understand the retrieving logic correctly but it mostly works as well now.
Once again, I highly recommend opening your Android folder with Android Studio to build your plugin. Native tooling, code completion, much better than your usual familiar IDE.
For Android things got a bit more challenging since the plugin needs to ask for permission first, which blows the code up a bit.
In the snippet below you can see that we have the same initial getContacts() function that will be called, which us annotated with @PluginMethod() to mark it for Capacitor.
But we also define a unique code for our permission dialog and add it to the @NativePlugin annotation of our class, because the flow for permissions looks like this:
- Use
saveCall()to save the information of our plugin call - Trigger the permission dialog by using
pluginRequestPermissionor other functions to start the dialog, and pass the unique ID to it - Handle the result of the dialog within the
handleRequestPermissionsResultand check if you can load the plugin data usinggetSavedCall() - Compare the
requestCodewith the static value we defined to know for which permission dialog the result came in - Finally if everything is fine, call the actual logic of your plugin, which in this case is the
loadContacts()
It’s a bit more tricky, but a good example of how to build more complex Capacitor plugins - and if you think about it, the flow is actually quite nice, a bit like a callback in Javascript.
Now go ahead and change your android/src/main/java/com/devdactic/contacts/ContactsPlugin.java (you might have a different package name though) to:
package com.devdactic.contacts;

import android.Manifest;
import android.content.ContentResolver;
import android.content.pm.PackageManager;
import android.database.Cursor;
import android.provider.ContactsContract;
import android.util.Log;

import com.getcapacitor.JSObject;
import com.getcapacitor.NativePlugin;
import com.getcapacitor.Plugin;
import com.getcapacitor.PluginCall;
import com.getcapacitor.PluginMethod;

import org.json.JSONArray;

import java.util.ArrayList;
import java.util.HashMap;
import java.util.Map;

@NativePlugin(
        requestCodes={ContactsPlugin.REQUEST_CONTACTS}
)
public class ContactsPlugin extends Plugin {
    protected static final int REQUEST_CONTACTS = 12345; // Unique request code

    @PluginMethod()
    public void getContacts(PluginCall call) {
        String value = call.getString("filter");
        // Filter based on the value if want

        saveCall(call);
        pluginRequestPermission(Manifest.permission.READ_CONTACTS, REQUEST_CONTACTS);
    }

    @Override
    protected void handleRequestPermissionsResult(int requestCode, String[] permissions, int[] grantResults) {
        super.handleRequestPermissionsResult(requestCode, permissions, grantResults);


        PluginCall savedCall = getSavedCall();
        if (savedCall == null) {
            Log.d("Test", "No stored plugin call for permissions request result");
            return;
        }

        for(int result : grantResults) {
            if (result == PackageManager.PERMISSION_DENIED) {
                Log.d("Test", "User denied permission");
                return;
            }
        }

        if (requestCode == REQUEST_CONTACTS) {
            // We got the permission!
            loadContacts(savedCall);
        }
    }

    void loadContacts(PluginCall call) {
        ArrayList<Map> contactList = new ArrayList<>();
        ContentResolver cr = this.getContext().getContentResolver();

        Cursor cur = cr.query(ContactsContract.Contacts.CONTENT_URI,
                null, null, null, null);
        if ((cur != null ? cur.getCount() : 0) > 0) {
            while (cur != null && cur.moveToNext()) {
                Map<String,String> map =  new HashMap<String, String>();

                String id = cur.getString(
                        cur.getColumnIndex(ContactsContract.Contacts._ID));
                String name = cur.getString(cur.getColumnIndex(
                        ContactsContract.Contacts.DISPLAY_NAME));

                map.put("firstName", name);
                map.put("lastName", "");

                String contactNumber = "";

                if (cur.getInt(cur.getColumnIndex( ContactsContract.Contacts.HAS_PHONE_NUMBER)) > 0) {
                    Cursor pCur = cr.query(
                            ContactsContract.CommonDataKinds.Phone.CONTENT_URI,
                            null,
                            ContactsContract.CommonDataKinds.Phone.CONTACT_ID + " = ?",
                            new String[]{id}, null);
                    pCur.moveToFirst();
                    contactNumber = pCur.getString(pCur.getColumnIndex(ContactsContract.CommonDataKinds.Phone.NUMBER));
                    Log.i("phoneNUmber", "The phone number is "+ contactNumber);
                }
                map.put("telephone", contactNumber);
                contactList.add(map);
            }
        }
        if (cur != null) {
            cur.close();
        }

        JSONArray jsonArray = new JSONArray(contactList);
        JSObject ret = new JSObject();
        ret.put("results", jsonArray);
        call.success(ret);
    }
}
In the end we return again an array of the same type like we did before inside the web and iOS implementation. Make sure your plugin doesn’t return a different format on different platforms. You want to use a unified API in your Ionic app, and therefore the result on all platforms should have the same interface!
After you are done with everything, you can run a final npm run build and we are done with the Capacitor plugin!
Using Your Capacitor Plugin with Ionic
For the integration, let’s quickly start a blank Ionic app with Capacitor support. The official guide recommends to link your local plugin now, which actually didn’t work well for me. Instead, I simply passed the local path to the plugin to the install command, so make sure you put in the right path to your Capacitor plugin in this step!
ionic start devdacticPlugin blank --type=angular --capacitor
cd ./devdacticPlugin
npm i ../contacts-plugin

# Build app and add native platforms
ionic build
npx cap add ios
npx cap add android
Once the plugin is installed, you should see an entry like this in your package.json:
"contacts-plugin": "file:../contacts-plugin",Of course this won’t work well with your colleagues (unless they also have the plugin and Ionic app next to each other), but for testing and building the plugin this should be perfectly fine, and we’ll see another benefit of this in the end as well.
Android Plugin Integration
The integration of Capacitor plugins always comes with some steps, you can see this for basically every community plugin.
In our case we first need to add the permission that our plugin needs inside the android/app/src/main/AndroidManifest.xml at the bottom where we can already see a bunch of other permissions:
<uses-permission android:name="android.permission.READ_CONTACTS" />To use the Capacitor plugin on Android we also need to register it inside the main activity, which we can do by loading the package (watch out for your package id in that path for both plugin and your app!) and calling the add() function inside the initialise within our android/app/src/main/java/io/ionic/starter/MainActivity.java:
package io.ionic.starter;
import com.devdactic.contacts.ContactsPlugin;

import android.os.Bundle;

import com.getcapacitor.BridgeActivity;
import com.getcapacitor.Plugin;

import java.util.ArrayList;

public class MainActivity extends BridgeActivity {
  @Override
  public void onCreate(Bundle savedInstanceState) {
    super.onCreate(savedInstanceState);

    // Initializes the Bridge
    this.init(savedInstanceState, new ArrayList<Class<? extends Plugin>>() {{
      // Additional plugins you've installed go here
      add(ContactsPlugin.class);
    }});
  }

}
This step is (afaik) always necessary for Android plugins.
iOS Plugin Integration
For iOS we also need to add a permission to read the contacts, which we can do inside the ios/App/App/Info.plist:
<key>NSContactsUsageDescription</key>
<string>We need your data</string>
You can do this directly from code or within Xcode by adding a row and searching for “Privacy”, which will prompt you with a bunch of permissions that you could add.
Capacitor Plugin Usage
Now we can finally integrate our own plugin. Since the plugin is registered within Capacitor we can destructure the Plugins object and extract the name of our plugin from there. This name is what you can find in the interface of your plugin!
It’s important to also add the import line using the name of the plugin (as specified in the package.json) because this will actually trigger the web registration of your plugin - otherwise the web part of it won’t work!
Once everything is added, we can simply use the plugin like any other plugin and use our created function to fetch the contacts, so open the home/home.page.ts and add this:
import { Component } from '@angular/core';
import { Plugins } from '@capacitor/core';
import 'contacts-plugin';

const { ContactsPlugin } = Plugins;

@Component({
  selector: 'app-home',
  templateUrl: 'home.page.html',
  styleUrls: ['home.page.scss'],
})
export class HomePage {
  contacts = [];

  constructor() {
  }

  async loadContacts() {
    this.contacts = (await ContactsPlugin.getContacts('somefilter')).results;
    console.log('my contacts: ', this.contacts);
  }
}
To wrap things up, simply add a little iteration over our contacts so we can display our result within the home/home.page.html:
<ion-header>
  <ion-toolbar color="primary">
    <ion-title>
      Devdactic Capacitor Plugin
    </ion-title>
  </ion-toolbar>
</ion-header>

<ion-content>
  <ion-button expand="full" (click)="loadContacts()">
    Load Contacts
  </ion-button>

  <ion-list>
    <ion-item *ngFor="let c of contacts">
      <ion-label>
        {{ c.firstName }} {{ c.lastName }}
        <p>
          {{ c.telephone }}
        </p>
      </ion-label>
    </ion-item>
  </ion-list>
</ion-content>
Now you can test your new plugin on the browser, and also within the native platforms of your Ionic app!
Capacitor Plugin Development Workflow
For this tutorial we have tackled the Capacitor plugin first, and then integrated it within our Ionic project. And if you know a bit about native development and can make it work immediately, that’s fine.
But usually, there’s another way to test and debug your plugin, which I actually also used to develop the code for this tutorial:
You create the plugin, integrate it with the local installation and then you continue to work on your plugin right from your Ionic app!
That means, you would run npx cap open ios to open Xcode, and you can work on your plugin directly from there. 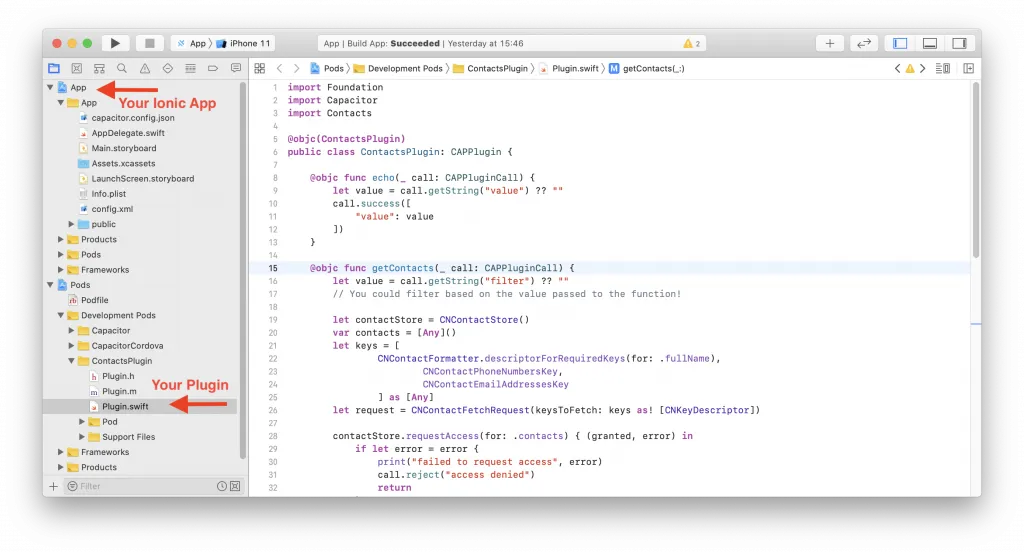
Hit save, run the app again on your Simulator or device and you can use native debugging with breakpoints to work on your plugin from there.
The same is true for Android as well, so after running npx cap open android from your Ionic app, edit the plugin right in there:
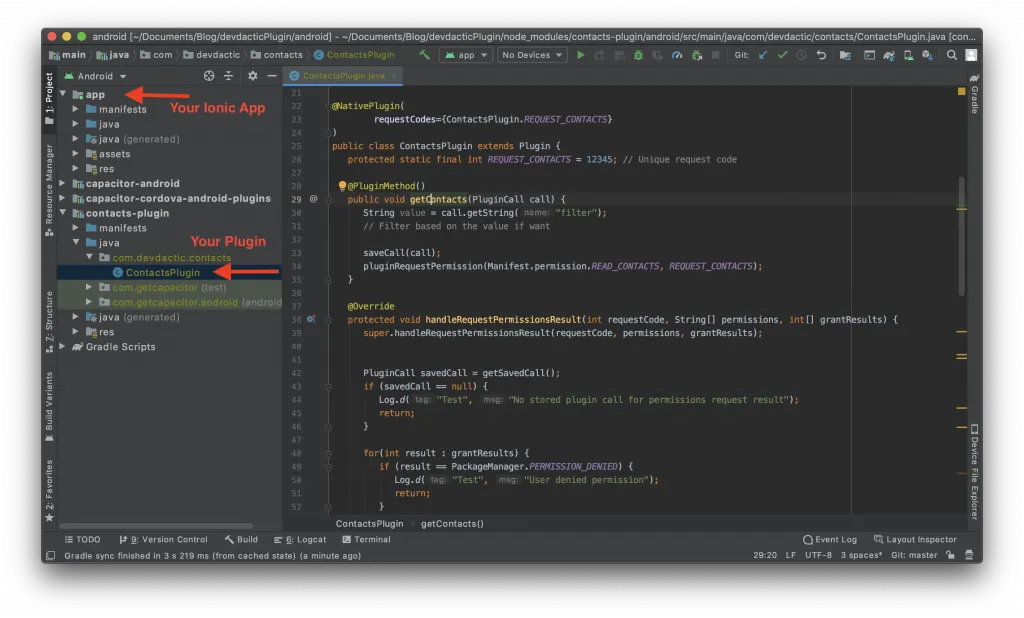 This development speed beats everything I’ve experienced with Cordova, and given the native tools, this is really the best way to develop and debug your plugin at the same time.
Because the plugin is basically a link to the files right inside your plugin folder, all the changes you make here are also directly saved inside the plugin folder - you are basically working on the same files!
Conclusion
If you can’t find the right Capacitor community plugin for your needs, simply go ahead and create your own!
We’ve seen that it’s easier than ever today, given the boilerplate of the generate command and the native debugging and development environment. And when you are done with the plugin, you can run npm publish to make it available to everyone so we can all install it simply using npm!
You can also find a video version of this tutorial below.