Building an Authentication System with Ionic 4 and NestJS Last update: 2019-12-24
Whether you celebrate Christmas or not, today is your happy day as I’ve prepared this special for all Devdactic followers!
Since I wanted to give back something to all the loyal followers of this blog, I created a little gift on one of the basics that you’ll hopefully enjoy!
Todays post is not really a tutorial, but a description of the code template that contains both a NestJS backend and also an Ionic app. As a result, once you run both parts you will have a full working authentication template ready for your next app!
You can get the whole gift package by entering your email in the box below.
Let’s talk about how and why it works, and what you need to set up upfront.
Prerequisite
It’s a good idea for both parts of the template to install Ionic and the Nest CLI locally to later build out the projects like this:
npm i -g @nestjs/cli
npm i -g ionic
Of course you could also simply install the dependencies inside the project, but having both of them globally is anyway a good idea.
Also, the backend needs a MongoDB for holding the users. Therefore, install MongoDB on your local machine and while you are at it, I recommend to get a good GUI tool for managing your database like Studio 3T.
The Nest Backend
Before you run the backend you need to set a few values, and for this you have to rename the dummy.env file to .env which is the environment used for the application.
In there you can specify the port, the URI to the MongoDB (which should work like it is, the database will automatically be created) and finally a secret for the JWT authentication.
You need to make sure to have your MongoDB up and running now, and then you can go ahead and install all dependencies and run the backend like this:
cd ./api
npm install
nest start --watch
You should see some logging about the routes being set up, and if everything works your fresh API is now running at port 5000!
The routes of the API are also included in the HolidayGift.postman_collection which you can simply import to Postman to now test your API.
The routes are:
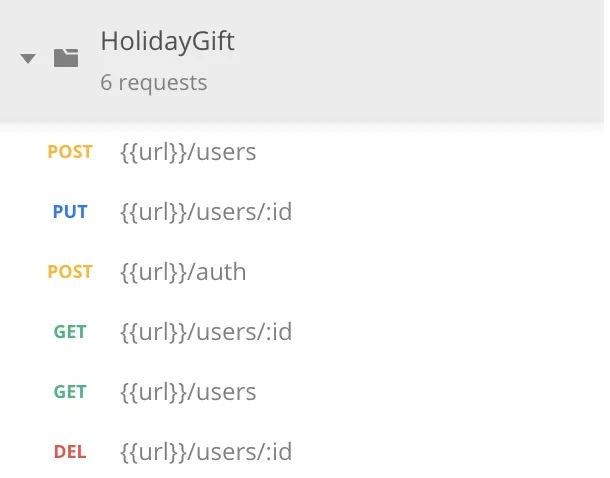
The API contains everything to register users, to login, get user data and delete accounts. Basically all CRUD operations for the user domain plus a login functionality.
In terms of code, you can find all the routes inside the src/users/users.controller.ts:
import { UserDto } from './dto/user.dto';
import { UsersService } from './users.service';
import {
  Controller,
  Get,
  Res,
  HttpStatus,
  Post,
  Body,
  Put,
  NotFoundException,
  Delete,
  Param,
  UseGuards
} from '@nestjs/common';
import { AuthGuard } from '@nestjs/passport';

@Controller('users')
export class UsersController {
  constructor(private userService: UsersService) {}

  @Post()
  async addUser(@Res() res, @Body() createUserDto: UserDto) {
    try {
      const user = await this.userService.addUser(createUserDto);
      return res.status(HttpStatus.OK).json({
        msg: 'User has been created successfully',
        user
      });
    } catch (e) {
      return res.status(HttpStatus.CONFLICT).json({
        msg: 'User already exists'
      });
    }
  }

  @UseGuards(AuthGuard())
  @Get(':userID')
  async getUser(@Res() res, @Param('userID') userID) {
    const user = await this.userService.getUser(userID);
    if (!user) throw new NotFoundException('User does not exist!');
    return res.status(HttpStatus.OK).json(user);
  }

  @UseGuards(AuthGuard())
  @Put(':userID')
  async updateUser(
    @Res() res,
    @Param('userID') userID,
    @Body() createUserDto: UserDto,
  ) {
    const user = await this.userService.updateUser(userID, createUserDto);
    if (!user) throw new NotFoundException('User does not exist!');
    return res.status(HttpStatus.OK).json({
      msg: 'User has been successfully updated',
      user,
    });
  }

  @UseGuards(AuthGuard())
  @Delete(':userID')
  async deleteUser(@Res() res, @Param('userID') userID) {
    const user = await this.userService.deleteUser(userID);
    if (!user) throw new NotFoundException('User does not exist');
    return res.status(HttpStatus.OK).json({
      msg: 'User has been deleted',
      user,
    });
  }

  @UseGuards(AuthGuard())
  @Get()
  async getAllUser(@Res() res) {
    const users = await this.userService.getAllUser();
    return res.status(HttpStatus.OK).json(users);
  }
}
As you can see, all routes are also protected with a guard, and we are using JWT authentication in this API.
The logic for authentication can also be seen inside the src/authauth/users.service.ts:
import { Injectable } from '@nestjs/common';
import { JwtService } from '@nestjs/jwt';
import { LoginUserDto } from '../users/dto/login-user.dto';
import { UsersService } from '../users/users.service';
import { JwtPayload } from './interfaces/jwt-payload.interface';

@Injectable()
export class AuthService {

    constructor(private usersService: UsersService, private jwtService: JwtService){ }

    async validateUserByPassword(loginAttempt: LoginUserDto): Promise<any> {
        let userToAttempt: any = await this.usersService.findOneByEmail(loginAttempt.email);

        return new Promise((resolve) => {
            if (!userToAttempt) {
                resolve({success: false, msg: 'User not found'});
            }
            userToAttempt.checkPassword(loginAttempt.password, (err, isMatch) => {
                if(err) resolve({success: false, msg: 'Unexpected error. Please try again later.'});

                if(isMatch){
                    resolve({success: true, data: this.createJwtPayload(userToAttempt)});
                } else {
                    resolve({success: false, msg: 'Wrong password'})
                }
            });
        });
    }

    createJwtPayload(user){
        let data: JwtPayload = {
            id: user._id,
            email: user.email
        };

        let jwt = this.jwtService.sign(data);

        return {
            exp: 36000,
            token: jwt
        }
    }

    async validateUser(payload: JwtPayload): Promise<any> {
        return await this.usersService.getUser(payload.id);
    }
}
So you can register without a JWT of course, but all other routes are protected and you need to add the Authorization filed to your header with a value of “Bearer yourJWT”.
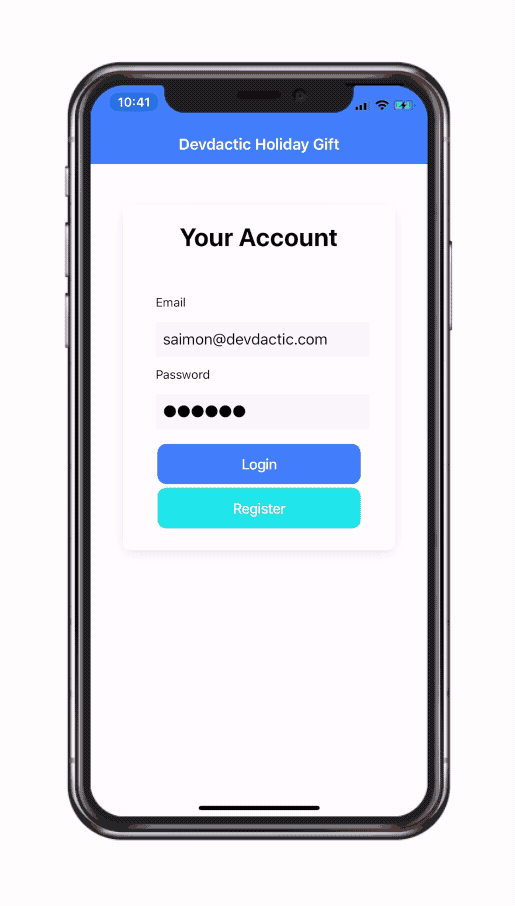
The Ionic App
There’s not much to say about the Ionic app, simply install the dependencies like always and then run it:
cd ./app
npm install
ionic serve
Inside your src/environments/environment.ts you can configure which backend will be used, and by default it will use my Heroku deployment - you should change this soon to your own local backend!
The logic of the app includes a login and register page, and a protected inside area that only users can enter because it’s protected by the auth-guard. Additionally there is another guard that is applied to all pages that are not protected in order to automatically log in users if they were authenticated before!
The code is a pretty simple check, and because it’s a guard you won’t see a page until we really receive the authentication state from the storage. You can find it inside the src/guards/auto-login.guard.ts:
import { Injectable } from '@angular/core';
import { CanActivate, Router } from '@angular/router';
import { Observable } from 'rxjs';
import { ApiService } from '../services/api.service';
import { take, map } from 'rxjs/operators';

@Injectable({
  providedIn: 'root'
})
export class AutoLoginGuard implements CanActivate {

   constructor(private api: ApiService, private router: Router) { }

  canActivate(): Observable<boolean> {
    return this.api.user.pipe(
      take(1),
      map(user => {
        if (!user) {
          return true;
        } else {
          this.router.navigateByUrl('/app');
          return false;
        }
      })
    )
  }
}
Besides that, all API interaction takes place inside the src/services/api.service.ts including the management of the JWT, for which we use once again the @auth0/angular-jwt package:
import { environment } from './../../environments/environment';
import { Platform } from '@ionic/angular';
import { Injectable } from '@angular/core';
import { Storage } from '@ionic/storage';
import { BehaviorSubject, Observable, from } from 'rxjs';
import { take, map, switchMap } from 'rxjs/operators';
import { JwtHelperService } from "@auth0/angular-jwt";
import { HttpClient } from '@angular/common/http';
import { Router } from '@angular/router';

const helper = new JwtHelperService();
export const TOKEN_KEY = 'jwt-token';

export interface User {
  first_name: string;
  last_name: string;
  email: string;
  avatar: string;
  bio: string;
  createdAt: string;
  _id: string;
  expanded?: boolean;
}

@Injectable({
  providedIn: 'root'
})
export class ApiService {
  public user: Observable<any>;
  private userData = new BehaviorSubject(null);

  constructor(private storage: Storage, private http: HttpClient, private plt: Platform, private router: Router) {
    this.loadStoredToken();
  }

  loadStoredToken() {
    let platformObs = from(this.plt.ready());

    this.user = platformObs.pipe(
      switchMap(() => {
        return from(this.storage.get(TOKEN_KEY));
      }),
      map(token => {
        if (token) {
          let decoded = helper.decodeToken(token);
          this.userData.next(decoded);
          return true;
        } else {
          return null;
        }
      })
    );
  }

  login(credentials: {email: string, password: string }) {
    return this.http.post(`${environment.apiUrl}/auth`, credentials).pipe(
      take(1),
      map(res => {
        // Extract the JWT
        return res['token'];
      }),
      switchMap(token => {
        let decoded = helper.decodeToken(token);
        this.userData.next(decoded);

        let storageObs = from(this.storage.set(TOKEN_KEY, token));
        return storageObs;
      })
    );
  }

  register(credentials: {email: string, password: string }) {
    return this.http.post(`${environment.apiUrl}/users`, credentials).pipe(
      take(1),
      switchMap(res => {
        console.log('result: ', res);
        return this.login(credentials);
      })
    );
  }

  getUserToken() {
    return this.userData.getValue();
  }

  getUserData() {
    const id = this.getUserToken()['id'];
    return this.http.get<User>(`${environment.apiUrl}/users/${id}`).pipe(
      take(1)
    );
  }

  getAllUsers(): Observable<User[]> {
    return this.http.get<User[]>(`${environment.apiUrl}/users`).pipe(
      take(1)
    );
  }

  updateUser(id, data) {
    return this.http.put(`${environment.apiUrl}/users/${id}`, data).pipe(
      take(1)
    );
  }

  removeUser(id) {
    return this.http.delete(`${environment.apiUrl}/users/${id}`).pipe(
      take(1)
    );
  }

  logout() {
    this.storage.remove(TOKEN_KEY).then(() => {
      this.router.navigateByUrl('/');
      this.userData.next(null);
    });
  }

}
As a final word: The JWT package needs to whitelist domains for which the JWT will be injected into HTTP calls. If you follow the next step and deploy your API somewhere, you need to make sure that you add your new backend URL inside the src/app/app.module.ts:
import { NgModule } from '@angular/core';
import { BrowserModule } from '@angular/platform-browser';
import { RouteReuseStrategy } from '@angular/router';

import { IonicModule, IonicRouteStrategy } from '@ionic/angular';
import { SplashScreen } from '@ionic-native/splash-screen/ngx';
import { StatusBar } from '@ionic-native/status-bar/ngx';

import { AppComponent } from './app.component';
import { AppRoutingModule } from './app-routing.module';

import { IonicStorageModule, Storage } from '@ionic/storage';
import { HttpClientModule } from '@angular/common/http';

import { TOKEN_KEY } from './services/api.service';
import { JwtModule, JWT_OPTIONS } from '@auth0/angular-jwt';

export function jwtOptionsFactory(storage) {
  return {
    tokenGetter: () => {
      return storage.get(TOKEN_KEY);
    },
    whitelistedDomains: ['localhost:5000', 'holidaygift.herokuapp.com'] // Add your Heroku URL in here!
  }
}
@NgModule({
  declarations: [AppComponent],
  entryComponents: [],
  imports: [BrowserModule, IonicModule.forRoot(), AppRoutingModule,
    IonicStorageModule.forRoot(),
    HttpClientModule,
    JwtModule.forRoot({
      jwtOptionsProvider: {
        provide: JWT_OPTIONS,
        useFactory: jwtOptionsFactory,
        deps: [Storage]
      }
    })],
  providers: [
    StatusBar,
    SplashScreen,
    { provide: RouteReuseStrategy, useClass: IonicRouteStrategy }
  ],
  bootstrap: [AppComponent]
})
export class AppModule {}
Now let’s see how you can deploy the backend.
Deployment
For the dummy deployment I used Heroku, and you can use it as well to quickly get your API up and running not only on your local machine.
You can basically follow the official Heroku guide to create a new app and push your code to it.
In addition you need to perform 2 further steps.
Add the mLab integration
The API needs a database, and you can easily add a cloud hosted MongoDB to your Heroku app inside the resources tab like this: 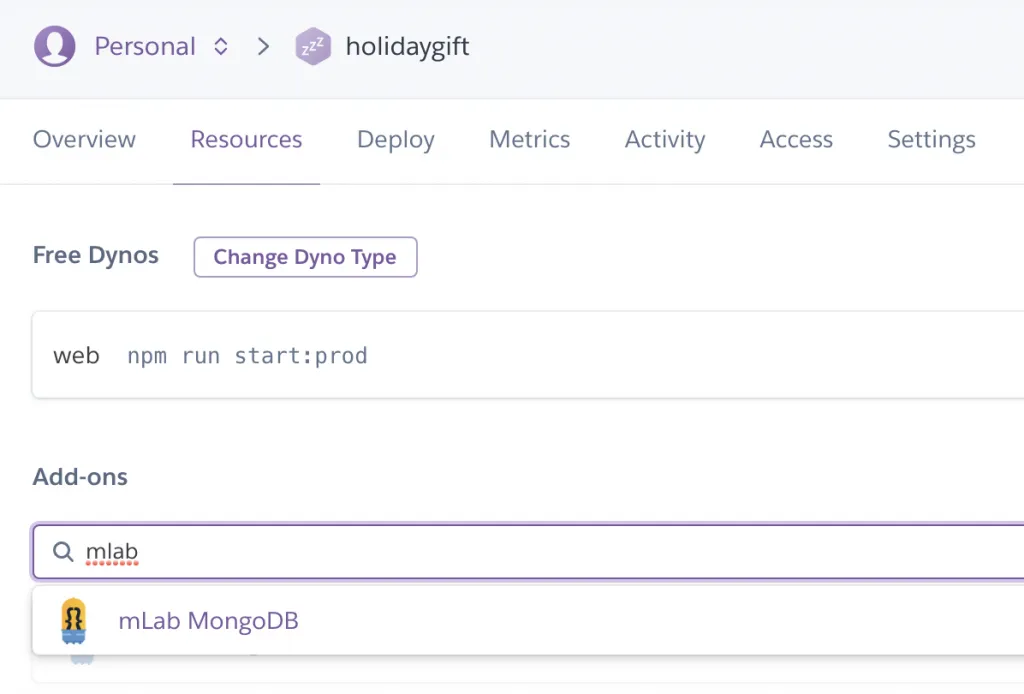
Environment Variables
The database will autoamtically write a variable like we did with our local environment file, but you also need to add the value for the JWT_SECRET which you can do inside the settings tab: 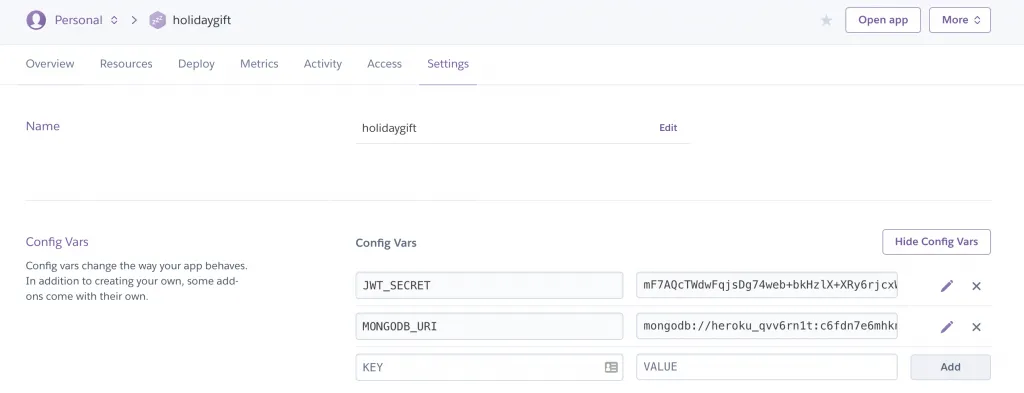
Over to You
Now you can use the Heroku URL and use it in your Ionic app, and you have a full blown authentication app in your hands.
Hopefully this is the starting point for your next project, and perhaps you already had some plans for the holiday season?
Definitely let me know if you enjoy the template by tweeting at me or tag me on Instagram!
I would love to see the template in action. You can also find a short video explanation of the authentication template in the video below.
Thanks for all your support and see you again next year, Simon