Build and deploy an Education Platform using Angular and Stream Last update: 2022-09-20

When you are building a learning platform, marketplace or any kind of sophisticated app you want inlcude an awesome chat experience - and there is no way to obtain this faster than with Stream components!
In this tutorial we will build our own school learning platform with user authentication and Stream chat component, both for group chats and direct 1-on-1 chat experiences.
To achieve this we will use Angular with Tailwind and finally host our application on Netlify where we also make use of a cloud function!
You can already try the hosted version of the finished app here or take a look at the full code on Github.
How Stream Works
With Stream you get access to in-app chat messaging and activity feeds that you can simply drop in to your existing app and manage from your Stream dashboard.
The components come with a great SDK that makes using Stream from your app a breeze, and within the backend you can manage your users, roles and channels with tons of additional functionality!
Stream is a high class service, but if your company is still under $10k per month you can actually get started for free!
Creating your Stream App
Adding Stream to your Angular project begins by creating a Stream app in your dashboard, which is done with just a few clicks where you can select the server and data storage location.
Now let’s focus on creating the app experience and integrating Stream.
Creating the Angular Application
We start with a fresh new Angular application and install the required packages for the Stream integration first:
ng new chatApp --routing --style=scss
cd ./chatApp
npm install stream-chat-angular stream-chat @ngx-translate/core
Those are the essential packages, but we also want to install a library for loading spinners, an additional select component where we can later select users to start a chat and a JWT library to decode tokens during out user authentication.
Besides that we need a bunch of services and components that we will one by one integrate into our appp, so run the following as well:
npm install ngx-spinner @ng-select/ng-select jwt-decode

ng generate service services/stream
ng generate service services/auth

ng generate component login
ng generate component insideLayout
ng generate component dashboard
ng generate component chats
ng generate component class
ng generate component students

ng generate guard guards/auth --implements CanActivate
Once we are done we also need to update the tsconfig.json in order to properly use all of our packages, so add the following under compilerOptions:
"compilerOptions": {
    "allowSyntheticDefaultImports": true,
    "resolveJsonModule": true,
    "esModuleInterop": true
},
Finally we need to add a styling file for our loading spinner, so bring up the angular.json and update the styles like this:
      "architect": {
        "build": {
          "options": {
            "styles": [
              "src/styles.scss",
              "node_modules/ngx-spinner/animations/ball-pulse.css"
            ],
To make use of Stream and the other packages we should now import them in our src/app/app.module.ts:
import { LoginComponent } from './login/login.component';
import { NgModule } from '@angular/core';
import { BrowserModule } from '@angular/platform-browser';

import { AppRoutingModule } from './app-routing.module';
import { AppComponent } from './app.component';
import { StreamChatModule, StreamAutocompleteTextareaModule } from 'stream-chat-angular';
import { TranslateModule } from '@ngx-translate/core';
import { FormsModule } from '@angular/forms';
import { HttpClientModule } from '@angular/common/http';
import { InsideLayoutComponent } from './inside-layout/inside-layout.component';
import { DashboardComponent } from './dashboard/dashboard.component';
import { NgxSpinnerModule } from 'ngx-spinner';
import { BrowserAnimationsModule } from '@angular/platform-browser/animations';
import { ClassComponent } from './class/class.component';
import { StudentsComponent } from './students/students.component';
import { ChatsComponent } from './chats/chats.component';
import { NgSelectModule } from '@ng-select/ng-select';

@NgModule({
	declarations: [
		AppComponent,
		LoginComponent,
		InsideLayoutComponent,
		DashboardComponent,
		ClassComponent,
		StudentsComponent,
		ChatsComponent
	],
	imports: [
		BrowserModule,
		FormsModule,
		AppRoutingModule,
		HttpClientModule,
		NgxSpinnerModule.forRoot({ type: 'ball-pulse' }),
		BrowserAnimationsModule,
		NgSelectModule,
		// Imports for Stream
		StreamAutocompleteTextareaModule,
		StreamChatModule,
		TranslateModule.forRoot()
	],
	providers: [],
	bootstrap: [AppComponent]
})
export class AppModule {}
Now we just need a styling library to make our app look awesome!
Adding Tailwind for Styling
The integration of Tailwind is of course optional if you prefer some other UI library, however the code examples in this tutorial will make heavily use of Tailwind.
To get started simply install it and initialise it:
npm install -D tailwindcss postcss autoprefixer @tailwindcss/forms
npx tailwindcss init
Now we need to quickly change the tailwind.config.js:
/** @type {import('tailwindcss').Config} */
module.exports = {
	content: ['./src/**/*.{html,ts}'],
	theme: {
		extend: {}
	},
	plugins: [require('@tailwindcss/forms')]
};
Finally we can import the Tailwind styles in our src/styles.scss at the top, where we can also add the styling from Stream and our select package:
@import '~stream-chat-angular/src/assets/styles/v2/scss/index.scss';
@import '~@ng-select/ng-select/themes/default.theme.css';

@tailwind base;
@tailwind components;
@tailwind utilities;

html {
	@apply h-full;
}
body {
	@apply h-full;
}
Now we can dive into the fun and start by setting up the login page of our learning platform - but to do so we also need to talk about authentication first.
Authentication and Stream Users
You can use Stream with anonymous users, but we will use my simple dummy API where we can sign up users and login to get a JWT, just like in most modern web apps.
To make your own authentication system work with Stream, you need to follow some steps:
- Login users with your own API
- Pass the user information to the Stream API
- Get a token from the Stream API
- Use the Stream user token when you initialise a chat
To make this process secure, we will deploy a cloud function since we don’t want to expose the Stream secret API key in our Angular frontend!
Cloud Functions
Get startedy by first of all installing another package:
npm i @netlify/functionsNow simply create a folder netlify/functions in your project and begin with the first function that’s actually already called directly after a registration, since we also want to register any new users with Stream.
Therefore create a file signup.ts in the functions folder and insert:
import { Handler, HandlerEvent } from '@netlify/functions';
import { StreamChat } from 'stream-chat';

const { STREAM_KEY, STREAM_SECRET_KEY } = process.env;

const serverStreamClient = StreamChat.getInstance(STREAM_KEY!, STREAM_SECRET_KEY!);

const handler: Handler = async (event: HandlerEvent, context: any) => {
	// Parse the body of the request
	const { email, id } = JSON.parse(event.body || '');

	// Make sure we got all data
	if (!email || !id) {
		return {
			statusCode: 400,
			body: 'Could not create user'
		};
	}

	try {
		await serverStreamClient.upsertUser({
			id,
			email,
			name: email
		});

		return {
			statusCode: 200,
			body: JSON.stringify({
				message: 'User successfull crated.'
			})
		};
	} catch (e) {
		return {
			statusCode: 500,
			body: 'Could not create user.'
		};
	}
};

export { handler };
This is a super simple cloud function setup, and essentially it will use the Stream client to call the upsertUser() function with all relevant data you want to pass along.
You can already see that we are using our secret keys, so make sure you create a .env file at the root of your project as well with the following content:
STREAM_KEY=yourkey
STREAM_SECRET_KEY=yoursecretkey
Since we are alredy working on the cloud functions, let’s add another one that will be called during login. Create a file get_token.ts and insert:
import { Handler, HandlerEvent } from '@netlify/functions';
import { StreamChat } from 'stream-chat';

const { STREAM_KEY, STREAM_SECRET_KEY } = process.env;

const serverStreamClient = StreamChat.getInstance(STREAM_KEY!, STREAM_SECRET_KEY!);

const handler: Handler = async (event: HandlerEvent, context: any) => {
	console.log('IN CF');

	// Parse the body of the request
	const { id } = JSON.parse(event.body || '');

	// Make sure we got all data
	if (!id) {
		return {
			statusCode: 400,
			body: 'Could not create user'
		};
	}

	try {
		const token = await serverStreamClient.createToken(`${id}`);

		return {
			statusCode: 200,
			body: JSON.stringify({ token })
		};
	} catch (e) {
		console.log('create token failed: ', e);

		return {
			statusCode: 500,
			body: 'Could not create user.'
		};
	}
};

export { handler };
Almost the same, but now we call createToken() instead!
Finally, we also need a function to revoke the token upon logout, so let’s add a third one called revoke_token.ts with this:
import { Handler, HandlerEvent } from '@netlify/functions';
import { StreamChat } from 'stream-chat';

const { STREAM_KEY, STREAM_SECRET_KEY } = process.env;

const serverStreamClient = StreamChat.getInstance(STREAM_KEY!, STREAM_SECRET_KEY!);

const handler: Handler = async (event: HandlerEvent, context: any) => {
	console.log('IN CF');

	// Parse the body of the request
	const { id } = JSON.parse(event.body || '');

	try {
		const revoked = await serverStreamClient.revokeUserToken(id);

		return {
			statusCode: 200
		};
	} catch (e) {
		console.log('create token failed: ', e);

		return {
			statusCode: 500,
			body: 'Could not create user.'
		};
	}
};

export { handler };
Awesome - now we can use the Stream API in a secure way through our cloud functions and never expose the keys. Just make sure you create the same environment files in Netlify once you deploy the project!
To run this locally, let’s also add a netlify.toml to the root of our project with the following content:
[build]
  publish = "dist/chat-app"
  command = "ng build"
  functions = "./netlify/functions"
[[redirects]]
  from = "/*"
  to = "/index.html"
  status = 200
We can now run Netlify locally with the Netlify CLI, so simply execute:
netlify devAwesome - we should now have the local version of our cloud function and the Angular app both running on http://localhost:8888 which is important as we otherwise run into CORS issues.
Authentication Service and Guard
To handle all JWT and user authentication related topics we generated the src/app/services/auth.service.ts in the beginning that we now fill with the following:
import { HttpClient } from '@angular/common/http';
import { Injectable } from '@angular/core';
import { map, switchMap, BehaviorSubject, tap, take } from 'rxjs';
import jwt_decode from 'jwt-decode';

export const USER_STORAGE_KEY = 'usertoken';

export interface UserData {
	token: string;
	id: string;
	stream_token: string;
}
@Injectable({
	providedIn: 'root'
})
export class AuthService {
	private user: BehaviorSubject<UserData | null | undefined> = new BehaviorSubject<
		UserData | null | undefined
	>(undefined);

	constructor(private http: HttpClient) {
		this.loadUser();
	}

	loadUser() {
		const token = localStorage.getItem(USER_STORAGE_KEY);

		if (token) {
			const decoded: any = jwt_decode(token);

			this.http
				.post(`${window.location.origin}/.netlify/functions/get_token`, {
					id: decoded.sub
				})
				.subscribe((res: any) => {
					const userData = {
						token,
						id: decoded.sub,
						stream_token: res.token
					};
					this.user.next(userData);
				});
		} else {
			this.user.next(null);
		}
	}

	register(email: string, password: string) {
		return this.http
			.post('https://api.developbetterapps.com/users', {
				email,
				password
			})
			.pipe(
				switchMap((res: any) => {
					return this.http.post(`${window.location.origin}/.netlify/functions/signup`, {
						email: res.email,
						id: res._id
					});
				})
			);
	}

	login(email: string, password: string) {
		return this.http
			.post('https://api.developbetterapps.com/auth', {
				email,
				password
			})
			.pipe(
				map((res: any) => {
					localStorage.setItem(USER_STORAGE_KEY, res.token);

					const decoded: any = jwt_decode(res.token);
					const userData = {
						token: res.token,
						id: decoded.sub,
						stream_token: ''
					};
					this.user.next(userData);
					return userData;
				}),
				switchMap((res: UserData) => {
					return this.http.post(`${window.location.origin}/.netlify/functions/get_token`, {
						id: res.id
					});
				}),
				tap((res: any) => {
					let userValue = this.user.getValue();
					userValue!.stream_token = res.token;
					this.user.next(userValue);
				})
			);
	}

	async signOut() {
		localStorage.removeItem(USER_STORAGE_KEY);

		this.http
			.post(`${window.location.origin}/.netlify/functions/revoke_token`, {
				id: this.getCurrentUserId()
			})
			.pipe(take(1))
			.subscribe();

		this.user.next(null);
	}

	getCurrentUser() {
		return this.user.asObservable();
	}

	getCurrentUserId() {
		return this.user.getValue()!.id;
	}
}
Quite a lot at once, but we want to progress towards the usage of Stream so let’s quickly cover what’s going on:
- We try to load a user JWT when the app starts, and call the Stream API to get a new user token
- For registration we do the general API registration and then the signup to Stream
- For a login, we do our login and then get a token from Stream for that user
- On sign out we destroy all existing information and tokens
To protect the internal pages of an Angular application we can use a guard, which holds a simple logic to check of the user is authetnicated and allowed to access a page, so let’s also open the src/app/guards/auth.guard.ts and change it to:
import { Injectable } from '@angular/core';
import { CanActivate, Router, UrlTree } from '@angular/router';
import { Observable, map, filter } from 'rxjs';
import { AuthService } from '../services/auth.service';

@Injectable({
	providedIn: 'root'
})
export class AuthGuard implements CanActivate {
	constructor(private auth: AuthService, private router: Router) {}

	canActivate(): Observable<boolean | UrlTree> {
		return this.auth.getCurrentUser().pipe(
			filter((user) => user !== undefined),
			map((isAuthenticated) => {
				if (isAuthenticated) {
					return true;
				} else {
					return this.router.createUrlTree(['/']);
				}
			})
		);
	}
}
Now we finally need to test this, so let’s implement our routing and the login page!
Defining the App Routing
By default the Angular project comes with a bunch of code in the src/app/app.component.html, but we can change this to three lines:
<div class="h-screen">
	<router-outlet></router-outlet>
</div>
Now we just load the router and therefore we should setup the paths of our application in the src/app/app-routing.module.ts and make sure we apply the guard from before to all internal protected pages:
import { ChatsComponent } from './chats/chats.component';
import { StudentsComponent } from './students/students.component';
import { ClassComponent } from './class/class.component';
import { AuthGuard } from './guards/auth.guard';
import { DashboardComponent } from './dashboard/dashboard.component';
import { InsideLayoutComponent } from './inside-layout/inside-layout.component';
import { LoginComponent } from './login/login.component';
import { NgModule } from '@angular/core';
import { RouterModule, Routes } from '@angular/router';

const routes: Routes = [
	{
		path: '',
		component: LoginComponent
	},
	{
		path: 'app',
		component: InsideLayoutComponent,
		canActivate: [AuthGuard],
		children: [
			{
				path: 'dashboard',
				component: DashboardComponent
			},
			{
				path: 'dashboard/:classid',
				component: ClassComponent
			},
			{
				path: 'students',
				component: StudentsComponent
			},
			{
				path: 'chats',
				component: ChatsComponent
			},
			{
				path: '',
				redirectTo: 'dashboard',
				pathMatch: 'full'
			}
		]
	},

	{
		path: '**',
		redirectTo: '/'
	}
];

@NgModule({
	imports: [RouterModule.forRoot(routes)],
	exports: [RouterModule]
})
export class AppRoutingModule {}
At this point only the login page is accessible without a token, so let’s finally implement that UI.
Creating the Login Page
Since we extracted all essential logic into the authentication service, buiulding the login is now quite easy as we just need to create functions to call our service.
For this bring up the src/app/login/login.component.ts and change it to:
import { Router } from '@angular/router';
import { AuthService } from './../services/auth.service';
import { Component, OnInit } from '@angular/core';
import { NgxSpinnerService } from 'ngx-spinner';

@Component({
	selector: 'app-login',
	templateUrl: './login.component.html',
	styleUrls: ['./login.component.scss']
})
export class LoginComponent implements OnInit {
	email = '';
	password = '';
	error: any = null;

	constructor(
		private auth: AuthService,
		private router: Router,
		private spinner: NgxSpinnerService
	) {}

	ngOnInit(): void {}

	async register() {
		this.spinner.show();

		this.auth.register(this.email, this.password).subscribe(
			(res) => {
				this.spinner.hide();
				this.login();
			},
			(err) => {
				this.spinner.hide();
				this.error = err.error;
			}
		);
	}

	async login() {
		this.spinner.show();

		this.auth.login(this.email, this.password).subscribe(
			(res) => {
				this.spinner.hide();
				this.router.navigateByUrl('/app', { replaceUrl: true });
			},
			(err) => {
				this.spinner.hide();
				this.error = err.error;
			}
		);
	}
}
Because we are using Tailwind the UI looks a bit messy usual, but this is essentially just a centered card with two input fields and buttons so we can use it for both the registration and login.
Go ahead and change the src/app/login/login.component.html to:
<ngx-spinner></ngx-spinner>
<div
class="min-h-full flex flex-col justify-center py-12 sm:px-6 lg:px-8 bg-center bg-cover bg-[url('https://images.unsplash.com/photo-1591123120675-6f7f1aae0e5b?ixlib=rb-1.2.1&ixid=MnwxMjA3fDB8MHxwaG90by1wYWdlfHx8fGVufDB8fHx8&auto=format&fit=crop&w=2069&q=80')]"
>
<div class="mt-8 sm:mx-auto sm:w-full sm:max-w-md">
<div class="bg-white py-8 px-4 shadow sm:rounded-lg sm:px-10">
<div class="space-y-6">
<div class="sm:mx-auto sm:w-full sm:max-w-md">
<h2 class="mt-6 text-center text-3xl font-extrabold text-gray-900">Polk High Hub</h2>
</div>
<div class="space-y-6">
<label for="email" class="block text-sm font-medium text-gray-700"> Email address </label>
<div class="mt-1">
<input
type="email"
[(ngModel)]="email"
autocomplete="email"
placeholder="john@doe.com"
class="block w-full px-3 py-2 border border-gray-300 rounded-md shadow-sm placeholder-gray-400 focus:outline-none focus:ring-blue-500 focus:border-blue-500 sm:text-sm"
/>
</div>
</div>
<div class="space-y-6">
<label for="email" class="block text-sm font-medium text-gray-700"> Password </label>
<div class="mt-1">
<input
type="password"
[(ngModel)]="password"
class="block w-full px-3 py-2 border border-gray-300 rounded-md shadow-sm placeholder-gray-400 focus:outline-none focus:ring-blue-500 focus:border-blue-500 sm:text-sm"
/>
</div>
</div>
<div class="rounded-md bg-red-50 p-4" *ngIf="error">
<div class="flex">
<div class="flex-shrink-0">
<svg
class="h-5 w-5 text-red-400"
xmlns="http://www.w3.org/2000/svg"
viewBox="0 0 20 20"
fill="currentColor"
aria-hidden="true"
>
<path
fill-rule="evenodd"
d="M10 18a8 8 0 100-16 8 8 0 000 16zM8.28 7.22a.75.75 0 00-1.06 1.06L8.94 10l-1.72 1.72a.75.75 0 101.06 1.06L10 11.06l1.72 1.72a.75.75 0 101.06-1.06L11.06 10l1.72-1.72a.75.75 0 00-1.06-1.06L10 8.94 8.28 7.22z"
clip-rule="evenodd"
/>
</svg>
</div>
<div class="ml-3">
<h3 class="text-sm font-medium text-red-800">Error: {{ error?.msg }}</h3>
</div>
</div>
</div>
<div>
<button
(click)="register()"
[disabled]="email === '' || password === ''"
class="w-full flex justify-center py-2 px-4 mb-2 disabled:opacity-50 border border-transparent rounded-md shadow-sm text-sm font-medium text-white bg-cyan-600 hover:bg-cyan-700 focus:outline-none focus:ring-2 focus:ring-offset-2 focus:ring-cyan-500"
>
Create Account
</button>
<button
(click)="login()"
[disabled]="email === '' || password === ''"
class="w-full flex justify-center py-2 px-4 disabled:opacity-50 border border-transparent rounded-md shadow-sm text-sm font-medium text-white bg-blue-600 hover:bg-blue-700 focus:outline-none focus:ring-2 focus:ring-offset-2 focus:ring-blue-500"
>
Login
</button>
</div>
</div>
</div>
</div>
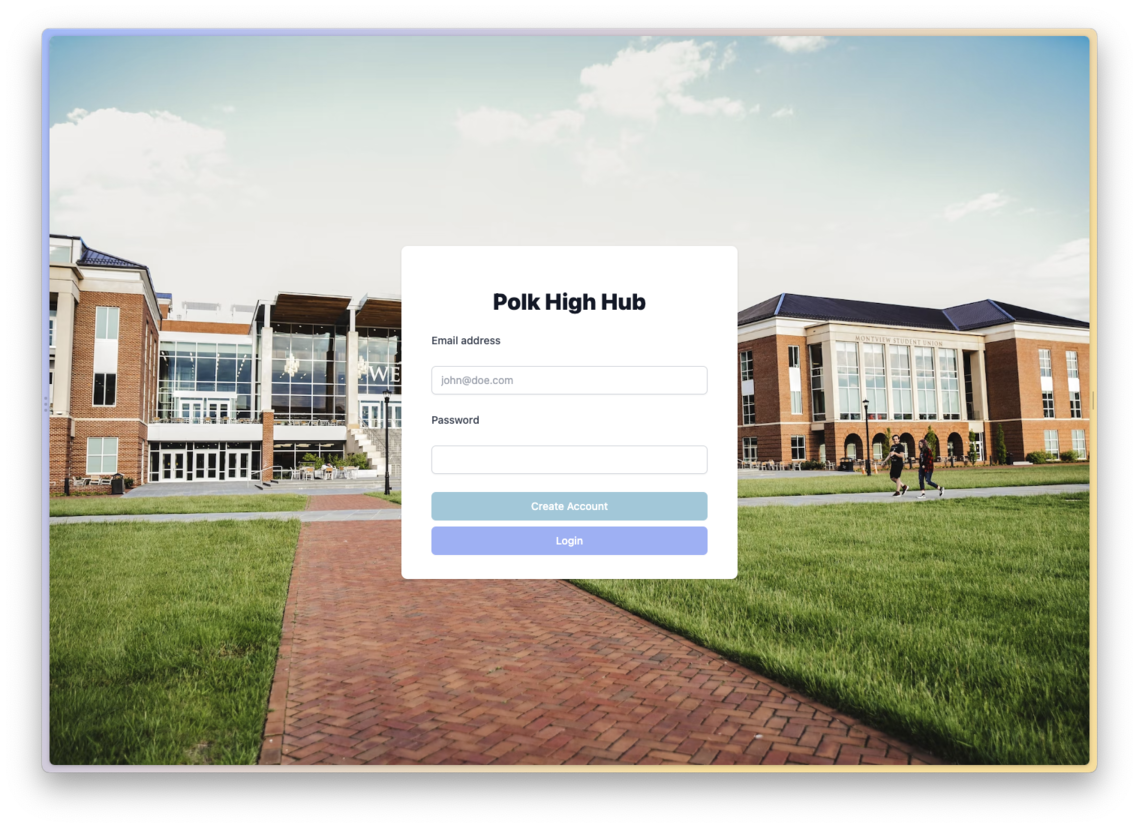
</div>At this point you should be able to see a school login like this:
We should also be able to create users and sign them in, and if you add some log messages you should see the flow of events and tokens being logget out, which means our whole setup works!
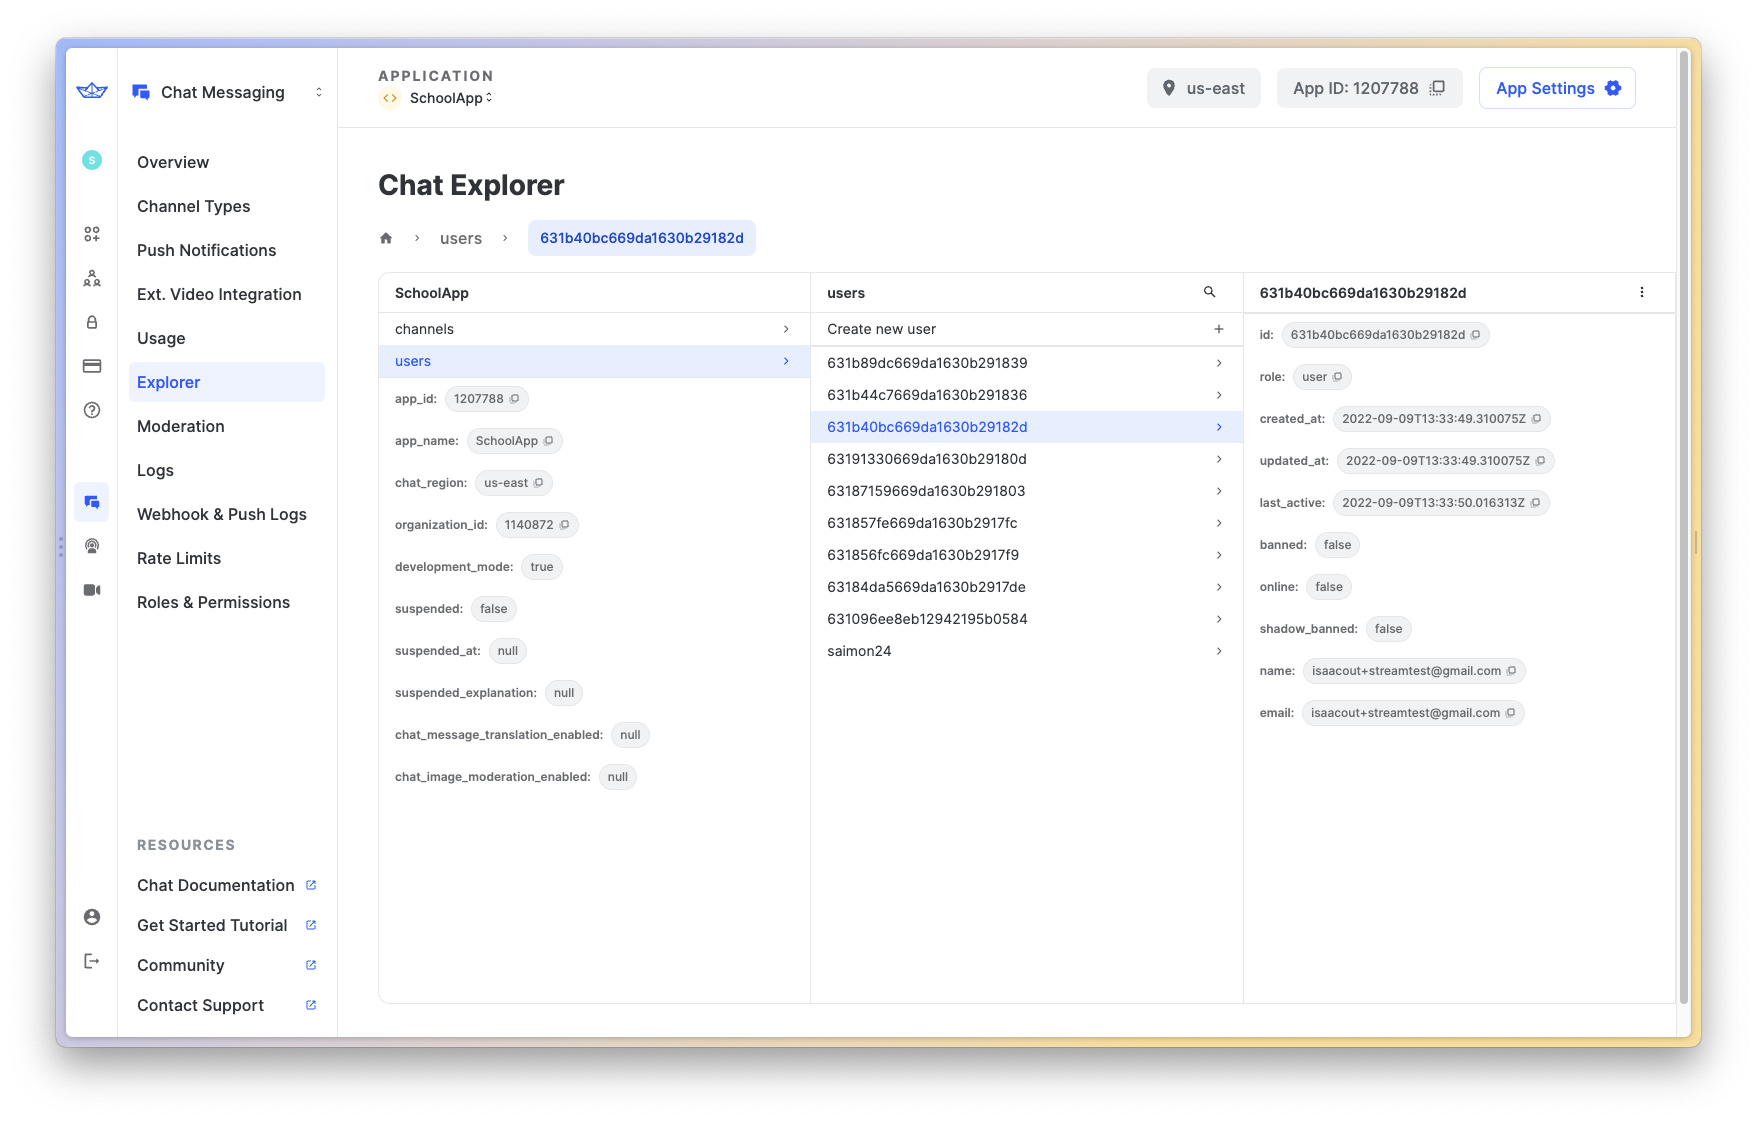
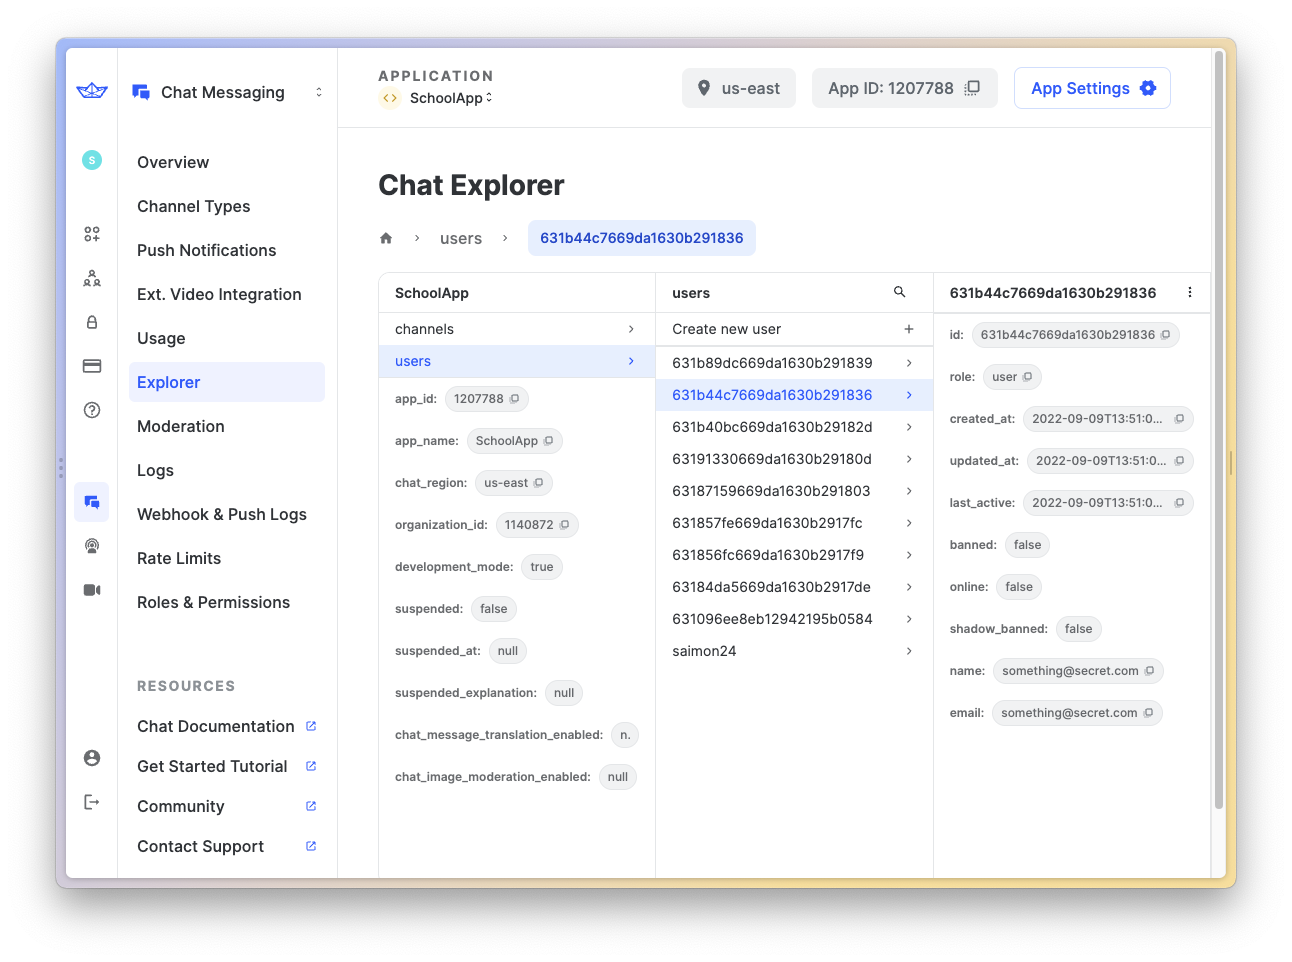
You can also confirm this by checking the cool explorer inside your Stream dashboard to find more information about users and later also channels:
Awesome, looks like we can move to the inside area of our learning platform.
Building the Inside Layout & Dashboard
It’s always a good idea to wrap the pages inside a general layout, and that’s what we do now with the src/app/inside-layout/inside-layout.component.html:
<header class="bg-blue-600">
	<nav class="max-w-7xl mx-auto px-4 sm:px-6 lg:px-8" aria-label="Top navigation">
		<div class="w-full py-6 flex gap-4">
			<a
				routerLink="/app/dashboard"
				routerLinkActive="active-link"
				class="text-base font-medium text-white hover:text-indigo-50"
			>
				Dashboard
			</a>
			<a
				routerLink="/app/students"
				routerLinkActive="active-link"
				class="text-base font-medium text-white hover:text-indigo-50"
			>
				Students
			</a>
			<a
				routerLink="/app/chats"
				routerLinkActive="active-link"
				class="text-base font-medium text-white hover:text-indigo-50"
			>
				Chats
			</a>

			<button (click)="signOut()" class="text-base font-medium text-white hover:text-indigo-50">
				<svg
					xmlns="http://www.w3.org/2000/svg"
					fill="none"
					viewBox="0 0 24 24"
					stroke-width="1.5"
					stroke="currentColor"
					class="w-6 h-6"
				>
					<path
						stroke-linecap="round"
						stroke-linejoin="round"
						d="M15.75 9V5.25A2.25 2.25 0 0013.5 3h-6a2.25 2.25 0 00-2.25 2.25v13.5A2.25 2.25 0 007.5 21h6a2.25 2.25 0 002.25-2.25V15m3 0l3-3m0 0l-3-3m3 3H9"
					/>
				</svg>
			</button>

			<button (click)="toggleLight()" class="text-white">
				<svg
					xmlns="http://www.w3.org/2000/svg"
					fill="none"
					viewBox="0 0 24 24"
					stroke-width="1.5"
					stroke="currentColor"
					class="w-6 h-6"
				>
					<path
						stroke-linecap="round"
						stroke-linejoin="round"
						d="M12 3v2.25m6.364.386l-1.591 1.591M21 12h-2.25m-.386 6.364l-1.591-1.591M12 18.75V21m-4.773-4.227l-1.591 1.591M5.25 12H3m4.227-4.773L5.636 5.636M15.75 12a3.75 3.75 0 11-7.5 0 3.75 3.75 0 017.5 0z"
					/>
				</svg>
			</button>
		</div>
	</nav>
</header>

<div class="max-w-7xl mx-auto sm:px-6 lg:px-8 my-6 h-4/5">
	<router-outlet></router-outlet>
</div>
We got a simple navigation bar at the top and our router outlet that displays the actual pages at the end.
Besides that we apply an active class to the active menu element, so let’s quickly change the src/app/inside-layout/inside-layout.component.scss to:
.active-link {
	@apply underline;
}
Finally we also have a toggle button in here for the theme of our Stream chat - yes, we can easily switch between dark and light mode like this inside the src/app/inside-layout/inside-layout.component.ts:
import { Router } from '@angular/router';
import { AuthService } from './../services/auth.service';
import { Component, OnInit } from '@angular/core';
import { ThemeService } from 'stream-chat-angular';

@Component({
	selector: 'app-inside-layout',
	templateUrl: './inside-layout.component.html',
	styleUrls: ['./inside-layout.component.scss']
})
export class InsideLayoutComponent implements OnInit {
	constructor(
		private auth: AuthService,
		private router: Router,
		private themeService: ThemeService
	) {}

	ngOnInit(): void {}

	toggleLight() {
		const current = this.themeService.theme$.getValue();
		if (current === 'light') {
			this.themeService.theme$.next('dark');
		} else {
			this.themeService.theme$.next('light');
		}
	}

	async signOut() {
		await this.auth.signOut();
		this.router.navigateByUrl('/', { replaceUrl: true });
	}
}
This is just one of the services from the Stream SDK, but you can bet that the rest is just as easy to use.
The first page that a student can see is the dashboard, which will now show some upcoming classes based on a dummy JSON - in reality this would of course come from your own API.
For our example, let’s add a classes.json to the assets folder and insert:
{
	"classes": [
		{
			"name": "Spanish for Beginners",
			"start": "1668071594000",
			"id": "c9d06d72-b13d-4a3d-b86d-1137d5bf7001",
			"teacher": {
				"name": "Steph Smith",
				"id": "1812MASDN",
				"avatar": "https://images.unsplash.com/photo-1553514029-1318c9127859?ixlib=rb-1.2.1&ixid=MnwxMjA3fDB8MHxwaG90by1wYWdlfHx8fGVufDB8fHx8&auto=format&fit=crop&w=1364&q=80"
			},
			"desc": "Leverage agile frameworks to provide a robust synopsis for high level overviews. Iterative approaches to corporate strategy foster collaborative thinking to further the overall value proposition. Organically grow the holistic world view of disruptive innovation via workplace diversity and empowerment.<br><br>Bring to the table win-win survival strategies to ensure proactive domination. At the end of the day, going forward, a new normal that has evolved from generation X is on the runway heading towards a streamlined cloud solution. User generated content in real-time will have multiple touchpoints for offshoring.<br><br>Capitalize on low hanging fruit to identify a ballpark value added activity to beta test. Override the digital divide with additional clickthroughs from DevOps. Nanotechnology immersion along the information highway will close the loop on focusing solely on the bottom line."
		},
		{
			"name": "History of Javascript",
			"start": "1668687194000",
			"id": "4fae99b0-b1ff-40cf-a115-a5ad722cc8dc",
			"teacher": {
				"name": "Ben Roberts",
				"id": "72JDOEK123",
				"avatar": "https://images.unsplash.com/photo-1570295999919-56ceb5ecca61?ixlib=rb-1.2.1&ixid=MnwxMjA3fDB8MHxwaG90by1wYWdlfHx8fGVufDB8fHx8&auto=format&fit=crop&w=1480&q=80"
			},
			"desc": "Leverage agile frameworks to provide a robust synopsis for high level overviews. Iterative approaches to corporate strategy foster collaborative thinking to further the overall value proposition. Organically grow the holistic world view of disruptive innovation via workplace diversity and empowerment.<br><br>Bring to the table win-win survival strategies to ensure proactive domination. At the end of the day, going forward, a new normal that has evolved from generation X is on the runway heading towards a streamlined cloud solution. User generated content in real-time will have multiple touchpoints for offshoring.<br><br>Capitalize on low hanging fruit to identify a ballpark value added activity to beta test. Override the digital divide with additional clickthroughs from DevOps. Nanotechnology immersion along the information highway will close the loop on focusing solely on the bottom line."
		},
		{
			"name": "Advanced Programming Patterns",
			"start": "1669216394000",
			"id": "0dd3bc93-e4ae-492f-8b3d-0fbb8687530e",
			"teacher": {
				"name": "Susanne Cole",
				"id": "8SdAHFP34",
				"avatar": "https://images.unsplash.com/photo-1597223557154-721c1cecc4b0?ixlib=rb-1.2.1&ixid=MnwxMjA3fDB8MHxwaG90by1wYWdlfHx8fGVufDB8fHx8&auto=format&fit=crop&w=1480&q=80"
			},
			"desc": "Leverage agile frameworks to provide a robust synopsis for high level overviews. Iterative approaches to corporate strategy foster collaborative thinking to further the overall value proposition. Organically grow the holistic world view of disruptive innovation via workplace diversity and empowerment.<br><br>Bring to the table win-win survival strategies to ensure proactive domination. At the end of the day, going forward, a new normal that has evolved from generation X is on the runway heading towards a streamlined cloud solution. User generated content in real-time will have multiple touchpoints for offshoring.<br><br>Capitalize on low hanging fruit to identify a ballpark value added activity to beta test. Override the digital divide with additional clickthroughs from DevOps. Nanotechnology immersion along the information highway will close the loop on focusing solely on the bottom line."
		}
	]
}
We can now directly load this file in our src/app/dashboard/dashboard.component.ts and make it available for the template:
import { Component, OnInit } from '@angular/core';
import data from '../../assets/classes.json';
@Component({
selector: 'app-dashboard',
templateUrl: './dashboard.component.html',
styleUrls: ['./dashboard.component.scss']
})
export class DashboardComponent implements OnInit {
classes = data.classes;
constructor() {}
ngOnInit(): void {}
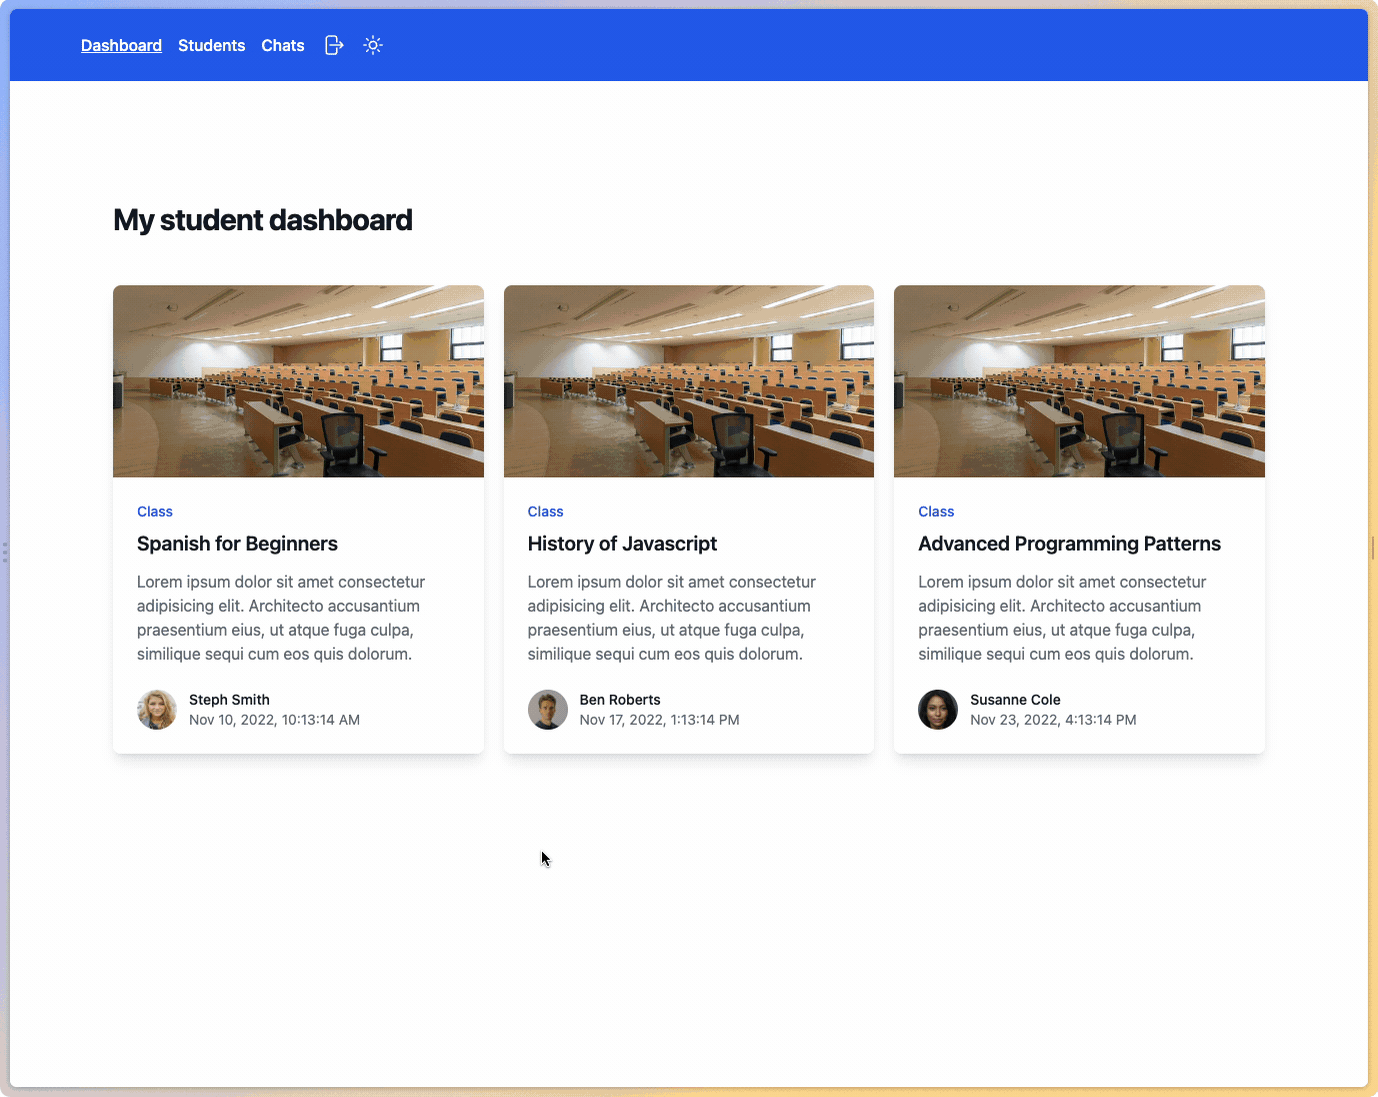
}Our dashboard can now show the different classes and users can check out the details by clicking on one of them, which will pass the ID of the class with the URL so the details page opens.
For that, open up the src/app/dashboard/dashboard.component.html and change it to:
<div class="relative px-4 pt-16 pb-20 sm:px-6 lg:px-8 lg:pt-24 lg:pb-28">
	<h1 class="text-3xl font-bold tracking-tight text-gray-900">
		<span class="block xl:inline">My student dashboard</span>
	</h1>
	<div class="relative mx-auto max-w-7xl">
		<div class="mx-auto mt-12 grid max-w-lg gap-5 lg:max-w-none lg:grid-cols-3">
			<div
				class="flex flex-col overflow-hidden rounded-lg shadow-lg hover:cursor-pointer"
				[routerLink]="[class.id]"
				*ngFor="let class of classes"
			>
				<div class="flex-shrink-0">
					<img class="h-48 w-full object-cover" src="./assets/class.jpg" alt="" />
				</div>
				<div class="flex flex-1 flex-col justify-between bg-white p-6">
					<div class="flex-1">
						<p class="text-sm font-medium text-indigo-600">
							<span>Class</span>
						</p>
						<div class="mt-2 block">
							<p class="text-xl font-semibold text-gray-900">{{ class.name }}</p>
							<p class="mt-3 text-base text-gray-500">
								Lorem ipsum dolor sit amet consectetur adipisicing elit. Architecto accusantium
								praesentium eius, ut atque fuga culpa, similique sequi cum eos quis dolorum.
							</p>
						</div>
					</div>
					<div class="mt-6 flex items-center">
						<div class="flex-shrink-0">
							<span class="sr-only">{{ class.teacher.name }}</span>
							<img class="h-10 w-10 rounded-full" [src]="class.teacher.avatar" alt="" />
						</div>
						<div class="ml-3">
							<p class="text-sm font-medium text-gray-900">
								<span>{{ class.teacher.name }}</span>
							</p>
							<div class="flex space-x-1 text-sm text-gray-500">
								<time>{{ class.start | date: "medium" }}</time>
							</div>
						</div>
					</div>
				</div>
			</div>
		</div>
	</div>
</div>
We should now be greeted by a nice looking dashboard page, and we can already navigate around since we have set up the app routing before!

Now all the setup is done, and we are ready to interact with the actual Stream Chat API.
Initialising the Stream Chat
We have one untouched service, and that’s were we will establish the connection to Stream now.
You could do this on other pages, but you would end up getting in trouble when multiple instances of Stream become active.
Therefore we use a service which acts a a singleton class in our code and holds the only reference to Stream that our pages will later use.
The idea is to call the init() function of the Chat service once we have an authenticated user and also a Stream token, which is obtained by our cloud function right after a login.
With this inforamtion we setup the connection, and we can also load all users chats by calling the same function on the Channel service where we add a query:
We only want to get back chats where the ID of our currently logged in user is included!
You could create a bunch of other filtering/queries with this field as well of course.
For now though let’s bring up the src/app/services/stream.service.ts and change it to:
import { BehaviorSubject } from 'rxjs';
import { AuthService } from './auth.service';
import { Injectable } from '@angular/core';
import { ChannelService, ChatClientService, StreamI18nService } from 'stream-chat-angular';
import { environment } from 'src/environments/environment';

@Injectable({
	providedIn: 'root'
})
export class StreamService {
	private streamReady = new BehaviorSubject(false);

	constructor(
		private authService: AuthService,
		private chatService: ChatClientService,
		private channelService: ChannelService,
		private streamI18nService: StreamI18nService
	) {
		this.authService.getCurrentUser().subscribe((user: any) => {
			if (user && user.stream_token) {
				this.chatService.init(environment.streamKey, `${user.id}`, user.stream_token);
				this.streamI18nService.setTranslation();
				this.initChat();
			} else {
				if (this.chatService.chatClient) {
					this.chatService.disconnectUser();
					this.channelService.reset();
				}

				this.streamReady.next(false);
			}
		});
	}

	async initChat() {
		await this.channelService.init({
			type: 'messaging',
			members: { $in: [this.authService.getCurrentUserId()] }
		});
		this.streamReady.next(true);
	}

	isStreamReady() {
		return this.streamReady.asObservable();
	}
}
We only expose the streamReady observable, so other pages simply need to subscribe to it to know when the chat can be used!
At this point we also make use of the Stream key again, but this time it’s only the public key so we can put it into our src/environments/environment.ts like this:
export const environment = {
	production: false,
	streamKey: 'yourkey'
};
Since we want to initialise this class as early as possible, let’s directly add it to our src/app/app.component.ts:
import { Component } from '@angular/core';
import { StreamService } from './services/stream.service';

@Component({
	selector: 'app-root',
	templateUrl: './app.component.html',
	styleUrls: ['./app.component.scss']
})
export class AppComponent {
	title = 'chatApp';
	constructor(private streamService: StreamService) {}
}
Now let’s see how quickly we can add that Stream chat using the included components.
Displaying a Chat
Once you got a connection to Stream with a user it’s actually super easy to integrate the chat component, which comes with a decent UI out of the box!
Therefore let’s simply grab the observable from our service inside the src/app/chats/chats.component.ts now:
import { Component, OnInit } from '@angular/core';
import { StreamService } from '../services/stream.service';

@Component({
	selector: 'app-chats',
	templateUrl: './chats.component.html',
	styleUrls: ['./chats.component.scss']
})
export class ChatsComponent implements OnInit {
	chatReady = this.streamService.isStreamReady();

	constructor(private streamService: StreamService) {}

	ngOnInit() {}
}
Based on this value we can now either show a little loading message or include the stack of components that make up the default Stream Chat UI.
For this, open the src/app/chats/chats.component.html and insert:
<div *ngIf="!(chatReady | async); else chat" class="text-2xl">Chat loading...</div>

<ng-template #chat>
	<div class="flex mt-4 h-full">
		<stream-channel-list></stream-channel-list>
		<stream-channel class="flex-grow">
			<stream-channel-header></stream-channel-header>
			<stream-message-list></stream-message-list>
			<stream-notification-list></stream-notification-list>
			<stream-message-input></stream-message-input>
			<stream-thread name="thread">
				<stream-message-list mode="thread"></stream-message-list>
				<stream-message-input mode="thread"></stream-message-input>
			</stream-thread>
		</stream-channel>
	</div>
</ng-template>
That was quite fast, wasn’t it?
If you don’t have any chats yet, you can simply create one manually inside the explorer of Stream and then add the user.
Just make sure you are creating a channel of the type ”messaging” since this is what we are currently loading!
The view you can see uses the standard styling and shows a list of all channels to the left, and the chat view on the rright side is made up of different components that you could all customise to your needs or completely uverwrite with your own code as well.
This is already pretty aweosme, but we want more control and get a better feeling, so let’s add a single chat group that users can join from the class page.
Integrating a Specific Chat
We are already able to dvie into a specific class, but we are not actually displaying anything in there yet.
What we want to do is give students the ability to manually join a chat for a specific class, or leave it again afterwards.
To achieve this we load the ID from the route and then filter the list of channels of the user to see if this channel is already included.
If that’s the case, we also tell the Stream Channel service to set this chat as active by calling the setAsActiveChannel() function!
Now open up the src/app/class/class.component.ts and change it to:
import { AuthService } from './../services/auth.service';
import { Component, OnInit } from '@angular/core';
import { ActivatedRoute } from '@angular/router';
import { ChannelService, ChatClientService } from 'stream-chat-angular';
import data from '../../assets/classes.json';
import { take } from 'rxjs';
import { NgxSpinnerService } from 'ngx-spinner';
import { StreamService } from '../services/stream.service';

@Component({
	selector: 'app-class',
	templateUrl: './class.component.html',
	styleUrls: ['./class.component.scss']
})
export class ClassComponent implements OnInit {
	class: any;
	joinedChat = false;
	loading = true;

	constructor(
		private route: ActivatedRoute,
		private chatService: ChatClientService,
		private channelService: ChannelService,
		private spinner: NgxSpinnerService,
		private authService: AuthService,
		private streamService: StreamService
	) {}

	ngOnInit(): void {
		const id = this.route.snapshot.paramMap.get('classid');

		this.class = data.classes.filter((item: any) => item.id == id)[0];

		this.streamService.isStreamReady().subscribe((ready: boolean) => {
			if (ready) {
				this.loadChat();
			}
		});
	}

	loadChat() {
		this.channelService.channels$.subscribe((channels) => {
			if (!channels) return;

			const filtered = channels.filter((channel) => channel.id == this.class.id);

			if (filtered.length) {
				// User is already member
				const toJoin = filtered[0];

				this.channelService.setAsActiveChannel(toJoin);
				this.joinedChat = true;
				this.loading = false;
			} else {
				this.loading = false;
			}
		});
	}

	async joinClassChat() {
		this.spinner.show();

		const channel = await this.chatService.chatClient.getChannelById(
			'messaging',
			this.class.id,
			{}
		);

		await channel.addMembers([this.authService.getCurrentUserId()]);

		this.spinner.hide();
		this.loadChat();
	}

	leaveClassChat() {
		this.channelService.activeChannel$.pipe(take(1)).subscribe((channel) => {
			if (channel) {
				channel.removeMembers([this.authService.getCurrentUserId()]);
				this.joinedChat = false;
			}
		});
	}
}
If the chat is not yet included for a user, the user has the ability to join it which we can do by first of all grabbing the channel using getChannelById() and then calling the addMembers() function on that channel.
Likewise, the user can leave the chat again by calling the removeMembers() function and passing its own ID.
Caution: At this point you would receive an error that looks like this “UpdateChannel failed with error: “User ‘xyz’ with role ‘user’ is not allowed to perform action AddOwnChannelMembership in scope ‘messaging’”
To make this work you need to change the Roles & Permissions inside Stream and add the “Join own Channel” permission under the messaging scope for the “user” role.

There are tons of roles and permissions to customise the chat experience in your app, which might take a while to browse around.
However, we are now more interested in actually adding the view for the class, so let’s open up the src/app/class/class.component.html and change it to:
<ngx-spinner></ngx-spinner>
<div class="relative px-4 pt-16 pb-20 sm:px-6 lg:px-8 lg:pt-24 lg:pb-28 h-full">
<h1 class="text-3xl font-bold tracking-tight text-gray-900 items-center flex">
<span class="block xl:inline">{{ class?.name }}</span>
<button
type="button"
*ngIf="joinedChat && !loading"
(click)="leaveClassChat()"
class="inline-flex mx-4 items-center rounded-md border border-gray-300 bg-white px-3 py-2 text-sm font-medium leading-4 text-gray-700 shadow-sm hover:bg-gray-50 focus:outline-none focus:ring-2 focus:ring-indigo-500 focus:ring-offset-2"
>
Leave chat
</button>
</h1>
<div class="relative mx-auto max-w-7xl">
<div class="mt-4 grid grid-cols-1 items-start gap-4 lg:grid-cols-3 lg:gap-8 h-full">
<!-- Course Chat -->
<div class="grid grid-cols-1 gap-4 lg:col-span-2 h-full">
<section>
<div class="overflow-hidden rounded-lg bg-white shadow h-full">
<div class="p-6 h-full flex justify-center">
<!-- <stream-channel-list></stream-channel-list> -->
<stream-channel class="flex-grow" *ngIf="!loading && joinedChat">
<stream-channel-header></stream-channel-header>
<stream-message-list></stream-message-list>
<stream-notification-list></stream-notification-list>
<stream-message-input></stream-message-input>
<stream-thread name="thread">
<stream-message-list mode="thread"></stream-message-list>
<stream-message-input mode="thread"></stream-message-input>
</stream-thread>
</stream-channel>
<div *ngIf="loading && !joinedChat">Loading chat...</div>
<div
*ngIf="!loading && !joinedChat"
class="flex flex-col gap-4 justify-center items-center"
>
<span class="text-xl">You are not yet a member of this chat.</span>
<button
type="button"
(click)="joinClassChat()"
class="inline-flex items-center rounded-md border border-transparent bg-blue-600 px-6 py-3 text-base font-medium text-white shadow-sm hover:bg-blue-700 focus:outline-none focus:ring-2 focus:ring-blue-500 focus:ring-offset-2"
>
Join chat
</button>
</div>
</div>
</div>
</section>
</div>
<!-- Course description -->
<div class="grid grid-cols-1 gap-4">
<section>
<div class="overflow-hidden rounded-lg bg-white shadow">
<div class="p-6" [innerHtml]="class.desc"></div>
<div class="m-6 flex items-center">
<div class="flex-shrink-0">
<span class="sr-only">{{ class.teacher.name }}</span>
<img class="h-10 w-10 rounded-full" [src]="class.teacher.avatar" alt="" />
</div>
<div class="ml-3">
<p class="text-sm font-medium text-gray-900">
<span>{{ class.teacher.name }}</span>
</p>
<div class="flex space-x-1 text-sm text-gray-500">
<time>{{ class.start | date: "medium" }}</time>
</div>
</div>
</div>
</div>
</section>
</div>
</div>
</div>
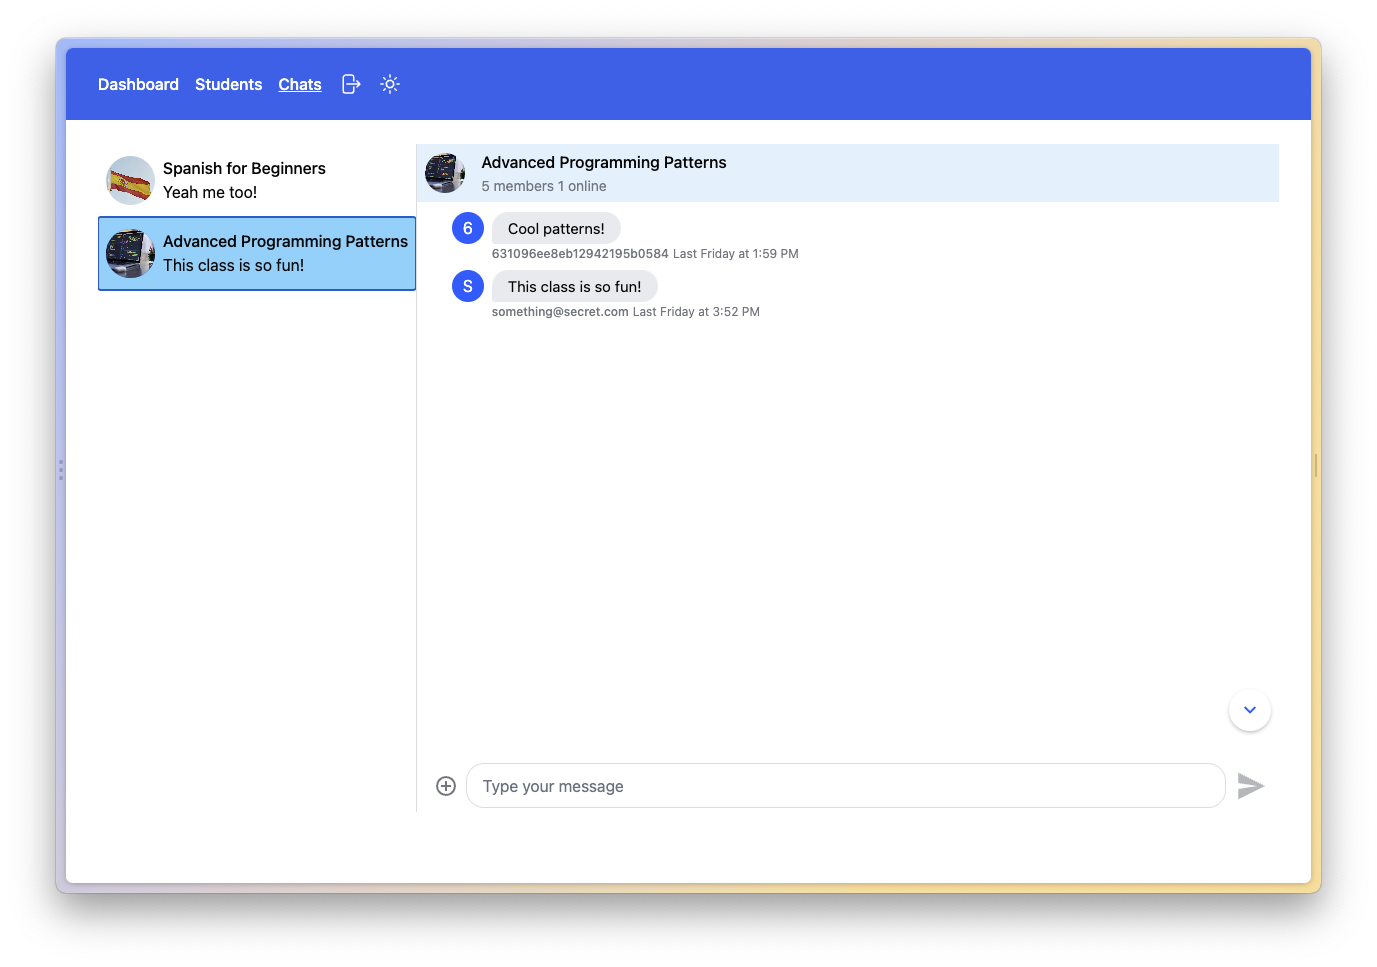
</div>Another long view, but essentially we are simply displaying only the Stream channel component this time, which means there won’t be a list of groups in this view.
Also, this will only be visible if the user is part of the chat, based on the value of joinedChat - otherwise a button is displayed so the user can join the chat.
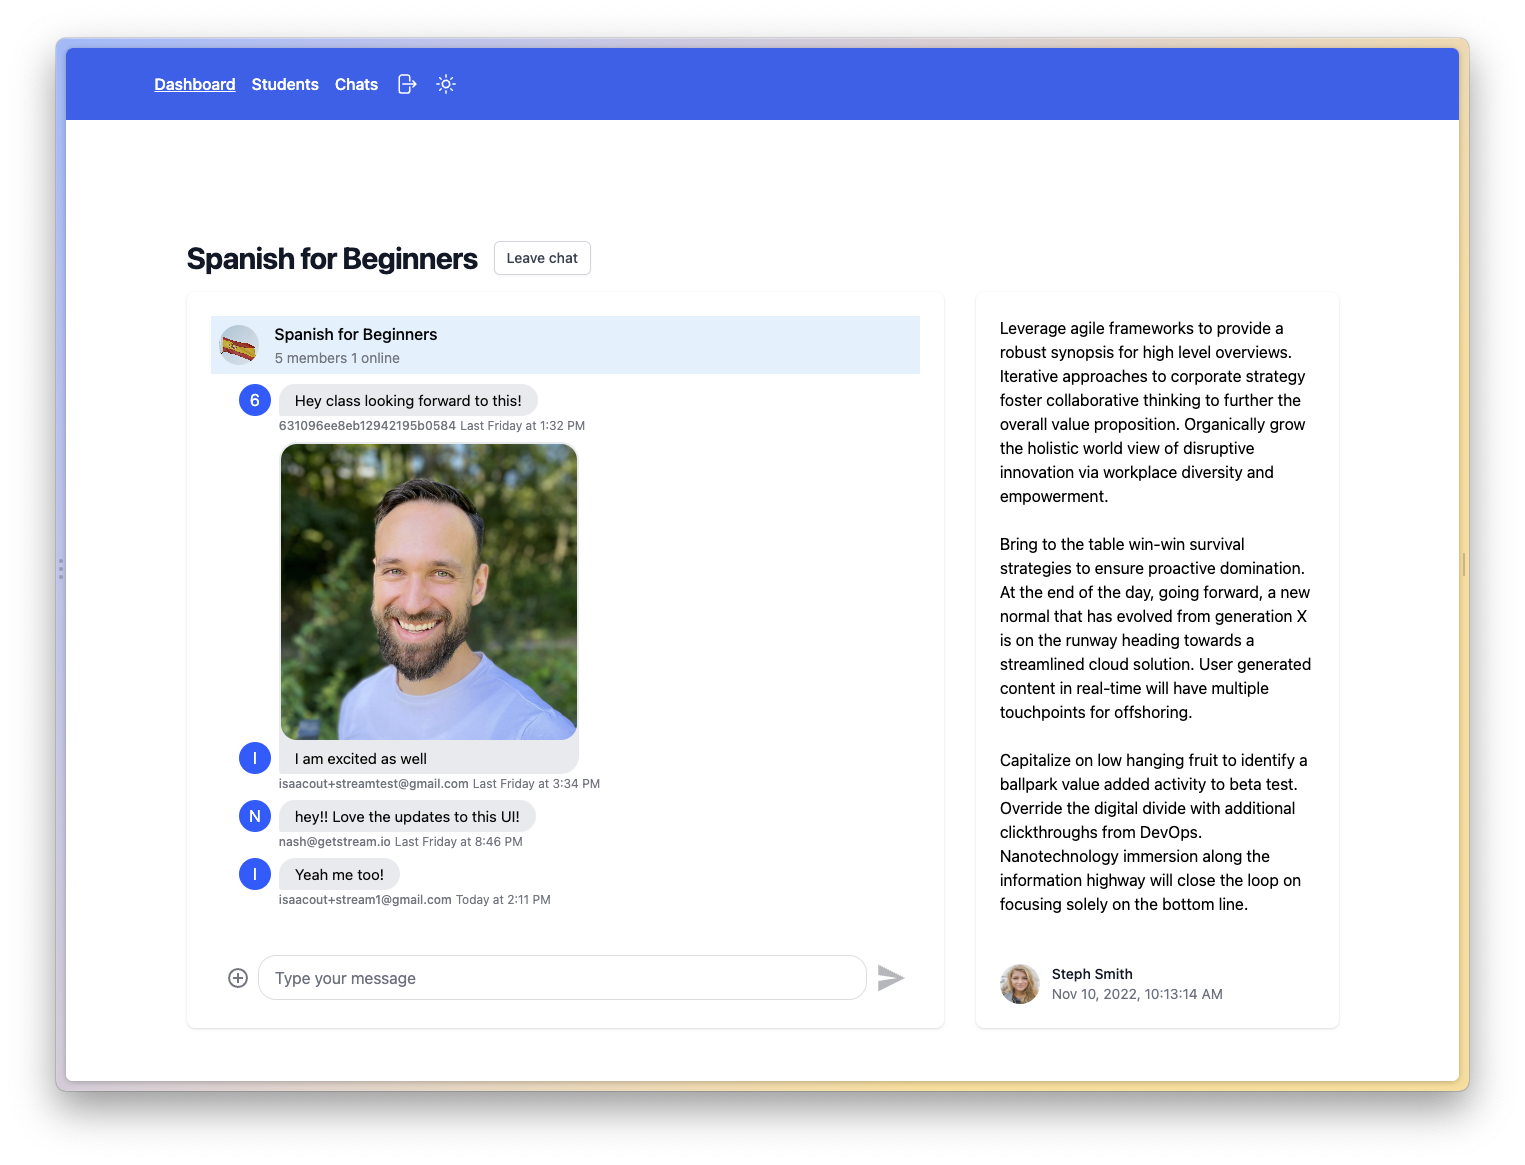
This view looks pretty awesome, and joining and leaving the channels feels really natural.
You can also see that a user can access the history of a channel after joining, which is another setting that could be tweaked inside your Stream dashboard.
But what if users want to chat with each other?
Starting a Chat
Users can find each other by the information we used to sign up users to Stream in the beginning, so let’s build a simple drop down component using the ng-select package where we can search for a user and then start a new chat.
To implement this, we will listen to changes of the input field and then call the autocompleteUsers() function from the Stream SDK which will return mathcing users.
The users will be presented in the drop down, and once a user is selected and a name for the new channel is set, we can create a new channel with a unique ID and supply some additional information like an image, the name and of course the members of the chat .
Therfore, open up the src/app/students/students.component.ts now and change it to:
import { Router } from '@angular/router';
import { ChatClientService, ChannelService } from 'stream-chat-angular';
import { AuthService } from './../services/auth.service';
import { Component } from '@angular/core';
import { concat, distinctUntilChanged, Observable, of, Subject, switchMap } from 'rxjs';
import { UserResponse } from 'stream-chat';

@Component({
	selector: 'app-students',
	templateUrl: './students.component.html',
	styleUrls: ['./students.component.scss']
})
export class StudentsComponent {
	channelName = '';
	selectedUser = null;
	foundUsers: Observable<UserResponse[]>;
	userInput = new Subject<string>();

	constructor(
		private authService: AuthService,
		private chatService: ChatClientService,
		private channelService: ChannelService,
		private router: Router
	) {
		this.foundUsers = concat(
			of([]),
			this.userInput.pipe(
				distinctUntilChanged(),
				switchMap((term) => this.chatService.autocompleteUsers(term))
			)
		);
	}

	async onSelect() {
		const channelId = `${Date.now()}-${this.authService.getCurrentUserId()}`;

		const channel = this.chatService.chatClient.channel('messaging', channelId, {
			image:
				'https://images.unsplash.com/photo-1577563908411-5077b6dc7624?ixlib=rb-1.2.1&ixid=MnwxMjA3fDB8MHxwaG90by1wYWdlfHx8fGVufDB8fHx8&auto=format&fit=crop&w=2340&q=80',
			name: this.channelName,
			members: [this.authService.getCurrentUserId(), this.selectedUser!]
		});

		await channel.create();

		this.channelName = '';

		channel.watch().then((_) => {
			this.channelService.setAsActiveChannel(channel);
			this.router.navigateByUrl('/app/chats');
		});
	}
}
It’s also imporatnt to call the watch() function on the channel and wait until it’s created before setting it as the active channel.
After that, we can simply jump to our chats overview page and since the new channel is the active channel now, it should show up at the top of the list!
To finally wrap up the code we need to add the UI for that page so open up the src/app/students/students.component.html and change it to:
<div class="relative px-4 pt-16 pb-20 sm:px-6 lg:px-8 lg:pt-24 lg:pb-28">
	<h1 class="text-3xl font-bold tracking-tight text-gray-900">
		<span class="block xl:inline">Connect with students</span>
	</h1>
	<div class="relative mx-auto max-w-7xl">
		<div class="mx-auto mt-12 grid max-w-lg gap-5 lg:max-w-none lg:grid-cols-3">
			<div class="flex w:full sm:w-4/5 gap-4">
				<input
					type="text"
					[(ngModel)]="channelName"
					class="block w-full rounded-md border-gray-300 shadow-sm focus:border-indigo-500 focus:ring-indigo-500 sm:text-sm"
					placeholder="New channel name"
				/>
			</div>

			<ng-select
				*ngIf="channelName != ''"
				[items]="foundUsers | async"
				[typeahead]="userInput"
				bindLabel="email"
				bindValue="id"
				[(ngModel)]="selectedUser"
				(change)="onSelect()"
			>
			</ng-select>
		</div>
	</div>
</div>
Besides the usage of ng-select nothing challenging, and a quite simply view - but that input dropdown with data coming right from Stream is quite epic!

We are done with our chat integration now and can start, join and leave chats and most importantly, use the actually chat experience of the Stream chat component which even allows to send files, reactions, threads and so much more!
Styling the Stream Chat
Now if you wanted to customise the chat, you can supply custom components to the different sections we have seen before using the CustomTemplateService of Stream.
If you are just looking for some small tweaks, you can easily overwrite the CSS variables as well, for example we could add the following to the src/styles.scss:
:root {
	.str-chat {
		--str-chat__channel-header-background-color: theme('colors.sky.100');
		--str-chat__channel-preview-active-background-color: theme('colors.sky.300');
	}

	stream-channel-header {
		margin-bottom: 10px;
	}
}
You can usually look up the CSS variables by inspecting the Stream components or checking out the Stream theming guide.
Teardown
Integrating the Stream Chat in your Angular app is easy once you understand the flow of tokens, and both the Stream dashboard as well as the SDK offer tons of functinalities to customise the chat experience in your app.
If you are somewhat serious about building a learning platform, ecommerce shop or any kind of marketplace, there’s actually no way around Stream as building your own solution would require you to write thousands of code lines just to come up with a worse solution.