RESTful API User Authentication with Node.js and AngularJS – Part 2/2: Frontend App Last update: 2015-12-01
In this second part of our User Authentication series I will show you how to hook up a frontend to our REST API backend. We will craft a little Ionic app with AngularJS, but the code and concept is almost the same for a pure AngularJS webapp.
If you came directly to this post, make sure to follow the first step or have some kind of backend already in place!
RESTful API User Authentication with Node.js and AngularJS - Part 1/2: Server
This part will cover a lot of code including HTML templates, so if you want it the lazy way grab your code below, but make sure to follow the article to understand what we do!
Creating the basic app
First of all we start (as always) with a blank Ionic app, so go ahead and run:
ionic start devdactic-rest-auth blankWe will have quite some files, so create all these folders and files under www:

Last thing for now is to include all the javascript files in our index.html so open the file and append right at the end of the header:
<!-- your app's js -->
<script src="js/app.js"></script>
<script src="js/controllers.js"></script>
<script src="js/services.js"></script>
<script src="js/constants.js"></script>
As you are in the index, also change the body to this:
<body ng-app="starter" ng-controller="AppCtrl">
  <ui-view></ui-view>
</body>
As our index will only serve different views and be the controller above everything else.
Crafting our views
As said before, we have a some views so I want go into detail for those as they are straight forward. If you need some more basic Ionic knowledge, check out my complete course Ionic by Doing: Create Mobile Apps with HTML5 and Javascript for in detail Ionic knowledge!
Ready for some code?
All right, let’s start. Open your outside.html, which is the boilerplate view for a Navigation stack outside of the logged in area:
<ion-nav-bar class="bar-positive nav-title-slide-ios7">
      <ion-nav-back-button class="button-clear">
        <i class="ion-arrow-left-c"></i>
      </ion-nav-back-button>
</ion-nav-bar>

<ion-nav-view animation="slide-left-right">
  <!-- Center content -->
</ion-nav-view>
We have a navigation bar and a nav-view where our children will be rendered, nothing fancy.
The next view is our login.html, which holds some input fields for the data, a login button and also a link to our register page (using ui-sref):
<ion-view title="Please sign in">
  <ion-content class="padding">
    <div class="list">
      <label class="item item-input">
        <input type="text" placeholder="Name" ng-model="user.name">
      </label>
      <label class="item item-input">
        <input type="password" placeholder="Password" ng-model="user.password">
      </label>
    </div>
    <button class="button button-full button-balanced" ng-click="login()">
      Login
    </button>
    <button class="button button-positive button-clear button-full" ui-sref="outside.register">Register now!</button>
  </ion-content>
</ion-view>
Again, straight forward. The result later will look like this: 
Next?
The register.html code is very similar, but the controller behind it will perform a different action later:
<ion-view title="Create a new account">
  <ion-content class="padding">
    <div class="list">
      <label class="item item-input">
        <input type="text" placeholder="Name" ng-model="user.name">
      </label>
      <label class="item item-input">
        <input type="password" placeholder="Password" ng-model="user.password">
      </label>
    </div>
    <button class="button button-full button-positive" ng-click="signup()">
      Sign up
    </button>
  </ion-content>
</ion-view>
Hold on, you can do this. Now the last part.
The last view is the inside.html which our users will see once they are logged in. According to our backend we have a button to grab some info (a simple string with greeting and the username) but I also added a dummy “destroy” button to simulate what happens if the user looses the token or something like that happens:
<ion-view>
  <ion-header-bar align-title="center" class="bar-positive">
    <h1 class="title">Member area</h1>
    <div class="buttons">
      <button class="button button-clear" ng-click="logout()">Logout</button>
    </div>
  </ion-header-bar>
  <ion-content class="padding">
    <div class="card">
      <div class="item item-text-wrap">
        {{memberinfo}}
      </div>
    </div>
    <button class="button button-full button-assertive" ng-click="destroySession()">
      Destroy token
    </button>
    <button class="button button-full button-balanced" ng-click="getInfo()">
      Get Memberinfo
    </button>
  </ion-content>
</ion-view>
Are you still with me?
This inside area will later look like this: 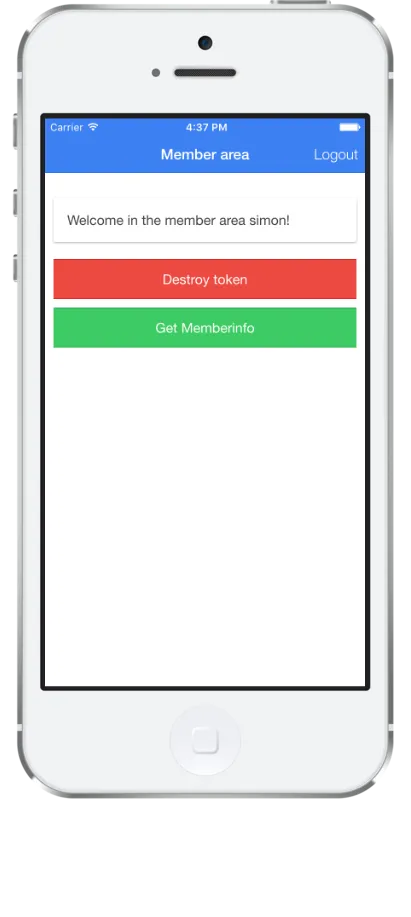
Those were all the views we need to craft our app, so now we can start the real code!
Crafting our AngularJS User Authentication
First of all we want to have some constants for our backend URL and also an event we can trigger when we encounter an invalid or unauthorized request. Therefore, open the constants.js and insert:
angular.module('starter')

.constant('AUTH_EVENTS', {
  notAuthenticated: 'auth-not-authenticated'
})

.constant('API_ENDPOINT', {
  url: 'http://127.0.0.1:8100/api'
  //  For a simulator use: url: 'http://127.0.0.1:8080/api'
});
As I added, if you want to run this demo in a simulator you need to use the other URL, because the first is used to fix some CORS issues. I will come back to this at the end of this article!
Next we craft a complete AngularJS User Authentication service, which is in most parts a copy from my previous article How To Handle User Authentication With AngularJS Inside Your Ionic App.
The changes are that we don’t add a role based auth this time, and also we know have a real backend we can talk with! So go ahead and add all of this to your services.js:
angular.module('starter')

.service('AuthService', function($q, $http, API_ENDPOINT) {
  var LOCAL_TOKEN_KEY = 'yourTokenKey';
  var isAuthenticated = false;
  var authToken;

  function loadUserCredentials() {
    var token = window.localStorage.getItem(LOCAL_TOKEN_KEY);
    if (token) {
      useCredentials(token);
    }
  }

  function storeUserCredentials(token) {
    window.localStorage.setItem(LOCAL_TOKEN_KEY, token);
    useCredentials(token);
  }

  function useCredentials(token) {
    isAuthenticated = true;
    authToken = token;

    // Set the token as header for your requests!
    $http.defaults.headers.common.Authorization = authToken;
  }

  function destroyUserCredentials() {
    authToken = undefined;
    isAuthenticated = false;
    $http.defaults.headers.common.Authorization = undefined;
    window.localStorage.removeItem(LOCAL_TOKEN_KEY);
  }

  var register = function(user) {
    return $q(function(resolve, reject) {
      $http.post(API_ENDPOINT.url + '/signup', user).then(function(result) {
        if (result.data.success) {
          resolve(result.data.msg);
        } else {
          reject(result.data.msg);
        }
      });
    });
  };

  var login = function(user) {
    return $q(function(resolve, reject) {
      $http.post(API_ENDPOINT.url + '/authenticate', user).then(function(result) {
        if (result.data.success) {
          storeUserCredentials(result.data.token);
          resolve(result.data.msg);
        } else {
          reject(result.data.msg);
        }
      });
    });
  };

  var logout = function() {
    destroyUserCredentials();
  };

  loadUserCredentials();

  return {
    login: login,
    register: register,
    logout: logout,
    isAuthenticated: function() {return isAuthenticated;},
  };
})

.factory('AuthInterceptor', function ($rootScope, $q, AUTH_EVENTS) {
  return {
    responseError: function (response) {
      $rootScope.$broadcast({
        401: AUTH_EVENTS.notAuthenticated,
      }[response.status], response);
      return $q.reject(response);
    }
  };
})

.config(function ($httpProvider) {
  $httpProvider.interceptors.push('AuthInterceptor');
});
The general idea is to have everything related to Authentication in one place. On login we contact our server and grab the JWT, which we than assign to the headers of all our requests and also save it to the local storage (for convenience).
If you have any question to this auth service, just leave a comment below or check out the previous article where this was described in detail.
We also have our AuthInterceptor to broadcast a global event if we encounter a 401 response, which means we are not authenticated anymore for some reasons. We will handle this event with our global AppCtrl later.
Next, we craft the routing for our complete app, so add the code to your app.js:
angular.module('starter', ['ionic'])

.config(function($stateProvider, $urlRouterProvider) {

  $stateProvider
  .state('outside', {
    url: '/outside',
    abstract: true,
    templateUrl: 'templates/outside.html'
  })
  .state('outside.login', {
    url: '/login',
    templateUrl: 'templates/login.html',
    controller: 'LoginCtrl'
  })
  .state('outside.register', {
    url: '/register',
    templateUrl: 'templates/register.html',
    controller: 'RegisterCtrl'
  })
  .state('inside', {
    url: '/inside',
    templateUrl: 'templates/inside.html',
    controller: 'InsideCtrl'
  });

  $urlRouterProvider.otherwise('/outside/login');
})

.run(function ($rootScope, $state, AuthService, AUTH_EVENTS) {
  $rootScope.$on('$stateChangeStart', function (event,next, nextParams, fromState) {
    if (!AuthService.isAuthenticated()) {
      console.log(next.name);
      if (next.name !== 'outside.login' && next.name !== 'outside.register') {
        event.preventDefault();
        $state.go('outside.login');
      }
    }
  });
});
Nothing special, just basic routing and also a nested state outside to have a little back back once we navigate to the register page.
But we also catch the stateChangeStart which will be triggered whenever we change routes, or when the user tries to somehow change the URL. In that case we check for our authentication, and if the user is not authenticated we prevent this event and go back to login!
Finally we have all our controllers inside the controllers.js which have those purposes:
- LoginCtrl: Handle user login
- RegisterCtrl: Handle registration of new users
- InsideCtrl: Handle operations after user is authenticated
- AppCtrl: Catch broadcasted events to go back once session is invalid
To achieve this, add the code below:
angular.module('starter')

.controller('LoginCtrl', function($scope, AuthService, $ionicPopup, $state) {
  $scope.user = {
    name: '',
    password: ''
  };

  $scope.login = function() {
    AuthService.login($scope.user).then(function(msg) {
      $state.go('inside');
    }, function(errMsg) {
      var alertPopup = $ionicPopup.alert({
        title: 'Login failed!',
        template: errMsg
      });
    });
  };
})

.controller('RegisterCtrl', function($scope, AuthService, $ionicPopup, $state) {
  $scope.user = {
    name: '',
    password: ''
  };

  $scope.signup = function() {
    AuthService.register($scope.user).then(function(msg) {
      $state.go('outside.login');
      var alertPopup = $ionicPopup.alert({
        title: 'Register success!',
        template: msg
      });
    }, function(errMsg) {
      var alertPopup = $ionicPopup.alert({
        title: 'Register failed!',
        template: errMsg
      });
    });
  };
})

.controller('InsideCtrl', function($scope, AuthService, API_ENDPOINT, $http, $state) {
  $scope.destroySession = function() {
    AuthService.logout();
  };

  $scope.getInfo = function() {
    $http.get(API_ENDPOINT.url + '/memberinfo').then(function(result) {
      $scope.memberinfo = result.data.msg;
    });
  };

  $scope.logout = function() {
    AuthService.logout();
    $state.go('outside.login');
  };
})

.controller('AppCtrl', function($scope, $state, $ionicPopup, AuthService, AUTH_EVENTS) {
  $scope.$on(AUTH_EVENTS.notAuthenticated, function(event) {
    AuthService.logout();
    $state.go('outside.login');
    var alertPopup = $ionicPopup.alert({
      title: 'Session Lost!',
      template: 'Sorry, You have to login again.'
    });
  });
});
No magic inside, right?
All the work is done inside our auth controller, the controllers are just the connector between our views and the services, just as they should be!
We also catch some error events and display messages we get from the server, but I guess there is no question about it. Our InsideCtrl does not use the auth service because I don’t want to blurry the purpose of that class. By this you can use it just as it is inside your own code!
If we are redirected to the login from an unauthorized request the error will look like this: 
One more thing…
Because we will encounter CORS issues if we serve this code in the browser, we have to apply a little change to our ionic.project file:
{
  "name": "devdactic-rest-auth",
  "app_id": "",
  "proxies": [
    {
      "path": "/api",
      "proxyUrl": "http://127.0.0.1:8080/api"
    }
  ]
}
By doing this we overcome those issues by using a little proxy to our local backend. For more information about this check out: Handling CORS issues.
Conclusion
This tutorial shows how to connect your frontend app with a real backend to get AngularJS user authentication working. There is quite a bit of code, but the general idea is not that hard to understand, so I hope this article helps for your next Ionic project to achieve real user management.
If you like my tutorials and also the Ionic Framework, I would be happy to welcome you in my course Ionic by Doing: Create Mobile Apps with HTML5 and Javascript!
Also find a video version of this article below.
Code on, Simon