Hosting an Ionic PWA with API Caching on Netlify Last update: 2020-12-29
If you want to improve the offline experience of your Ionic PWA, it’s actually quite easy to not only cache the static assets but also cache the API calls inside an Ionic PWA!
In this tutorial we will build a simple PWA and work with different caching strategies for different API endpoints. 
We will also prepare our final PWA and upload it to Netlify, which is a service for hosting web projects that you can get started with for free. You can give my PWA from this tutorial a try here!
Setup your Ionic PWA
To get started, simply create a blank new Ionic project and add the Angular schematic for PWAs which makes our app basically ready as a PWA:
ionic start devdacticPwa blank --type=angular --capacitor
cd ./devdacticPwa
ng add @angular/pwa
The schematic will inject a bunch of files, but we will not fine tune the apperance of our PWA in this tutorial.
If you want more in-depth knowledge about Ionic PWAs, check out the courses inside the Ionic Academy!
Since we want to perform API calls, we also need to add the HttpClientModule like we always do inside our app/app.module.ts:
import { NgModule } from '@angular/core';
import { BrowserModule } from '@angular/platform-browser';
import { RouteReuseStrategy } from '@angular/router';

import { IonicModule, IonicRouteStrategy } from '@ionic/angular';
import { SplashScreen } from '@ionic-native/splash-screen/ngx';
import { StatusBar } from '@ionic-native/status-bar/ngx';

import { AppComponent } from './app.component';
import { AppRoutingModule } from './app-routing.module';
import { ServiceWorkerModule } from '@angular/service-worker';
import { environment } from '../environments/environment';

import { HttpClientModule } from '@angular/common/http';

@NgModule({
  declarations: [AppComponent],
  entryComponents: [],
  imports: [
    BrowserModule,
    IonicModule.forRoot(),
    AppRoutingModule,
    ServiceWorkerModule.register('ngsw-worker.js', {
      enabled: environment.production,
    }),
    HttpClientModule,
  ],
  providers: [
    StatusBar,
    SplashScreen,
    { provide: RouteReuseStrategy, useClass: IonicRouteStrategy },
  ],
  bootstrap: [AppComponent],
})
export class AppModule {}
Now let’s add the basic logic for our API calls to the app.
Adding a simple API call to your Ionic PWA
We will make two different API calls in this app so we can later see the different caching strategies for our service worker.
Both of them are free to use and we only want to test a few basic things, so they are enough in our case.
To show the current state of our network we can also listen to the networkStatusChange using the Capacitor network plugin. This allows us to even better see and understand how our Ionic PWa works in different scenarios. Now go ahead and change the home/home.page.ts to:
import { HttpClient } from '@angular/common/http';
import { Component, OnInit } from '@angular/core';
import { Plugins } from '@capacitor/core';
const { Network } = Plugins;

@Component({
  selector: 'app-home',
  templateUrl: 'home.page.html',
  styleUrls: ['home.page.scss'],
})
export class HomePage implements OnInit {
  users = [];
  joke = null;
  appIsOnline = true;

  constructor(private http: HttpClient) { }

  async ngOnInit() {
    const status = await Network.getStatus();
    this.appIsOnline = status.connected;

    Network.addListener('networkStatusChange', (status) => {
      this.appIsOnline = status.connected;
    });
  }

  getData() {
    this.http.get('https://randomuser.me/api/?results=5').subscribe(result => {
      console.log('results: ', result);
      this.users = result['results'];
    });
  }

  getOnlineData() {
    this.http.get('https://api.chucknorris.io/jokes/random').subscribe(result => {
      console.log('joke result: ', result);
      this.joke = result;
    });
  }

}
Nothing really special, and in fact nothing related to PWAs or caching?
Yes, that’s right! The service worker configuration happens in a different place, and our app works just fine during testing without the service worker.
For the view, we can simply print out different values from the API calls and add an ion-footer so we can directly show when the network state in our app changes.
Open the home/home.page.html and replace it with:
<ion-header>
  <ion-toolbar color="primary">
    <ion-title>
      Devdactic PWA
    </ion-title>
  </ion-toolbar>
</ion-header>

<ion-content>
  <ion-button expand="block" (click)="getData()">Get Data</ion-button>
  <ion-button expand="block" (click)="getOnlineData()">Get Online Data</ion-button>

  <ion-card *ngIf="joke">
    <ion-card-content>
      {{ joke.value }}
    </ion-card-content>
  </ion-card>

  <ion-list>
    <ion-item *ngFor="let user of users">
      <ion-avatar slot="start">
        <img [src]="user.picture.thumbnail">
      </ion-avatar>
      <ion-label>
        <h2 class="ion-text-capitalize">{{ user.name.first }} {{ user.name.last }}</h2>
        <p>{{ user.email }}</p>
      </ion-label>
    </ion-item>
  </ion-list>

</ion-content>

<ion-footer>
  <ion-toolbar color="primary" *ngIf="appIsOnline">
    <ion-title>You are online :)</ion-title>
  </ion-toolbar>
  <ion-toolbar color="danger" *ngIf="!appIsOnline">
    <ion-title>You are offline :(</ion-title>
  </ion-toolbar>
</ion-footer>
Right now the app will already work as expected inside a browser, but we are not yet using the full power of the service worker.
Caching API Calls inside your Ionic PWA
If we would build our app right now as a PWA, it would work like the web version: You get data when you are online, you get an error and no data when you are offline.
But we can improve that behaviour with caching strategies that we pass to the service worker that works in the background of our PWA.
This worker already downloads all the static files of our app when we install the app as a PWA, and we can do even more by configuring different API endpoints that we also want to cache.
In our case we got two endpoints, and you can use multiple URLs or wildcards and entries to define different strategies for different endpoints. Sounds complicated, but it’s just flexible.
In our case, we will use both strategies:
- freshness: This strategy means we want to get the most up to date data from the API, and only present a cached version after the timeout specified.
- performance: Show data as fast as possible, so if anything is cached, it will be returned immediately from there instead of calling the API.
To use this information, open your ngsw-config.json and add the following entry on the top level next to the already existing assetGroups which are used for caching static files:
  "dataGroups": [
    {
      "name": "joke",
      "version": 1,
      "urls": ["https://api.chucknorris.io/**"],
      "cacheConfig": {
        "strategy": "freshness",
        "maxSize": 5,
        "maxAge": "5h",
        "timeout": "3s"
      }
    },
    {
      "name": "randomuser-api",
      "version": 1,
      "urls": ["https://randomuser.me/api/?results=5"],
      "cacheConfig": {
        "strategy": "performance",
        "maxSize": 10,
        "maxAge": "20s",
        "timeout": "3s"
      }
    }
  ],
Now we can finally test our PWA, and the easiest way is to run a production build and a local server to serve the files using the http-server:
ionic build --prod
http-server www
After running this you can inspect your app on http://127.0.0.1:8080 and play around with the PWA.
Note: If you get any problems during testing, simply click “Clear site data” inside the Application -> Clear storage menu of your browser debugging tools!
You can first make a standard request with your PWA being online, then you can go into offline mode inside the Network tab of your developer tools.
When you now run the requests again, you will see that the requests you make are filled by the service worker: 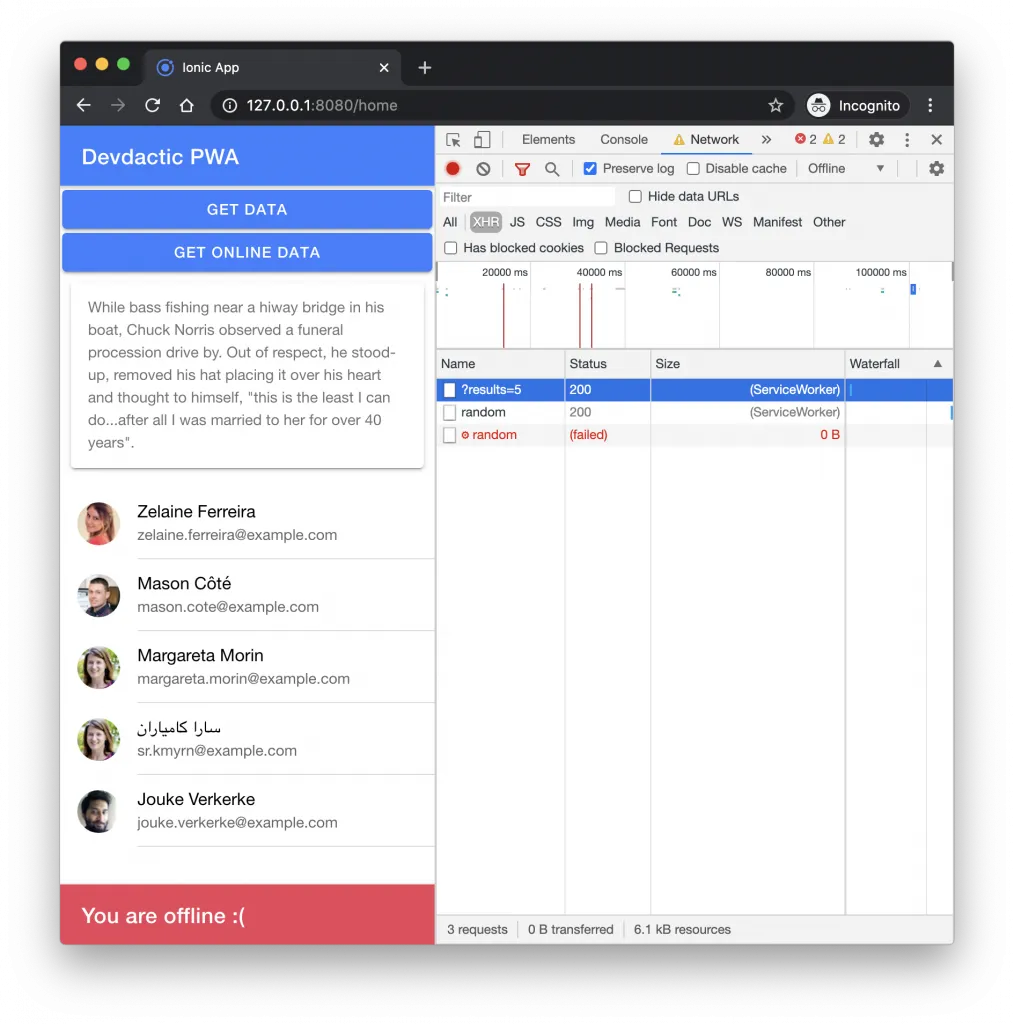
You can see two succeeded calls handled by the SW, and one failed because our one API resource has the caching strategy freshness and tries to get new data!
You can even inspect which data is currently cached by going to Application -> Cache Sorage:
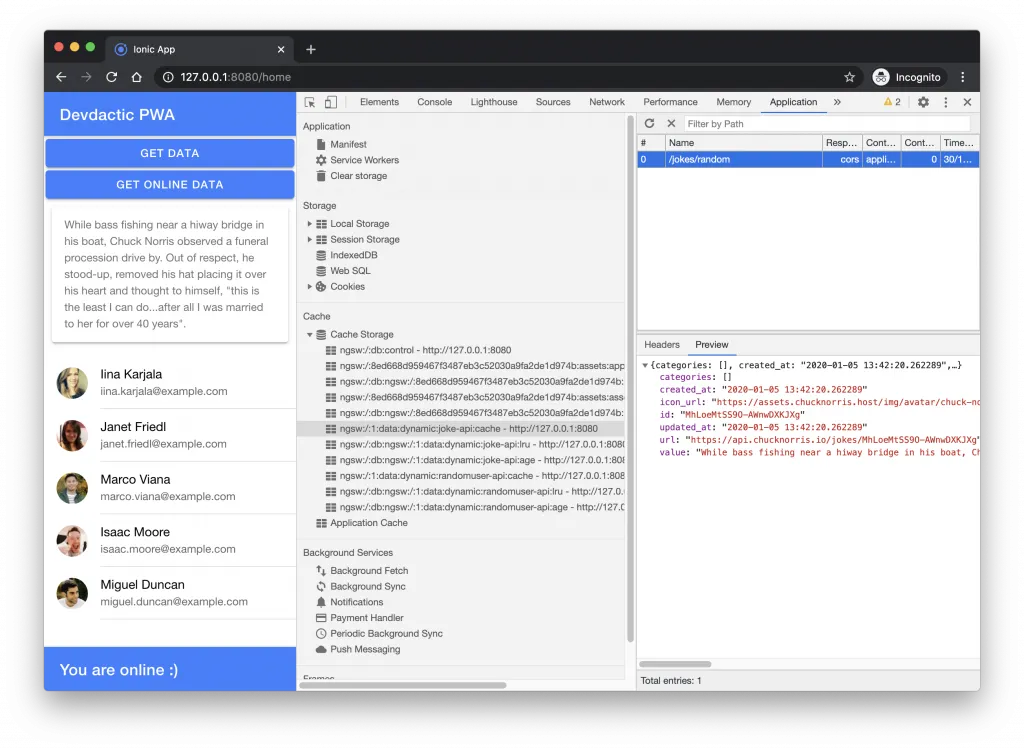
If you data is not present in here after your standard API calls, something with the URLs of your caching strategy is messed up, or the SW is out of sync and you should clear the site data and refresh the browser.
Keep in mind that we set a maxAge of 10 seconds for our one API resource, and therefore the data won’t be used after that time passed!
Netlify Ionic PWA hosting
So we are confident about our Ionic PWA and tested it locally, but now we want to see it on a real device! There are a lot of different ways like using Firebase hosting for your PWA, or using a service like Vercel.
To show you another way (which is very similar to Vercel) we will use Netlify in this tutorial to build and host the PWA.
Since Netlify needs to build our app in the end, we need to add another script to the scripts object of our package.json upfront:
"build:prod": "ng build --prod"This makes it easier to run a production build automatically.
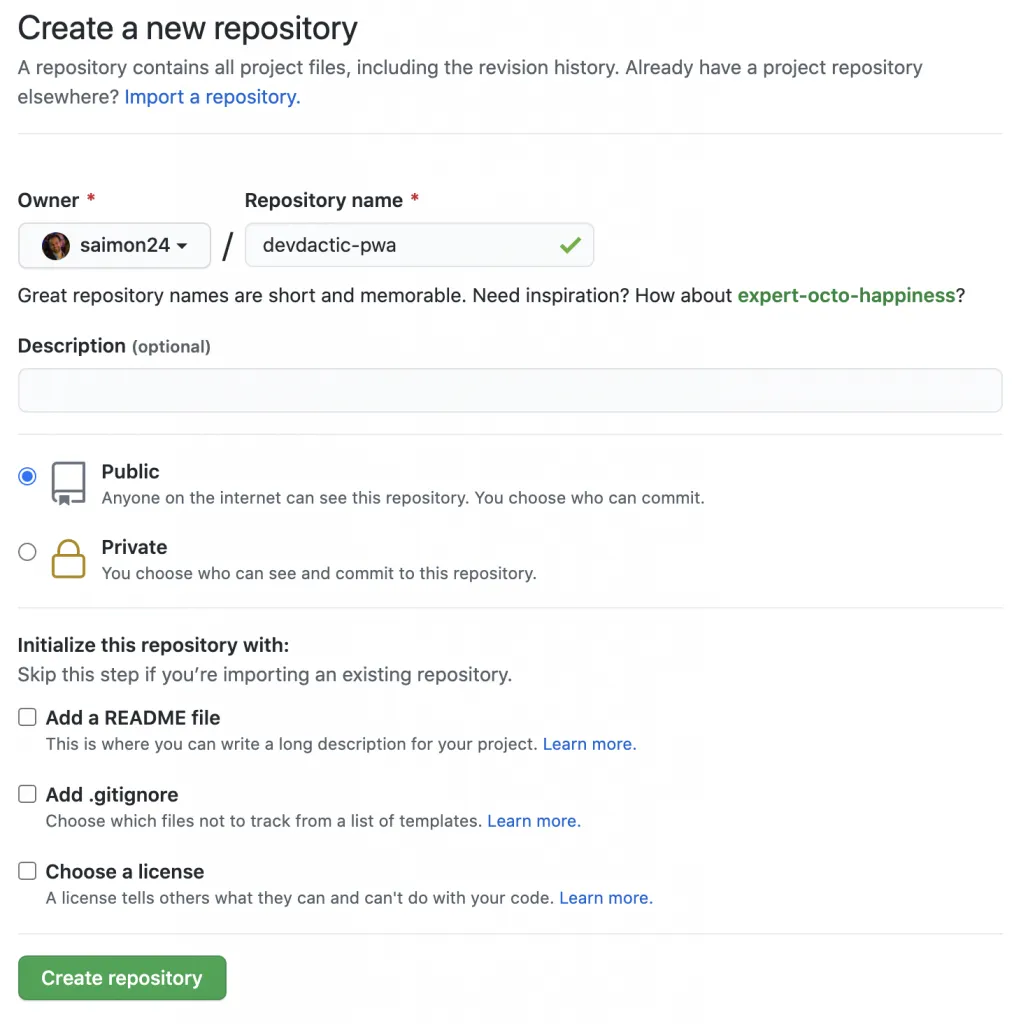
Now we need a Git repository, and you can either use Github or Bitbucket for this.
Simply create a new repository in your account without any files, because we already got a Git repository locally through our Ionic project!
Both Github and Bitbucket will show you commands to connect your existing repository with this new repo, and usually you just need to add your local files, commit them and then add a new origin and push the code:
ngit add .
git commit -am 'Initial commit.'

# Copy this from your repository!
git remote add origin https://github.com/saimon24/devdactic-pwa.git

git push -u origin master
Next time I’ll also use main instead of master, which is now the recommended terminus.
After your push your code should show up inside the repository, and you can start with Netlify by creating a new account.
Inside your account, click on New site from Git to start the wizard that will add your project. You will need to authorise Netlify to access your Github (Bitbucket) account and you can select the previously created project. 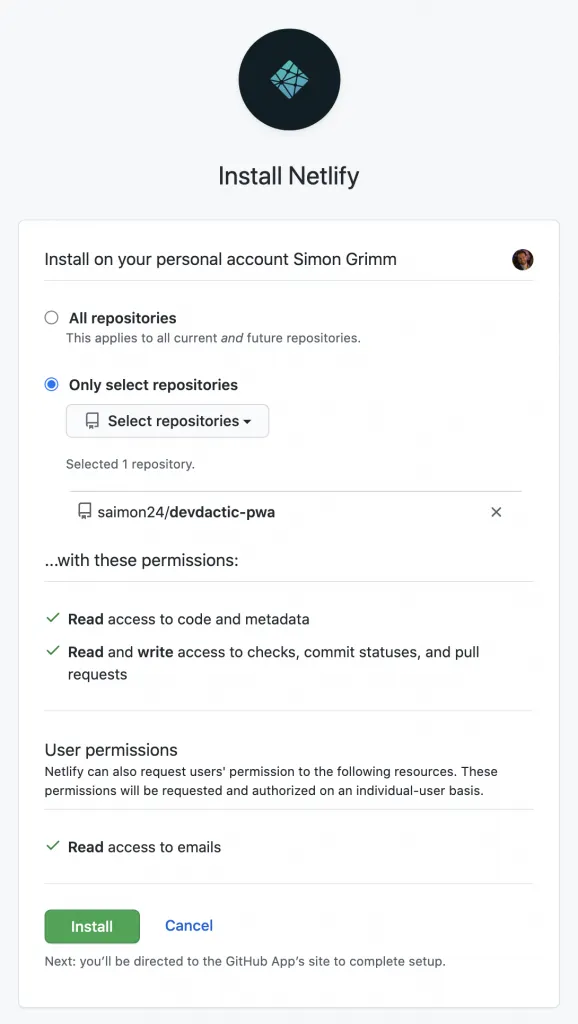
The important part is now to configure the build correctly in the next step:
- Build command: npw run build:prod
- Publish directory: www
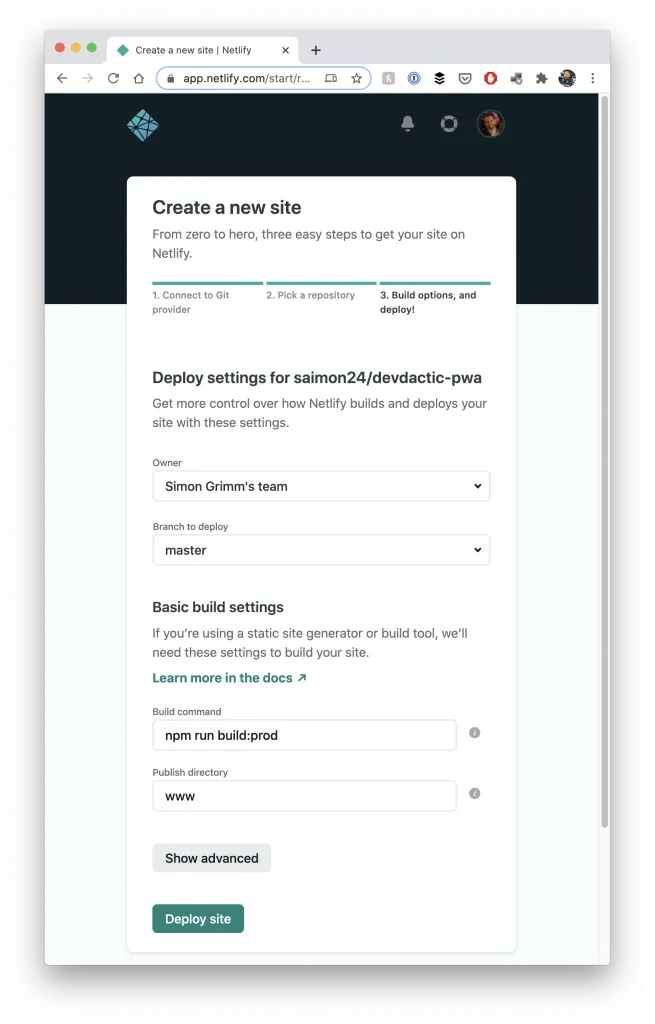
Based on this information, Netlify can now pull in your code, run a production build (using the additional script we added to the package.json!) and host the output www folder to serve the PWA!
Once you deploy the site, you can see the log and finally get the URL to your deployment. I’ve hosted my PWA from this tutorial here!
Whenever you now push code, Netlify will run a new build of your app and update your PWA - what a great service.
Conclusion
Embracing the service worker inside your Ionic PWA and caching different resources and API endpoints can help to make your PWA work completely offline based on cached information.
Keep in mind that the service worker is only inside a PWA, so if you create a real native iOS or Android app from your code, you need a different caching approach as the service worker wont work in there like it does in our PWA.
On top services like Netlify and Vercel make it super easy these days to quickly build and host your Ionic PWA starting for free!
You can also find a video version of this tutorial below.